
Windows OS Optimization Tool for VMware Horizon Guide
Introduction
This guide documents how to use the Windows OS Optimization Tool for VMware Horizon and describes the features and usage. The Windows OS Optimization Tool for VMware Horizon optimizes virtual and physical desktops and servers and is available in the product downloads in VMware Customer Connect.
Two additional guides are available to complement this documentation:
- Manually Creating Optimized Windows Images for VMware Horizon VMs - provides step-by-step procedures for creating optimized images. These procedures include creating a VM, installing and configuring a Windows operating system, optimizing the OS using the Windows OS Optimization Tool for VMware Horizon, and installing the various VMware agents required for desktop deployment.
- Using Automation to Create Optimized Windows Images for VMware Horizon VMs - learn how to automate the creation of images with Microsoft Deployment Toolkit (MDT), which can optionally be used with System Center Configuration Manager (SCCM). These procedures include creating a vSphere VM, installing, and configuring a Windows operating system, optimizing the OS using the Windows OS Optimization Tool for VMware Horizon, and installing the various VMware agents required for deployment in a VMware Horizon environment
Audience
This guide is written for data center administrators and IT personnel who want to optimize Windows operating systems. The guide assists you in working with the Windows OS Optimization Tool for Horizon and provides an ongoing reference as you become a more proficient Windows OS Optimization Tool for Horizon user. VMware periodically updates this document to reflect continuing enhancements to the Windows OS Optimization Tool for Horizon and future releases of the Windows operating system.
Horizon
VMware Horizon is a desktop virtualization solution that enables organizations to deliver virtualized or remote desktops and applications to end users through a single platform.
Horizon Cloud
VMware Horizon Cloud provides virtual desktops and hosted apps as a cloud service, deploying and managing them in the cloud. Like the user experience in Horizon, users can securely access their desktops and apps from any device or browser.
Why Optimize?
Windows was designed for physical hardware, specifically desktops, to be accessed by one user at a time. But many of its settings are unnecessary or even detrimental in a virtual environment. You can use the Windows OS Optimization Tool for Horizon to optimize by eliminating unnecessary settings and disabling unnecessary features to provide the best performance. For example, animating windows as the user opens them takes significant CPU resources, which decreases the number of desktops that you can host per physical server. Consequently, this nonessential function in a virtual machine (VM) environment increases the amount of system hardware that you need. Windows animations do not perform well when accessed remotely, especially when connecting over a slow WAN or Internet connection. As a result, keeping unnecessary features such as animations enabled impairs the end-user experience.
Another example of desktop optimization in a VM environment is to disable Windows Update so that control of the service is isolated to administrators. Administrators can run Windows Update in batch mode for the VMs as opposed to users performing this task.
Note: You can optimize physical machines by removing nonessential functions as well. However, the focus of this document is on the virtual environment, which involves the administration of golden images to be deployed to end users or used as RDSH servers.
What Are You Optimizing?
You can maximize the efficiency and performance of virtual desktops and RDSH servers by using the recommendations provided in the Windows OS Optimization Tool for Horizon.
Optimizing virtual desktops:
- Increases their performance
- Increases their density, boosting the number of virtual desktops that can be hosted per vSphere server, thereby reducing infrastructure costs
- Improves end-user experience
- Reduces end-user support incidents
Optimizing RDSH servers:
- Increases hosted desktop and application performance
- Reduces the amount of system resources that each RDSH server requires
- Increases the density and the number of RDSH servers that can be hosted
- Increases the number of users that can be supported per RDSH server
- Improves the end-user hosted desktop and application experience
- Reduces system support incidents
Windows OS Optimization Tool for VMware Horizon
The Windows OS Optimization Tool for Horizon makes it easy to apply configuration settings to desktops and servers. It includes settings to optimize the following Windows operating systems for both desktops and servers that reside in the data center and in the cloud:
- Windows 11
- Windows 10
- Windows Server 2022
- Windows Server 2019
The Windows OS Optimization Tool for Horizon optimizes virtual desktops and RDSH servers for Horizon, and Horizon Cloud.
Notes:
- The Windows OS Optimization Tool for Horizon is not compatible with Windows 7, 8.1, Server 2012, Server 2012 R2, and Server 2016. An older version of the OS Optimization Tool (b1130) is available to download from the VMware Flings site to use on these OS versions.
- The optimization information in this guide does not pertain to Windows XP or Windows 7, which Microsoft no longer supports. For more information, see the Windows XP Deployment Guide.
The Windows OS Optimization Tool for Horizon offers many advantages over traditional scripts, including the ability to selectively edit optimization values, and view detailed audit information before applying optimizations.
The Windows OS Optimization Tool for Horizon includes a built-in template that allows you to select whether to enable or disable Windows features and system services. You can copy the built-in template and customize it. You use the Windows OS Optimization Tool for Horizon to improve Windows performance, as per VMware recommendations and best practices.
The Windows OS Optimization Tool for Horizon also has features to assist with the generalization of a Windows image and also to automate many of the clean-up tasks that are run as a final step before using the image.
The Windows OS Optimization Tool for VMware Horizon is available to download from VMware Customer Connect.
Windows OS Optimization Tool for Horizon Features
A row of tab buttons provides the main functions and operations of the OS Optimization Tool:

Figure 1: Tabs Available in the Windows OS Optimization Tool for Horizon
- Optimize – Analyzes the current state of Windows using a template and then applies the selected optimizations.
- Generalize – Runs Windows system preparation (Sysprep).
- Finalize – Runs system clean-up tasks and clears information, getting the VM ready for use with Horizon.
- Update – Runs Windows Update on a previously optimized image.
- History – Views optimization history and rolls back virtual machines to a pre-optimized state.
- Templates – Edits the built-in Windows OS Optimization Tool for Horizon templates and saves the changes to create your own templates.
- Help – Uses the link provided to access the Windows OS Optimization Tool for Horizon documentation.
Additionally, the Windows OS Optimization Tool for Horizon comes with a Microsoft Deployment Toolkit (MDT) plugin to allow the whole golden image build process to be automated. This includes the installation of Windows, VMware Tools, Horizon agents, and applications. See Microsoft Deployment Toolkit Plugin for more detail.
Template Choices
The built-in Windows OS Optimization Tool for Horizon template comes with a list of modifications for a standard golden image. Each Windows OS Optimization Tool for Horizon template is an XML file that contains the coding for the optimizations. The default settings are the recommended values for optimizing your Windows operating system.
With the release of Windows OS Optimization Tool for Horizon version 1.0 (2111) a single template is built in that that includes support for all versions of Windows 10, Windows 11, Windows Server 2019 and Windows Server 2022.
You can also create your own templates within the Windows OS Optimization Tool for Horizon, as described in Customizing Templates.
Template Steps and Groups
Each Windows OS Optimization Tool for Horizon template has a list of modifications, called Steps, which are organized into Groups.

Figure 2: Templates and Their Steps
System Information
The System Information pane, below the five main tabs, has details about the machine (local or remote) that you are targeting.

Figure 3: System Information Pane of the Optimize Window
System Information details include:
- OS – Operating system on machine being viewed
- Version – Version and build information for Windows
- User Name – Current logged-in user
- Physical Memory – Installed physical memory
- Windows Locale – OS setting that identifies the language used by the targeted machine by geographical location
Building an Image with the Windows OS Optimization Tool for Horizon
At a high level, building an optimized Windows image consists of the following steps:

Figure 4: Steps for Building an Optimized Windows Image
The Windows OS Optimization Tool for Horizon helps with three key steps in this process:
- Optimize
- Generalize
- Finalize
For a step-by-step walkthrough of the complete process, see the Creating an Optimized Windows Image for a VMware Horizon Virtual Desktop guide.
Audit Mode
During the initial VM creation step, you install Windows. As part of the Windows installation, you should enter audit mode.
The screen at which you enter audit mode depends on which Windows operating system you are using. For example, some operating systems automatically log in to Windows after a restart operation, while others prompt for user credentials. If prompted, use Administrator for the username and leave the password field blank.
Different Windows operating systems provide different prompts after the initial installation. Depending on the Windows operating system, when you are prompted with Let's start with a region, Get going fast, Personalize, Customize Settings, or Setup Windows, press CTRL+SHIFT+F3 to switch to audit mode.
Example 1: Windows 10
After you install Windows 10 21H1, the Let's start with a region prompt is displayed. When you see this prompt, press CTRL+SHIFT+F3 to switch to audit mode in Windows 10.

Figure 5: Window where you press CTL+SHIFT+F3 to enter Audit Mode on Windows 10
Example 2: Windows Server
After you install Windows Server 2019, the Customize Settings prompt is displayed. When you see this prompt, press CTRL+SHIFT+F3 to switch to audit mode in Windows Server.

Figure 6: Window where you press CTL+SHIFT+F3 to enter Audit Mode on Windows Server 2019
System Preparation Tool Prompt
After Windows is in audit mode, it displays a prompt to run the System Preparation Tool (Sysprep) each time Windows is rebooted, and you log on. Sysprep is run by the Windows OS Optimization Tool for Horizon as part of the Generalize step.
You should cancel the Sysprep prompt each time it displays, to keep Windows in audit mode.

Figure 7: Cancel the System Preparation Tool Prompt
Optimize
Before using the Windows OS Optimization Tool for Horizon, which contains recommended configurations in the built-in templates, your IT organization should investigate and evaluate the benefits of the various optimizations. There is sometimes a trade-off between productivity and optimization. Also, test before and after using the Windows OS Optimization Tool for Horizon to ensure that optimizations do not interfere with other software that might be in use within your organization.
Steps for Optimizing with the Windows OS Optimization Tool for Horizon
Using the Windows OS Optimization Tool for Horizon involves the following steps:
- Snapshot the golden virtual machine before you start.
- Analyze the golden image.
- (Optional but recommended) Configure the Common Options settings.
- Verify that the list of optimizations checked are those that you want to apply.
- (Optional) Export the analysis results to an HTML file.
- Optimize the golden image.
- Analyze the optimization results. Each optimization will include the status SUCCESS or FAILED.
- Troubleshoot any FAILED results: Click the respective FAILED links to review error code and error string information.
- Address the cause of the failure and optimize again.
- (Optional) View the optimization history.
- (Optional) Perform a rollback if you want to return a golden image to its pre-optimized state.
- (Optional) Create a custom Windows OS Optimization Tool for Horizon template.
Best Practices
To make the most of the Windows OS Optimization Tool for Horizon, follow these best practices:
- (Highly recommended) Take VM-level snapshots before applying any changes so that you can easily revert to the previous state if needed.
- Use the Windows OS Optimization Tool for Horizon on a base image. Apply the tool to an unused system that has been built to match the configuration that you plan to deploy for virtual desktops or RDSH servers.
- Disable as many unnecessary Windows OS components as possible. Consider using the default selected optimizations when you disable, and then performing user-acceptance testing (UAT) to see if there are problems. Re-enable any components that cause a problem when disabled.
Unblock Executable Files
Different versions of Windows 10 have Windows security that prevent executables running and present an Open file – Security Warning. If you see this warning:
- Open the file properties of VMwareOSOptimizationTool.exe and check to see if there is an Unblock option. If there is, select it and apply to make sure that this executable is allowed to run.
- If you copied in SDelete64.exe and LGPO.exe as instructed in Finalize, unblock these executables.
Analyze a Golden Image
You view the Windows OS Optimization Tool for Horizon Optimization pane by selecting the Optimize tab.

Figure 8: Optimize Pane Before You Analyze
- The default, built-in template will be selected. If you created any custom templates, you can select the desired template from the Template Name menu.
- Perform an analysis by clicking the Analyze button, the columns populate with the optimizations that you can perform.
- You see a check box before each optimization item, with some check boxes selected and others unselected.
- The selected items indicate those that are included for optimization. Some items are not selected for optimization by default because they can cause undesirable results.
Note: If you create your own template, you can configure an optimization item to be selected by default. For more information, see Customizing Templates.
First, you analyze the current state of a desktop golden image, and later (when you optimize), you apply the template’s optimizations according to your choices. To analyze a golden image:
Run the Windows OS Optimization Tool for Horizon from the golden image that you want to optimize.
- Apply the tool to an unused system that has been built to match the configuration that you will deploy as virtual desktops or RDSH servers.
- From the Template Name drop-down menu in the left pane, select a built-in or custom template that matches the OS of the system you are optimizing.
The optimizations for your selected template are listed in the main pane.
Note: Use a template that matches the OS of the target machine. This step is critical because each OS has different optimizations. If you see an element in the template that is marked with a red X, it is not available in the targeted image that you are optimizing, and the Windows OS Optimization Tool for Horizon cannot perform that optimization.
- Click Analyze to produce a list of optimizations for the selected template:

Figure 9: Click the Analyze Button
Defaults or previous selections:
- During an Analyze, a check is made to see if the golden image has already been optimized with the VMware Windows OS Optimization Tool for Horizon.
- If it has, the previous selections are imported and used instead of the defaults.
- The previous selections are stored in the
%ProgramData%\VMware\OSOT\OptimizedTemplateData.jsonfile. - If the default selections are required, delete this file, relaunch the tool, and run Analyze.
The main pane shows detailed optimization information for the targeted system.
- The Optimizations column shows a list of selected and unselected items.
- You can compare the Expected Result column to the Actual Result column. If an item in the two columns is different, it means the setting for that item is not optimized.
- Most items have an icon indicating how important it is to optimize.
Note: Those items without an icon are not settings, but actions that will be performed when optimization is run. The action that will be performed is shown in the Description column.
Table 1: Optimization Importance
|
Symbol |
Description |
|
|
Mandatory – You must apply the optimization to the item in the target system because of problems or issues that the Windows OS Optimization Tool for Horizon has identified. |
|
|
Recommended – Even if the Windows OS Optimization Tool for Horizon recommends an optimization, there can be valid reasons to not apply it. Determine if the recommended setting is applicable to your organization’s use cases. |
|
|
Optional – The Windows OS Optimization Tool for Horizon has no recommendation regarding applying the optimization to the item in the target system. Determine if the setting is applicable to your organization’s use cases. |
|
|
OK – The item already has the proper value or setting and does not require any optimization. |

Figure 10: Optimize Window After You Analyze
- The Analysis Summary pane in the upper-right of the main Windows OS Optimization Tool for Horizon window provides a graphical representation of the current optimization of the targeted system.

Figure 11: Analysis Summary Pane of Optimize Window
The graphical chart makes it easy to review how close the analyzed system is to being optimally configured for best performance in terms of the optimization importance. Within each chart, the number of items in which settings do not match the expected values (red) or which they do match expected values (green) is shown.
- Review the list of selected and deselected items to be optimized.
- The template chosen will have optimizations selected by default. Select additional items that you want to optimize or deselect those you do not want to optimize by ticking or unticking the blue box next to an optimization.
Use the arrow button next to a grouping to expand the group to see any sub-groups and individual optimizations settings. Selecting the check box for a grouping will select all items within that group.

Figure 12: Navigating and Selecting Individual Template Settings
Caution: If the icon next to an item is a blue i, and it has been deselected by the Windows OS Optimization Tool for Horizon, selecting it for optimization can cause instability. Test the optimization of this item before putting it into a production environment.
Note: If the icon next to an item is a green check mark, selecting or deselecting the item will make no difference.
Common Options
The Common Options button opens a window where the tabs allow you to choose and set preferences to control common functionality quickly and easily. The Common Options button is only available after you have performed an Analyze.

Figure 13: Common Options Optimization Settings
These options normally involve configuring multiple individual settings. By grouping the actions together, the individual settings get configured as necessary to give the desired outcome.
Changes made in the common options tabs will be reflected in the selection or deselection of individual items in the template.

Figure 14: Common Options Overview
Visual Effect
This allows you to select from several options to control the appearance and performance of Windows visual effects. The selection here influences several individual optimizations. To understand the settings that are affected, navigate to System Properties > Advanced > Performance Settings in Windows.

Figure 15: Control Visual Effect Settings in Common Options
Notification
Disable or leave notifications enabled. This applies to various notifications including balloon tips, lock screen messages, security, and maintenance messages. If granular control is required, unselect this option and manually select or deselect the required notification optimizations from the main Optimize window.

Figure 16: Enable or Disable Notification Settings in Common Options
Update
Control whether Windows Update functionality is disabled or left enabled. The default action is to disable Windows Update.

Figure 17: Enable or Disable Windows Update
Search
Select whether to remove or keep Cortana search. The default is to remove Cortana search. You can also select whether the search item in the taskbar appears as the default box or instead as a magnifying glass icon.

Figure 18: Cortana and Search Selections in Common Options
Store Apps
On the Store Apps page of the common options dialog, there is the option to remove Windows 10 Store Apps while keeping the commonly used apps. The default behavior is to remove all Windows Store Apps. You can select to keep all apps or select individual apps to be kept.
Note that the Windows Store App itself and the StorePurchaseApp are always retained, regardless of the selection.

Figure 19: Windows Store Applications Control in Common Options
Background
On the background page, you can select to change the default background (wallpaper) to a solid color. Having a solid wallpaper color can have performance benefits, as it can reduce the amount of data the display protocol has to transmit. You can also allow users to change their background.

Figure 20: Background Control
Security
Select whether to disable or enable various security features in Windows.

Figure 21: Security Selections
Export and Import Selections
You can export all of the optimizations that have selected, which allows you to import the selection if you run an optimization again, or to use the same selection on another golden image.
To export the selections:
- In the lower-right corner of the main Windows OS Optimization Tool for Horizon window, click Export Selections.

Figure 22: Export Selections
- Save the JSON file in your preferred location.

Figure 23: Save Selections
To import a saved JSON file, use the Import Selection button, browse to the file and Open.
Export Results
Before you optimize the golden image, you can export the analysis results to an HTML file for record keeping and to share with other personnel. You can also compare the analysis results with the post optimization results.
- In the lower-right corner of the main Windows OS Optimization Tool for Horizon window, click Export Analysis Result.

Figure 24: Export Analysis Results
- Save the HTML file in your preferred location.

Figure 25: Save Analysis Results
Optimize the Golden Image
When you are satisfied with the optimizations that you selected in the Optimizations column during the Analyze step, you are ready to perform the optimization.

Figure 26: Main Windows OS Optimization Tool for Horizon Window Ready to Optimize
- Click the Optimize button at the bottom of the Analyze page.
- Wait for the optimization to complete, as indicated by the progress bar showing 100% and a new tab being displayed.
Note: When Optimize is run, an export of the optimization selections is created to a default json file. This is %ProgramData%\VMware\VMware Horizon OS Optimization Tool\OptimizedTemplateData.json. If this file is present, this is used during an Analyze to populate the optimization selections.
The new tab shows:
- A new Results tab (active) in the row of Windows OS Optimization Tool for Horizon tabs.
- An Export button to allow you to save the results as an HTML file for later reference.

Figure 27: Results Tab Shows the Results of the Optimization Process
Use the Export button to save the results as an HTML file for later reference.
View Optimization History
You can view the details of the optimization operations that you have performed.

Figure 28: History Tab
- Click the History tab.
- Review the information for the optimization operations that you have performed.
The following table defines the elements that you can view in the optimization history.
Table 2: Optimization History Elements
|
Screen Item |
Description |
|
Template Name |
Name of the template used for an operation |
|
Machine Name |
Name of the machine on which an operation was performed |
|
Date |
Date when the operation was completed |
|
Time |
Time when the operation was completed |
|
Type |
Operation type, either Optimization or Rollback |
Roll Back to the Pre-Optimized State of the Golden Image
A Rollback attempts to return the golden image to its pre-optimized state. It is advised that you take snapshots before applying any optimizations, as reverting to the snapshot gives a quicker and more reliable method of undoing any undesirable changes.

Figure 29: Rollback Process
- Click the History tab.
- In the Template Name column, select the check box for the optimized entry that you want to roll back and click Rollback.
- When the Rollback operation is complete, click OK in the dialog box.
Generalize
The Windows OS Optimization Tool for Horizon includes the Generalize feature to help in running the system preparation tool (Sysprep) with a supplied unattend answer file. This generalizes the Windows image and removes computer-specific information so that the image can be safely cloned and deployed throughout the enterprise.
The updated interface allows you to customize the provided information that is then used to generate the unattend answer file.

Figure 30: Generalize window
Before running the Generalize task, it is recommended that you install any required language packs.
- Time Zone – Select the appropriate time zone.
- Input Locale – Sets the Input language locale used by Sysprep.
- System Locale – Sets the system Locale, the UI locale, and the user locale to the selection. The drop-down list will only display installed language packs as valid selections.
- Autologon – Select if you want the local administrator account to automatically log on when Windows boots.
- Password – Set the password for the local administrator.
- Copy Profile – Copies the built-in administrator profile to the default user profile, which is then used as a template for new user profiles.
- Automatic Restart – Automatically restarts Windows once the Generalize task has completed.
Use the View Answer File button to view the generated unattend answer file and see the changes your selections have made.
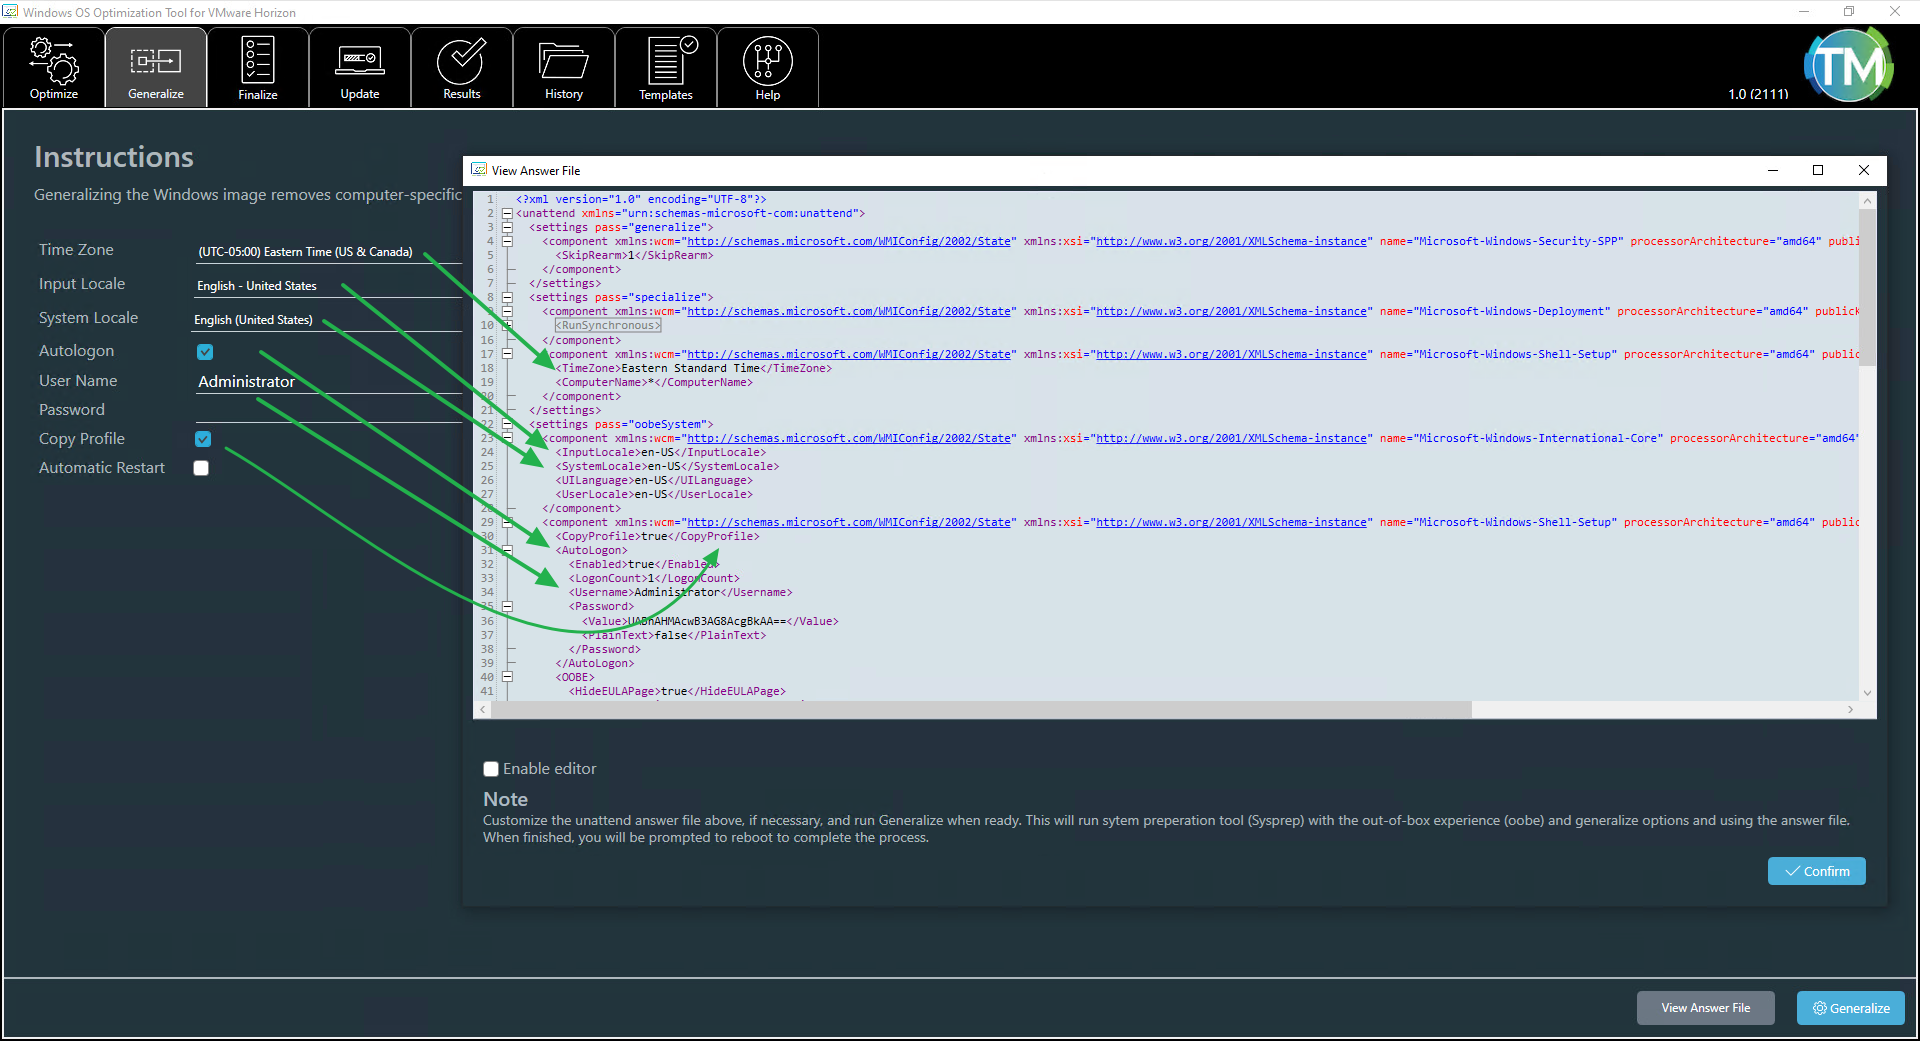
Figure 31: Generated Unattend Answer File
If required, you can also enable the editor using the tick box, and manually edit the unattend answer file.
When ready, running Generalize will run Sysprep with the out-of-box experience (OOBE), Generalize options, and using the unattend answer file. When finished, you will be prompted to reboot to complete the process.
The Windows OS Optimization Tool for Horizon will detect if Windows is in audit mode. If it does not detect audit mode, Sysprep does not need to be run. In that case, the Windows OS Optimization Tool for Horizon will display a warning and disable the Generalize button at the bottom of the screen.
Finalize
The Windows OS Optimization Tool for Horizon includes the ability to automate and help with some of the common clean-up tasks that are typically run just before using the prepared image. These include system clean-up tasks and clearing information that makes the image cleaner and ready for use with Horizon.

Figure 32: Finalize the Windows Image
Note: The Finalize tasks can take many minutes to complete.
Finalize includes two tasks: zero empty disk space and create local group policies. Although these tasks are optional, they are recommended. Both tasks require an additional executable to be downloaded and made accessible to the Windows OS Optimization Tool for Horizon. These can be placed either in the same directory as the Windows OS Optimization Tool for Horizon executable, or in a directory that is part of the search path.
When running the Windows OS Optimization Tool for Horizon from a network share, it has been observed on Windows 10 that file security can prevent these additional tools from executing properly. To correct this, either copy the executables locally or add the network share to the list of local intranet zones. See the Workaround in https://docs.microsoft.com/en-us/troubleshoot/windows-client/networking/intranet-site-identified-as-an-internet-site.
Zero Empty Disk Space
This task overwrites empty disk space with zeros using the Microsoft SysInternal tool SDelete. This is done so the VMDK (virtual disk) size can be reduced when cloning.
SDelete can be downloaded from Microsoft SysInternals: https://docs.microsoft.com/en-us/sysinternals/downloads/sdelete.
- Extract SDelete64.exe and place in either the same directory as the Windows OS Optimization Tool for Horizon executable or in a directory that is part of the search path.
- Open the file properties of SDelete64.exe and check if there is an Unblock option. If there is, select it and apply to make sure that this executable will be allowed to run.
Create Local Group Policies
This task creates local group policies and user settings for the optimizations applied, using the Microsoft Local Group Policy Object (LGPO) tool. The policies created can be viewed with tools such as RSOP and GPEdit.
LGPO can be downloaded as part of the Microsoft Security Compliance Toolkit https://www.microsoft.com/en-us/download/details.aspx?id=55319. Extract LGPO.exe and place in either the same directory as the Windows OS Optimization Tool for Horizon executable or in a directory that is part of the search path.
Update
Update makes it easy to re-enable Windows Update functionality on an image that has previously been optimized and had this disabled.
The four steps should be run in order:
- Enable – Changes the required registry values, local group policy, and enables the required services.
- Windows Update – Starts the Windows update process and opens the Windows UI settings page. You can run the Windows Update process as often as required and reboot, if necessary, before progressing to the next step.
- Restore – Returns all settings to their original values. This also disables scheduled tasks that get regenerated when a Windows Update runs.
- Recommendations – After updating Windows, it is recommended that you rerun an Optimize using your original optimization settings and then a Finalize task.
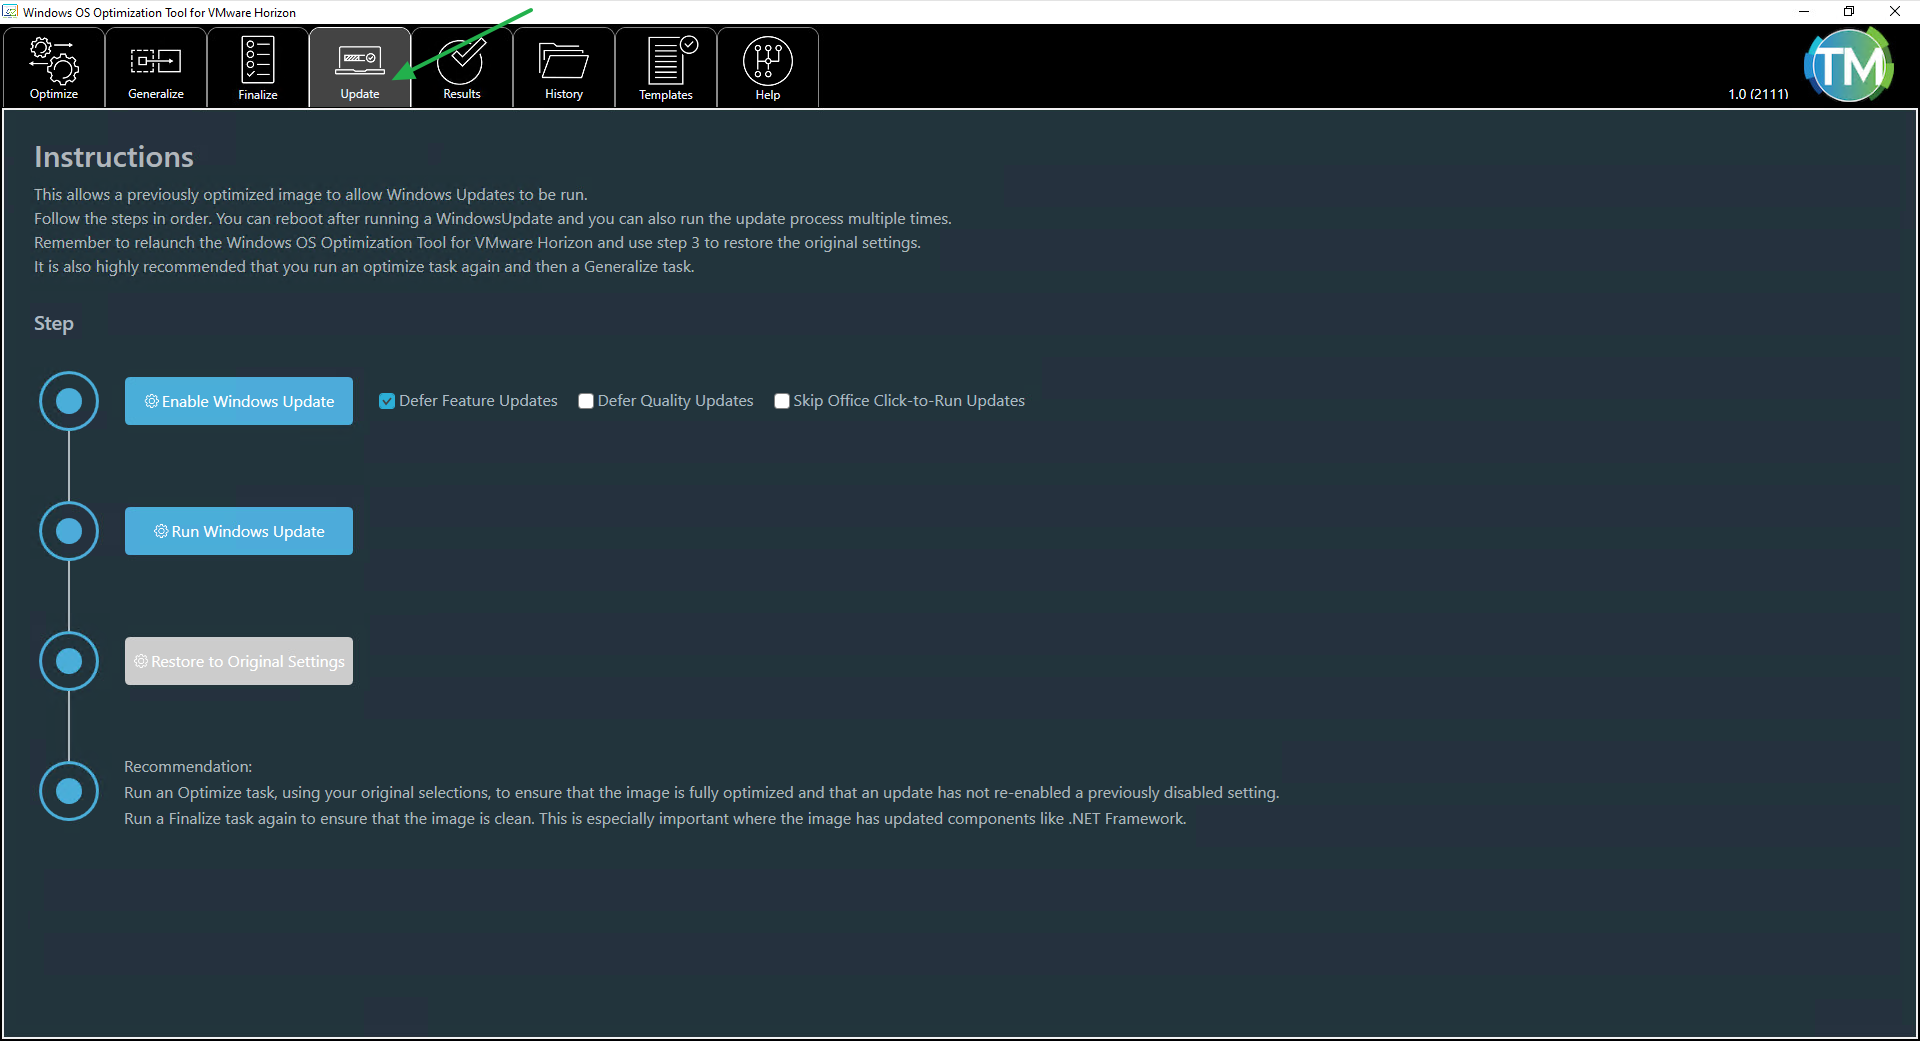
Figure 33: Enabling Windows Update on an Optimized Image
Command Line
The Windows OS Optimization Tool for Horizon can be run from the command line by specifying parameters to control the behavior. Run a CMD prompt as an Administrator.
The main options available through the command line are given below. Each main task has additional command line options and detail described in the sections below.
Note: For readability, the options available have been listed on separate lines. A command line should not contain line breaks and should be entered as a single command.
VMwareOSOptimizationTool.exe
[-h]
[-v]
[-optimize or -o]
[-generalize or -g]
[-finalize or -f]
[-reboot | -shutdown]
Where:
-h : Display the command line help.
-v : Enable verbose mode.
-optimize or -o : Optimize Windows.
-generalize or -g : Generalize Windows by running Sysprep.
-finalize or -f : Performs tasks to clean up and clear information.
-reboot : Restart the computer after all operations have completed.
-shutdown : Shut the computer down after all operations have completed.
Optimize
The Windows OS Optimization Tool for Horizon can be used to run optimization tasks from the command line.
VMwareOSOptimizationTool.exe
[-v]
[-r report_file_path_name]
[-o [default | all | recommended | mandatory | none]]
[-applyoptimization settings_file.json]
[-t template]
[-reboot | -shutdown]
Where:
-v : Enable verbose mode.
-r : Save analysis report as a file.
-o : Optimize items with the specific level and above.
- If the
-ois not specified, no optimization is performed. - If no level is specified, the default selected items will be optimized.
-applyoptimization : Apply optimization selections from a file that contains previously selected optimizations that were exported to a json file.
- The file is created by using the UI and the Optimize page. First Analyze, select the desired Common Options settings and select or unselect any necessary individual selections. Then use the Export Selections button to create the json file.
- This option cannot be used with the Common Options commands.
-t : Specify the template to use (optional).
- The template can be a template name in the default template repository, or the absolute path of a template file.
- For example -t “VMware Templates\Windows 10 and Server 2016 or later”
- If no template is specified, the default template is used.
Examples
Generate an analysis report, without performing any optimization.
VMwareOSOptimizationTool.exe -r c:\reports\
Optimize, using the default template and the default selected items to optimize.
VMwareOSOptimizationTool.exe -o
Optimize, using the default template, for only recommended items and mandatory items. Show verbose messages.
VMwareOSOptimizationTool.exe -o recommended -v
Optimize by importing the optimization selections from a json file containing previously selected items.
VMwareOSOptimizationTool.exe -o -v -applyoptimization my-settings.json
Optimize all default selected items, using a specified VMware template.
VMwareOSOptimizationTool.exe -o -t "VMware Templates\Windows 10 and Server 2016 or later"
Optimize all default selected items, using a specified custom template.
VMwareOSOptimizationTool.exe -o -t "My Templates\My Windows 10 or Server 2016 and later"
Optimize all default selected items, using a specified template file.
VMwareOSOptimizationTool.exe -o -t c:\temp\myTmpl.xml
Optimize using the default template, default selected items, and write output to a file.
VMwareOSOptimizationTool.exe -o -v > c:\temp\mylog.txt 2>&1
Controlling Common Options
When running an optimize command (-o), you can also specify the common options settings.
VMwareOSOptimizationTool.exe -o
[-v]
[-SyncHkuWithHkcu [enable | disable]]
[-visualeffect [performance | balanced | quality | enablehardwareacceleration]]
[-notification [enable | disable]]
[-windowsupdate [enable | disable]]
[-officeupdate [enable | disable]]
[-windowsSearch [enablecortana | searchboxasicon]]
[-storeapp [keep-all | remove-all [--exclude [Alarms | ScreenSketch | Camera | SoundRecorder | Calculator | StickyNotes | MSPaint | Photos | WebExtension]]]
[-background #000000]
[-firewall [enable | disable]]
[-antivirus [enable | disable]]
[-securitycenter [enable | disable]]
SyncHkuWithHkcu
Specify whether to enable or disable synchronizing the HKCU (Current User) registry keys to the Default User registry hive. The default user registry is used to create new user profiles. The default action is enabled.
VMwareOSOptimizationTool.exe -o [-SyncHkuWithHkcu [enable | disable]]
Where:
Enable: Synchronize current user registry settings to the default user.Disable: Do not synchronize current user registry settings to the default user.
Visual Effect
Specify the visual effects level.
VMwareOSOptimizationTool.exe -o [-visualeffect [performance | balanced | quality | enablehardwareacceleration]]
This controls the system advanced properties changing Visual Effects to one of the following:
Performance: Turns off all of the visual effects settings to prioritize performance.Balanced: Turns off all of the visual effects settings apart from Smooth edges of font screens and Use drop shadows for icon labels on the desktop.Quality: Leaves all visual effects settings turned on. This prioritizes the user experience but will consume more resources.Enablehardwareacceleration: Enables hardware acceleration for various applications. Recommended when using GPU cards in the host servers.
Example
Optimize using the default template with the default selected items and setting the common options of visual effect to performance.
VMwareOSOptimizationTool.exe -o -visualeffect performance
Notification
Specify whether system notifications are enabled or disabled. These include balloon tips, lock screen notification, and security and maintenance notifications.
VMwareOSOptimizationTool.exe -o [-notification [enable | disable]]
Example
Optimize using the default template with the default selected items and disabling system notifications.
VMwareOSOptimizationTool.exe -o - notification disable
Windows Update
Specify whether Windows Update is enabled or disabled. When enabled, Windows updates will be downloaded and installed. With non-persistent desktops, it is highly recommended to disable Windows updates and handle updates through the golden VM and by updating the pool.
VMwareOSOptimizationTool.exe -o [-windowsupdate [enable | disable]]
Example
Optimize using the default template with the default selected items but leaving Windows Updates enabled.
VMwareOSOptimizationTool.exe -o -windowsupdate enable
Office Update
Specify whether to activate update service for Office 365, 2016 and 2019 (Click-to-Run).
VMwareOSOptimizationTool.exe -o [-officeupdate [enable | disable]]
Windows Search
Leave Cortana enabled and change the taskbar entry for Cortana to a magnifying glass.
VMwareOSOptimizationTool.exe -o [-windowssearch [enablecortana | searchboxasicon]]
Where:
enablecortana: Keep Cortana and its search function available.Searchboxasicon: Shows the search box as a magnifying glass icon on the taskbar and not an input field.
Examples
Optimize using the default template with the default selected items but leaving Cortana enabled.
VMwareOSOptimizationTool.exe -o - windowssearch enablecortana
Leave Cortana enabled and change the taskbar item for Cortana to an icon.
VMwareOSOptimizationTool.exe -o - windowssearch enablecortana searchboxasicon
Store Apps
Allows for the removal of Windows store applications:
VMwareOSOptimizationTool.exe -o [-storeapp [keep-all | remove-all [--exclude [Alarms | ScreenSketch | Camera | SoundRecorder | Calculator | StickyNotes | Paint3D | Photos | WebExtension]]]
Where:
Keep-all: Retains all of the windows store applications.Remove-all: Removes all of the windows store applications.--exclude: Can be used in conjunction with the remove-all parameter to specify certain applications to be kept.
Examples
Optimize using the default template with the default selected items and removing all of the Windows Store Apps apart from the alarms and calculator applications.
VMwareOSOptimizationTool.exe -o -storeapp remove-all --exclude alarms calculator
Optimize using the default template with the default selected items and keep all of the Windows Store Apps.
VMwareOSOptimizationTool.exe -o -storeapp keep-all
Background
Set the background (wallpaper) to a solid color.
VMwareOSOptimizationTool.exe -o [-background #000000]
Where:
#000000: Is the hex value of the color. See https://htmlcolorcodes.com/color-names/ for a list of possible colors and corresponding hex values.
Example
Optimize using the default template with the default selected items and set the background to sky blue.
VMwareOSOptimizationTool.exe -o -background #87CEEB
Firewall
Specify whether to enable or disable the Windows Firewall. The default is to leave this enabled.
VMwareOSOptimizationTool.exe -o [-firewall [enable | disable]]
Where:
enable: Turn on the Windows Firewall.disable: Turn off the Windows Firewall.
Antivirus
Specify whether to enable or disable the OS built-in antivirus. The default is to leave this enabled.
VMwareOSOptimizationTool.exe -o [-antivirus [enable | disable]]
Where:
enable: Enable the built-in antivirus.disable: Turn off the built-in antivirus.
Security Center
Specify whether to enable or disable Security Center. The default is to leave this enabled.
VMwareOSOptimizationTool.exe -o [-SecurityCenter [enable | disable]]
Where:
enable: Enable the Security Center.disable: Disable the Security Center.
Generalize
Generalizing the Windows image removes computer-specific information so that the image can be safely cloned and deployed throughout the enterprise. This performs a Sysprep using the provided unattend answer file.
VMwareOSOptimizationTool.exe -g [answerfile] [-reboot | -shutdown]
Where:
answerfile: The Sysprep answer file. If none is provided, the built-in sysprep answer file is used.
Notes:
- To be able to generalize, Windows must be in audit mode.
- Windows will need to reboot after finishing Generalize.
- A Generalize operation can be carried out at the same time as an Optimize operation.
- A Generalize operation cannot be carried out at the same time as a Finalize operation.
Generalize using a supplied Sysprep unattend answer file.
VMwareOSOptimizationTool.exe -g "C:\unattend.xml"
Generalize using the built-in Sysprep unattend answer file.
VMwareOSOptimizationTool.exe -generalize
Generalize using the built-in Sysprep unattend answer file and reboot when complete.
VMwareOSOptimizationTool.exe -generalize -reboot
Finalize
Performs tasks to clean up the system and clear information. These tasks are generally recommended to be run as the last step before shutting down to use the prepared golden image in Horizon. These should also be used after a revision to the Windows image with application installation or update, or a Windows update process.
VMwareOSOptimizationTool.exe -f [all |0 |1 |2 |3 |4 |5 |6 |7 |8 |9 |10 |11] [-reboot | -shutdown]
Where:
all: Runs all of the tasks below.0: Native Image Generator (NGEN). Optimizes the .NET Framework. Should be run after an update of .NET Framework.1: Side-by-Side Component Cleanup (DISM). Reduces the size of the WinSxS folder by uninstalling and deleting packages with components that have been replaced by other components with newer versions. Should be run after a Windows update.2: Compact. Enables CompactOS to compress specific Windows system files to free up space. Can take several minutes to execute.3: Disk Cleanup. Deletes temporary and unnecessary files.4: Clears system event logs.5: Disables Superfetch service.6: Clears default user profile.7: Zero empty disk space (to enable this option, copy SDelete64.exe into the Windows\System32 or the current user directory).8: Creates local group policies (to enable this option, copy LGPO.exe into the Windows\System32 or the current user directory).9: Clears KMS Settings.10: Flushes DNS cache.11: Releases IP Address.
Finalize, running all the tasks.
VMwareOSOptimizationTool.exe -f all
Finalize, running NGEN to optimize .NET Framework and DISM to do a side-by-side component cleanup.
VMwareOSOptimizationTool.exe -f 0 1
Combining Command Line Parameters
You can combine the various optimize, common options, and either the Generalize or Finalize parameters together into a single command. You cannot combine a Generalize operation and a Finalize operation into a single command, because a reboot is required after a Generalize.
The following example optimizes, applying the default selected items and:
- Disables system notifications.
- Removes all the Windows Store Apps apart from the Photos application.
- Runs the Generalize operation using a provided Sysprep answer file.
VMwareOSOptimizationTool.exe -o -v -notification disable -windowsupdate enable -storeapp remove-all --exclude Photos -g c:\unattend.xml
The following example optimizes, applying the recommended items and:
- Disables system notifications.
- Sets Visual Effects to performance.
- Leaves Windows Update enabled.
- Removes all of the Windows Store Apps apart from the Paint3D and calculator applications.
- Sets the background to light sea green.
- Runs all the finalize tasks.
VMwareOSOptimizationTool.exe -o recommended -v -notification disable -visualeffect performance -windowsupdate enable -storeapp remove-all --exclude paint3D calculator -background #20B2AA -f all
Microsoft Deployment Toolkit Plugin
The Windows OS Optimization Tool for Horizon now comes with a plugin for Microsoft Deployment Toolkit (MDT). This allows you to use Microsoft Deployment Toolkit to automate the creation of your golden images and adds in custom tasks that can be inserted into MDT task sequences. These custom tasks include:
- Install and configure VMware Tools.
- Install and configure the Horizon Agent.
- Install and configure Dynamic Environment Manager FlexEngine.
- Install and configure the App Volumes Agent.
- Run a Windows OS Optimization Tool for Horizon Optimize.
- Run a Windows OS Optimization Tool for Horizon Generalize.
- Run a Windows OS Optimization Tool for Horizon Finalize.
Combined with the ability for MDT to PXE boot a machine, install an operating system, and install applications, this provides the ability to fully automate the build and optimization of a Windows image, ready for use with Horizon.
MDT Installation and Configuration
To set up and configure Microsoft Deployment Toolkit, see Using Automation to Create Optimized Windows Images for VMware Horizon VMs.
Plugin Installation and Setup
The Windows OS Optimization Tool for Horizon Plugin for Microsoft Deployment Toolkit consists of a separate download zip file. The contents of this zip file need to be copied to certain locations on your Microsoft Deployment Toolkit server, along with the Windows OS Optimization Tool for Horizon files.
Install the Plugin
Extract the contents of the VMwareOSOptimizationTool_MDT_Plugin_xxxx_yyyyyy.zip file and copy the files to the following locations on your Microsoft Deployment Toolkit server.
- Copy the contents of the Bin folder to
%ProgramFiles%\Microsoft Deployment Toolkit\Bin. - Copy the
osot.xmlfile in the Templates folder to the Templates directory within your Deployment share. - Copy the VMware folder and its contents to the root of your Deployment Share.
Install Windows OS Optimization Tool for Horizon Files
The Windows OS Optimization Tool for Horizon files need to be copied into the Microsoft Deployment Toolkit Deployment share.
- Extract the contents of the VMwareOSOptimizationTool_xxxx_yyyyyy.zip file.
- Copy the contents to the VMware\OSOT folder in your Deployment Share.
- Check that the executable is not restricted by Windows security.
- Right-click on the VMwareOSOptimizationTool.exe file and select Properties.
- If the General tab displays an Unblock box, tick it and select OK.
Install VMware Tools and Agent Files
The Windows OS Optimization Tool for Horizon MDT plugin can automate the installation of VMware Tools, the Horizon Agent, the Dynamic Environment Manager FlexEngine, and the App Volumes Agent as part of an MDT task sequence.
This requires the following files to be copied into the indicated locations within your Deployment Share:
Table 3: VMware Tools and Agents for the MDT plugin
|
Component |
Files Required |
Destination (in Deployment Share) |
|
VMware Tools |
VMware-tools-xx.x.x-yyyyyyyy-x86_64.exe |
\VMware\VMwareTools |
|
Horizon Agent |
VMware-Horizon-Agent-x86_64-xxxx-yyyyyy.exe |
\VMware\HorizonAgent |
|
Dynamic Environment Manager FlexEngine |
VMware Dynamic Environment Manager Enterprise xxxx x64.msi |
\VMware\DEM |
|
App Volumes Agent |
App Volumes Agent.msi |
\VMware\AppVolumesAgent |
- Check that any executable copied is not restricted by Windows security.
- Right-click on the exe file and select Properties.
- If the General tab displays an Unblock box, tick it and select OK.
*Note: VMware Tools can be downloaded either as part of vSphere or from https://packages.vmware.com/tools/releases/latest/windows/x64/.
Install Other Tools
A Finalize task has two steps that use external tools: Zero empty disk space and Create Local Group Policy. To allow the MDT plugin to be able to execute these steps during a Finalize task, the two executables need to be copied to the Deployment share.
- Download SDelete and the Microsoft Security Compliance Toolkit using the links provided in Finalize.
- Extract the content of the downloaded zip files.
- Copy SDelete64.exe and LGPO.exe files to the VMware\OSOT folder in your Deployment Share.
- Check that the executables are not restricted by Windows security.
- Right-click on the SDelete64.exe file and select Properties.
- If the General tab displays an Unblock box, tick it and select OK.
- Repeat for the LGPO.exe file to ensure it is not blocked.
Using the MDT Plugin
The MDT plugin allows you to add VMware specific steps to a task sequence in Microsoft Deployment Toolkit. These can either be added to an existing task sequence or added to a new task sequence when created, using the provided templates.
The custom steps include:
- VMware Horizon
- VMware Tools
- Horizon Agent
- Dynamic Environment Manager
- App Volumes Agent
- VMware OS Optimization Tool
- Optimize
- Generalize
- Finalize
Adding to an Existing Task Sequence
You can add the VMware custom steps to an existing Microsoft Deployment Toolkit task sequence.
In the Microsoft Deployment Toolkit Workbench:
- Navigate to Task Sequences.
- Select the task sequence you want to add the tasks to, right-click, and select Properties.
- Select the Task Sequence tab.
- Select an existing task in the sequence (the new task will be created after this).
- Click the Add button at the top of the task sequence and select the desired step from the menu.
- If you are selecting a VMware Tools or Horizon Agent task for the first time, you will see the executable getting extracted to an MSI before the task properties are displayed.

Figure 34: Add a Task to an MDT Task Sequence
- Edit the step options and selections as desired.

Figure 35: Change the Selections of VMware Tools in MDT
Creating a New Task Sequence
To simplify the creation of Microsoft Deployment Toolkit task sequences for use with Horizon and the Windows OS Optimization Tool for Horizon, a task sequence template has been provided. This includes the custom VMware tasks.
To create a new task sequence, in the Microsoft Deployment Toolkit Workbench:
- Browse to and right-click on Task Sequences and select New Task Sequence.
- Provide a Task sequence ID and a Task sequence name, and then click Next.
- From the list of task sequence templates select the VMware OSOT Task Sequence, and then click Next.

Figure 36: Select Task Sequence Template
- Select an operating system version and edition, and then click Next.
- Click Next to leave product key as the default.
- Provide the Full Name and Organization, and then click Next.
- Select Do not specify an Administrator password at this time, and then click Next.
- Click Next, and then click Finish.
- Right-click the task sequence, select Properties, and change to the Task Sequence tab.
- Locate and select the following VMware tasks:
- VMware Tools, VMware Agent, Dynamic Environment Manager, Optimize, Generalize, App Volumes Agent, Finalize.

Figure 37: Edit the Optimize Task in the MDT Task Sequence
- Change the task options and selections as desired.
- If you are selecting VMware Tools or Horizon Agent for the first time, you will see the executable getting extracted to an MSI before the task properties are displayed.
- Note that a task sequence created by a template has the App Volumes Agent task disabled by default. To enable this task, view its Properties, change the App Volumes Manager Address and then enable it using the tick box on the Options tab.
- If creating a Windows Server image to create an RDSH Farm, enable the two steps: Remote Desktop Services and Restart computer. Currently RDSH builds cannot be fully automated with the MDT plugin for the Windows OS Optimization Tool for Horizon. When the task sequence reaches the Restart computer step, you will have to manually logon as Administrator to allow the sequence to continue.
- Modify the default unattend,xml for the task sequence. Follow the steps outlined in Create and Edit MDT Task Sequences in the Using Automation to Create Optimized Windows Images for VMware Horizon VMs guide.
Customizing Templates
Beyond its built-in optimization capabilities, the Windows OS Optimization Tool for Horizon enables you to create custom templates. Using the Windows OS Optimization Tool for Horizon template editor, you can create and apply your own optimizations.

Figure 38: Windows OS Optimization Tool for Horizon Template Editor
The built-in Windows OS Optimization Tool for Horizon templates are read-only, so you do not have to worry about accidentally changing them. You can copy a built-in template to create your own version that is editable.
You can customize templates in the following ways:
- Add or remove a Group or Step
- Change the order of the Steps
- Edit the properties of Steps and their action types
- Execute particular Steps on different operating systems
Note: If you have not saved your changes, you can remove all your changes by clicking the Reset button.

Figure 39: Overview of the Key UI Items for Creating a Customized Template
In the example above, the built-in Windows 10 and Server 2016 or later template has been copied. This allows you to edit and change settings.
- Note the Default Selected option in the Step Details area. This defines whether this item and setting will be selected in the template by default.
- The Preview section shows the setting that will be applied.
Groups
A Group is a set of optimization settings that are organized as a category, such as Apply HKLM Settings. You can add, edit, or remove a Group to customize a template.
Add Groups
You can add a Group to an existing or new template.

Figure 40: Add a Group to a Template
- Click the Templates tab, and from the Template list, select the template you want to modify.
- Select an existing group or level where you want to create the group.
- Click the Add Group button.
- In the Add Group dialog box:
- Enter the Name of the Group.
- Enter a Description of the Group.
- Select either Current Level or Nested Level:
- The current level option adds the Group to the same level as the selected Group.
- The nested level option adds the Group as a subgroup of the selected Group.
- Click Add.
- Click Save.
Rename Existing Groups
You can rename an existing Group.

Figure 41: Rename a Group in a Template
- Click the Templates tab, and from the Template Name drop-down menu, select the template.
- Select the Group to edit.
- Change the name and description of the Group.
- Click Save.
Remove Groups
You can remove a Group from a template. You can also remove a Group that is nested in another Group.
- Click the Templates tab, and from the Template Name drop-down menu, select the template.
- Right-click the Group to remove and click Remove.
- Click Save.
Steps
A Step is an optimization setting within a Group. You can create and add Steps and edit, reorder, or remove them to customize a template.
Add Steps
You can add a new Step under a Group.
- Click the Templates tab, and from the Template Name drop-down menu, select the template to edit.
- Right-click the Group to which you want to add a Step and click Add Step.

Figure 42: Add Step to a Template
- In the Step Details section, add information about the Step.
- Provide a name and optional description for the Step.
- Select the values for Category, Reboot Required, Operating System, Release Version, and Default Selected.
Release Version allows you to specify which versions of Windows 10 this setting applies to.
- To apply to all versions, leave blank.
- Specify multiple entries, comma separated.
- If the setting applies to a certain version, specify the version number (for example, 1709).
- If the setting applies to a certain version and later, use the + symbol after the version number (for example, 1809+).
- Specify a range of versions to include (for example, 1809-2004).
- Specify a certain version to omit (for example, !1903).
- Specify a list of versions to omit (for example, !(1607,1809,1909)).
- Specify a range of versions to omit (for example, !1507-1809).
- Combine the above, separated with commas to specify more complex scenarios:
- 1709+, !(1809-1909) – Apply to 1709 and all versions after apart from 1809, 1903 and 1909.
- 1809-2004, !1903 – Apply to 1809, 1909 and 2004 but not 1903. It would also not apply to any version after 2004.
- Select what type of step this is. In most cases, this can be left as the default Base Information:

Figure 43: Step Type
Note: Custom Optimization is used to add an additional operation during optimization, and Custom RollBack is used to add an additional operation during rollback. Entering information for one Action Type does not negate any information already entered for another Action Type. These operations are additive.
- Select the Action parameters.
After you select the action parameter type from the Type drop-down menu, the text box names change according to your selection.

Figure 44: Action Parameters for a Registry Step
The text box names and values for each action parameter type are described in the following sub-steps and tables.
If configuring a registry setting, provide the following information for the Registry action parameter type:
Table 4: Parameters for the Registry Type
|
Text Box |
Description and Values |
|
Command |
Command to execute. The options are:
|
|
Key Name |
The registry path where the registry key is located |
|
Value |
The name of the registry key being edited |
|
Type |
Data type of the specified value. The supported data types are:
|
|
Expected Data |
The value of the registry key |
Caution: Do not use a DELETEKEY or DELETEVALUE command unless you are certain of the effect it will have.
If configuring a service, provide the following information for the Service action parameter type:

Figure 45: Action Parameters for a Service Step
Table 5: Parameters for the Service Type
|
Text Box |
Description and Values |
|
Service Name |
Name of a service |
|
Start Mode |
Startup mode for the service. The options are:
|
If running a command, provide the following information for the ShellExecute action parameter type:

Figure 46: Action Parameters for a ShellExecute Step
Table 6: Parameters for the ShellExecute Type
|
Text Box |
Description and Values |
|
Command |
The command to execute |
If configuring a Scheduled Task, provide the following information for the SchTasks action parameter type:

Figure 47: Action Parameters for a Scheduled Task (SchTasks) Step
Table 7: Parameters for the SchTasks Type
|
Text Box |
Description and Values |
|
Task Name |
The full path of the task as it appears in Task Scheduler. For example:
|
|
Status |
The supported status values are:
|
- Click Add to save the new Step.
- Click Save to save the template.
Edit Steps
You can edit an existing Step under a Group.
- Click the Templates tab, and from the Template Name drop-down menu, select the template to edit.
- Click the Step to edit.
- Edit the Step information.
- Click Save, to save the template.
Remove Steps
You can remove a step from a template.
- Click the Templates tab, and from the Template Name drop-down menu, select the template to edit.
- Click the Step to remove and click Remove.
- Click Save, to save the template.
Change the Order of Steps
You can change the order of the Steps within a template.
- Click the Templates tab, and from the Template Name drop-down menu, select the template to edit.
- Click a Step to move and click Up or Down to move it.
- Click Save, to save the template.
Template Updates
This section lists the changes made to the OS Optimization templates.
You can view the detail of what action is taken by a particular setting by looking at the template in My Templates in the Windows OS Optimization Tool for Horizon. Optionally, you can export the template to an XML file and use an editor, such as Notepad++, to search for the entry you are interested in.
Windows 10, 11 and Server 2019, 2022
From version 1.0 (2111) , this is the default template for Windows 10 (1809 - 21H2), Windows 11 (21H2), Windows 2019, and Server 2022. All optimizations from the previous Windows 10 and Server 2016 or later template have been incorporated into this and the old template removed.
|
Template Version |
Changes |
|
2.3 (2111) |
Added support for:
Added support for more versions of Office to now include 2013, 2016, 2019, 2021, and 365. |
|
2.2 |
Set start type of Windows Update service to manual. Added step to turn off notifications from apps and other senders. |
Windows 10 and Server 2016 or later
This is a new combined template for all versions of Windows 10 and Windows Server 2016, 2019, and later. Optimizations can have optional parameters to filter the version that a setting is applied to.
As of build b1170, this is the default template for Windows 10 and Server 2016 or later. All optimizations from version 5.22 of the two previous Windows 10 templates have been incorporated into this and the old templates removed.
|
Template Version |
Changes |
||||||||||||||||||||||||||||||||||||||||||||||||||||||||||||||||||||||||||||||||||||||||||||||||||||||
|
2.1 (2107) |
Changed step UBPM Autologger to be unselected by default. |
||||||||||||||||||||||||||||||||||||||||||||||||||||||||||||||||||||||||||||||||||||||||||||||||||||||
|
2.0 (2106) |
New Optimization entries have been renamed to better describe the function and intention of the optimizations. They have been grouped to make it easier to find items and allow the selection of a group or subgroup of related entries. New optimizations:
Changed Defaults Firewall, Antivirus and Security Center are not selected to be disabled by default. They can be disabled by selecting them in Common Options before running an Optimize task. Removed The OS Optimization Tool version 2106 ships with template version 2.0 which removes many optimization entries that were present in previous versions of built-in templates.
Local Machine Registry Settings (HKEY_LOCAL_MACHINE/ HKLM) – Removed Removed optimizations for the following registry settings that applied to the local machine.
User Registry Settings (HKEY_CURRENT_USER/ HKCU and default user profile) – Removed Removed optimizations for the following registry settings that applied to the current user, the default user profile or both.
Scheduled Tasks - Removed
Services – Removed Removed optimizations for the following Windows services. In most cases, by default, these services are either set to manual startup or disabled.
PowerShell Commands - Removed
Non-default Optimizations - Removed There were also many optimizations in previous versions of the template that were not selected by default. Some of these cause undesirable effects if used, so they have been removed from the template to avoid confusion.
|
||||||||||||||||||||||||||||||||||||||||||||||||||||||||||||||||||||||||||||||||||||||||||||||||||||||
|
1.8 (b2003) |
Changed filter condition for Remove All Windows built-in apps to resolve unexpected installation issue. This was to resolve a bug where Windows Store Apps were being removed even though they were being selected to be kept. |
||||||||||||||||||||||||||||||||||||||||||||||||||||||||||||||||||||||||||||||||||||||||||||||||||||||
|
1.7 (b2002) |
Changed step Block all consumer Microsoft account user authentication to be unselected by default. When disabled this was causing failures to login to Edge and Windows store. Changed the step Turn off Thumbnail Previews in File Explorer to be unselected by default. This was causing no thumbnails to show for store apps in search results. |
||||||||||||||||||||||||||||||||||||||||||||||||||||||||||||||||||||||||||||||||||||||||||||||||||||||
|
1.6 (b2001) |
Optimization entries relating to Common Options re-added to main template. Changed entries for Hyper-V services to not be selected by default. These services are required for VMs deployed onto Azure. Windows installation sets these to manual (trigger) so these do not cause any overhead on vSphere, when left with the default setting. |
||||||||||||||||||||||||||||||||||||||||||||||||||||||||||||||||||||||||||||||||||||||||||||||||||||||
|
1.5 |
Optimization entries relating to Common Options re-added to main template. |
||||||||||||||||||||||||||||||||||||||||||||||||||||||||||||||||||||||||||||||||||||||||||||||||||||||
|
1.4 (b2000) |
Changes
New
|
||||||||||||||||||||||||||||||||||||||||||||||||||||||||||||||||||||||||||||||||||||||||||||||||||||||
|
1.3 |
Update execution condition for Disable VMware Tools version 11.x AppInfo to cover all versions of VM Tools 11. Removed the optimization for Group policy - Disable playing videos in web pages. |
||||||||||||||||||||||||||||||||||||||||||||||||||||||||||||||||||||||||||||||||||||||||||||||||||||||
|
1.2 (b1171) |
Changed optimization for Disable Passive Polling. This is no longer selected by default as this was shown to cause issues with some applications thinking they did not have internet connectivity. Note that this optimization entry was previously incorrectly named as Enable Passive Polling. Several items were updated to give the option of retaining Cortana search and presenting the search box as an icon on the taskbar. |
||||||||||||||||||||||||||||||||||||||||||||||||||||||||||||||||||||||||||||||||||||||||||||||||||||||
|
1.1 |
Added new setting to HKLM to Use WDDM graphics display driver for Remote Desktop Connections. |
||||||||||||||||||||||||||||||||||||||||||||||||||||||||||||||||||||||||||||||||||||||||||||||||||||||
|
1.0 (b1170) |
Optimizations
New optimizations have been added. Unless indicated, these are selected by default. Machine:
User:
Scheduled Tasks
Services (not default selected)
|
Windows 10 1809-2004-Server2019 and Windows 10 1507-1803-Server2016
|
Template Version |
Changes |
|
5.22 |
Added new entry that is selected by default.
Removed entries for some AppPrivacy settings that were added in 5.21. These were being selected by default and were found to disable functionality that could be required.
|
|
5.21 (b1160) |
Optimizations Added new optimizations. These are selected by default.
Scheduled Tasks Added new entries to disable or delete scheduled tasks. These are selected by default.
Services Added new entries to disable services. These are selected by default.
|
Changelog
This section lists the changes made to this document.
|
Changes |
|
|
2021/12/09 |
Updated for the general availability release of version 1.0 (2111). This represents the first official product release of the Windows OS Optimization Tool for VMware Horizon. Added detail on new template that adds support for Windows 11 and Server 2022. |
|
2021/08/02 |
Bug Fixes
Naming
MDT Plugin
|
|
2021/06/28 |
All screenshots updated to 2106. Added more detail on Common Options New section on Microsoft Deployment Toolkit (MDT) plugin. Took out references to removed functionality: Public Templates, Remote Analysis. Added detail on template change for 2106 (template version 2.0). |
|
2021/04/14 |
Added detail on template change for b2003 (template version 1.8). |
|
Added detail to the Optimize section on the new automatic export of selections to a json file. Added detail to the Analyze section on the check for a previous Optimize having been run. If it has and the json file exists, it is imported and used to populate the previous selections. Added in detail on the commands executed for each of the Finalize tasks. |
|
|
2020/11/19 |
Updated Update section to include details on new controls to defer Feature and Quality updates. Added in instructions for new command line options: -applyoptimization, -officeupdate, -windowssearch, -bitlocker, -firewall, -antivirus, -smartscreen. Additional considerations if running from a network share and using SDelete and LGPO during the Finalize step. Updated template update information for version 1.4 (b2000). |
|
2020/0825 |
Updated template update information for version b1171. |
|
2020/07/31 |
Updated for version b1170. Updated Template Update section with changes for new combined Windows 10 template. Added information about how to use the new Release Version filter when adding a template step to apply the setting to particular versions of Windows. |
|
2020/06/30 |
Added Template Update section and information about what has been added, removed or changed in the template versions. |
|
2020/06/02 |
Updated for version b1160 Added section on new update functionality that helps in re-enabling Windows Update. Updated Generalize section to reflect the new, simpler interface. Added detail on two Finalize tasks that require additional executables and where to download. |
|
2020/04/01 |
Updated for version b1150 Document reorganized for readability Screenshots updated Added command line detail on new features including using Generalize and Finalize options. |
Author and Contributors
- Graeme Gordon is a Senior Staff End-User-Computing (EUC) Architect in EUC Technical Marketing, VMware.
- Hilko Lantinga is a Staff End-User-Computing (EUC) Architect in EUC Technical Marketing, VMware.
- Tianqi Chen is a Member of Technical Staff in Virtual Workspace R&D at VMware.
- Nan Wang is a Staff Engineer in Virtual Workspace R&D at VMware and contributed to content in previous papers whose content has been subsumed into this paper.
To comment on this paper, contact VMware End-User-Computing Technical Marketing at euc_tech_content_feedback@vmware.com.