
Using Automation to Create Optimized Windows Images for VMware Horizon VMs
Overview
Automating the build of Windows golden images for use with VMware Horizon® reduces the manual work required, removes potential errors, provides consistent results, and speeds up builds. While constructing the automation environment may take a bit of extra time to configure up front, it repays this effort many times over and is therefore highly recommended.
In this guide, you learn how to automate the creation of Windows images for use with VMware Horizon. This includes building a deployment server using the new MDT Environment Automation tool that comes with the Windows OS Optimization Tool for VMware Horizon. The deployment server uses the Microsoft Deployment Toolkit (MDT), which can optionally be used with System Center Configuration Manager (SCCM) and allows you to quickly start automating Windows image builds.
For simplicity's sake, in this guide, everything is installed and configured on a single virtual machine, which meets the needs for most environments for creating Windows images for use with Horizon. If you are familiar with MDT, you can also manually install the required applications across different servers to match your needs.
Important: This guide describes how to build a deployment server to automate the creation of VMware vSphere® VMs that have an optimized Windows 10, 11, or Windows Server guest operating system, with various VMware agents installed and, optionally, other applications.
For a list of the Windows operating systems we tested, see the section called Tested Operating Systems, in the guide Manually Creating Optimized Windows Images for VMware Horizon VMs.
Purpose of This Tutorial
Using Automation to Create Optimized Windows Images for VMware Horizon VMs provides step-by-step procedures for automating the creation of optimized images.
Infrastructure Prerequisites
Before you can perform the procedures in this guide, you must have certain infrastructure components installed and configured.
Your VMware vSphere infrastructure can reside either on-premises or on one or more cloud platforms. Verify that you have the following components installed and configured:
- VMware vSphere and VMware vCenter Server®. We used vSphere 8.0 and Horizon 2212 in our testing. For information and installation instructions, see the VMware vSphere documentation.
- VMware ESXi™ host or hosts configured in the vCenter Server instance.
- An infrastructure that includes Active Directory, DNS, and DHCP.
- If you intend to use VMware App Volumes™, you must have the host name or IP address of the server on which App Volumes Manager is installed or the load balancer fronting the server on which App Volumes Manager is installed. You will enter this information when you install the App Volumes Agent on the primary VM image.
If you plan to create Horizon desktop pools or RDSH server farms, ideally at this point you would also have Horizon Connection Server installed and configured. For installation instructions, see the Quick-Start Tutorial for VMware Horizon 8.
The automation strategies described in this guide do not apply to VMware Horizon® Cloud Service™ on Microsoft Azure, which uses Azure VMs that you import from the Azure Marketplace. The Horizon Cloud Service is a VMware-managed virtual desktop and application solution that provides desktops as a service using a Microsoft Azure public cloud infrastructure. For more information, see the VMware Horizon Cloud Service Documentation.
Components
The following figure shows the high-level flow of how a target machine is built using the Microsoft Deployment Toolkit server.
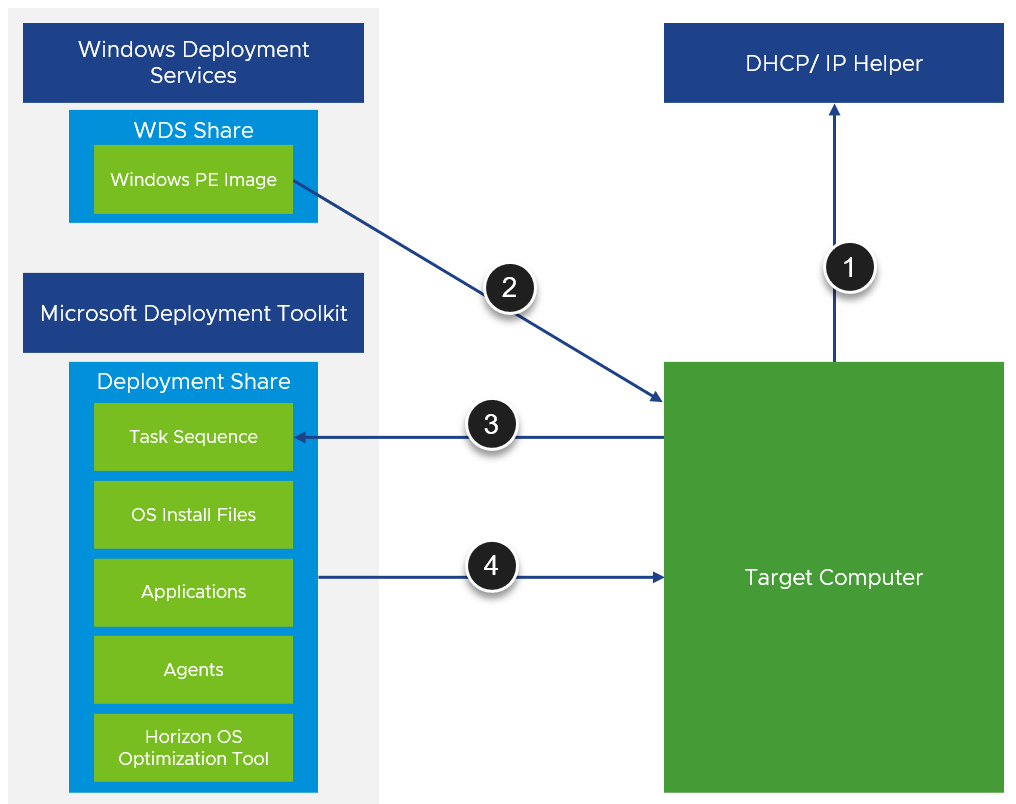
Figure 1: High-level flow of target machine build process
- Target computer powers on and does a network boot (PXE). Depending on the network configuration, either DHCP or the router IP helper will return the boot server name.
- The Windows PE image is downloaded from Windows Deployment Services and run on the target computer.
- The Microsoft Deployment Toolkit task sequence is initiated.
- The task sequence installs Windows, updates, applications, agents, and optimizes Windows using the Windows OS Optimization Tool for Horizon.
The required software and components are described in the following table.
Table 2: Required Software and Components
| Component | Description |
| Windows Deployment Services | Windows Deployment Services (WDS) enables the deployment of Windows images over the network. This allows a target machine to network boot and run a lightweight Windows PE image that can then be used to contact the Microsoft Deployment Toolkit server. |
| Windows Pre-installation Environment (PE) | Windows PE is a lightweight operating system used to install, deploy, and repair Windows. It is used by MDT to create a bootable image to facilitate the installation of Windows on target machines so that communication with the Microsoft Deployment Toolkit services is possible. |
| DHCP/ IP Helper | When building a Windows image, the target machine first PXE boots into the Windows PE image hosted on the Windows Deployment Services (WDS) server. To facilitate this, you need to configure your network so that the WDS boot server can be located. See Specify the Location of the PXE Boot Server for more information. |
| Microsoft Deployment Toolkit (MDT) | Microsoft Deployment Toolkit (MDT) provides a unified collection of tools, processes, and guidance for automating desktop and server deployments. |
| Task Sequence | An MDT task sequence contains the steps and configuration to be performed during the build of a target machine. This can include the installation of a desired Windows version, applying updates, installing applications, VMware Tools, Horizon agents, and running the Windows OS Optimization Tool for Horizon. |
| MDT Deployment Share | A network shared folder in which all the deployment files for MDT reside. These include Windows source files, applications, VMware Tools and agents, and the Windows OS Optimization Tool for Horizon. |
| Microsoft SQL Server | MDT uses a SQL database to store computer entries and match them to a corresponding task sequence. If a database entry is not found for the target machine with a valid task sequence, you are prompted to choose a task sequence during the build process. |
Build the Deployment Server
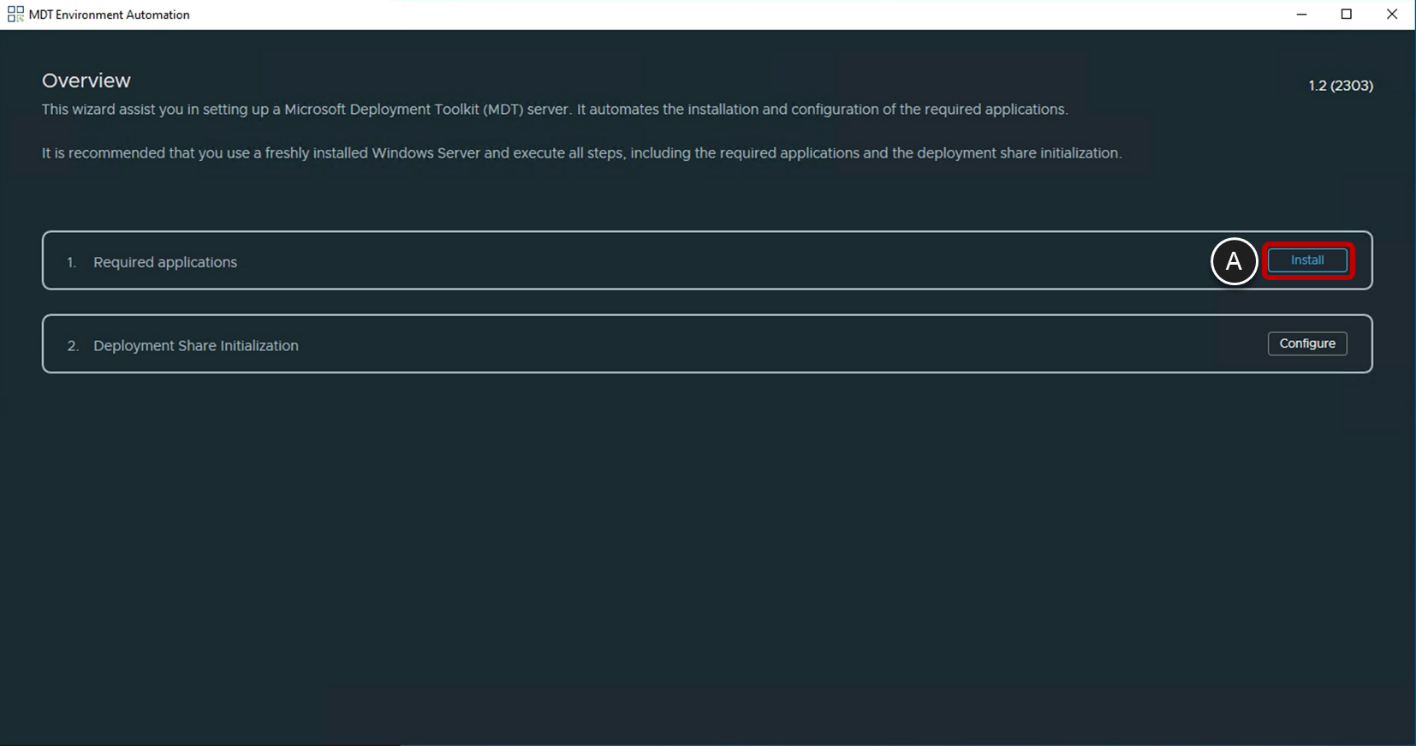
The Windows OS Optimization Tool for VMware Horizon now comes with a utility to help in the building of a Microsoft Deployment Toolkit (MDT) server to use with the creation of Windows images.
The wizard-driven process sets up an MDT server from scratch to automate Windows deployments. This server can automate the installation process for the Windows OS, installation of applications, installation of agents, and the running of the Windows OS Optimization Tool for Horizon.
This utility builds a server that combines Windows Deployment Services, Microsoft Deployment Toolkit, the MDT deployment share, the SQL server, and the MDT console on a single machine.
Prerequisites
To host the deployment server, create a Windows Server VM (we used Server 2022), joined to an Active Directory domain, and registered in DNS. If you do not create many VMs at the same time, 2 vCPUs and 4 GB of RAM should be sufficient, but size the VM according to your needs. We used a 200-GB secondary disk because we wanted to build all images that we support. For only a single image or a couple of images, however, you will not need as much storage.
Download the latest version of the Windows OS Optimization Tool for VMware Horizon including the:
- Windows OS Optimization Tool for Horizon
- MDT Environment Automation tool (
MdtEnvironmentAutomation-x86_64-a.b.yymm.xxxxxxxx.exe) from the OSOT download page. - MDT Plugins ZIP file
Download the other required VMware agents and tools:
- VMware Tools
- Horizon Agent
- Dynamic Environment Manager FlexEngine Agent
- App Volumes Agent
You can download these products from the VMware download site at https://my.vmware.com/web/vmware/downloads.
Download an ISO image of the Windows edition that you want to use for your first virtual machine.
Start the Installation
- Run the MDT Environment Automation tool executable on the server you have prepared.
- MdtEnvironmentAutomation-x86_64-a.b.zzxx.yyyyyyyy.exe
- Accept the VMware General Terms and click Next.
Install Winget
The MDT Environment Automation tool uses Winget to download and install required applications. If the OS does not already have Winget, a button will appear to assist you in installing Winget. If your OS already has Winget installed, the button will not appear, and you can proceed to the next step, Install Required Applications.
|
Important |
The current version (2303) of the MDT Environment Automation tool cannot install Winget with the new version of Windows Package Manager. An alternative, you can manually install Winget, Download the required Microsoft packages Follow the instruction in Manual Install of Winget below. |
Download the Required Microsoft Applications
Use the following links to browse to and download the required Microsoft packages for Winget.
Microsoft.VCLibs– Browse to https://aka.ms/Microsoft.VCLibs.x64.14.00.Desktop.appxMicrosoft.UI.Xaml- Browse to https://www.nuget.org/packages/Microsoft.UI.Xaml/2.7.3.
- Click on Open in NuGet Package Explorer on the right side of the page.
- In the Contents pane, expand /tools/AppX/x64/Release to get to the
Microsoft.UI.Xaml.2.7.appxfile. - Double-click it to download.
- Windows Package Manager and license
- Browse to https://github.com/microsoft/winget-cli/releases/tag/v1.5.2201
- In the Assets section at the bottom of the page, locate the required files:
- Windows Package Manager file – the file ending with an
.msixbundleextension - License file – the file ending with an
.xmlextension
- Windows Package Manager file – the file ending with an
Using the MDT Environment Automation Tool to Install Winget
- Click the INSTALL WINGET button (A).

- Download the Microsoft packages for
Microsoft.VCLibs,Microsoft.UI.Xaml, and Windows Package Manager and license, using the links and instructions at the top of this section in Download the Required Microsoft Applications. - To populate the Install Winget page with the downloaded files, for each entry, use the UI and click BROWSE (A) to locate the corresponding saved file and click INSTALL (B).

- When a message appears, notifying you that Winget is successfully installed, click OK to dismiss the message.
Manual Install of Winget
You can also manually install Winget by following the instructions below and using PowerShell commands to install the required packages.
- Download the Microsoft packages for
Microsoft.VCLibs,Microsoft.UI.Xaml, and Windows Package Manager and license, using the links and instructions at the top of this section in Download the Required Microsoft Applications. - Open Windows PowerShell as an Administrator and navigate to the folder that contains the package downloads.
- Install Microsoft.VCLibs
Add-AppxPackage Microsoft.VCLibs.x64.14.00.Desktop.appx
Install Microsoft.UI.XamlAdd-AppxPackage Microsoft.UI.Xaml.2.7.appx
- Install Windows Package Manager using the following two commands. Note that the msixbundle and license file names might differ from those shown below.
Add-AppxPackage Microsoft.DesktopAppInstaller_8wekyb3d8bbwe.msixbundleAdd-ProvisionedAppxPackage -PackagePath Microsoft.DesktopAppInstaller_8wekyb3d8bbwe.msixbundle -LicensePath .\e9f07317387242099dd02cb57aa04c37_License1.xml -Online
- Check if Winget is installed by running the following command in the PowerShell window.
winget
Install Required Applications
Once Winget is installed, the next step is to download and install the required applications. We used Winget to download the required installation files. As an alternative, you also have the option to specify the use of local installer files for the individual applications.
- Click the Install button for Required applications (A) to start the installation.
A wizard will help you choose which method to use to obtain each required application and will then install those applications.
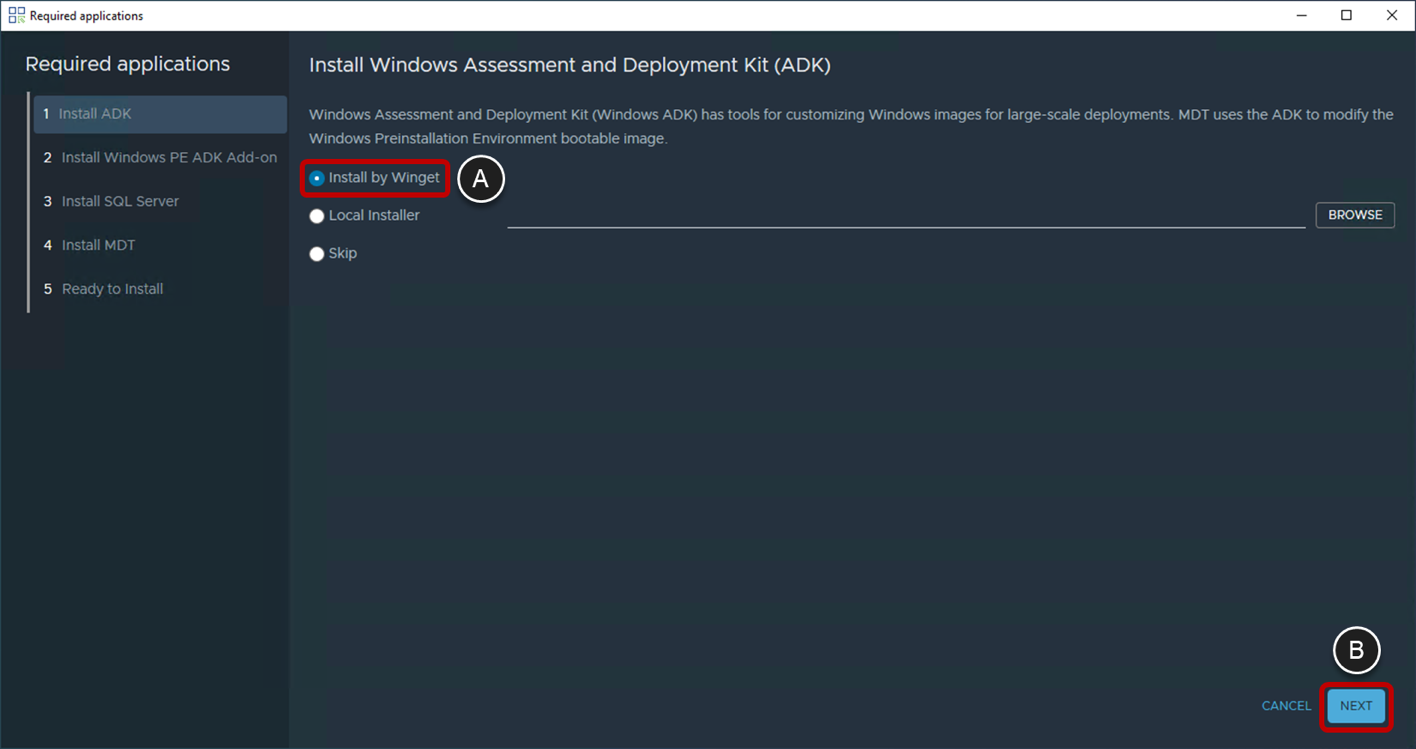
- On the Install Windows Assessment and Deployment Kit (ADK) page, leave the default, Install by Winget (A), and click NEXT (B).
The Windows Assessment and Deployment Kit (ADK) has tools for customizing Windows images. MDT uses the ADK to modify the Windows Preinstallation Environment bootable image.
- On the Install Windows Pre-installation Environment (PE) ADK Add-on page, leave the default, Install by Winget (A), and click NEXT (B).
Windows PE is a lightweight operating system used to install, deploy, and repair Windows. It is used by MDT to create a bootable image to facilitate the installation of Windows.

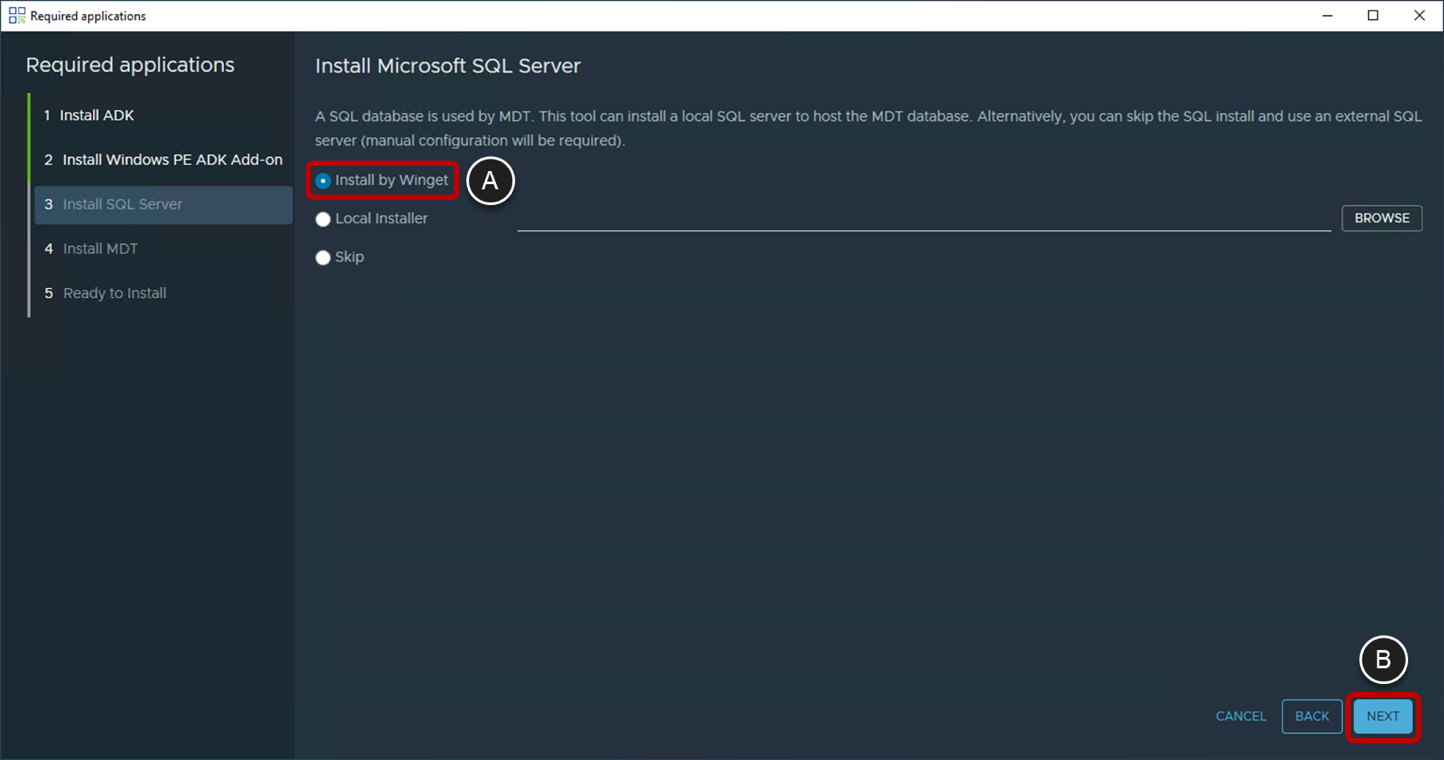
- On the Install Microsoft SQL Server page, leave the default, Install by Winget (A), and click NEXT (B).
MDT uses a Microsoft SQL database to store configuration and machine records. The MDT Environment Automation tool installs Microsoft SQL Server 2019 Express locally onto the MDT server.
- On the Install Microsoft Deployment Toolkit (MDT) page, leave the default, Install by Winget (A), and click NEXT (B).
The Microsoft Deployment Toolkit drives the automation of Windows builds. It uses task sequences to install Windows, updates, applications, agents, and the optimization of Windows using the Windows OS Optimization Tool for Horizon.
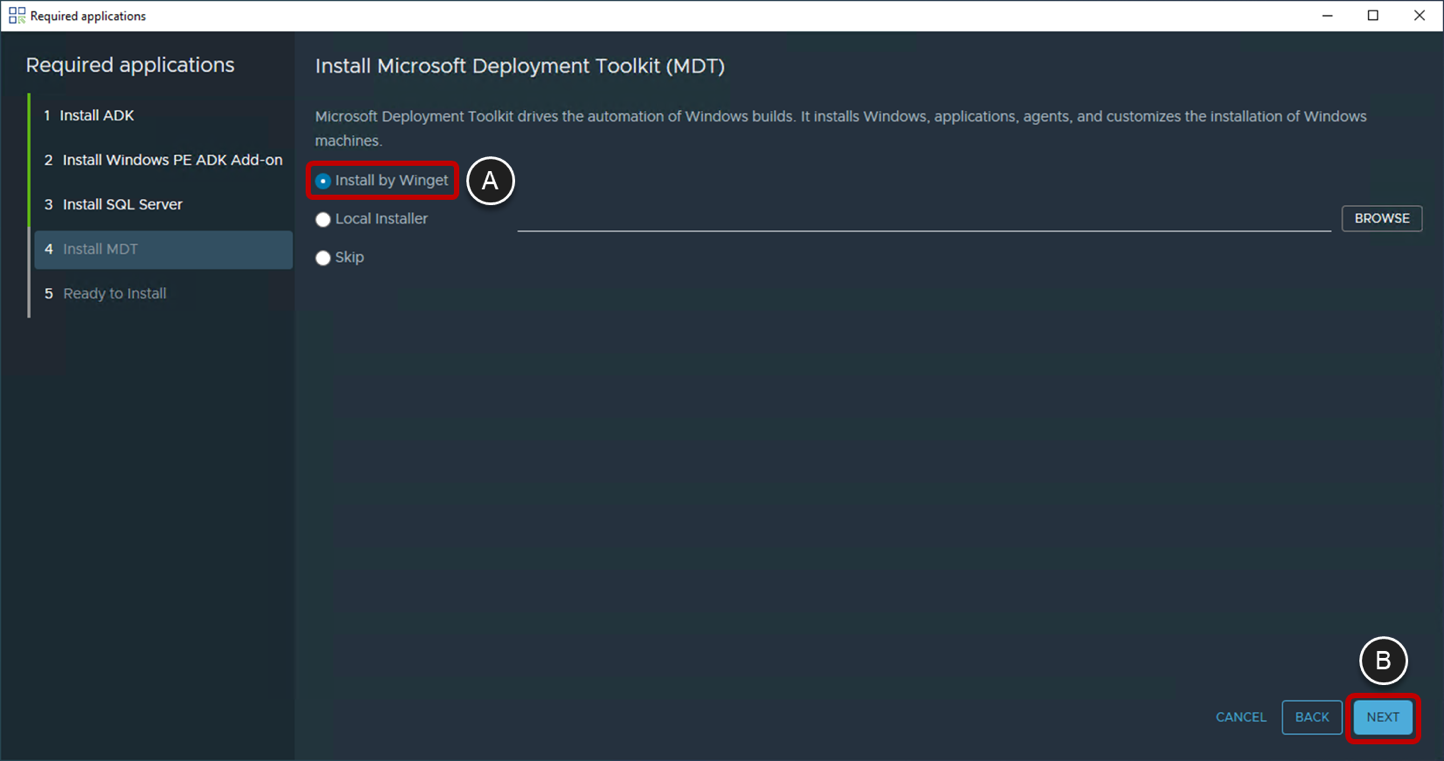
- On the Ready to Install page, click FINISH (A).
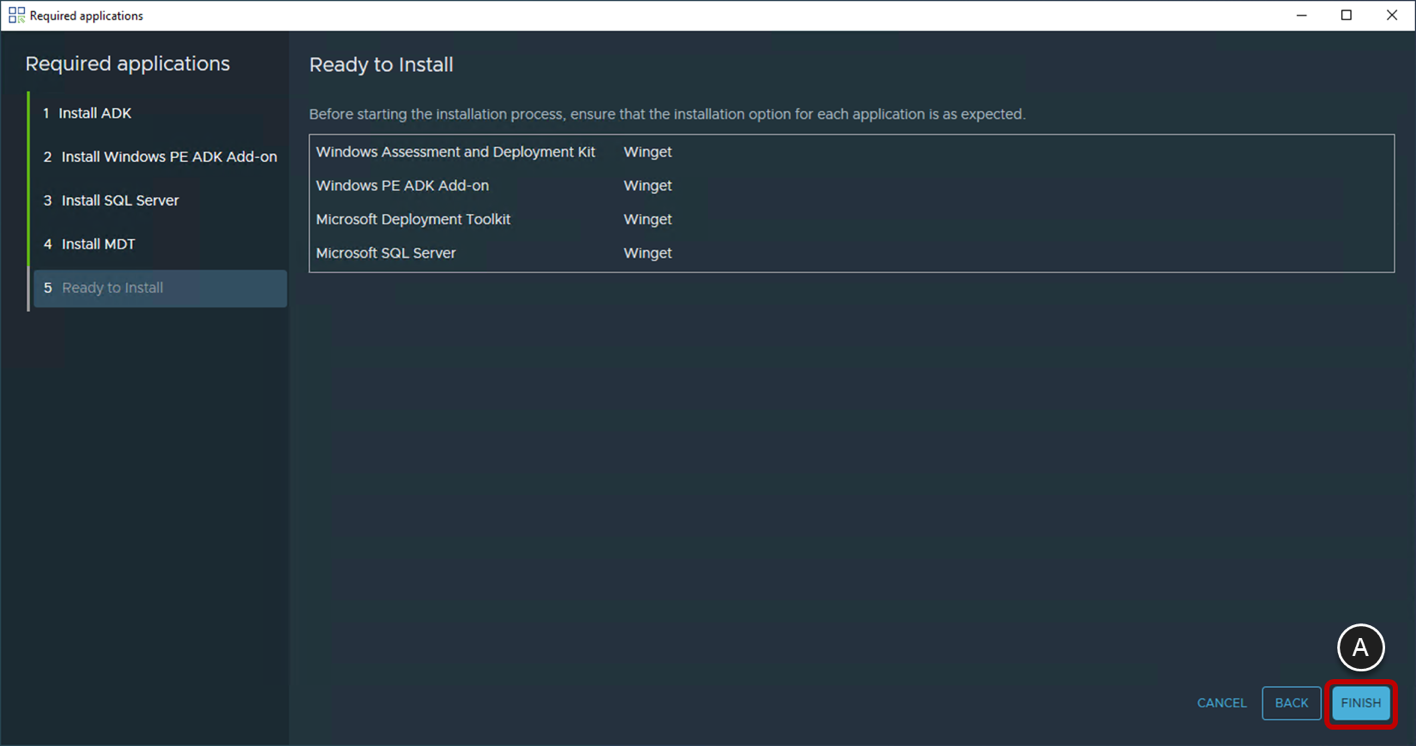
- When the installation completes, a message will appear. Click OK to dismiss that message.
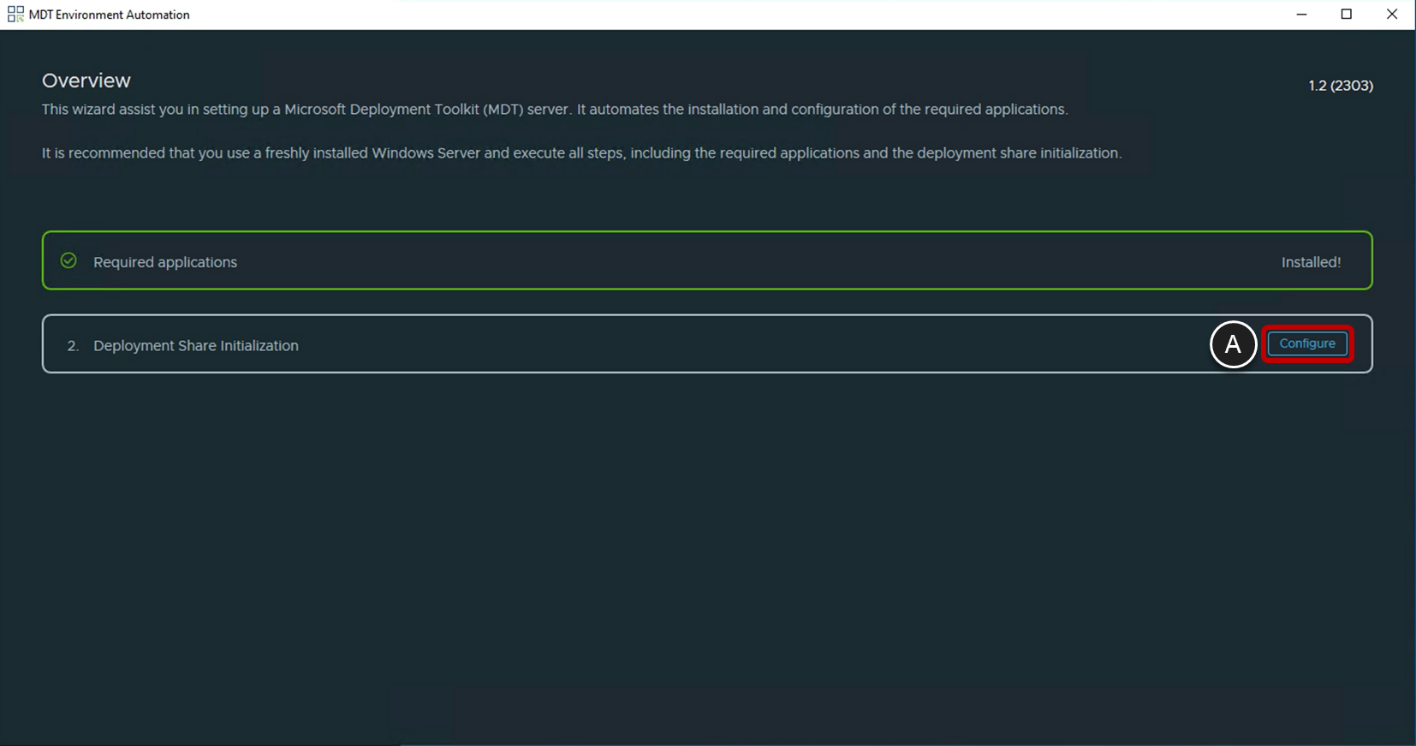
Initialize the Deployment Share
An MDT deployment share needs to be initialized. A deployment share stores the OS installation files, boot images, applications, drivers, and control files that are used to automatically create Windows images.
- To start the Deployment Share Initialization wizard, click on the Configure button for Deployment Share Initialization (A).
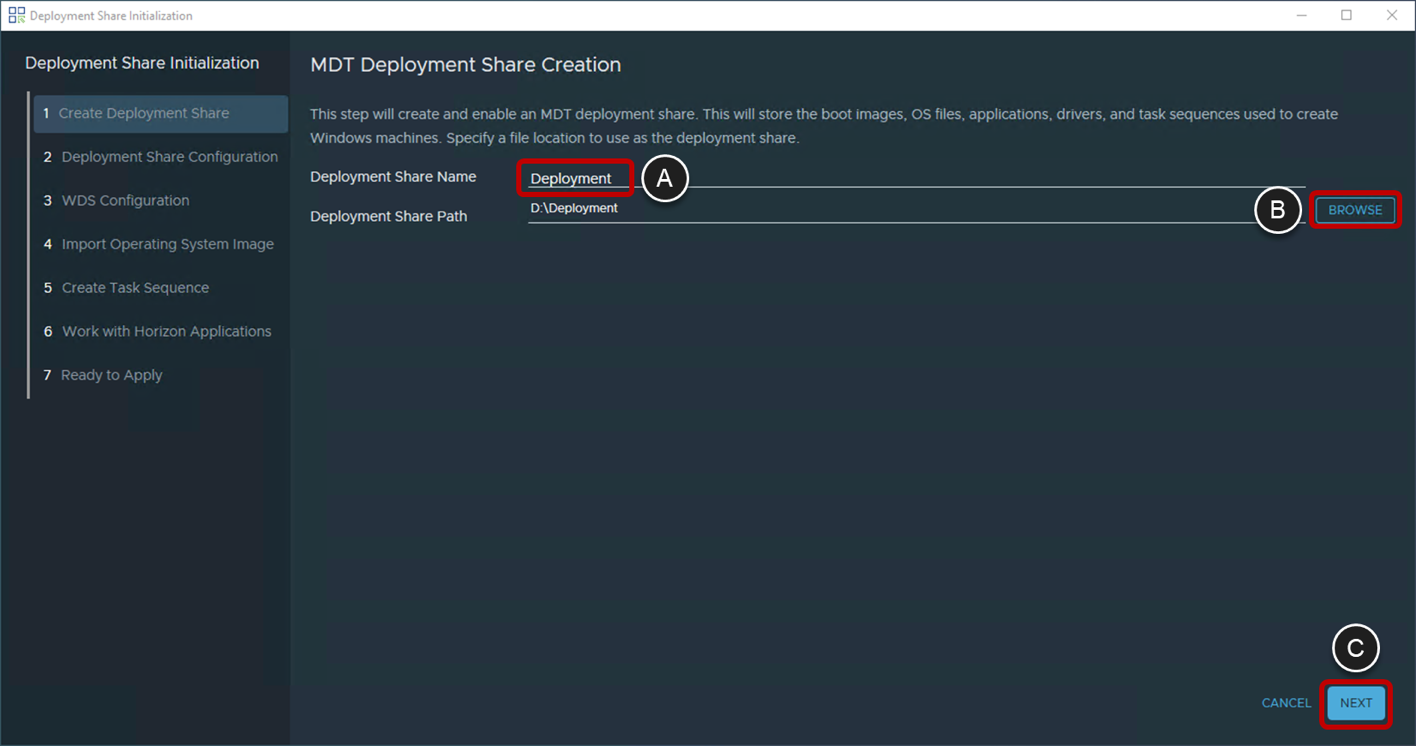
- On the MDT Deployment Share Creation page enter a Deployment Share Name (A), BROWSE (B) to the appropriate disk location and create the directory to use for the MDT deployment share. and click NEXT (C).
Note: The Deployment share path should not contain spaces otherwise the MDT plugin will fail.
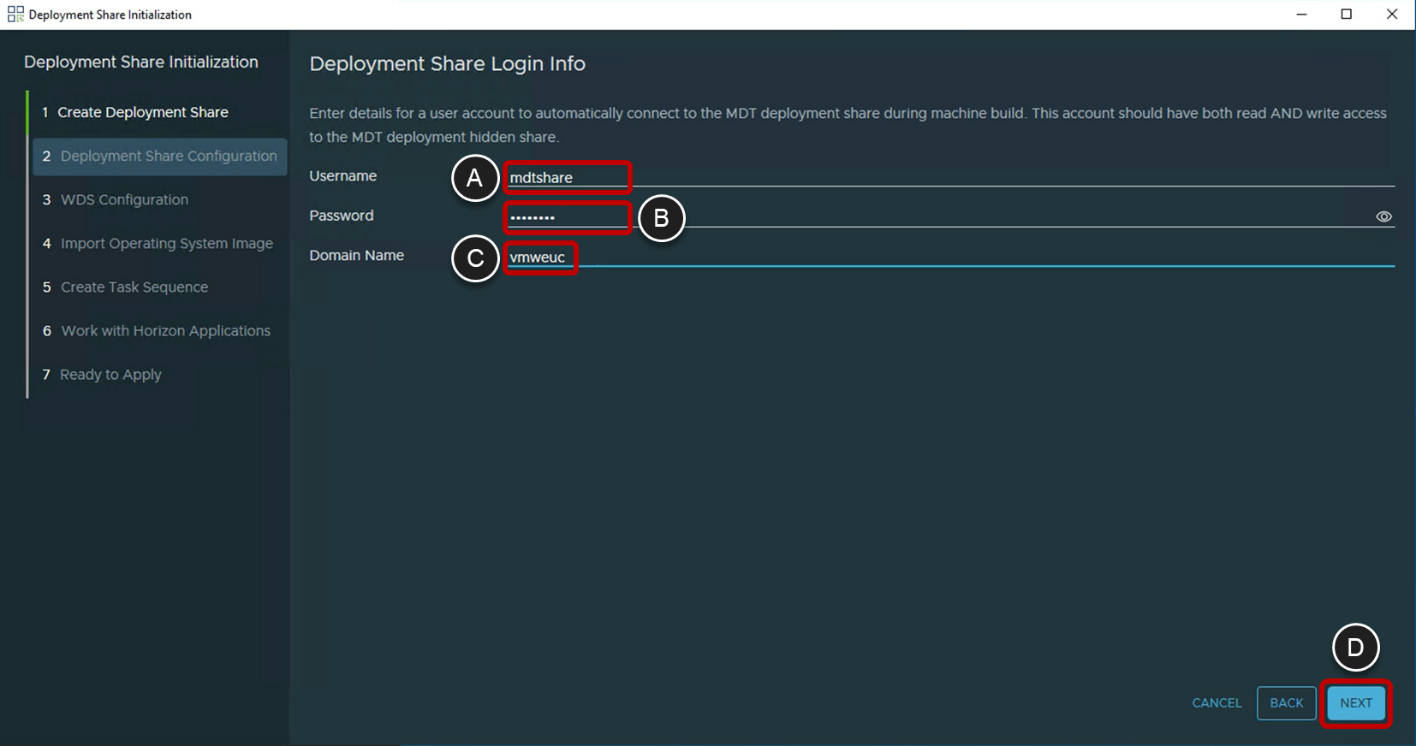
- On the Deployment Share Login Info page, enter a Username, Password, and the Domain Name for the account (A) that will be used to access the deployment share, and click Next (B).
When an image is being built, Windows PE connects to the deployment share to run the task sequence. You can specify a user account to have this connection made automatically rather than be prompted during the build process. This user account information is added to theMDT Bootstrap.iniconfiguration file.
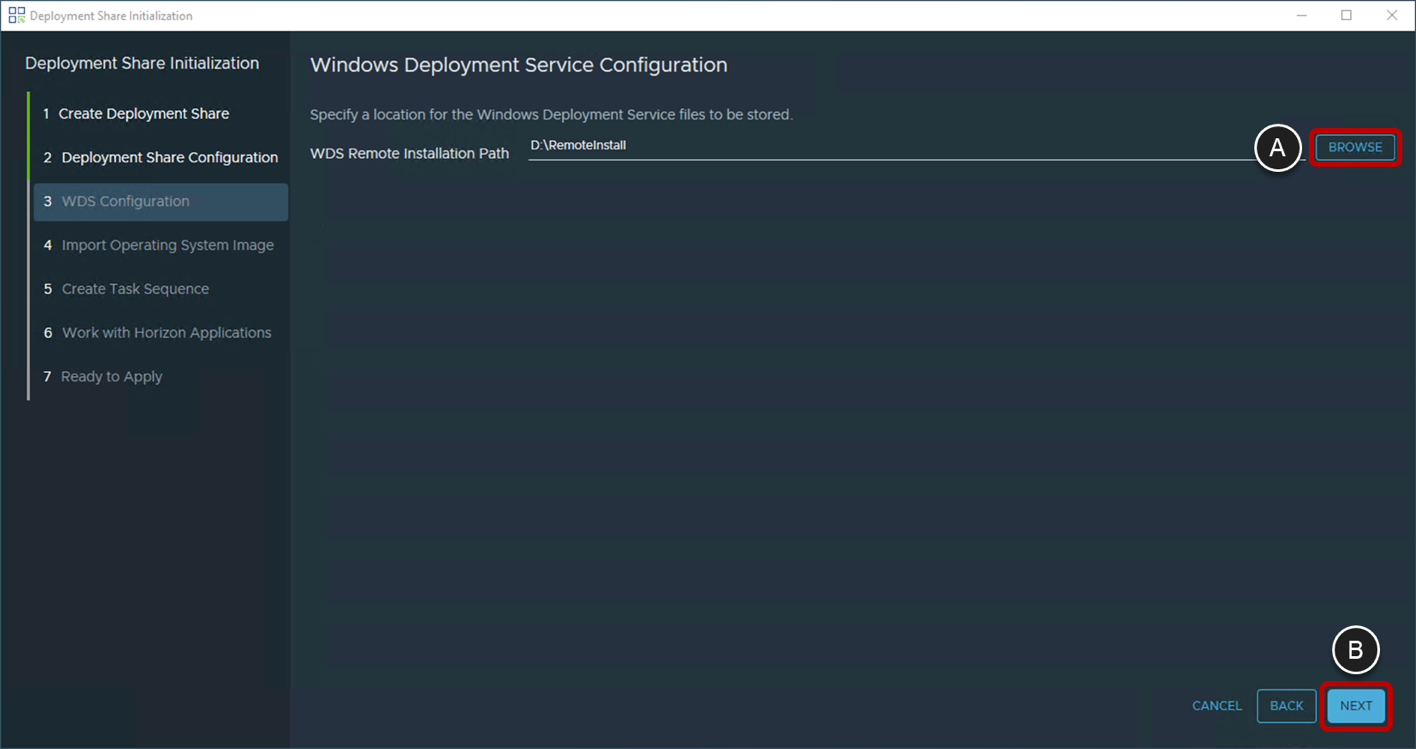
- On the Windows Deployment Service Configuration page, click BROWSE (A) to go to the disk location you want to use for the WDS Remote Installation files, and click NEXT (B).
The Windows Deployment Service (WDS) requires a file share to store boot images and other files.
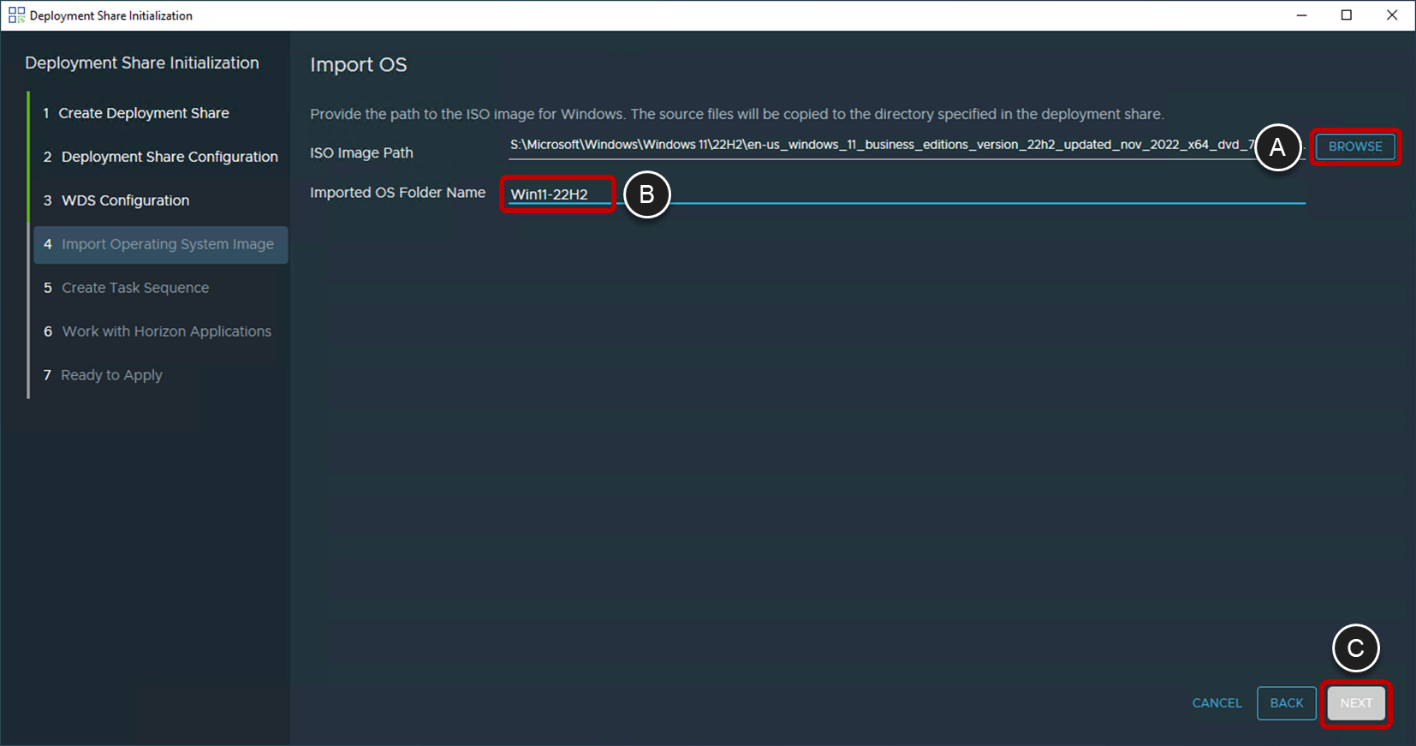
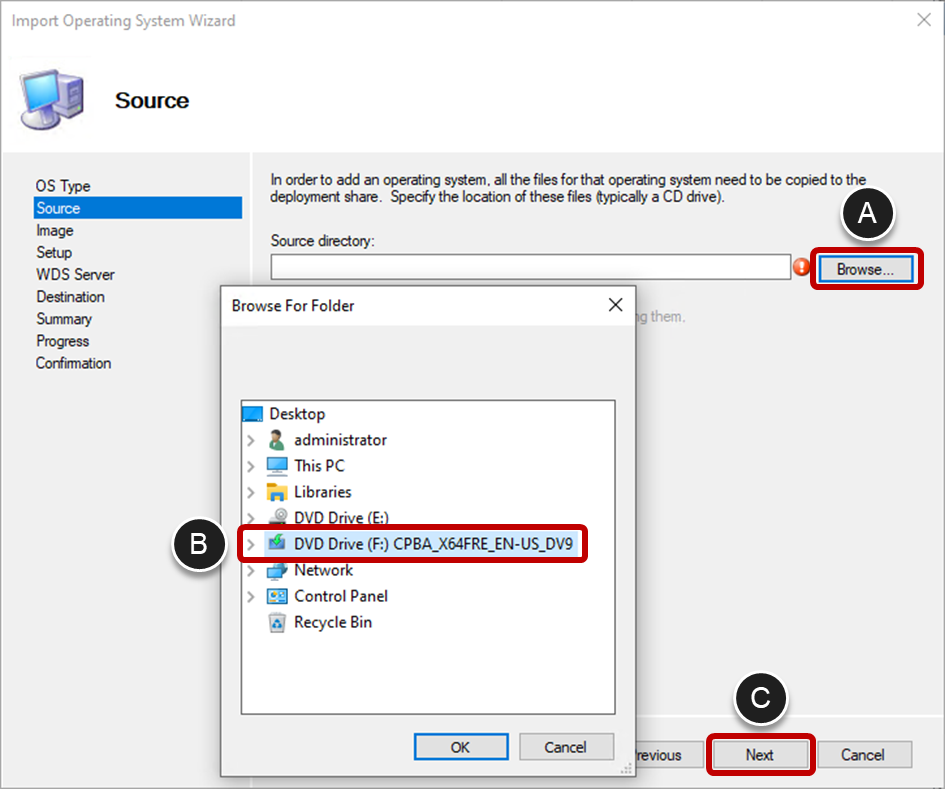
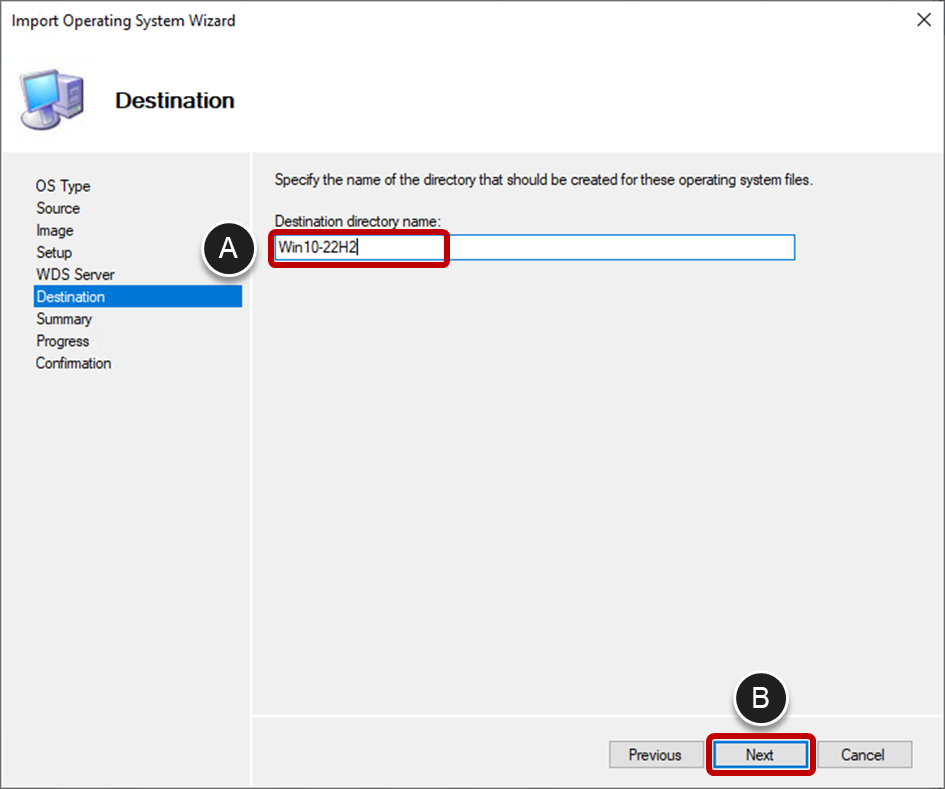
- On the Import Operating System (OS) page, click BROWSE (A) to navigate to and select the ISO image for the chosen OS. Enter a name to give the folder (B) where the OS installation files will be stored in the deployment share and click NEXT (C).
The installation files for the desired Windows version are imported into the MDT deployment share. The wizard helps you import one set of Windows installation files. You can also import other versions of Windows using the standard MDT console.
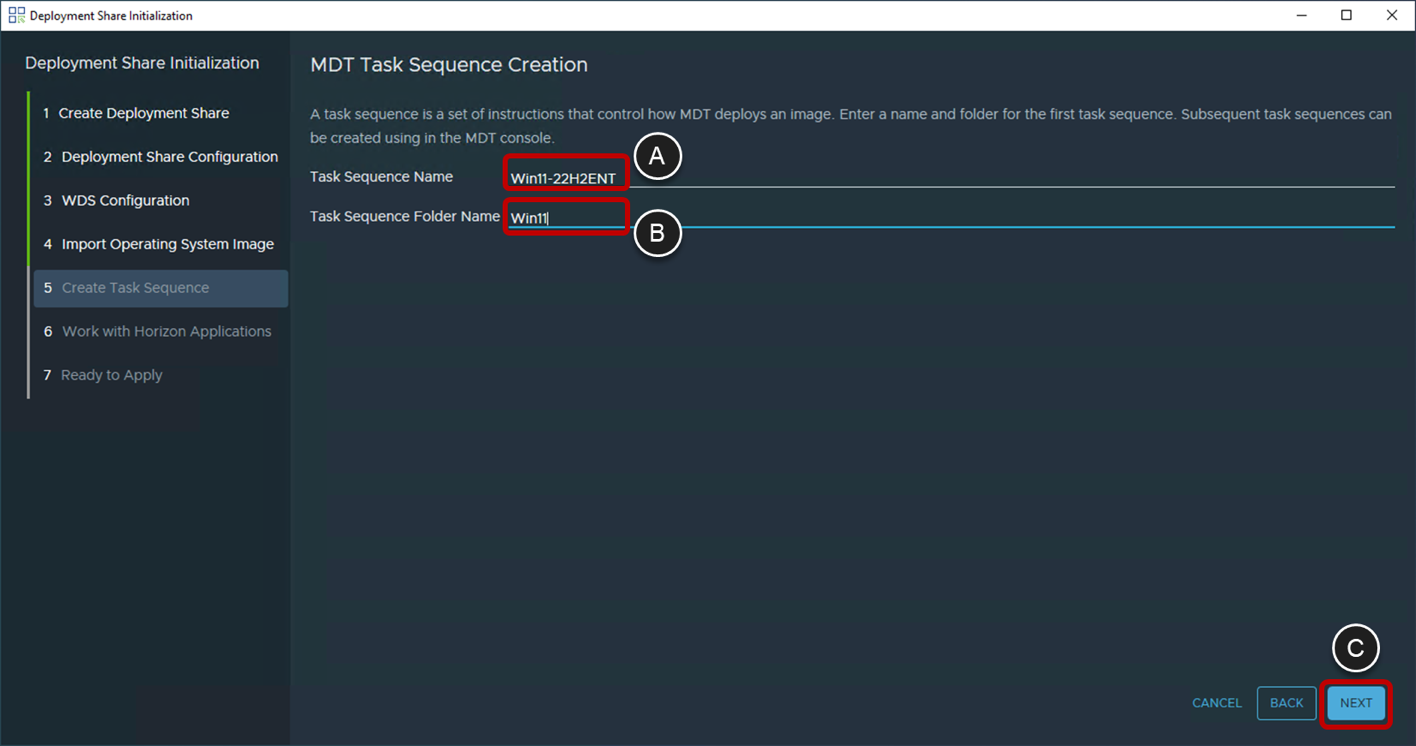
- On the MDT Task Sequence Creation page, enter a Task Sequence Name (A), enter a name for the task sequence folder (B), and click NEXT (C).
An MDT task sequence contains the steps that are to be carried out during the image build. The wizard helps create the first task sequence. You can also create other task sequences using the standard MDT console.
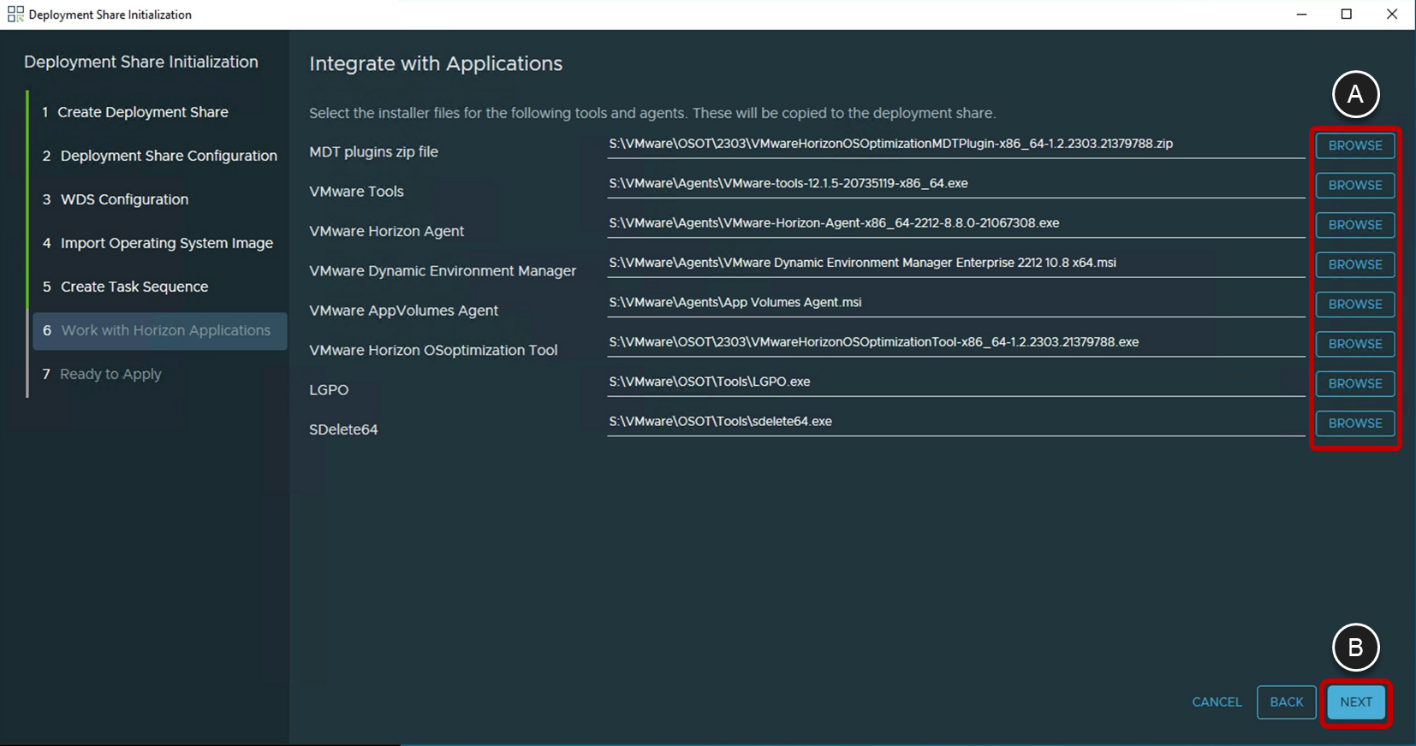
- On the Integrate with Applications page, click BROWSE (A) to go to the installation files for the various VMware products and agents that will be used and installed in the creation of the Windows images, and click NEXT (B).
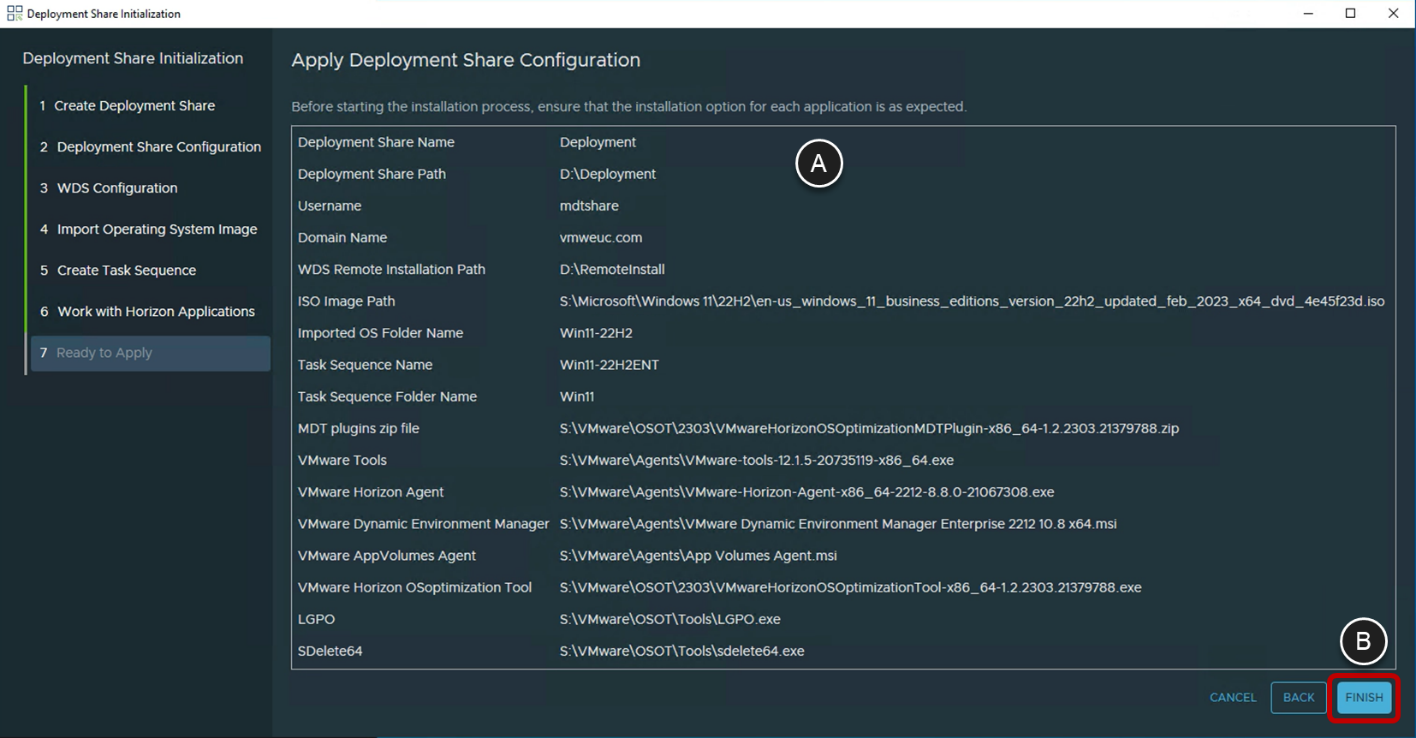
- On the Apply Deployment Share Configuration page, review the summary of information entered (A) and click FINISH (B).
- When the deployment share initialization finishes a message will display. Click OK to dismiss this message.
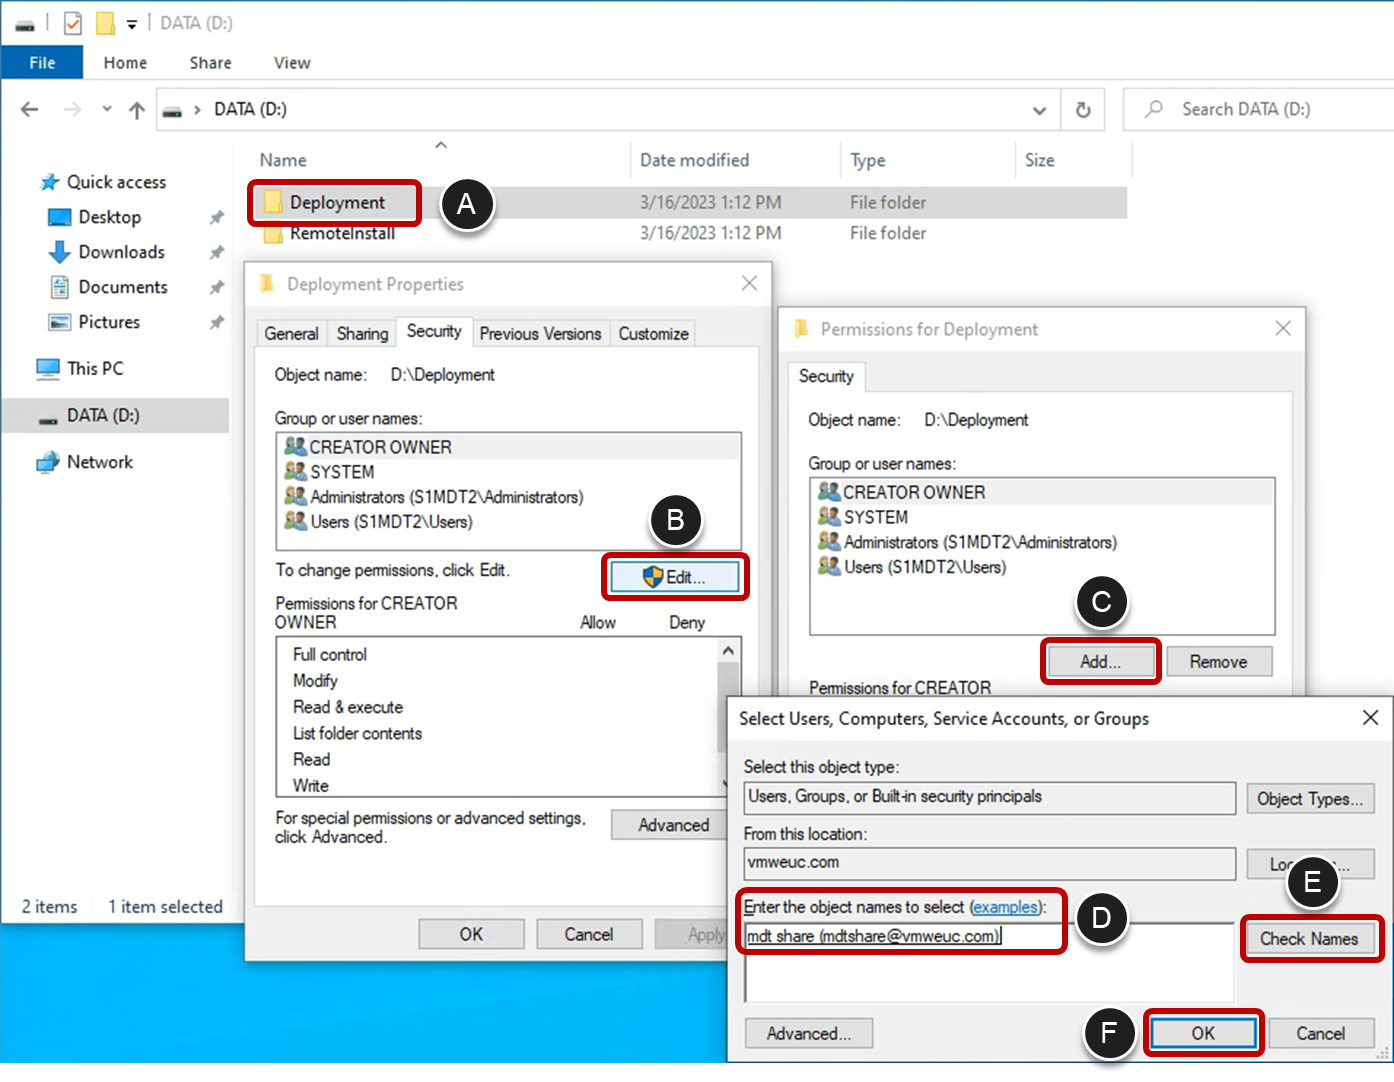
Add User Permissions to the Deployment Share
The user account specified in step 3 (Share Login Info), in Initialize the Deployment Share process just completed, needs read and write permissions to the contents and also permission to access the network share for the Deployment directory.
- Give user account the correct file permissions for the deployment share, as follows.
- In File Explorer, right-click the Deployment directory and select Properties.
- On the Security tab, click Edit.
- Click the Add button to add a new user.
- Type in the user account name you want to give read access to the deployment directory.
- Click Check Name to confirm the correct user account.
- Click OK to add the user account.
- Select Allow, Full Control for the user account you just added.
- Click OK to close the Permissions dialog. box.
- Give user account share permissions to Deployment share:
- With the Deployment Properties dialog still open, select the Sharing tab.
- Click on the Advanced Sharing button.
- Click on the Permissions button.
- Click on the Add button.
- Type in the user account name you want to give read access to the deployment share.
- Click Check Name to confirm the correct user account.
- Click OK to add the user account.
- Select Allow, Full Control for the user account you just added.
- Click OK to close the Permissions dialog box.
- Click OK to close the Advanced Sharing dialog box.
- Click Close to close the Deployment Properties dialog box.

Fix an MDT Known Issue
The Windows 11, 22H2 version of the Windows Assessment and Deployment Kit (Windows ADK) has a known issue because the default legacy scripting engine was changed. During Windows PE execution, applications stop working and a message box is displayed: Script Error - An error has occurred in the script on this page.

A workaround has been provided by Microsoft with instructions available at https://github.com/MicrosoftDocs/memdocs/blob/main/memdocs/configmgr/mdt/known-issues.md. For your convenience, the workaround has been copied into the first two steps below:
- Back up the
Unattend_PE_x64.xmlfile by making a copy of the file at:C:\Program Files\Microsoft Deployment Toolkit\Templates\Unattend_PE_x64.xml - Edit
C:\Program Files\Microsoft Deployment Toolkit\Templates\Unattend_PE_x64.xmlfile and modify the contents of the file to match the text below, and then save the file.
<unattend xmlns="urn:schemas-microsoft-com:unattend">
   <settings pass="windowsPE">
       <component name="Microsoft-Windows-Setup" processorArchitecture="amd64" publicKeyToken="31bf3856ad364e35" language="neutral" versionScope="nonSxS" xmlns:wcm="http://schemas.microsoft.com/WMIConfig/2002/State">
           <Display>
               <ColorDepth>32</ColorDepth>
               <HorizontalResolution>1024</HorizontalResolution>
               <RefreshRate>60</RefreshRate>
               <VerticalResolution>768</VerticalResolution>
           </Display>
           <RunSynchronous>
               <RunSynchronousCommand wcm:action="add">
                   <Description>Lite Touch PE</Description>
                   <Order>1</Order>
                   <Path>reg.exe add "HKLM\Software\Microsoft\Internet Explorer\Main" /t REG_DWORD /v JscriptReplacement /d 0 /f</Path>
               </RunSynchronousCommand>
               <RunSynchronousCommand wcm:action="add">
                   <Description>Lite Touch PE</Description>
                   <Order>2</Order>
                   <Path>wscript.exe X:\Deploy\Scripts\LiteTouch.wsf</Path>
               </RunSynchronousCommand>
           </RunSynchronous>
       </component>
   </settings>
</unattend>
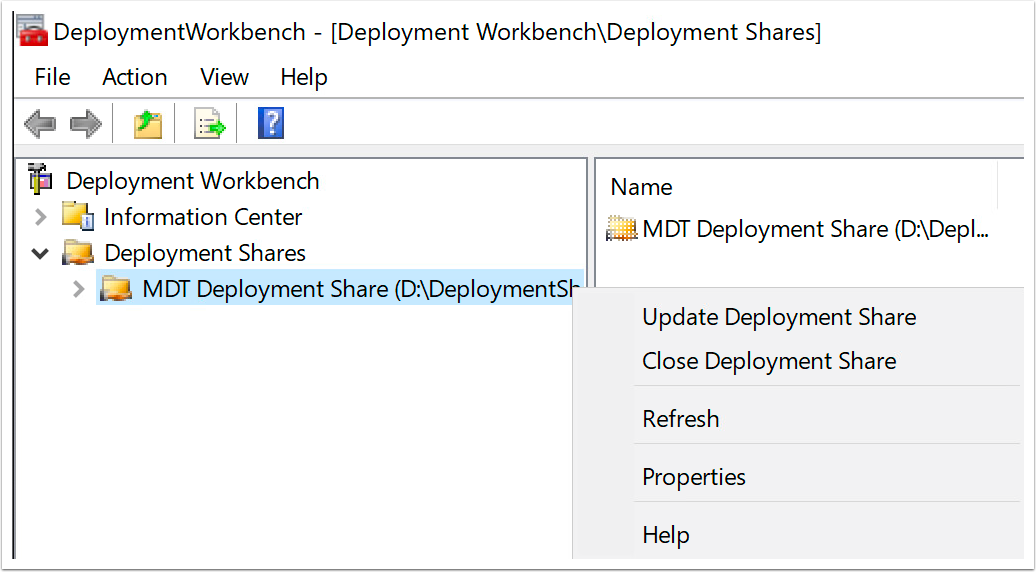
- Regenerate the boot image, as follows:
- Open the Deployment Workbench and navigate to the deployment share.
- Rick-click on the deployment share and select Update Deployment Share.
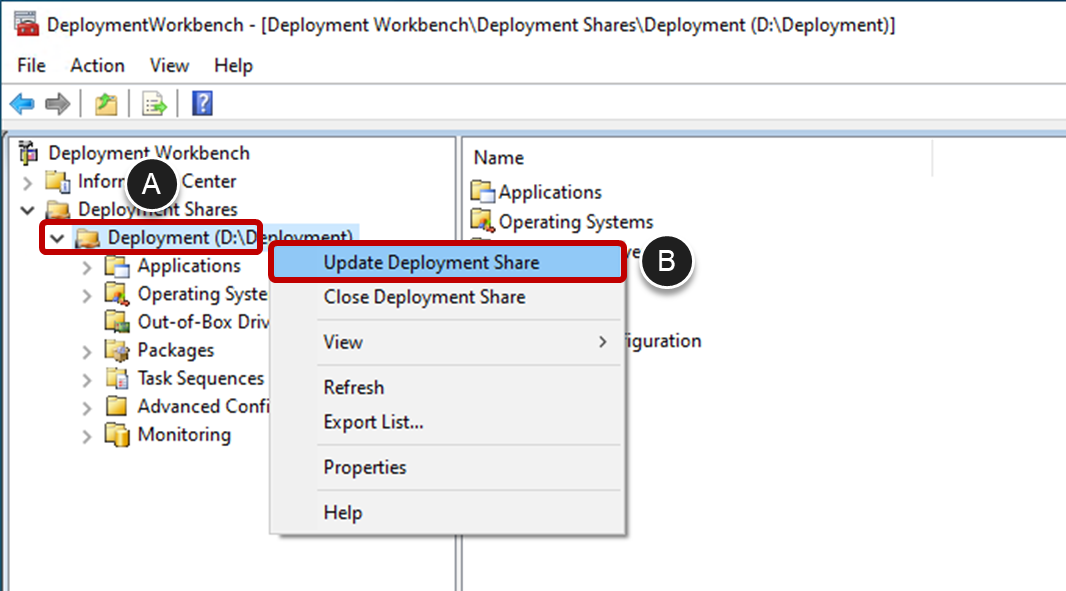
- On the Options page, select the option to Completely regenerate the boot images (A) and click Next (B).
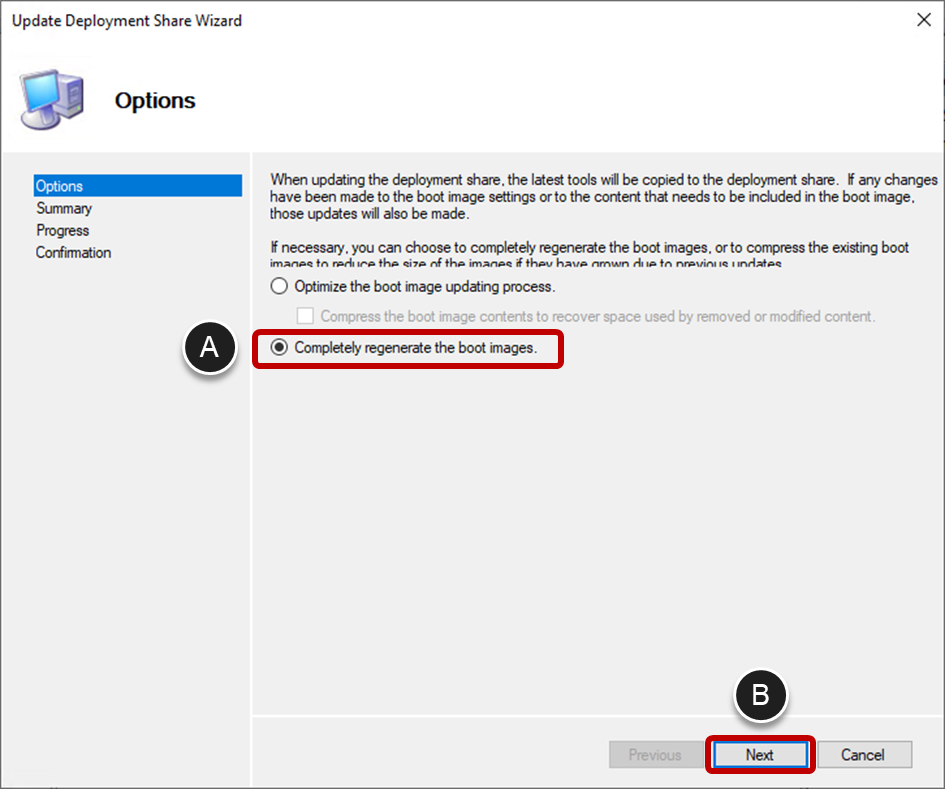
- Click Next on the Summary page to execute the update and when the update completes click Finish.
- To update Windows Deployment Services to use the newly generated boot image, open the Windows Deployment Services console and do the following:
- Navigate to Servers > Your deployment server > Boot Images.
- Right-click on the Lite Touch entry and select Replace image.
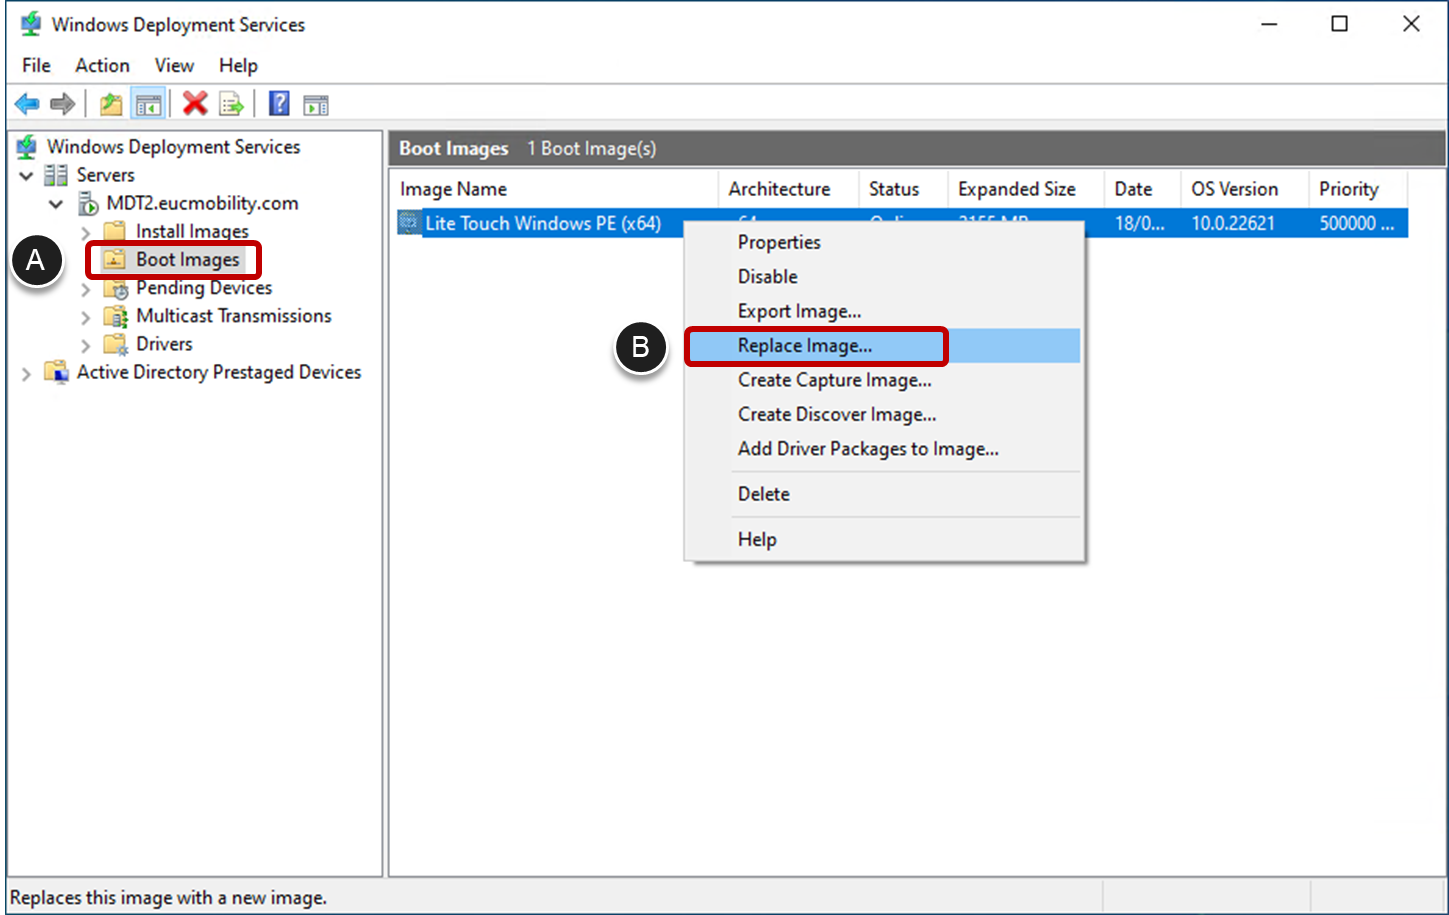
- To select the boot image, click Browse (A) to go to the Boot directory in the MDT deployment directory, select the
LiteTouchPE_x64.wimfile, and click Next (B).
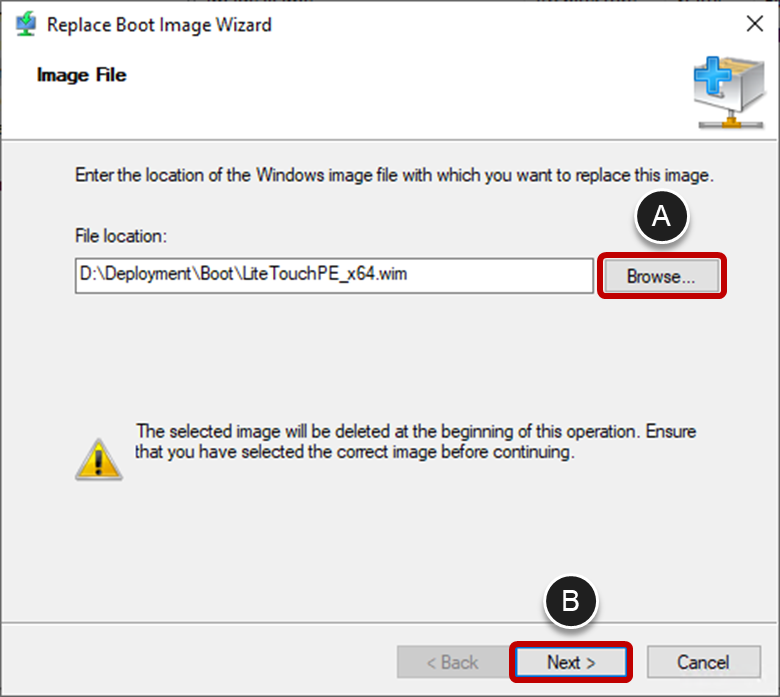
- Click Next on the Available Images page.
- Click Next, leaving the Image Metadata as it is.
- Click Next after reviewing the Summary information.
- Click Finish and close the Windows Deployment Services console.
Specify the Location of the PXE Boot Server
When building a Windows image, the first step a target machine performs is to network (PXE) boot into a Windows PE image. To facilitate this boot-up, you need to configure your network so that the PXE boot server (hosted on the MDT server) can be located. There are different ways of achieving this task, depending on your network configuration and preference.
- DHCP Scope Options
- IP Helper router configuration
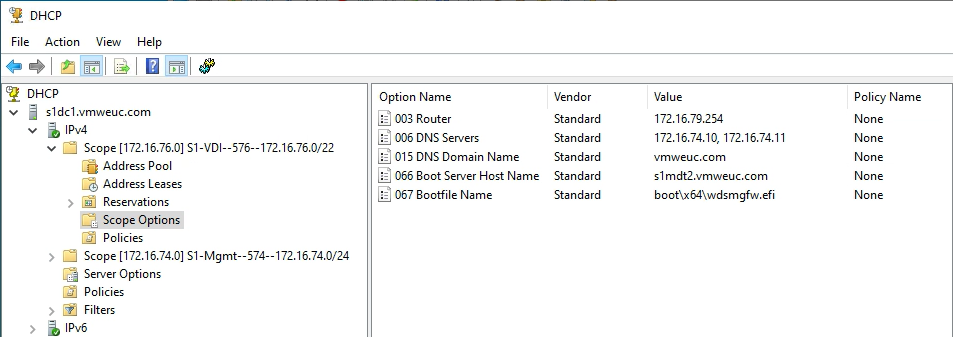
DHCP Scope Options
If you are using DHCP to define the PXE boot server, add the following two options. These can be added to the DHCP scope for the subnet where you are building VM images.
- 066 Boot Server Host Name – the FQDN of the Windows Deployment Services Server
- 067 Bootfile Name –
boot\x64\wdsmgfw.efi
MDT Task Sequences
A task sequence is a set of instructions that tell the Microsoft Deployment Tool how to create or deploy an image. If you used the MDT Environment Automation tool to help install and configure your MDT server, an initial task sequence will have been created for you.
Some configuration is required to complete the provided task sequence that was generated during the deployment server installation and configuration.
Complete the Task Sequence Configuration
To complete the configuration of the task sequence, you need to edit it and select the desired operating system. You must also ensure that the various tools and agents are available, and that the installation files have been extracted.
You should also repeat this process if you update any of the applications, tools, or agents. Ensure that any new version has extracted installation files and that the task sequence is using the correct version.
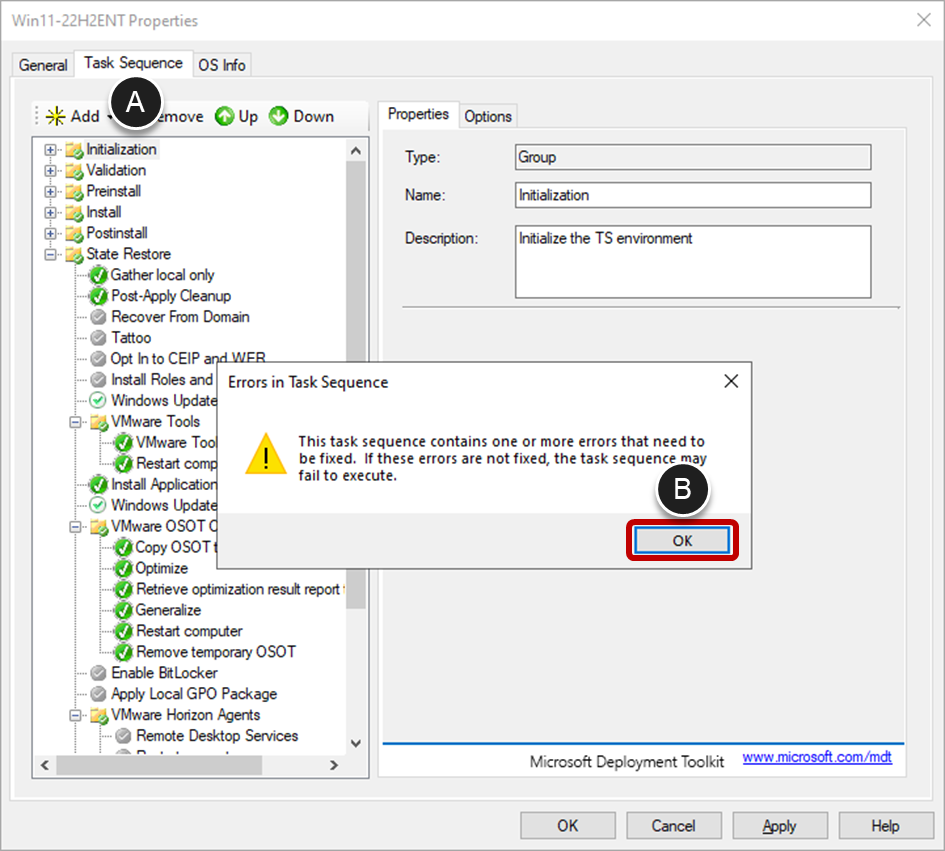
- Open the Deployment Workbench using the Start menu and navigate to the deployment share and the Task Sequences folder within that. Double-click on task sequence to view and edit the properties.
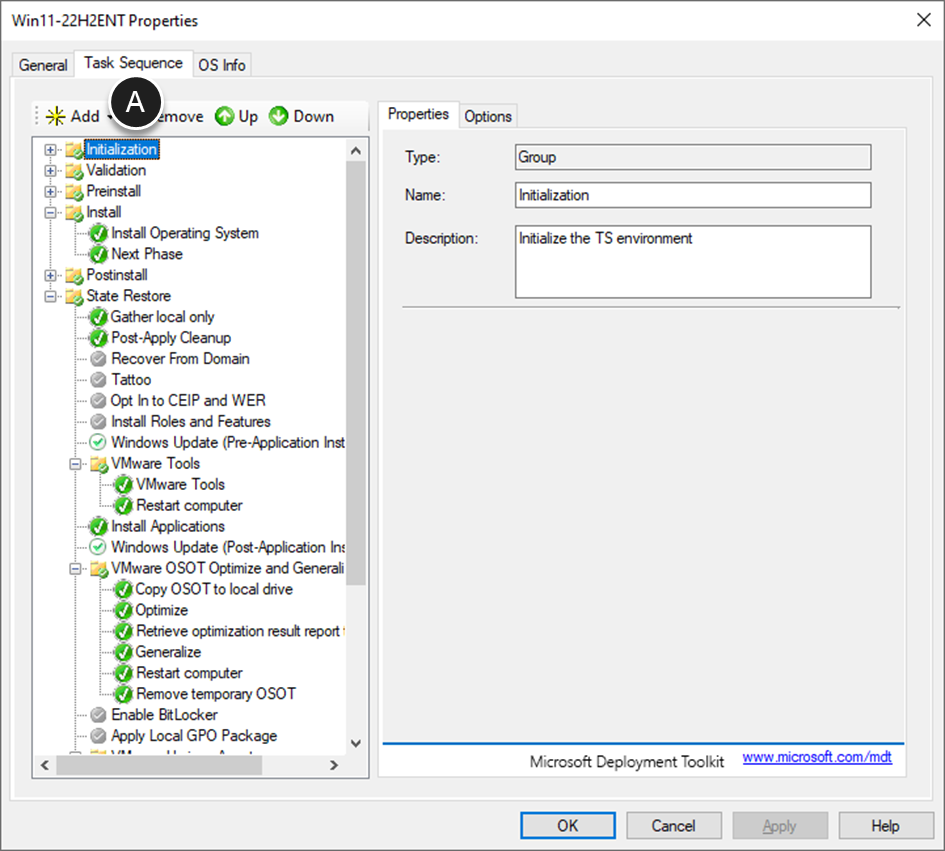
- Select the Task Sequence tab (A) and click OK (B) to cancel the message warning that there are errors that need to be fixed.
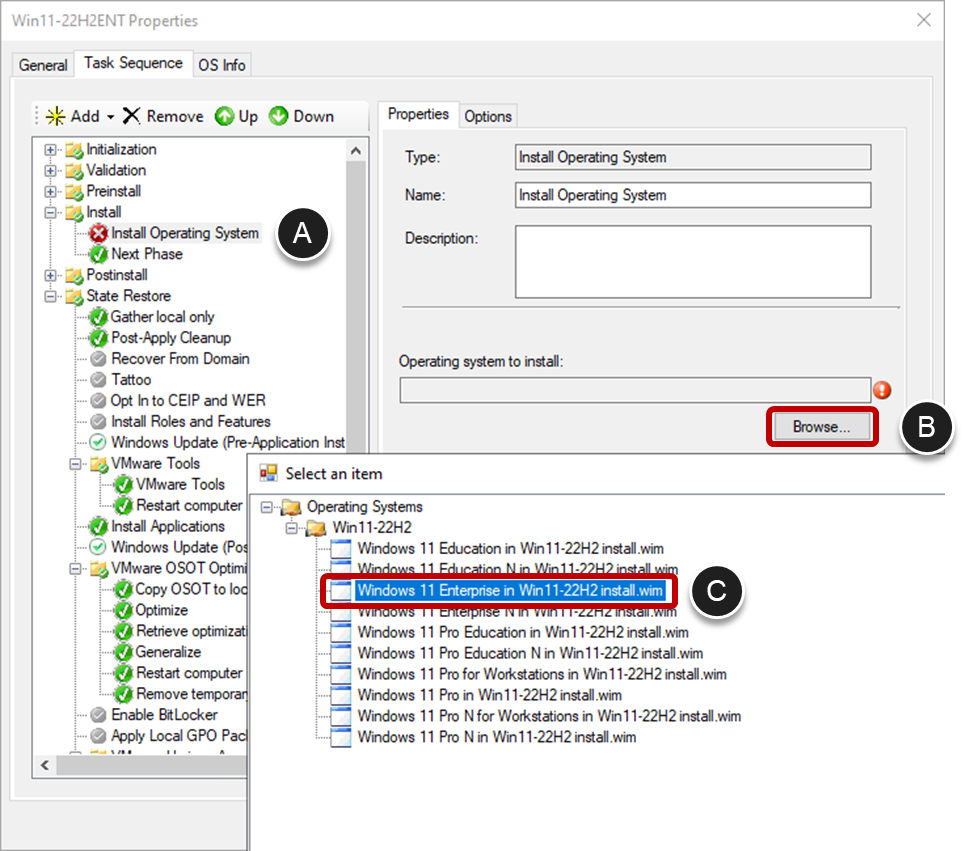
- Select the operating system to install:
- Navigate to Install > Install Operating System.
- Use the Browse button to open the operating system selection dialog box.
- Select the desired version and edition of Windows and click OK.
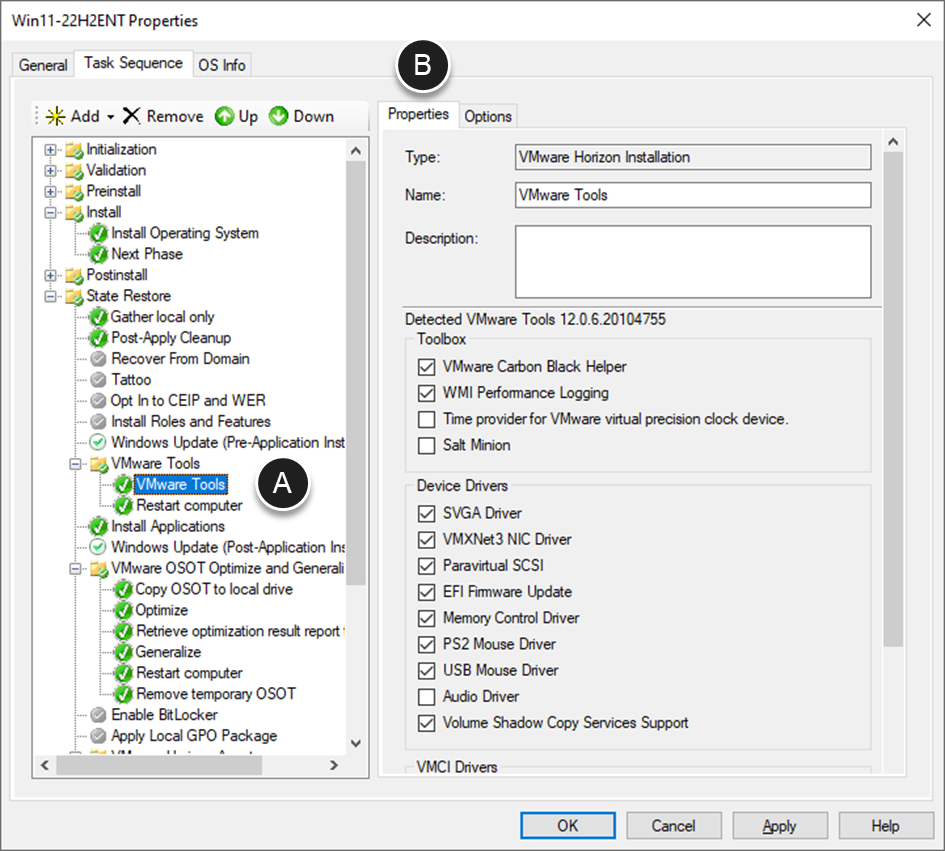
- View VMware Tools properties.
Note: It is important that this page is opened once so that the MDT plug-in can detect the version and extract the installation files. Here, you can optionally modify the VMware Tools options.- Navigate to State Restore > VMware Tools > VMware Tools.
- Select the Properties tab.
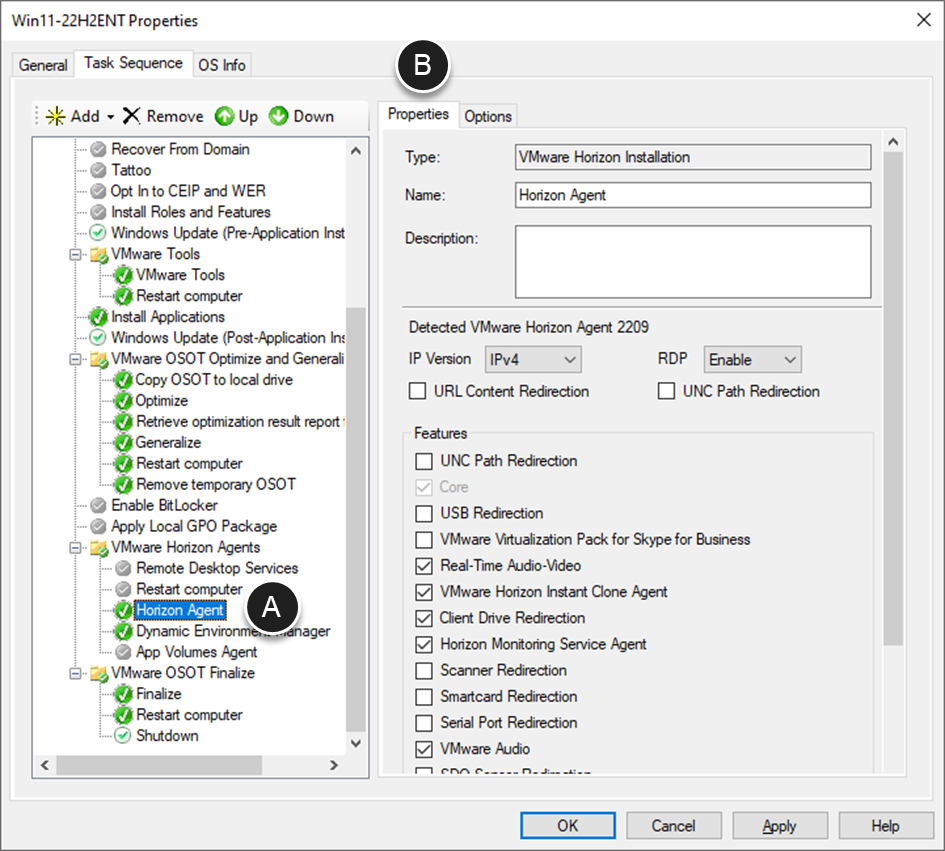
- View the Horizon Agent properties.
Note: It is important that this page is opened once so that the MDT plug-in can detect the version and extract the installation files. Here, you can optionally modify the Horizon Agent options.- Navigate to VMware Horizon Agents > Horizon Agent.
- Select the Properties tab.
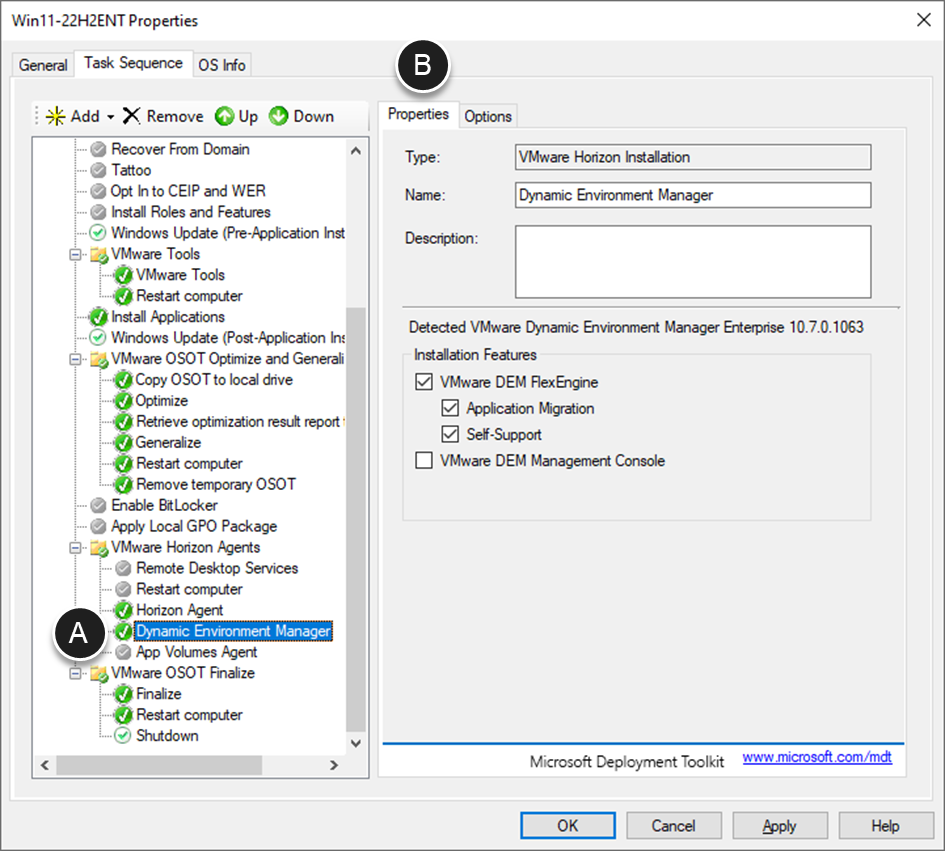
- View Dynamic Environment Manager properties.
Note: It is important that this page is opened once so that the MDT plug-in can detect the version. Here, you can optionally modify the Dynamic Environment Manager options.- Navigate to VMware Horizon Agents > Dynamic Environment Manager.
- Select the Properties tab.
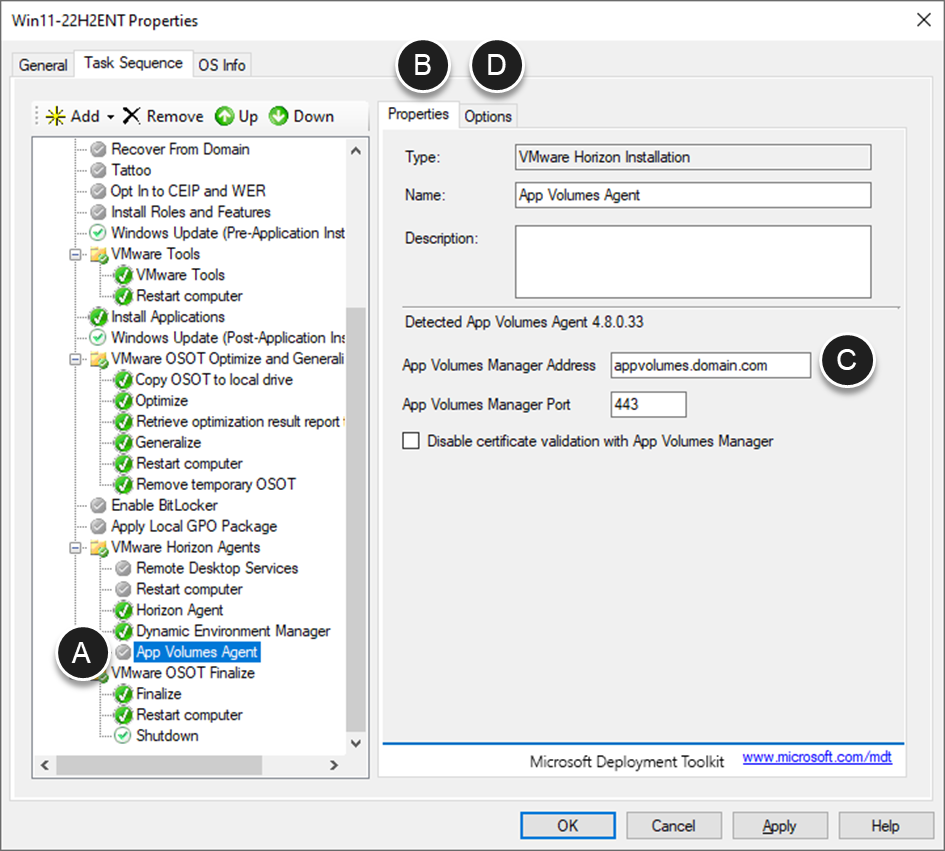
- View App Volumes Agent properties.
Note: It is important that this page is opened once so that the MDT plug-in can detect the version. Here, you can optionally modify the App Volumes Agent options.- Navigate to VMware Horizon Agents > App Volumes Agent.
- Select the Properties tab.
- Modify the App Volumes Manager Address to match your environment.
- By default, the step to install the App Volumes agent is not enabled. To enable the installation of App Volumes agent into the image, select the Options tab and deselect the Disable this step.
- Click OK to save the changes to task sequence.
Edit an Existing Task Sequence
You may wish to tailor the behavior of the Windows OS Optimization Tool for Horizon.
- To view the properties of the task sequence, select the Task Sequence tab (A).
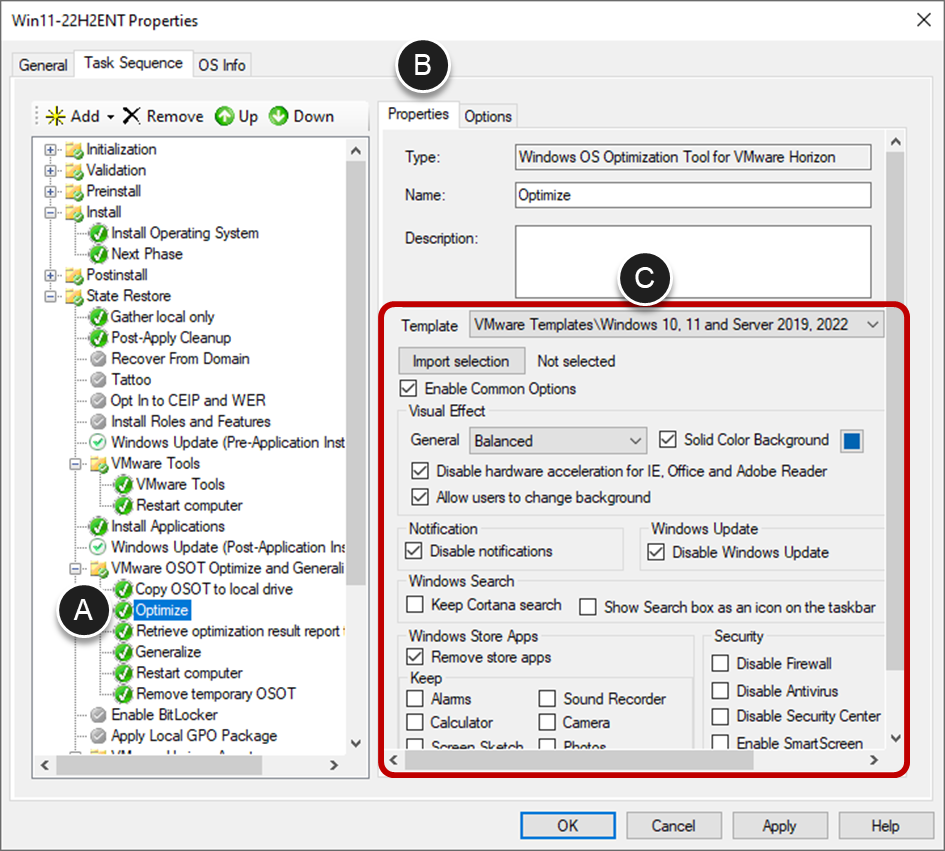
- Configure the optimization settings:
- Navigate to State Restore > VMware OSOT Optimize and Generalize > Optimize.
- Select the Properties tab.
- Edit the configuration settings to match your requirements.
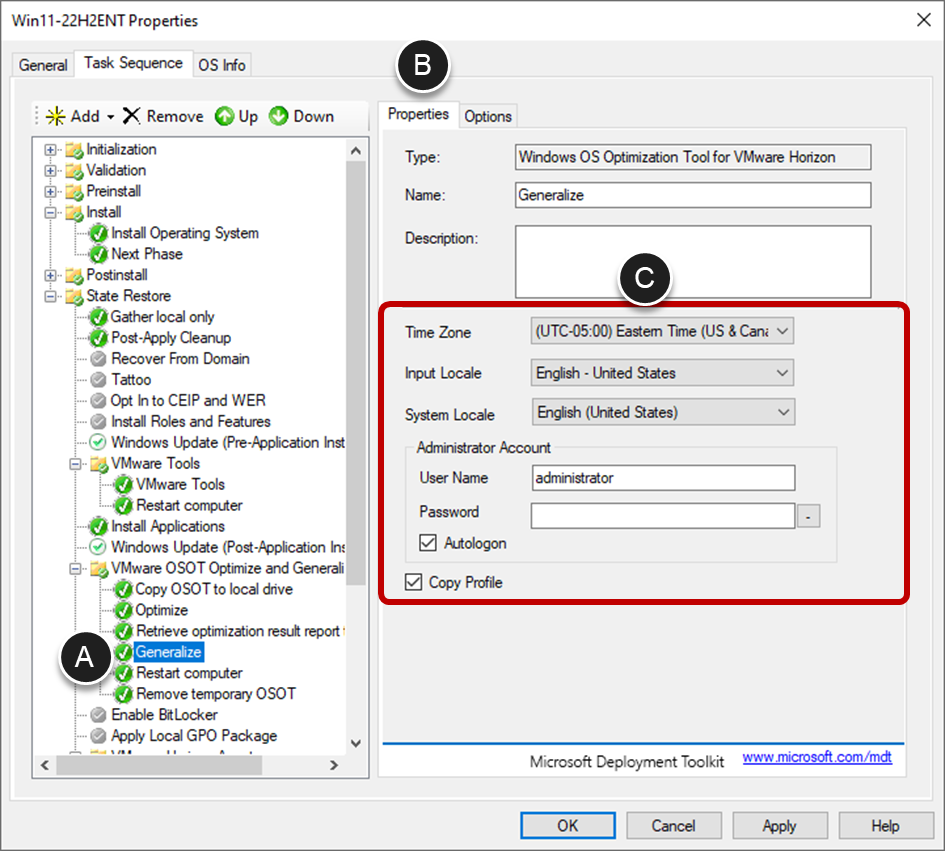
- Configure the generalization settings:
- Navigate to State Restore > VMware OSOT Optimize and Generalize > Generalize.
- Select the Properties tab.
- Edit the configuration settings to match your requirements.
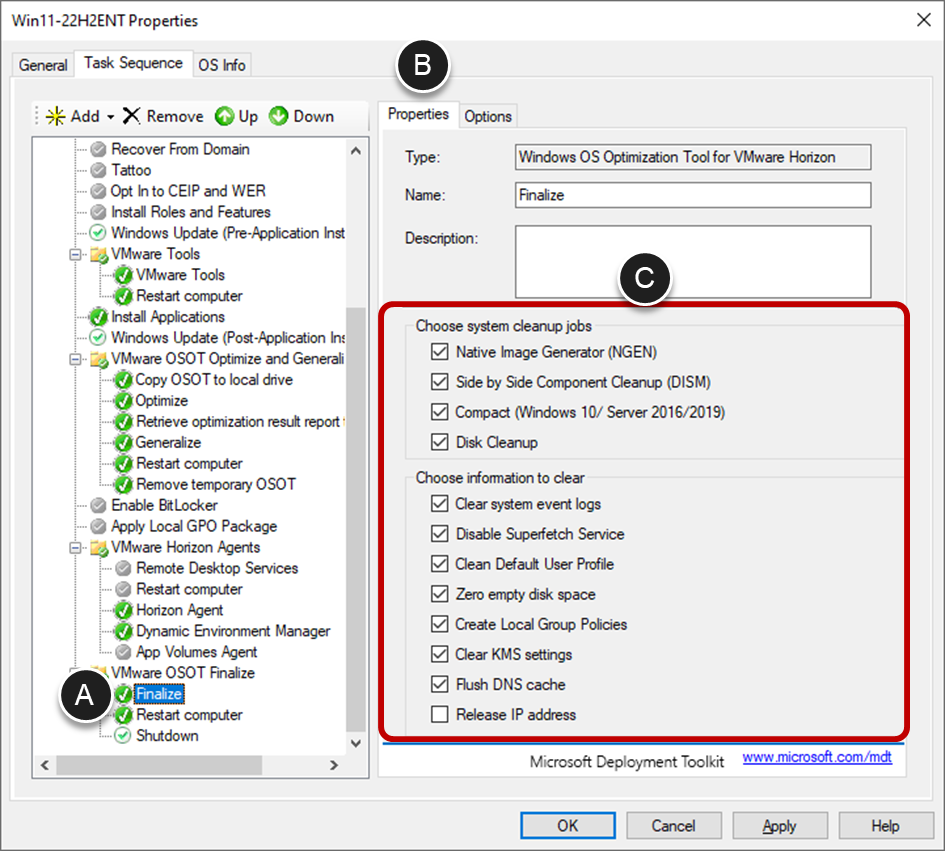
- Configure the Finalize settings:
- Navigate to State Restore > VMware OSOT Finalize > Finalize.
- Select the Properties tab.
- Edit the configuration settings to match your requirements.
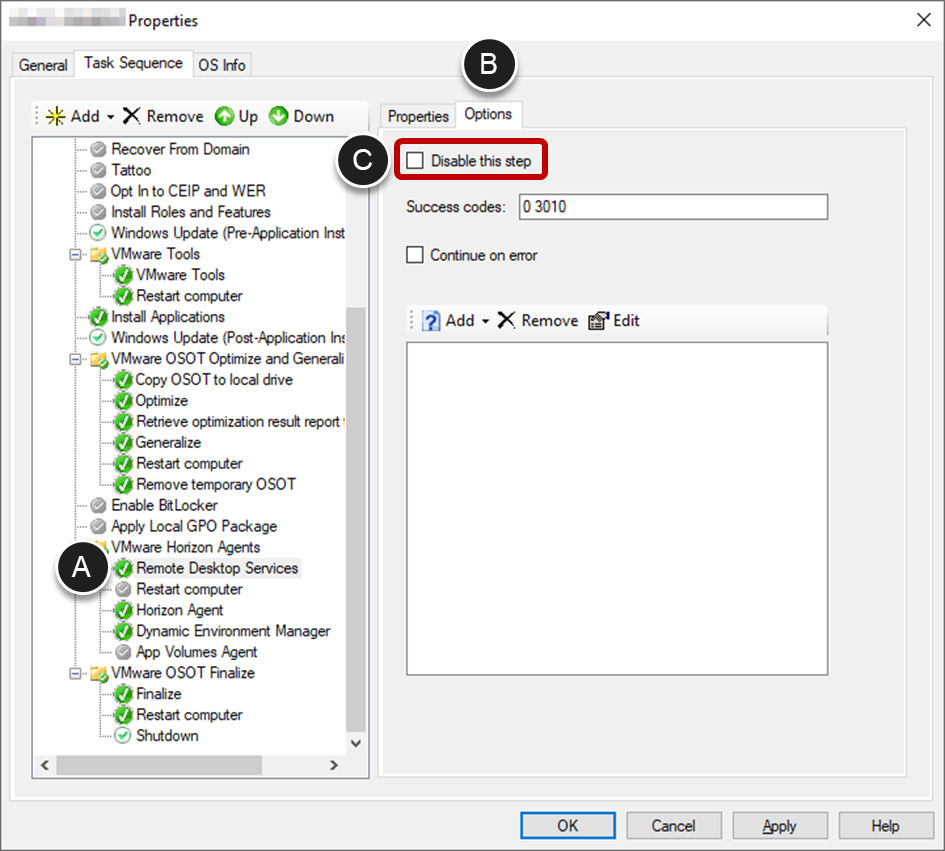
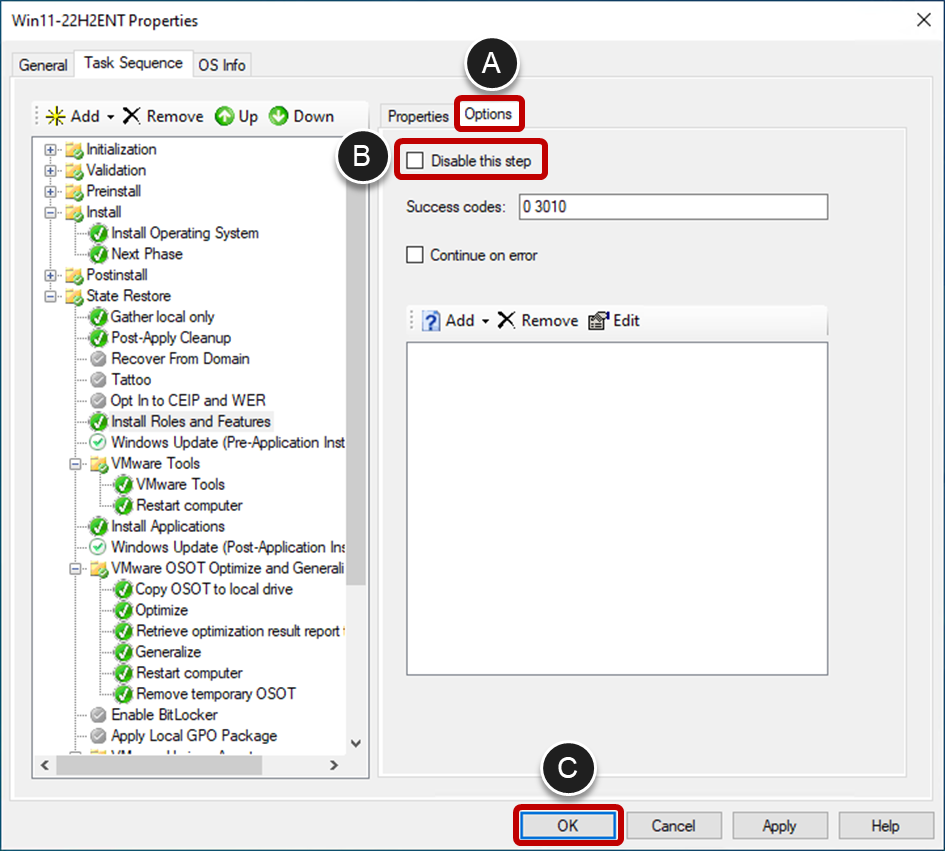
- For Remote Desktop Server Hosts (RDSH), enable Remote Desktop Services, as, follows:
- Navigate to VMware Horizon Agents > Remote Desktop Services.
- Click the Options tab.
- Deselect Disable this step.
Important: If you are creating a Windows Server image to create an RDSH farm, also enable Restart computer below Remote Desktop Services. Currently RDSH builds cannot be fully automated with the MDT plugin for the OS Optimization Tool. When the task sequence reaches the Restart computer step, you will have to manually log in as Administrator to allow the sequence to continue.
- Click OK to save the changes to the task sequence.
Select the Option to Install .NET 3.5
- View the properties of the task sequence.
- Select the Task Sequence tab.
- Navigate to State Restore > Install Roles and Features.
- Select the operating system that corresponds closest to the version you are working on.
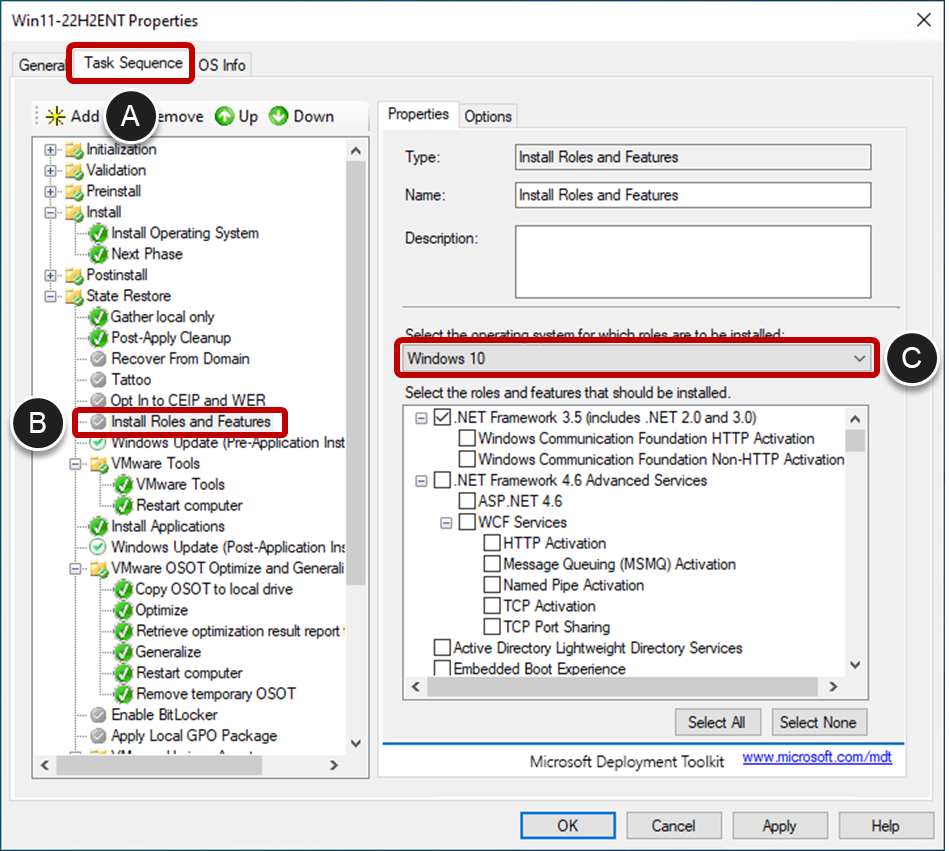
- For a Windows Server operating system:
- Collapse the Roles list.
- Under Feature, select .NET Framework 3.5.
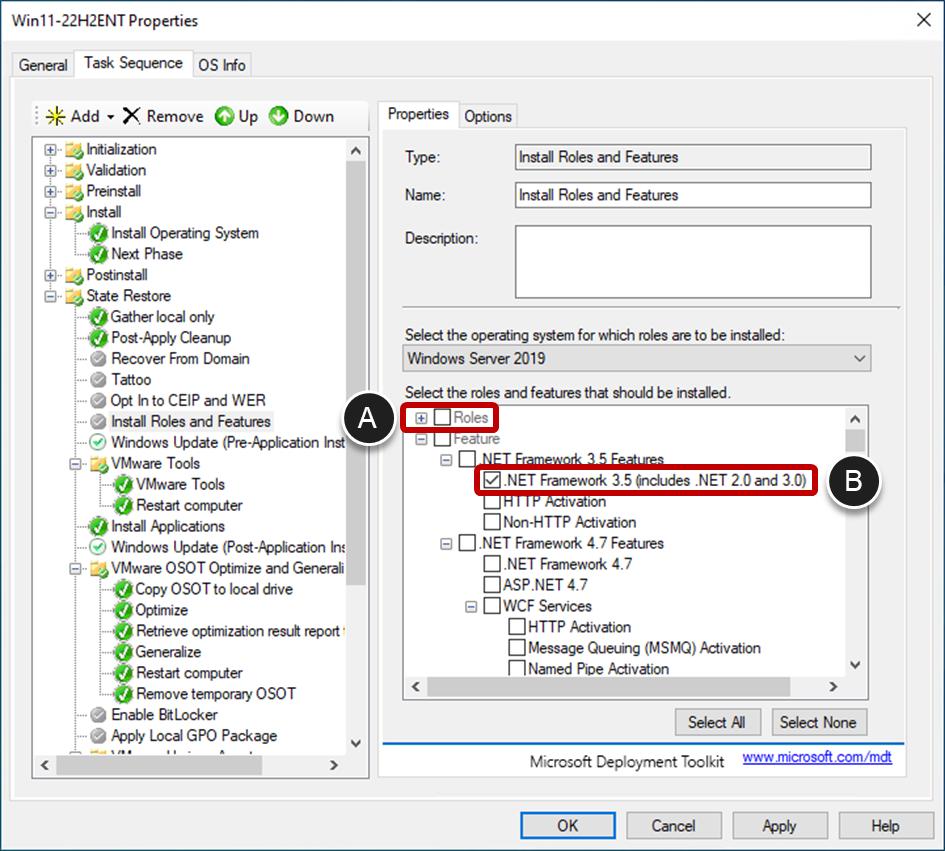
- Enable the task sequence step.
- Click the Options tab.
- Deselect Disable this step.
- Click OK to save the changes to the task sequence.
Generate a Catalog for the OS Image and Edit the Unattend.xml File
You next generate a catalog for the operating system image and use Windows System Image Manager (SIM) to edit the answer file for an unattended installation.
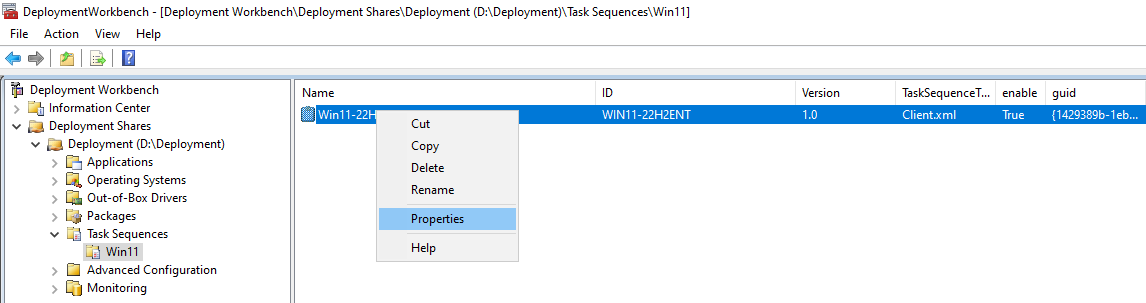
- In the Deployment Workbench, with Task Sequences expanded under the deployment share, right-click the task sequence you just created and select Properties.
- Edit the
Unattend.xmlfile by clicking the OS Info tab (A), and click the Edit Unattend.xml button (B).
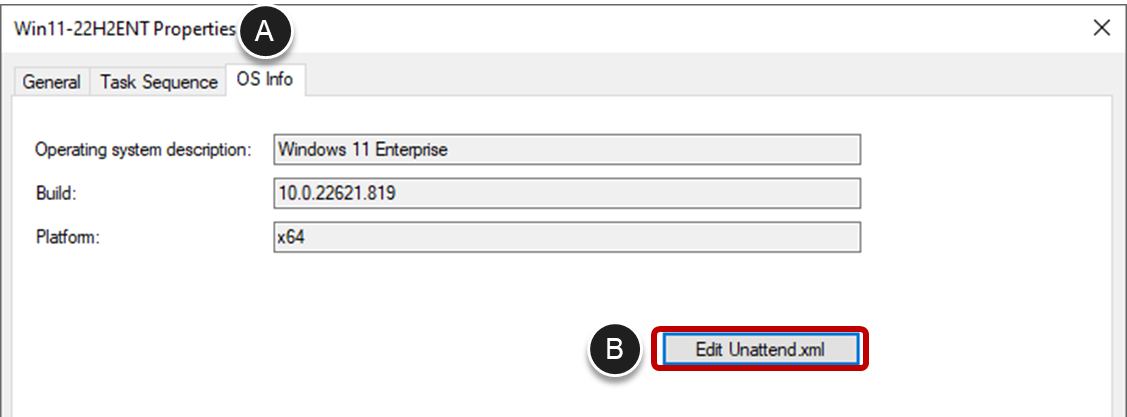
- Wait for the OS image catalog to be generated.
The first time you do this for each operating system version/edition, the process of generating the catalog takes a while.

- Add Reseal to the answer file.
- In the Windows Image pane, navigate to Components > amd64_Microsoft-Windows-Deployment_xxx > Reseal (A).
- Drag Reseal into the Answer File pane and into the 7 oobeSystem section (B).
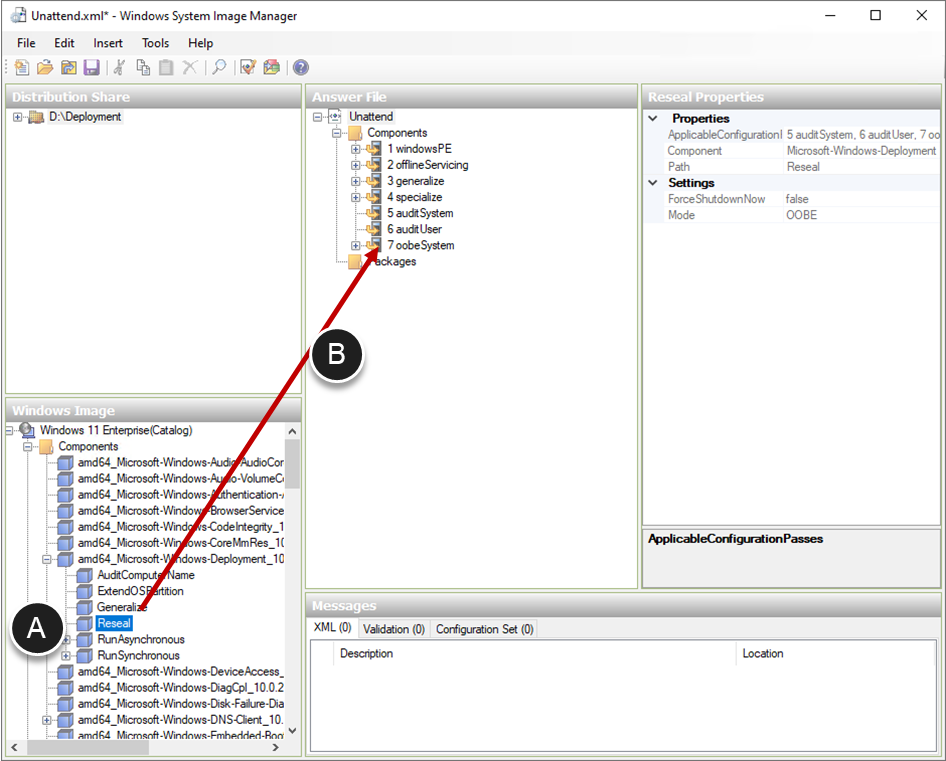
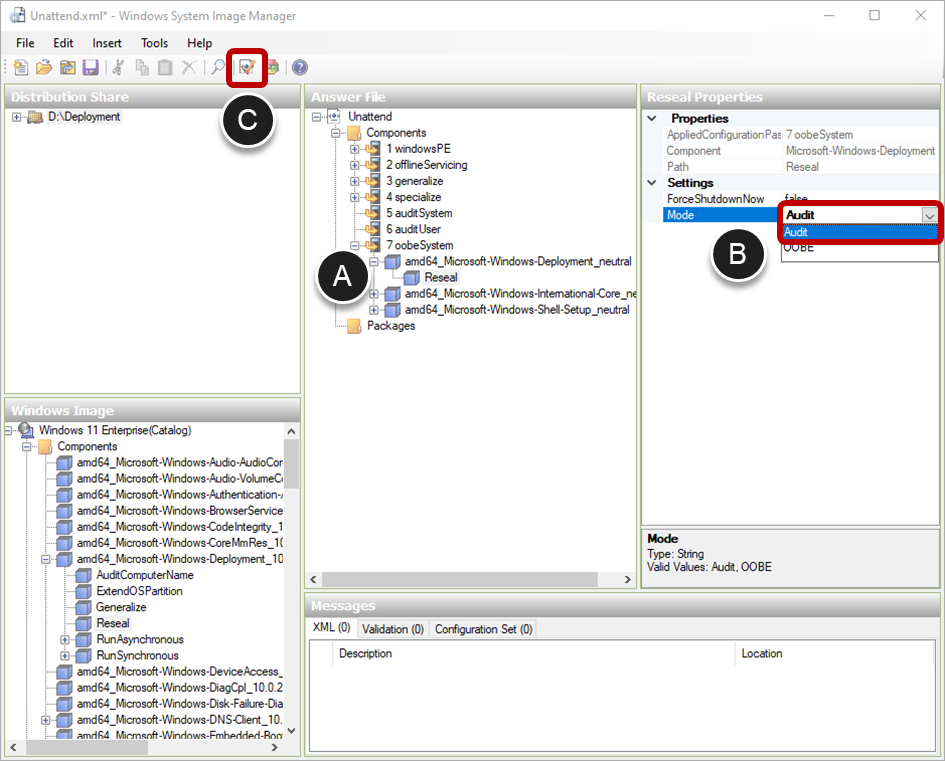
- Verify that Reseal is set to Audit mode.
- In the Answer File pane, navigate to 7 oobeSystem > Reseal.
- In the Reseal Properties pane, check that Mode is set to Audit and change if necessary.
- Click the Validate Answer File icon.
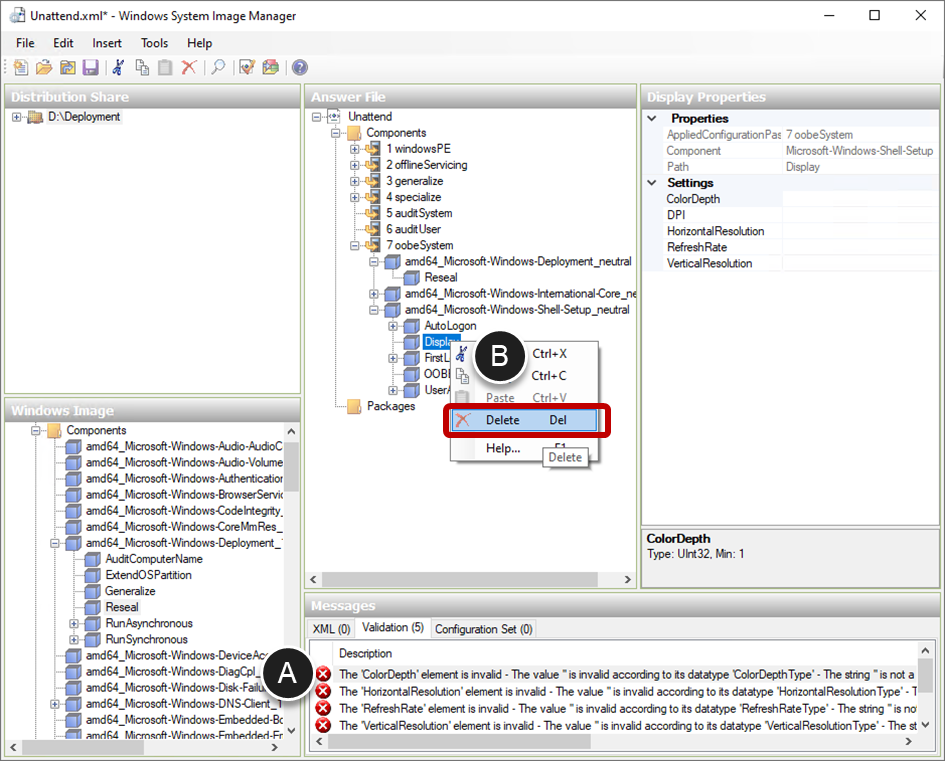
- Delete the Display section.
- In the Messages pane, double-click the first error message (The ColorDepth element is invalid).
This will take you to 7 oobeSystem > amd64_Microsoft-Windows-Shell-Setup_neutral > Display in the Answer File pane. - Right-click Display and select Delete.
- Confirm deletion by clicking Yes.
- In the Messages pane, double-click the first error message (The ColorDepth element is invalid).
- For a Windows Server Image, there may be a second section (SystemRestore) that needs deletion.
- Check in the Messages pane to see if there is an error (SystemRestore). If present, double-click on this error message.
- Right-click SystemRestore in the Answer File pane and select Delete.
- Confirm deletion by clicking Yes.
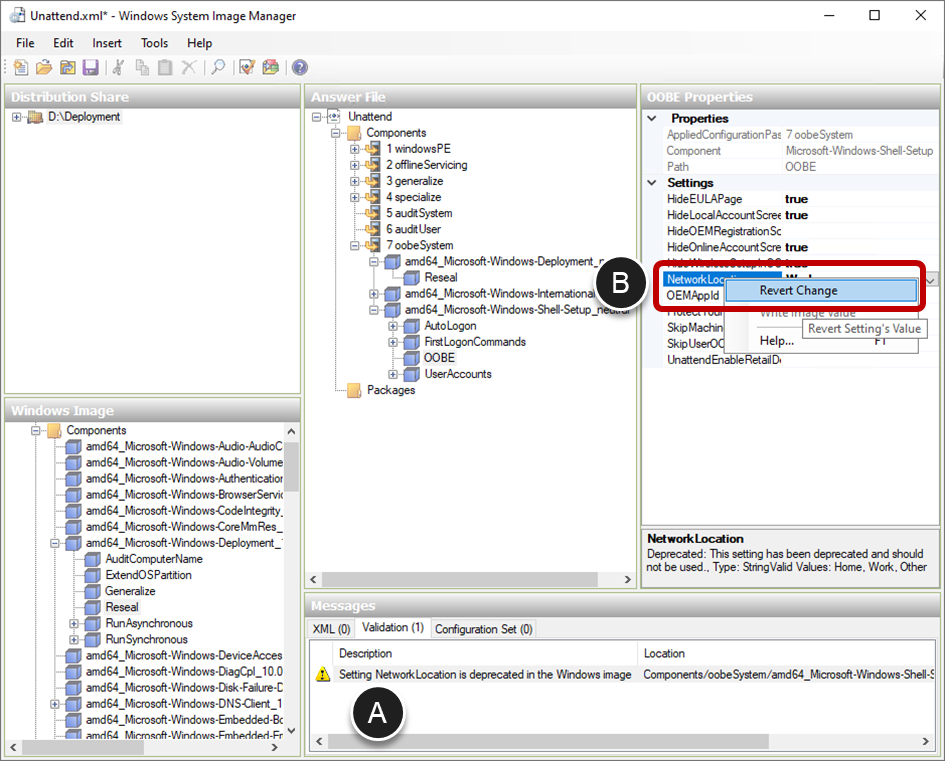
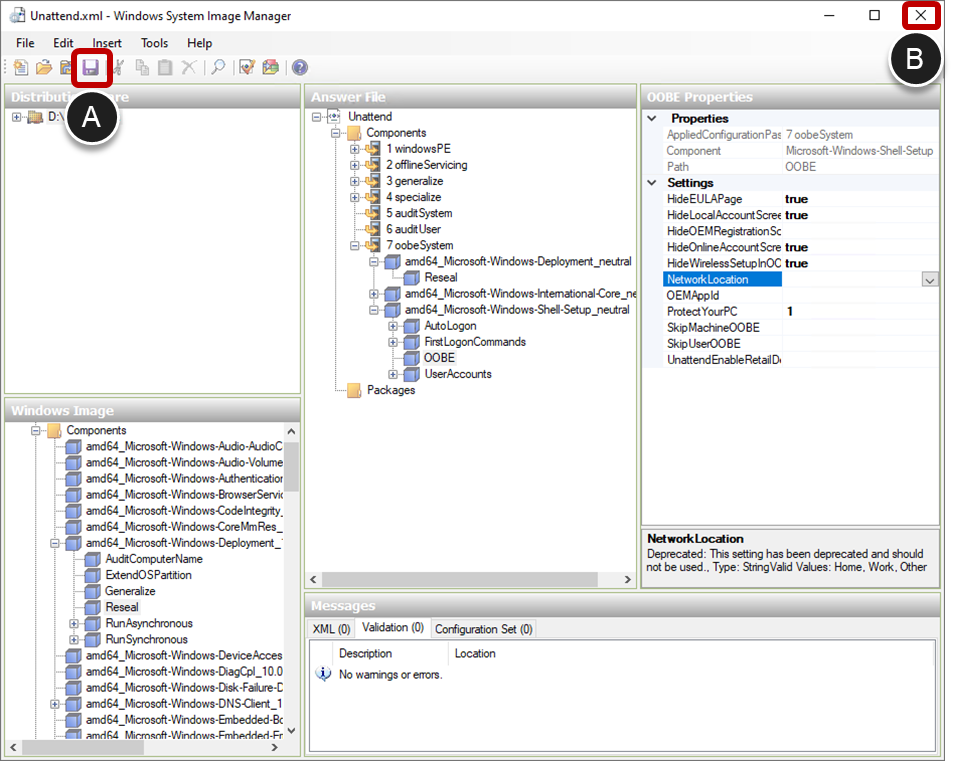
- Revert change for Network Location.
- Double click the Setting NetworkLocation is deprecated warning in the Messages pane.
- Right-click NetworkLocation and select Revert Change.
- Click the Save Answer File button (A) and close the Windows System Image Manager (B).
- Click OK to close the task sequence.
Create and Deploy VMs
Now that you have a functioning deployment server and a completed task sequence, you are ready to use the sequence to build Windows images. You now need to create suitable target virtual machines that will power on, network-boot using Windows Deployment Services, and then run the MDT task sequence.
You could prepare the virtual machines manually:
- Create an empty virtual machine (VM) following Create a vSphere-Based Virtual Machine.
- Add that virtual machine (computer) to the MDT database and indicate which task sequence to use.
You could also rebuild images using existing virtual machines:
- Edit the settings of a virtual machine.
- Delete any snapshots, delete the current hard disk, and add a new blank hard disk.
But this guide is about automating the process of creating Windows images. The process below uses a PowerShell script to assist you in those steps and the preparation of target virtual machines.
PowerShell Scripts to Create Target VMs
To assist in creating and working with virtual machines, two PowerShell scripts have been provided. These require VMware PowerCLI.
The CreateResetVM.ps1 script:
- Provides a GUI that allows selection of VMs from a list in a comma-separated file that contains the VM names and specifications.
- Creates new VMs that use the given specification.
- Resets existing VMs.
- Any snapshots are deleted,
- The existing hard disk is deleted, and a new hard disk is added to the VM.
- You can optionally add new VMs to the MDT database, specifying a task sequence for MDT to use.
- Optionally powers on the VM after it is created or reset.
- Opens a vSphere remote console to the VM.
The ExportVMtoOVA.ps1 script:
- Provides a GUI that allows selection of VMs from a list in a comma-separated file that contains the VM names.
- Assists with exporting VMs to OVA (open virtualization appliance) files.
Note: You can also choose to manually create VMs and add them to the MDT database.
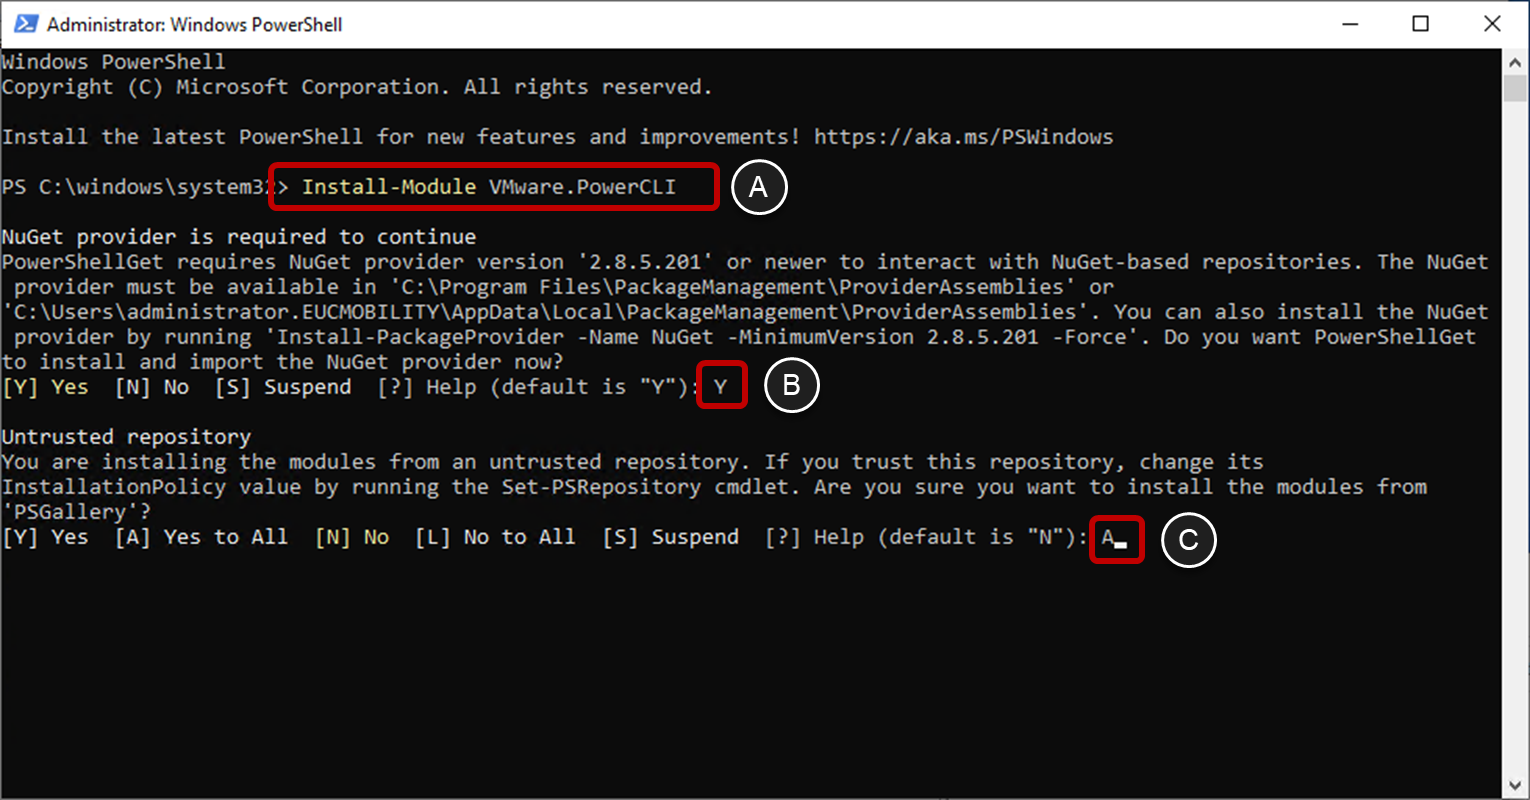
Install VMware PowerCLI
- Start a PowerShell Console as an Administrator:
- Run
Install-Module VMware.PowerCLI. - Type Y and press enter, to update the NuGet provider.
- Type A and press enter, to install PowerCLI.
- Run
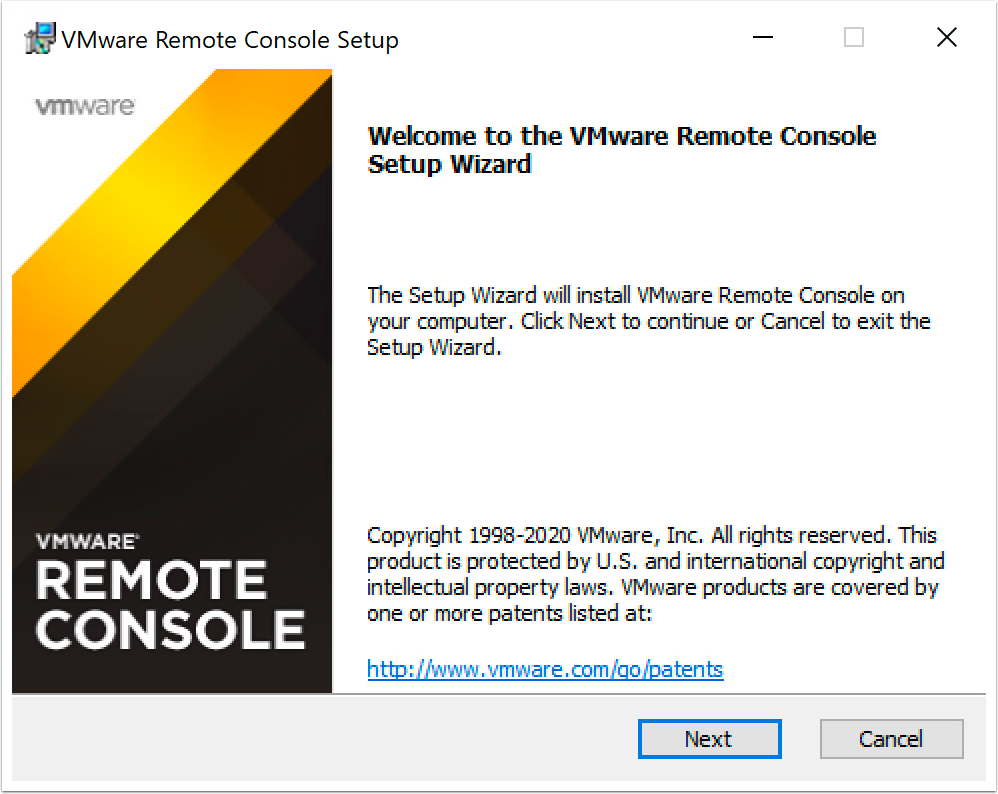
Install the VMware Remote Console
You can download the latest version of the VMware Remote Console from the VMware Downloads website under VMware vSphere, Drivers & Tools. You must have a profile at customerconnect.vmware.com to download the VMRC installer.
- Download, extract, and run the VMware Remote Console Installer.
- Click Next on the Welcome page.
- Accept the License agreement and click Next.
- Click Next to confirm the installation destination directory.
- Click Next on the User Experience settings page.
- Click Install.
- Click Finish to exit the wizard.
Create VMs with the PowerShell Script
You will use the Create or Reset VMs script with the Microsoft Deployment Toolkit (MDT) to automate the creation of VMs that then PXE-boot and follow the MDT task sequence you created in a previous exercise. MDT can then use the Windows OS Optimization Tool for Horizon and the MDT plug-in to automate the installation of the agents and the optimization of Windows.
- Download the Create-or-Reset-VMs-main.zip script and extract it.
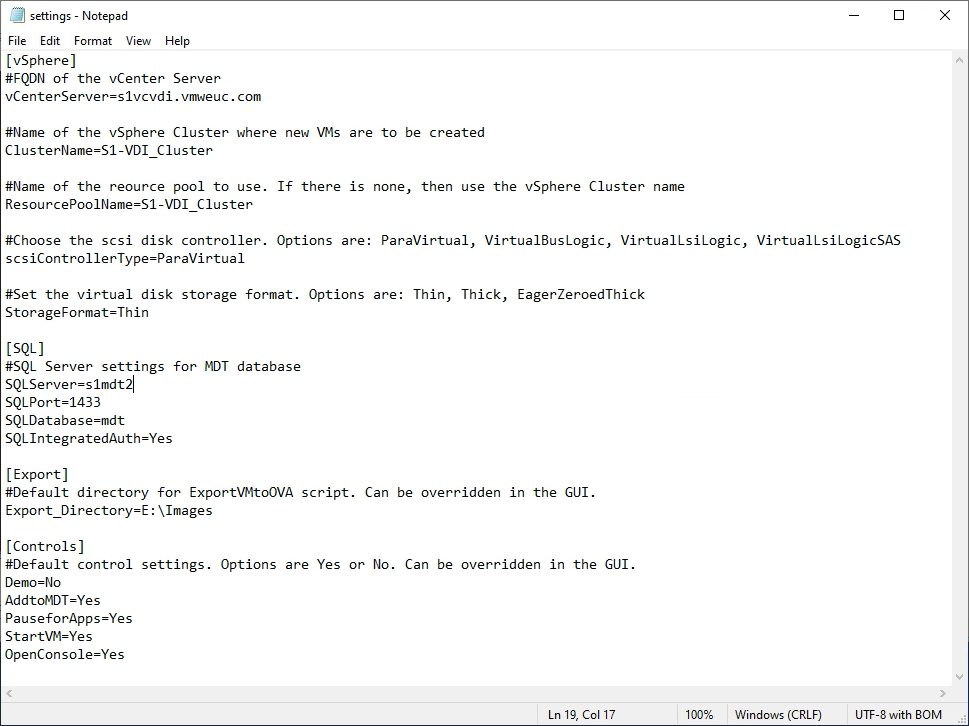
- Edit the
settings.inifile and make the following changes:
- Change the FQDN of the vCenter Server.
- Change the name of the vSphere cluster.
- Change the resource pool name.
- Change the SQL Server name to match the MDT deployment server name.
- Review and amend other settings and the control defaults as required.
- Edit the
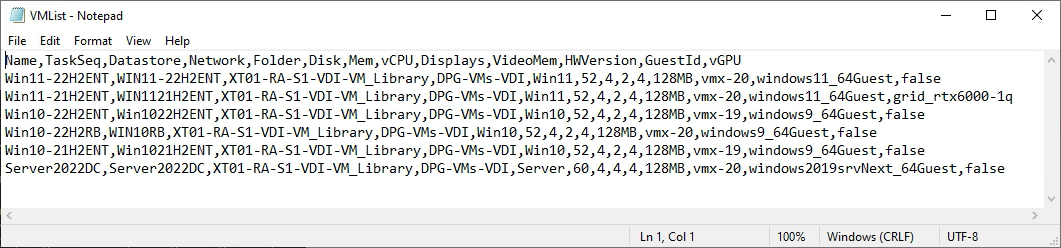
VMList.csvto amend the list of VMs as necessary.
This is a comma-delimited file with one VM per row. Fields are:
- Name is the name of the VM.
- TaskSeq is the name of the MDT task sequence.
- Datastore is the name of the vSphere datastore.
- Network is the name of the vSphere network to attach the VM to.
- Folder is the name of the vSphere VM and template folder to place the VM in.
- Disk is the amount of diskspace of the VM disk, in GB.
- Mem is the amount of memory of the VM, in GB.
- vCPU is the number of virtual CPUs in the VM.
- Displays is the number of monitors the VM will support.
- VideoMem is the amount of video memory for the VM, in GB.
- HWVersion is the virtual machine hardware version.
- GuestId identifies the Windows version. Windows11_64Guest for Windows 11, Windows9_64Guest for Windows 10, Windows2019srvNext_64Guest for Windows Server 2022, Windows2019srv_64Guest for Windows Server 2019.
Note: HWVersion 15 and earlier do not have Windows2019srv_64Guest. Use windows9Server64Guest (Windows Server 2016) for Windows Server 2019 if using HWVersion 15 and earlier. - vGPU is the vGPU profile to use for this VM. If vGPU is not used with a VM, enter false.
- To run the
CreateResetVM.ps1script, open a PowerShell prompt and run this script with or without parameters, as shown in the accompanying README file.
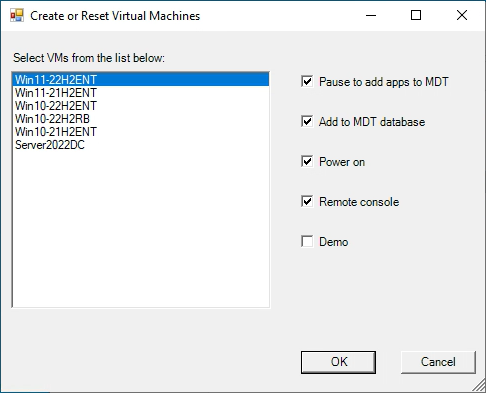
Note: You may need to change the execution policy for PowerShell to allow it to run an unsigned script. To do this, open an Administrator PowerShell prompt and runSet-ExecutionPolicy Unrestricted. - Complete the Create or Reset Virtual Machines dialog box.
- Select the VMs that you want to either create or reset. The list of VMs is read from the
vmlist.csvfile. Multiple VMs can be selected using the Shift or Control keys. - Select Pause to add apps to MDT if the VMs are being created for the first time and applications or roles need to be set before deployment. You can add these in the MDT Console.
- Select Add to MDT database to add the VMs to the MDT database when a machine with the MAC address of the VM does not already exist in the MDT database.
- Select Power on to start the VM after creation.
- Select Remote console to launch a VMware Remote Console window to show progress.
- Click OK.
- Provide credentials for vCenter Server, if prompted, and click OK.
If you do not specify the username and password for vCenter Server in the parameters when running the script, you will be prompted to authenticate.
Note: If Add to MDT database was selected you might also be prompted to authenticate to the SQL Server instance. This depends on whether integrated authentication is being used or if you specified the SQL username and password as parameters. The default SQL user account is sa with a password of sa_Passw0rd - During deployment, if prompted, select which task sequence to use.
Once the VM powers on, it will PXE boot. Whether you are prompted to select a task sequence depends on whether the MDT server has a computer entry in its database with a matching MAC address:
- If the MDT server does have an entry with a matching MAC address, it will run the configured MDT task sequence. This will install Windows, applications, VMware Tools, the various Horizon agents, and run the Windows OS Optimization Tool for Horizon.
- If the MDT server does not have a computer entry or cannot match a task sequence, you will be prompted to select which task sequence to use.
- Wait while the image is built. Depending on updates, applications required, and the speed of the environment, this can take some time.
Tip: Use the remote console window to monitor progress of the build.
When complete, the virtual machine should shut down. - (Optional) If you want to export the VM to an OVA file, once the Windows image has been completely built by MDT, you can export using the Export VMs to OVA script.
Add Additional Configurations
The MDT Environment Automation tool assists in the import of installation files for an initial OS version and assists in the creation of one task sequence. You may want to import different OS versions and create additional task sequences for different image builds. You can also add applications to MDT and assign these machines so that they are installed during image build.
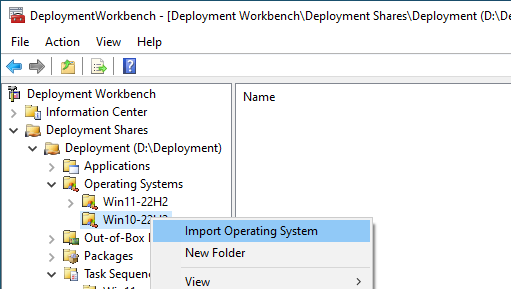
Add Additional Operating Systems
After you use the MDT Environment Automation tool to import installation files for your first OS version, you can import other OS versions manually using the MDT console. The following procedure shows how to use the Import Operating System wizard in the MDT Deployment Workbench to import Windows OS source files from an ISO image to a directory on the deployment share.
Before you complete this procedure, you need to download an ISO file that contains a supported version of the Windows operating system. For a list of the operating systems we tested, see Tested Operating Systems in the document Manually Creating Optimized Images for VMware Horizon VMs. For a complete list of supported Windows 10 operating systems, see the VMware knowledgebase article Supported versions of Windows 10 on Horizon Agent Including All VDI Clones (Full Clones, Instant Clones, and Linked Clones on Horizon 7) (2149393).
Important: Use an OS version that has a Microsoft Windows volume license key using the Key Management Service (KMS). KMS treats each activated clone as a computer with a newly issued license. In a production environment, you must activate Windows. In an evaluation environment, you can create the VM and log in without activating Windows.
- To mount the OS image, double-click the Windows installation ISO file that you downloaded from Microsoft.
- Start the Import Operating System wizard.
- Open the Deployment Workbench, and under the correct deployment share, right-click Operating Systems. You can optionally create folders to organize the different OS versions.
- Select Import Operating System.
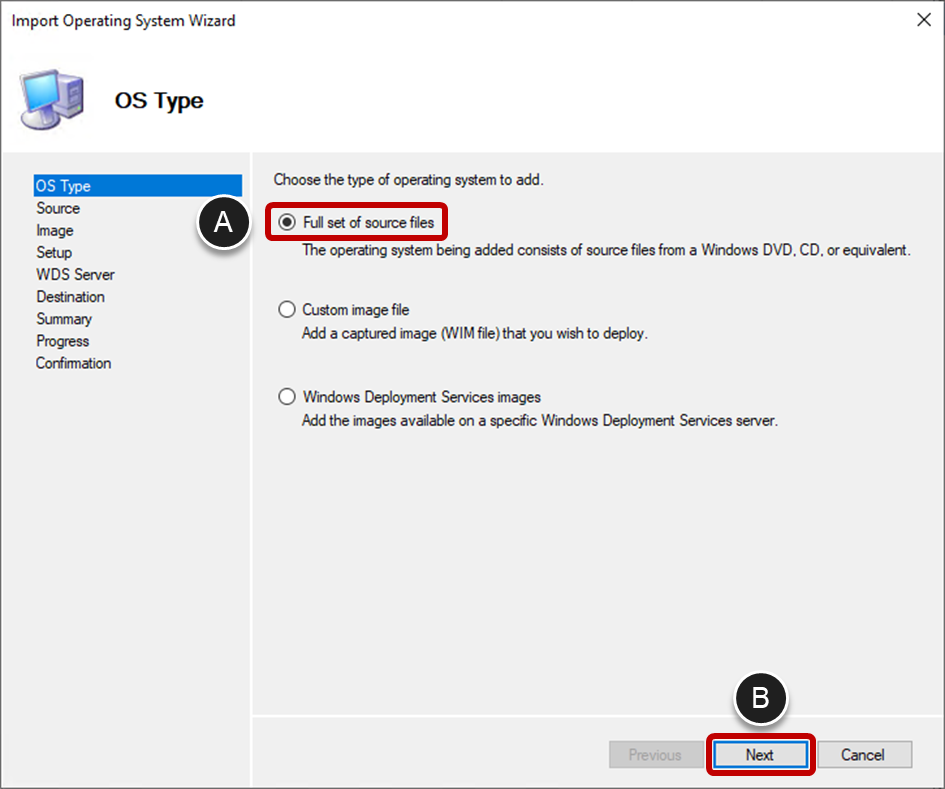
- On the OS Type page, select Full set of source files (A) and click Next (B).
- Select the source files on the ISO by clicking Browse (A) and navigate to the drive (B) where the ISO is mounted, select it, and click OK and then click Next (C).
- Provide a name for the directory that will be created on the deployment share to store the OS files (A) and click Next (B).
- Click Next to begin the import process.
- Click Finish to exit the wizard.
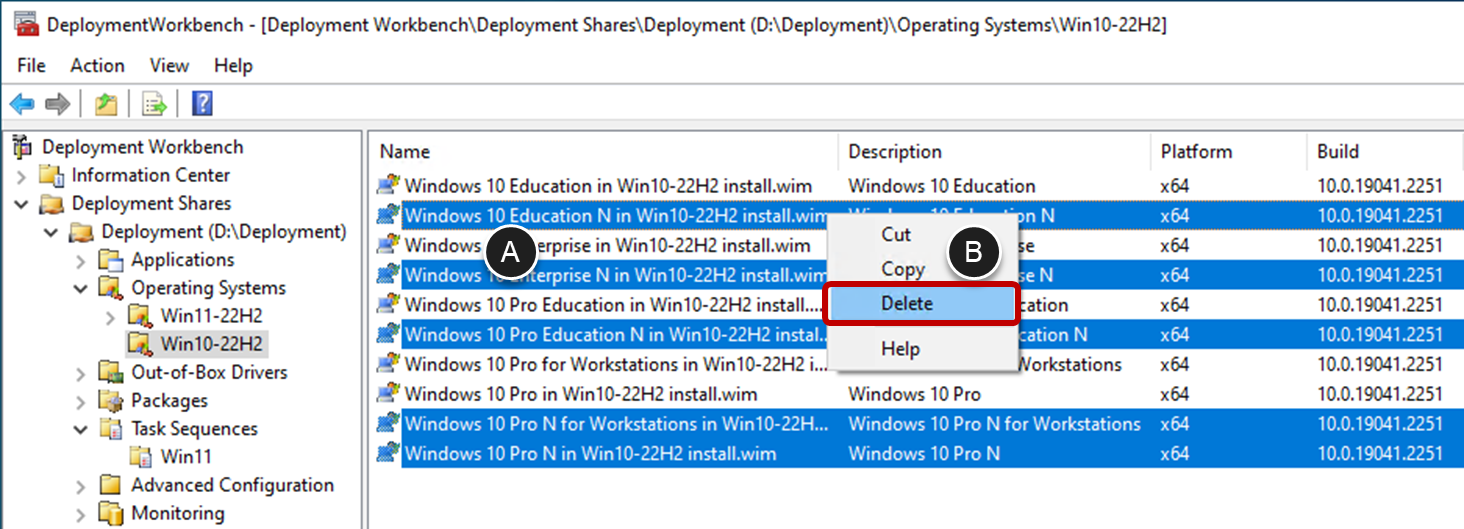
- Delete OS editions you do plan not to use.
- Use CTRL-click to select all editions that will not be used.
- Right-click one of the selected entries and select Delete.
- Click Next on the Options page, and then Next again to start the deletion,
- Once the OS entries have been deleted, click Finish.
Create a New Task Sequence
To create new, additional task sequences, use the MDT Console and the OSOT MDT task sequence template that is installed by the MDT Environment Automation tool.
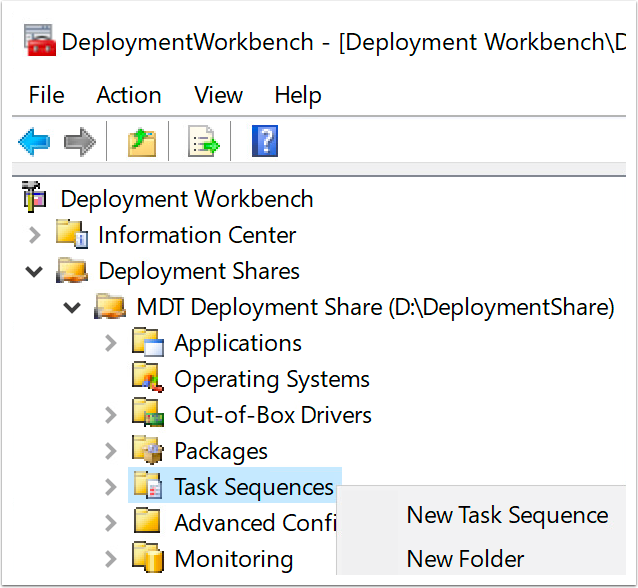
- To start the wizard, in the Deployment Workbench, under the correct deployment share, right-click Task Sequence and select New Task Sequence.
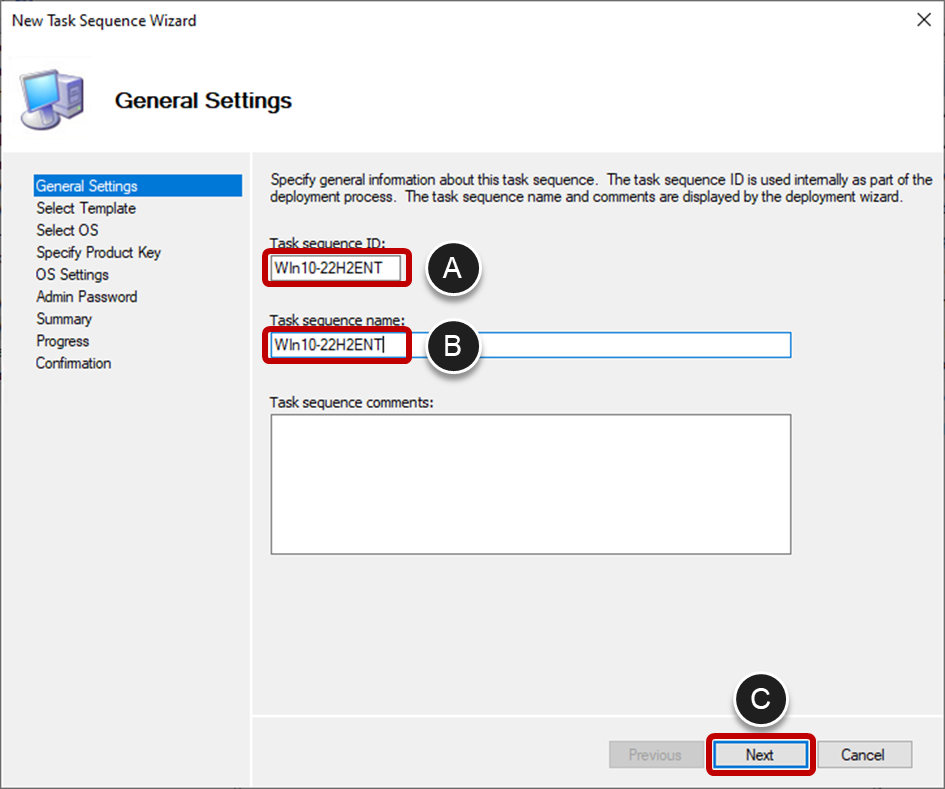
- Complete the General Settings page by providing a Task sequence ID (A), a Task sequence name (B), and click Next (C).
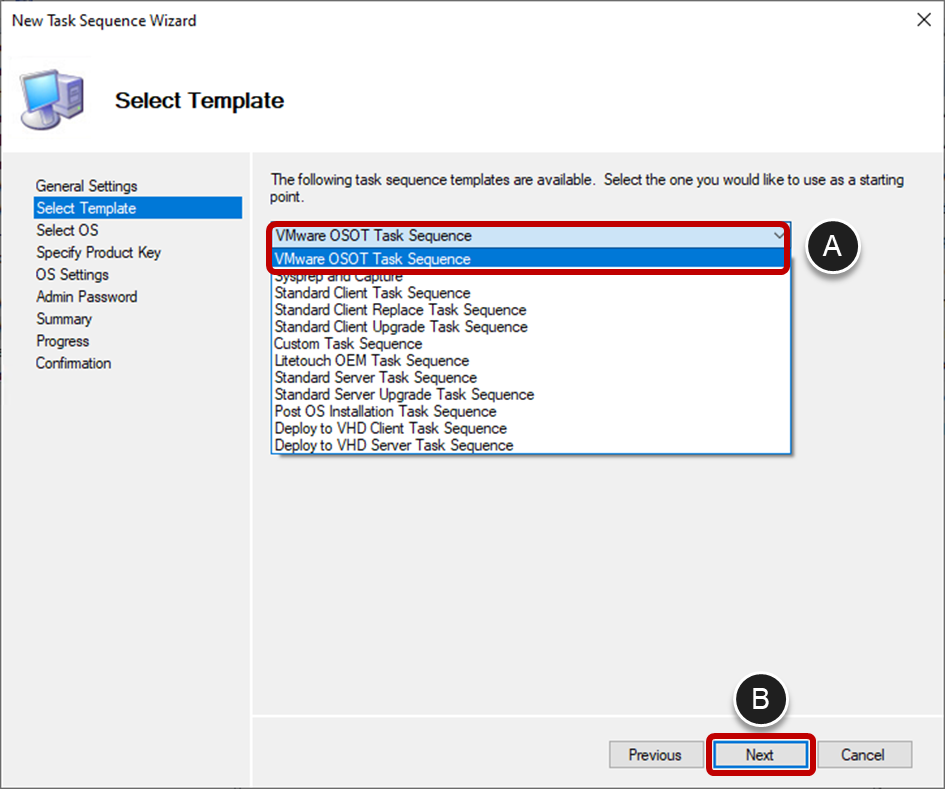
- Select the VMware OSOT Task Sequence template (A) and click Next (B).
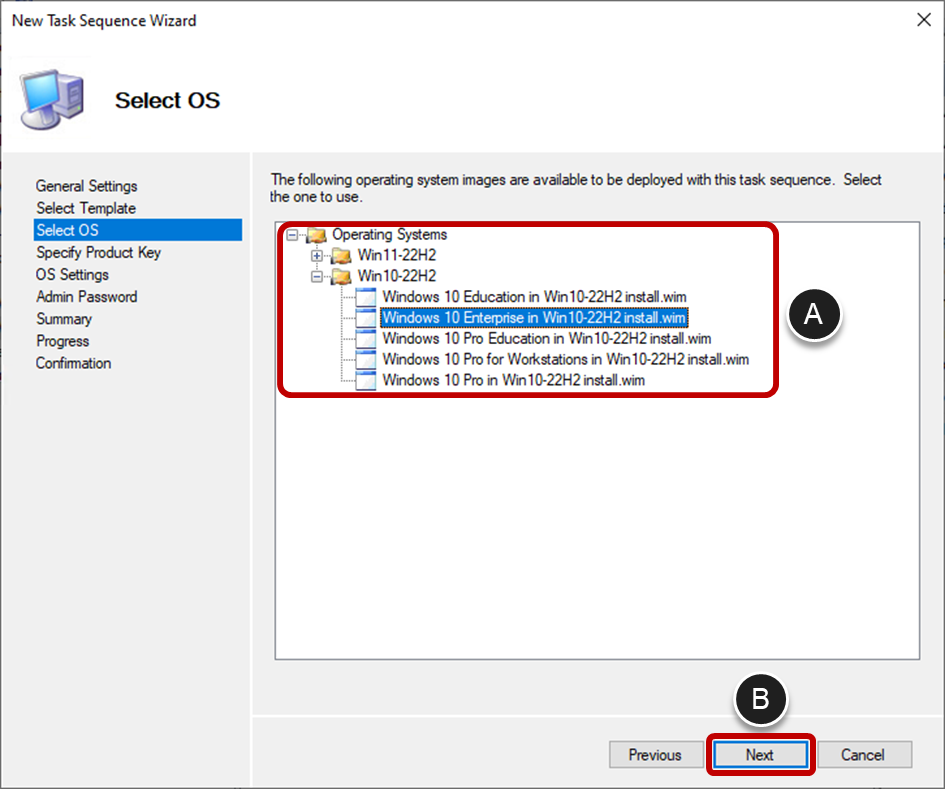
- On the Select OS page, browse to and select the desired operating system version and edition (A) and click Next (B).
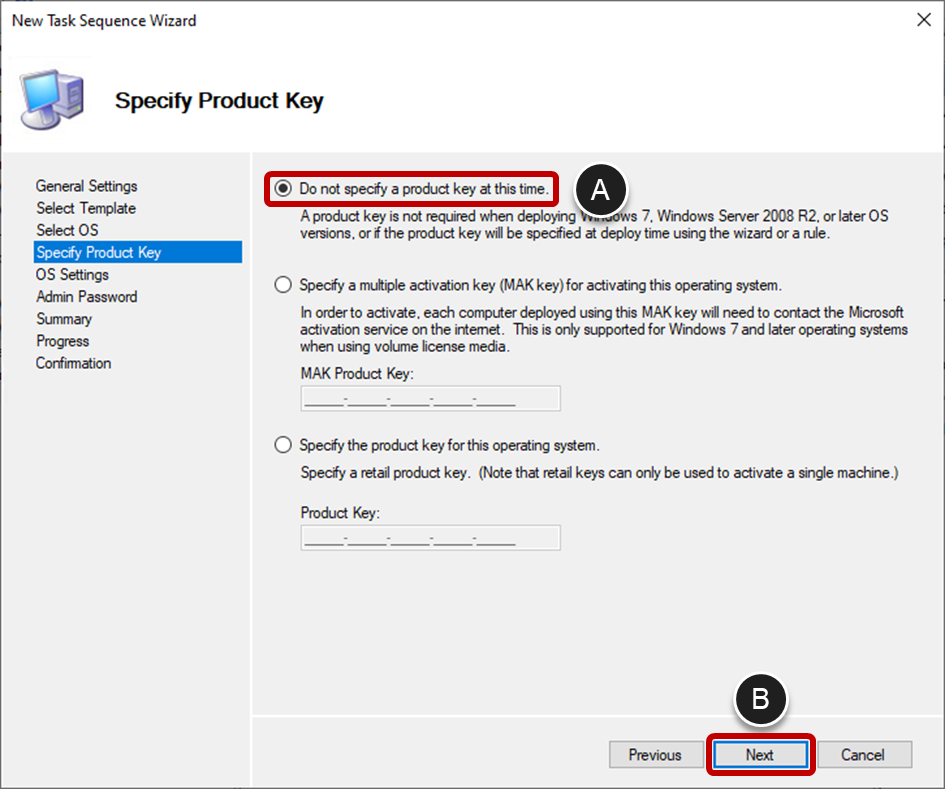
- On the Specify Product Key, select Do not specify a product key at this time (A) and click Next (B).
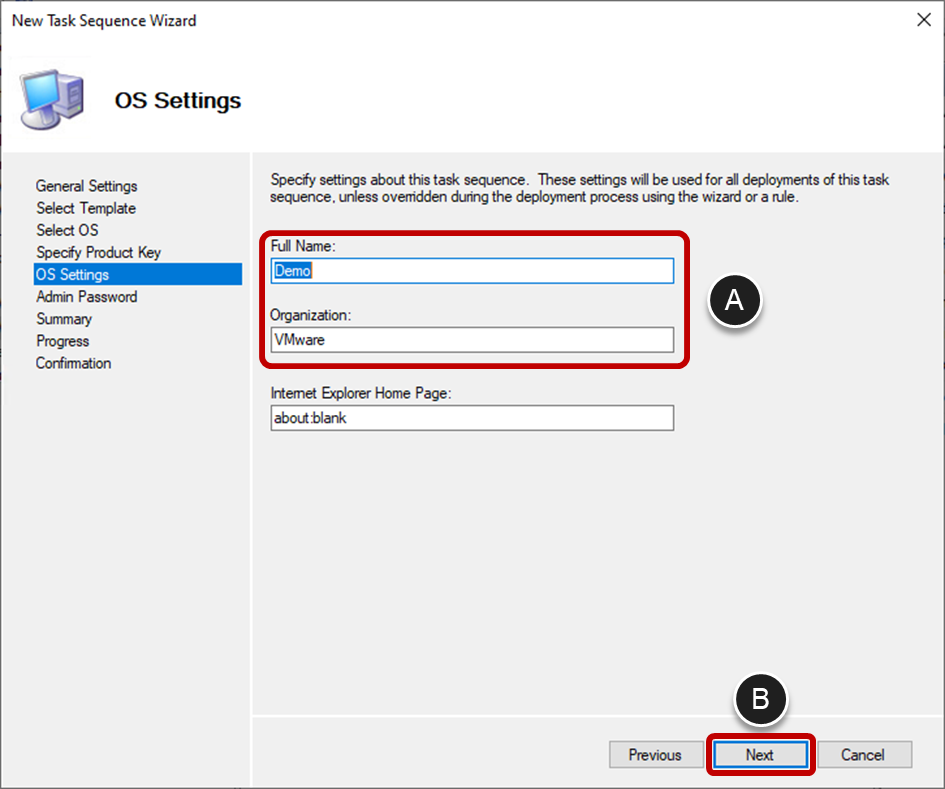
- On the OS Settings page, specify a name and organization (A) and click Next (B).
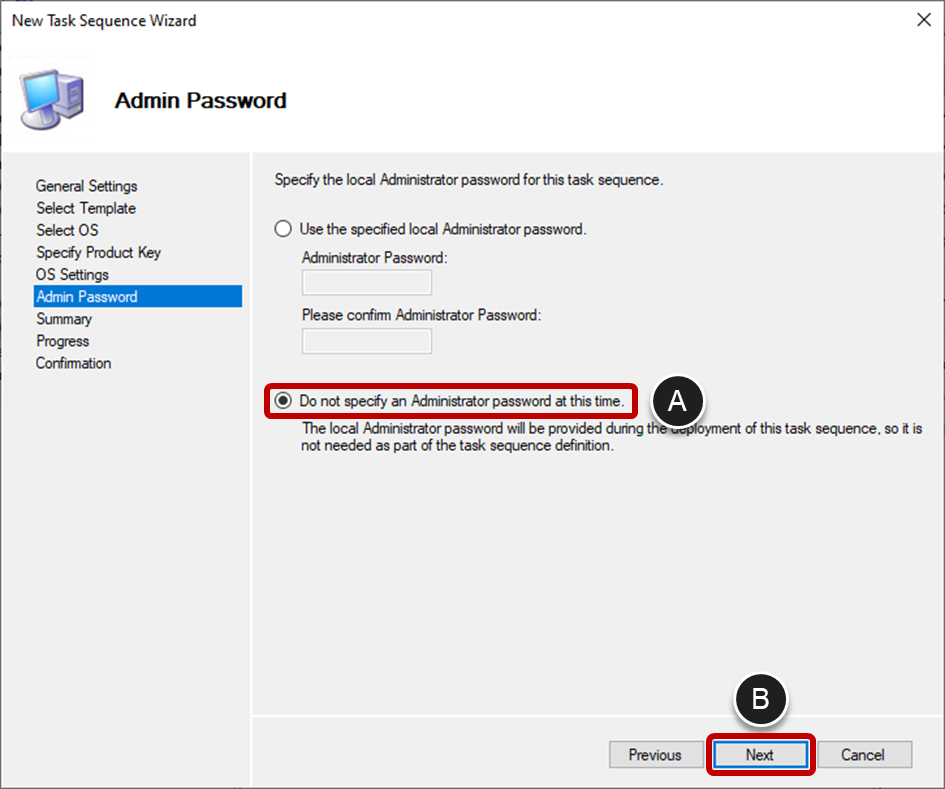
- On the Admin Password page, select Do not specify an administrator password (A) and click Next (B).
- Click Next to create the task sequence.
- Click Finish to exit the wizard.
- Confirm agent versions and customize the behavior of the task sequence by completing the steps in Complete the Task Sequence Configuration and Edit an Existing Task Sequence.
Add Applications to Microsoft Deployment Tool
In this procedure, you download application source files and then use the New Application wizard in MDT Deployment Workbench to import those application source files to a directory on the deployment share.
As an example, we use Microsoft Office 2019, but the same principle applies for any application that goes into the golden image.
- Download and run the Microsoft Office Deployment Tool.
- Accept the License agreement and click Continue.
- Specify a folder to store Office files, as follows:
- In the Browse For Folder dialog box, select a folder and click Make New Folder.
- Enter a name and click OK.
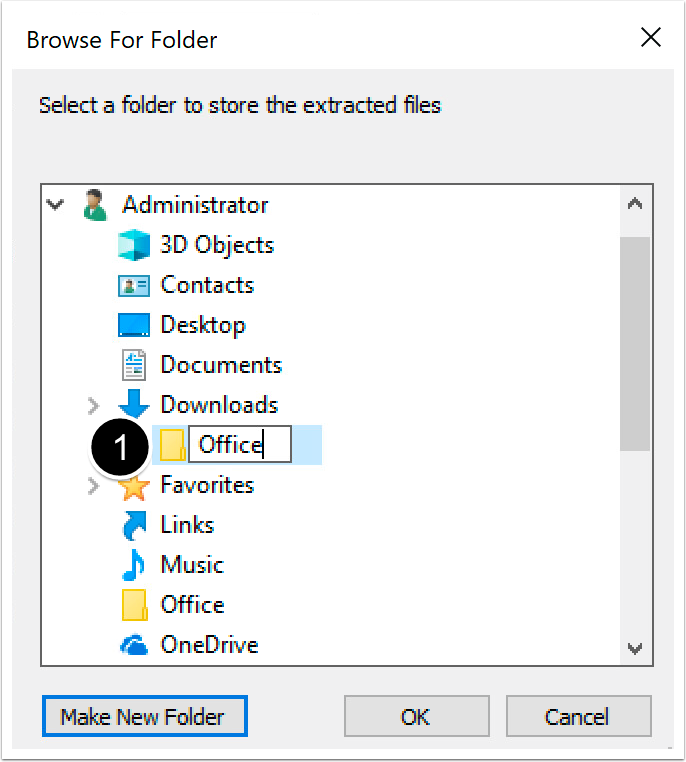
- Click OK to confirm.
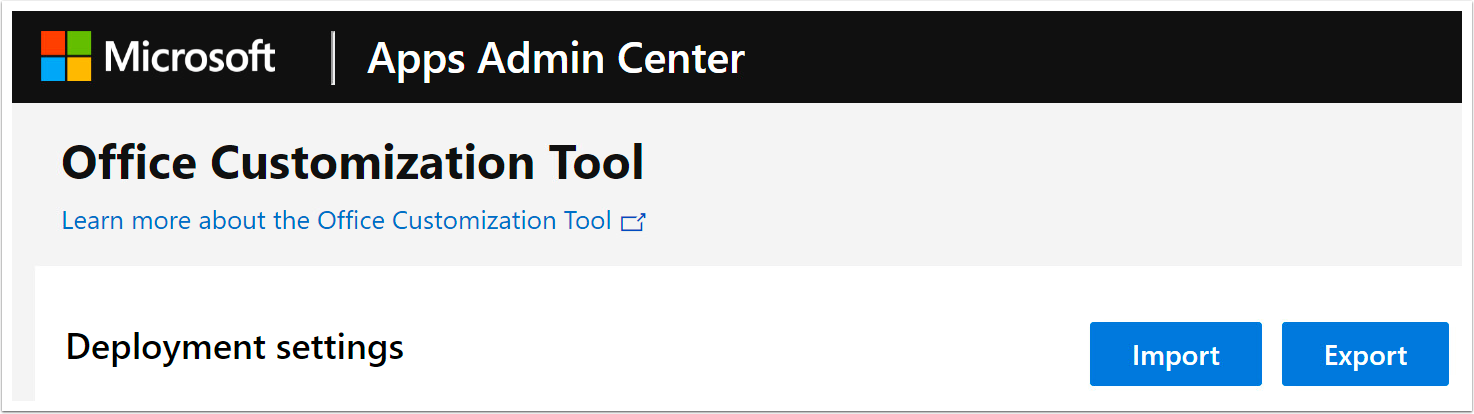
- (Optional) Create a configuration file to be used by the Office Deployment Tool.
Optionally, you can create a configuration XML file with the Office Customization Tool. This tool gives you fine-grained control over the Office installation.
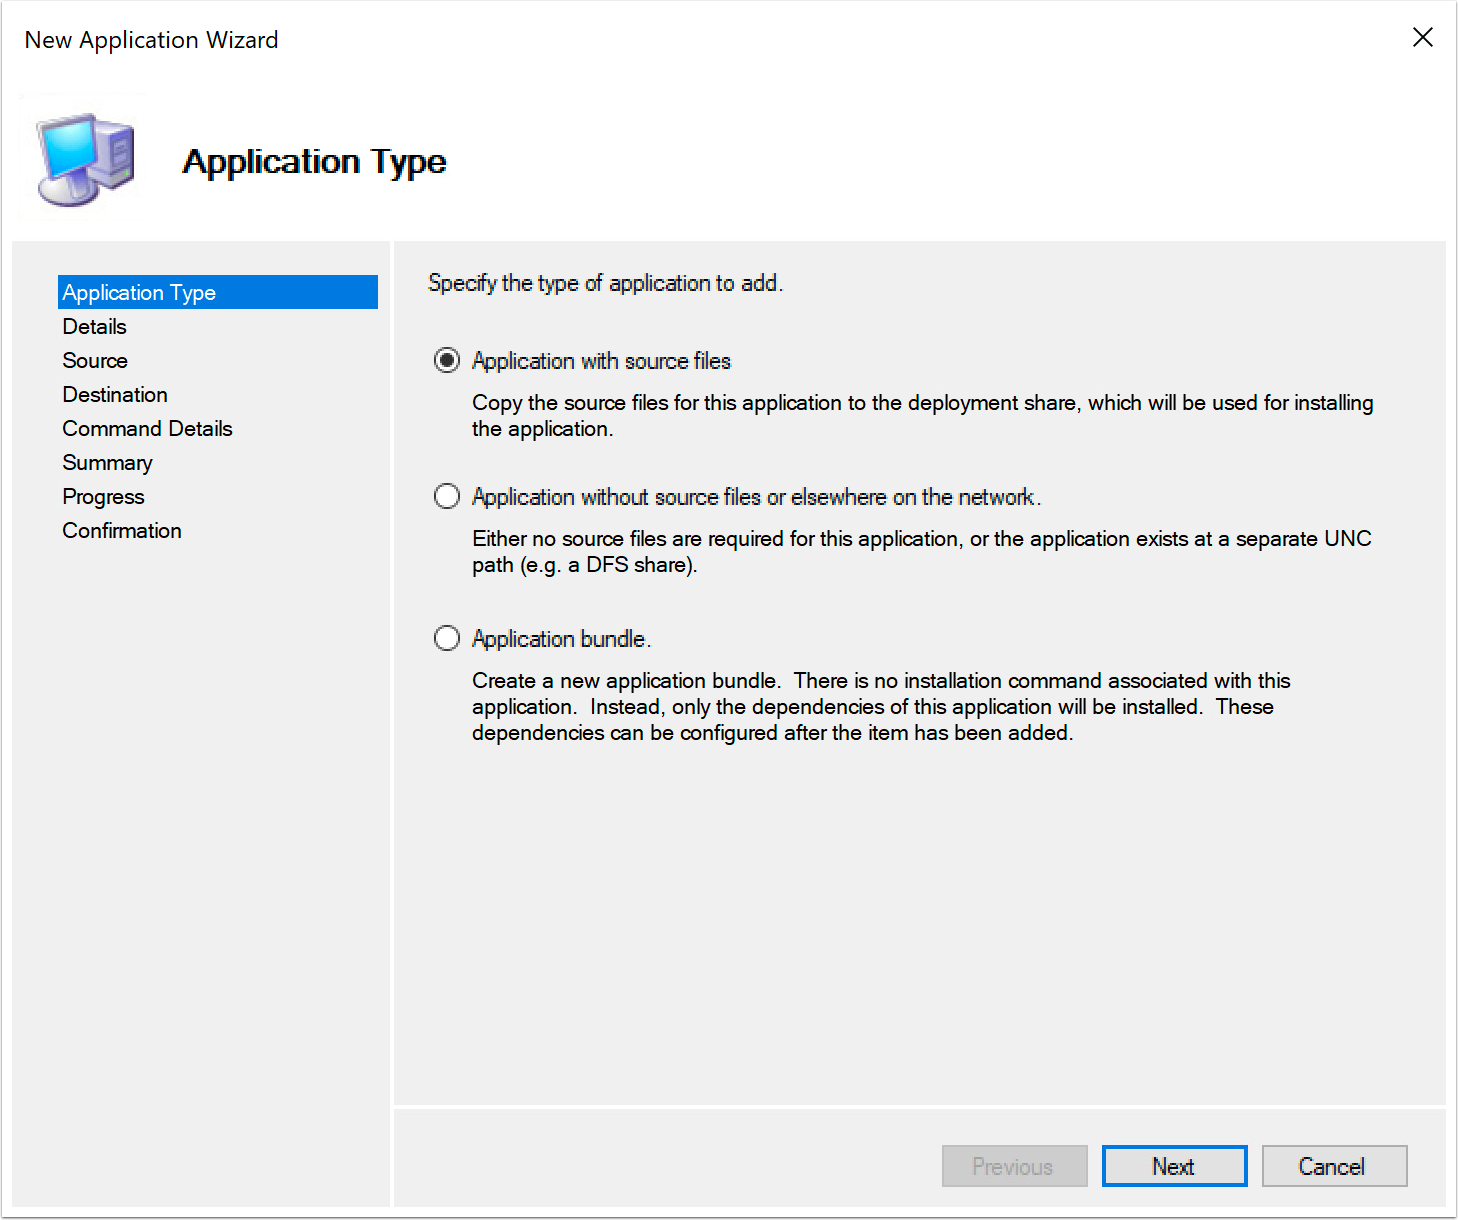
- To start the New Application wizard, in the Deployment Workbench, under the correct deployment share, right-click Applications and select New Application.
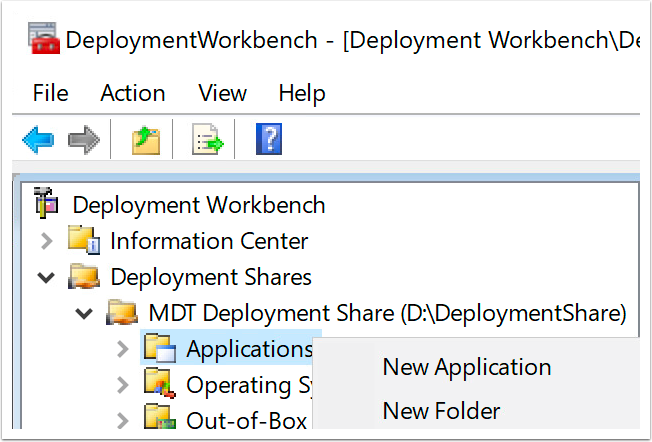
- Select Application with source files and click Next. This selection imports the application files directory into a directory located in the deployment share.
- Provide application details and click Next.
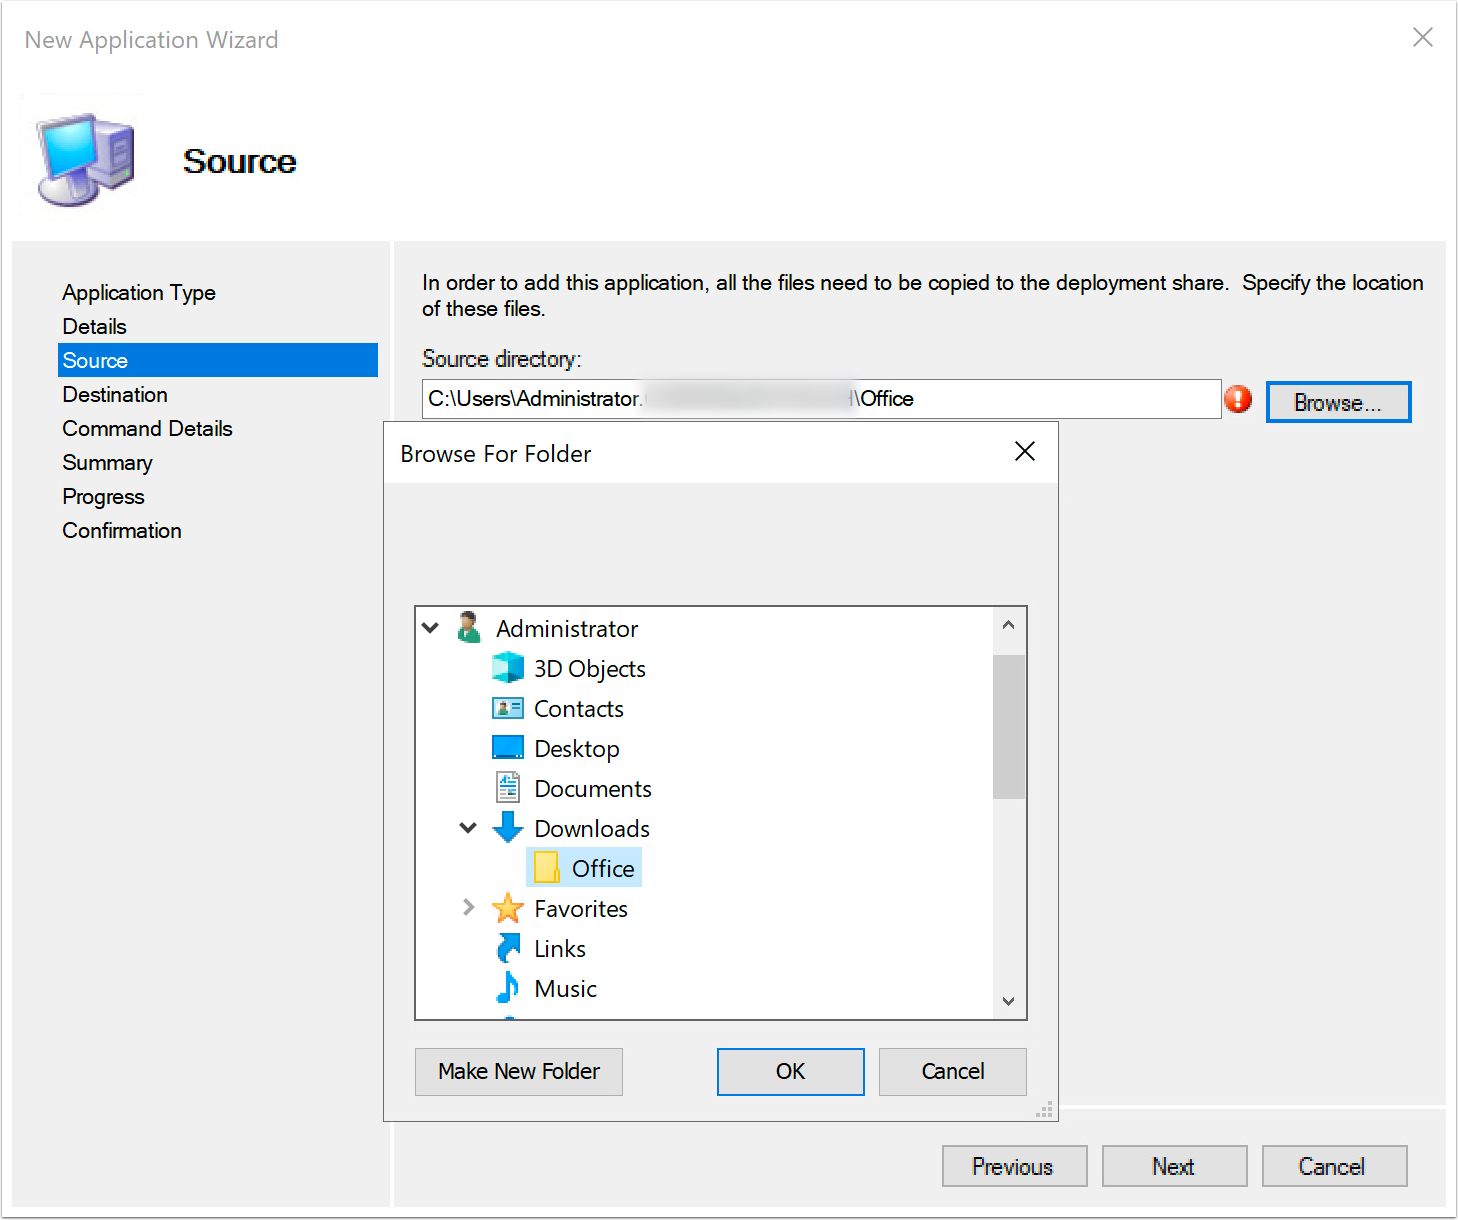
- Click Browse, browse to and select the folder with the extracted Office files, click OK, and click Next.
- Provide a name for the directory that will be created on the deployment share to store this imported application and click Next.
- Provide a command line for attended install and click Next.

- Click Next to begin the import process.
- Click Finish to exit the wizard.
Make Updates to an Image
Because you are using the Microsoft Deployment Toolkit (MDT), updates are a simple matter of copying (importing) the new version of software into the correct location on the deployment share and then running the PowerShell scripts again to create a new or updated image. You do not need to repeat most of the procedures in this guide.
For example:
- To update an application, download the new version of the source files and then use the procedure Add Applications in the Microsoft Deployment Tool to add the new files and overwrite the old files on the deployment share.
- To update the OS (feature update), download the new version and use the procedure Add Additional Operating Systems to add a new OS version.
- To update one of the agents, download the new version of the installer and use the procedure Add VMware Agents and Tools to add the new file and remove the old file on the deployment share. After you add the new file, open the agent section in the task sequence so that the installation command for the agent in the task sequence gets updated.
After you add the new version to the deployment share, run the CreateResetVM.ps1 script again, as described in the procedure Create VMs with the PowerShell Script. To simply install a Windows security patch or some other type of Windows Update patch, just run the CreateResetVM.ps1 script again. As part of the task sequence, Windows Update is run.
Manual Deployment Server Build and Configuration
To host the deployment server, create a Windows Server VM joined to an Active Directory domain, and registered in DNS.
Manual Installation of the Required Applications
The following process gives a high-level overview of the applications and features that need to be installed on the deployment server when not using the MDT Environment Automation tool,
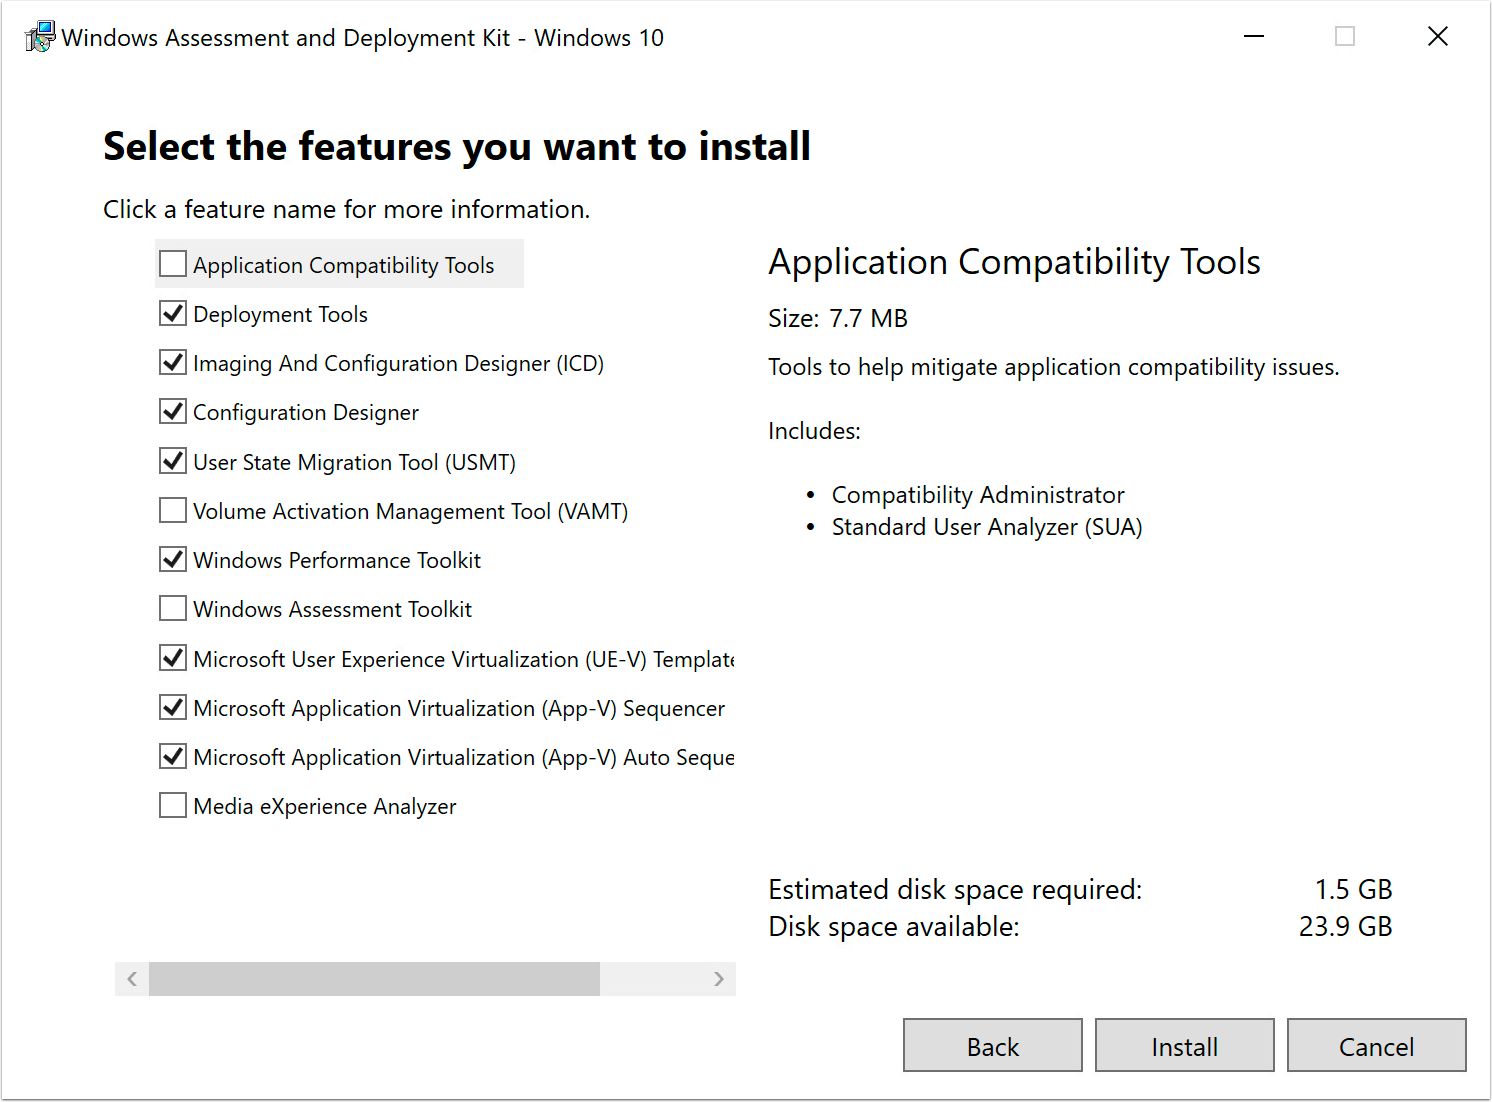
Install the Windows Assessment and Deployment Kit (ADK)
The Windows Assessment and Deployment Kit (Windows ADK) has tools for customizing Windows images for large-scale deployments. MDT uses the ADK to modify the Windows Preinstallation Environment bootable image.
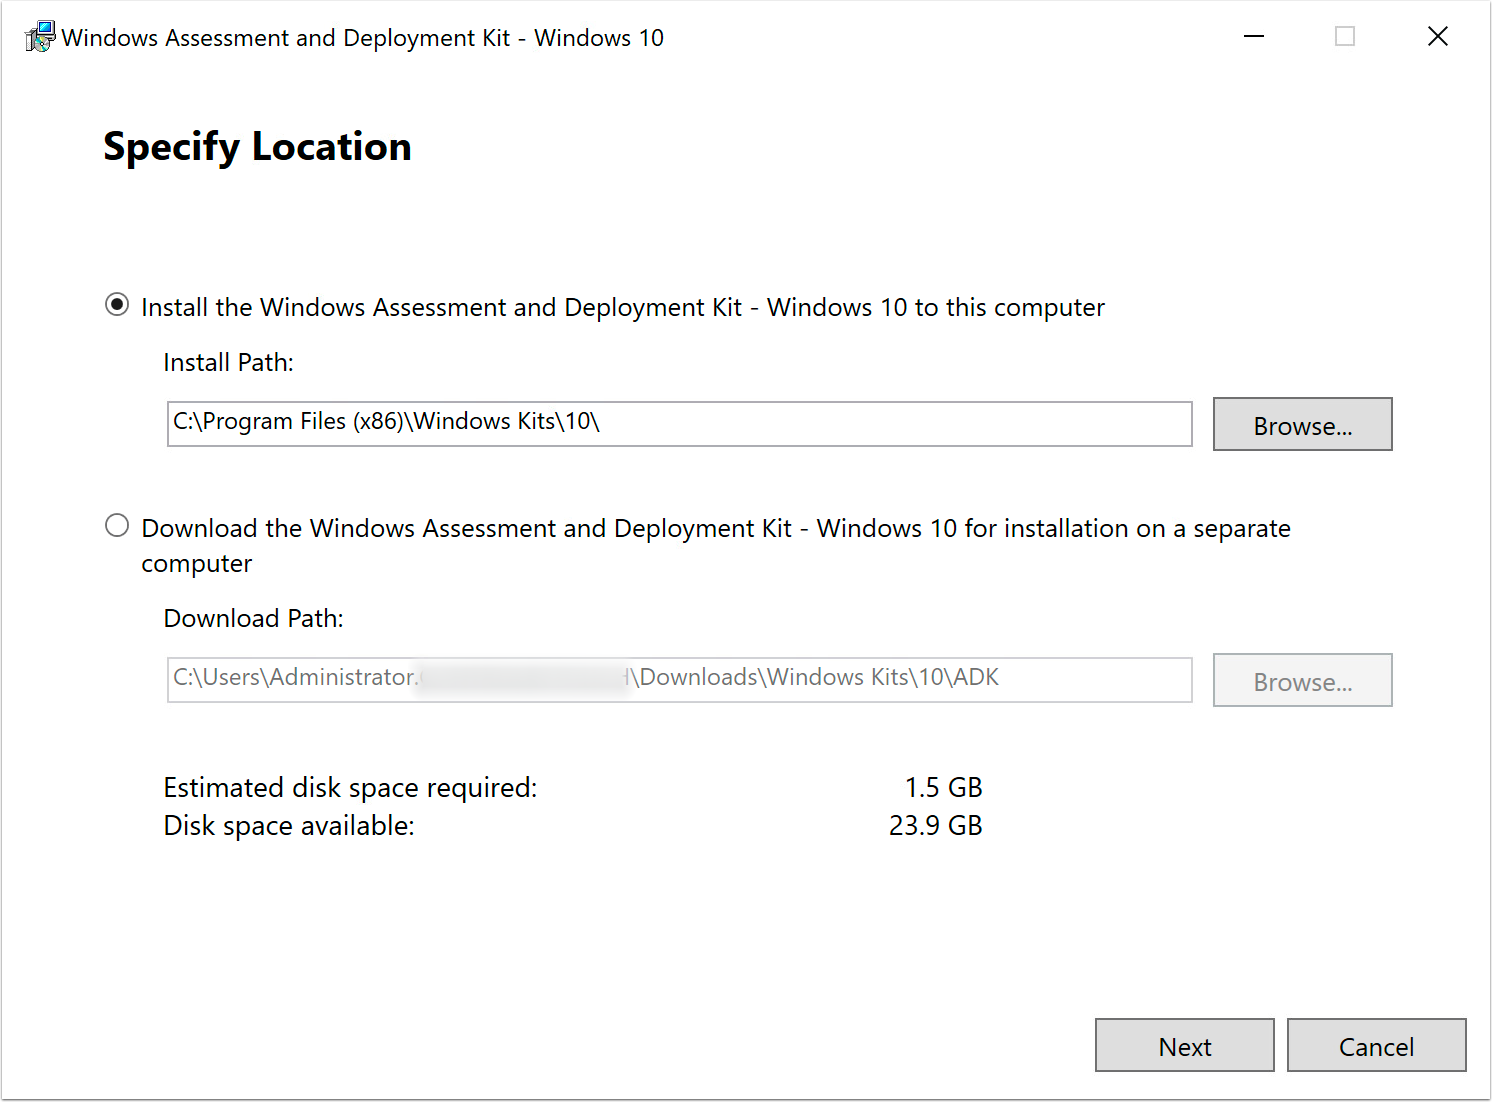
- Download and run the Windows Assessment and Deployment Kit (ADK).
- On the Specify Location page of the wizard, specify the installation path and click Next.
- On the Windows Kits Privacy page select No and click Next.
- Click Accept to accept the license agreement.
- Select features and click Install.
- Click Close to exit the wizard.
Install Microsoft SQL Server
This procedure describes installing SQL Server Express Edition, but you can also use an existing Microsoft SQL Server, or install a Standard or Enterprise version. A SQL database is used by MDT to select which machine should get which task sequence and applications.
- Download and run the SQL Server installer; for this example, download and run SQL Express.
- Select Basic to select the basic installation type.
- Click Accept to accept the license agreement.
- Specify the installation path and click Install.
- Click Close to exit the wizard and click Yes to confirm.
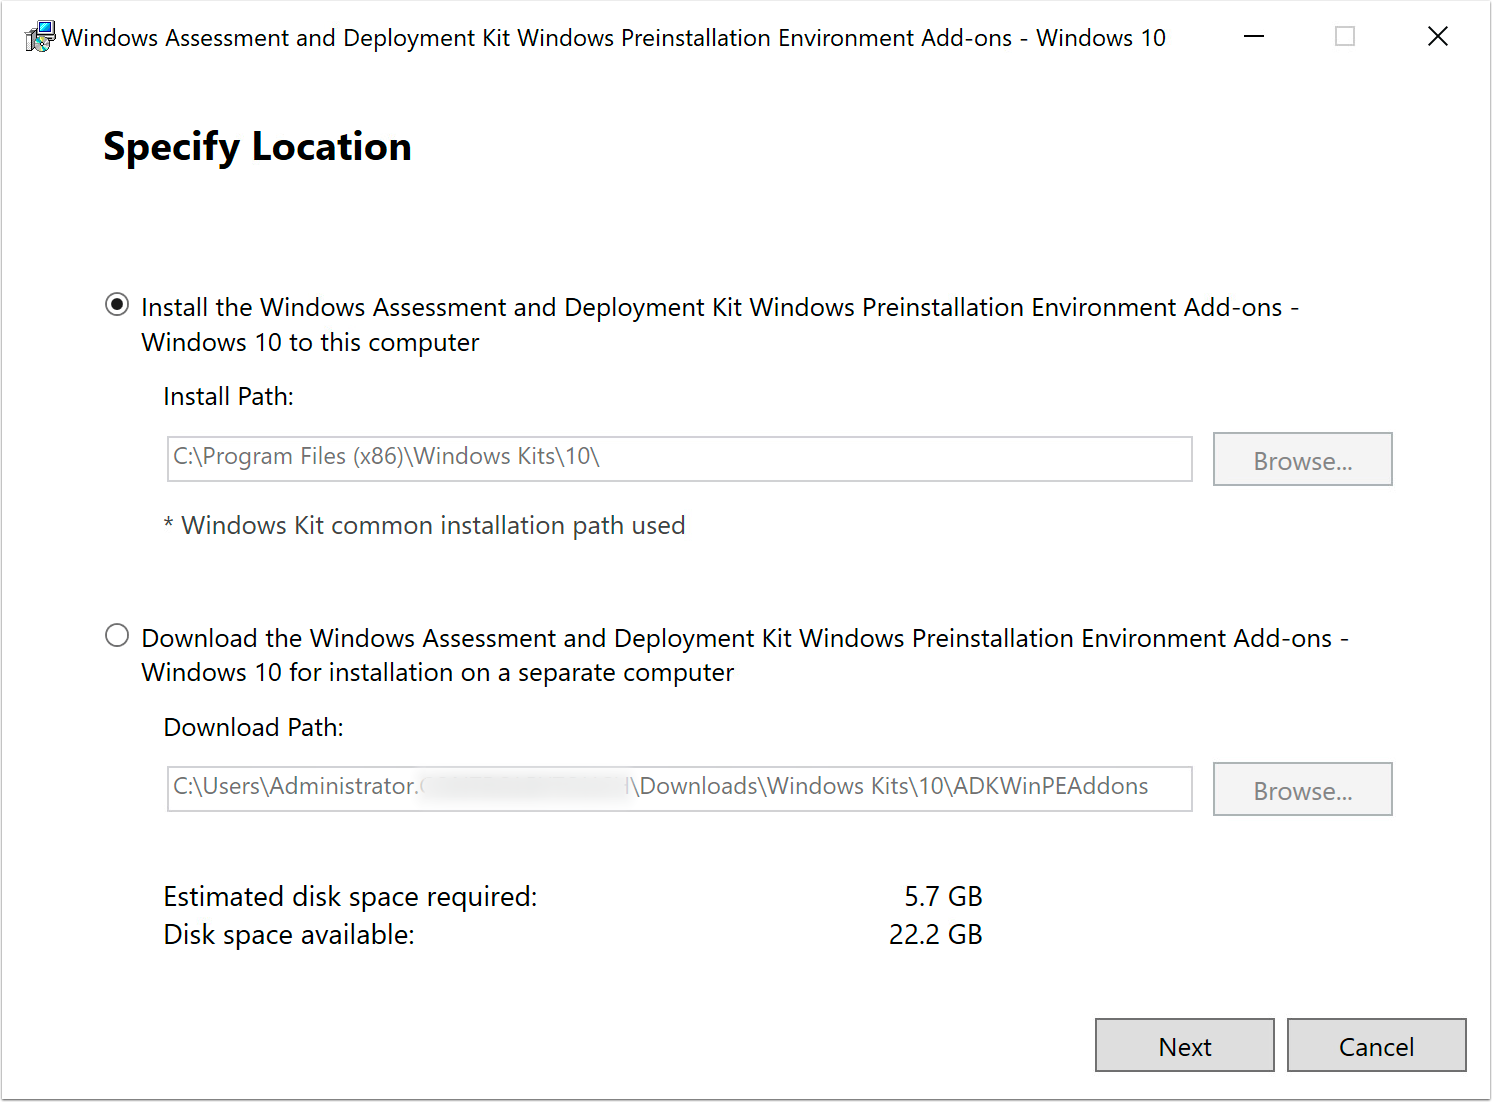
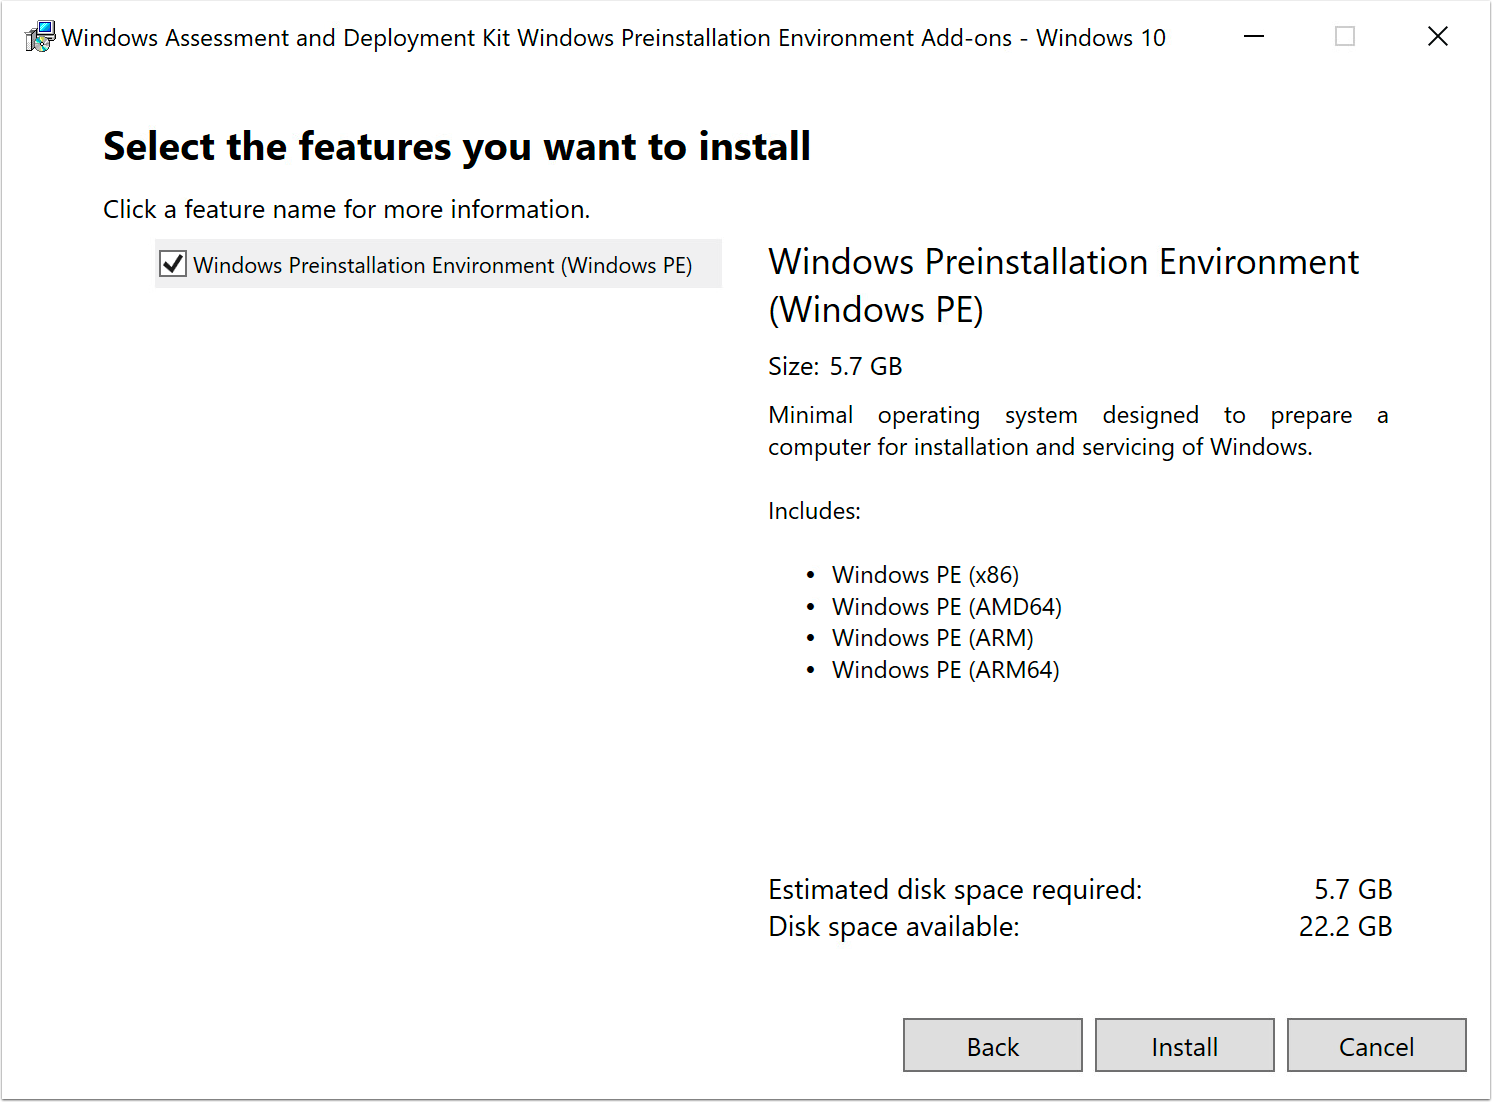
Install the Windows Preinstallation Environment (PE) ADK Add-On
Windows PE is a small operating system used to install, deploy, and repair Windows. It is used by MDT to create a bootable image to set up Windows.
- Download and run the Windows preinstallation environment (PE) ADK add-on.
- Specify the installation path and click Next.
- Click Next to complete the Privacy page.
- Accept the license agreement.
- Select features and click Install.
- Click Close to exit the wizard.
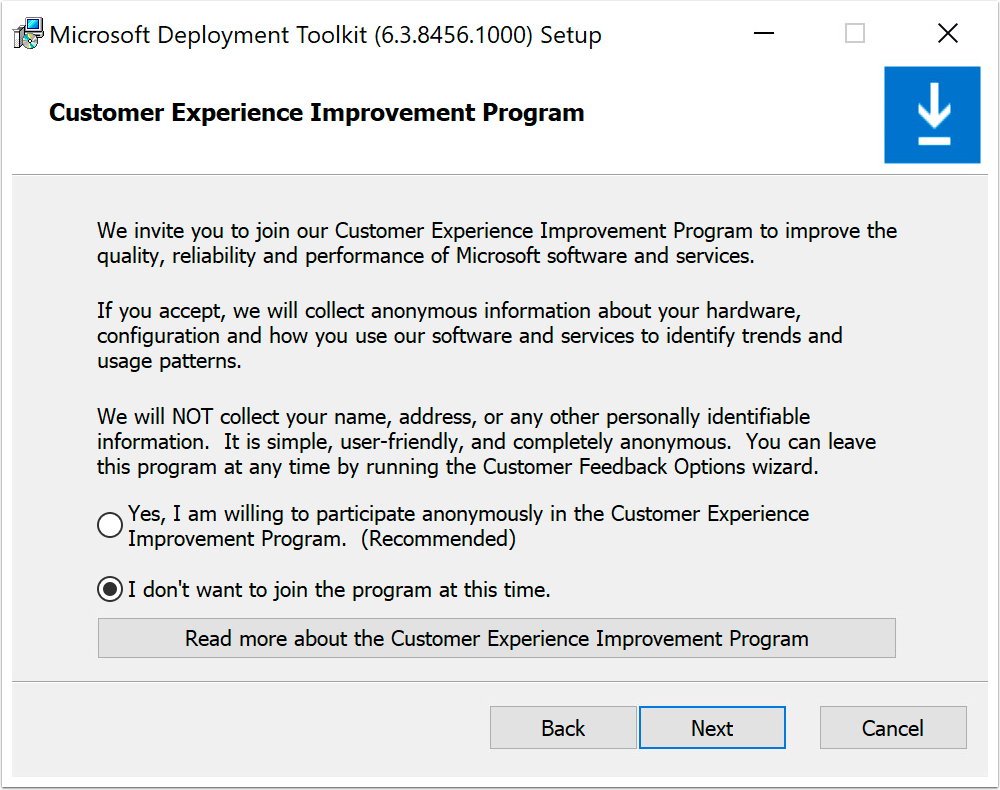
Install the Microsoft Deployment Toolkit (MDT)
MDT helps automate the deployment of Windows operating systems and applications. Use MDT to configure the unattended Setup files for Windows and package the necessary files into a consolidated image file that you then deploy to reference and target computers. For more information, see Using the Microsoft Deployment Toolkit.
- Download and run MicrosoftDeploymentToolkit_x64.
- Click Next on the Welcome page.
- Select the check box and click Next to accept the license agreement.
- Select the Custom Setup type and click Next.
- On the CEIP page, select I don’t want to join and click Next.
- Click Install to begin installation.
- Click Finish to exit the wizard.
Install Windows Deployment Services
Windows Deployment Service (WDS) is a server role that gives administrators the ability to deploy Windows operating systems over the network. Microsoft WDS is used to load the MDT-created Windows PE boot image to perform the installation of Windows.
- Go to Server Manager and click Add roles and features.
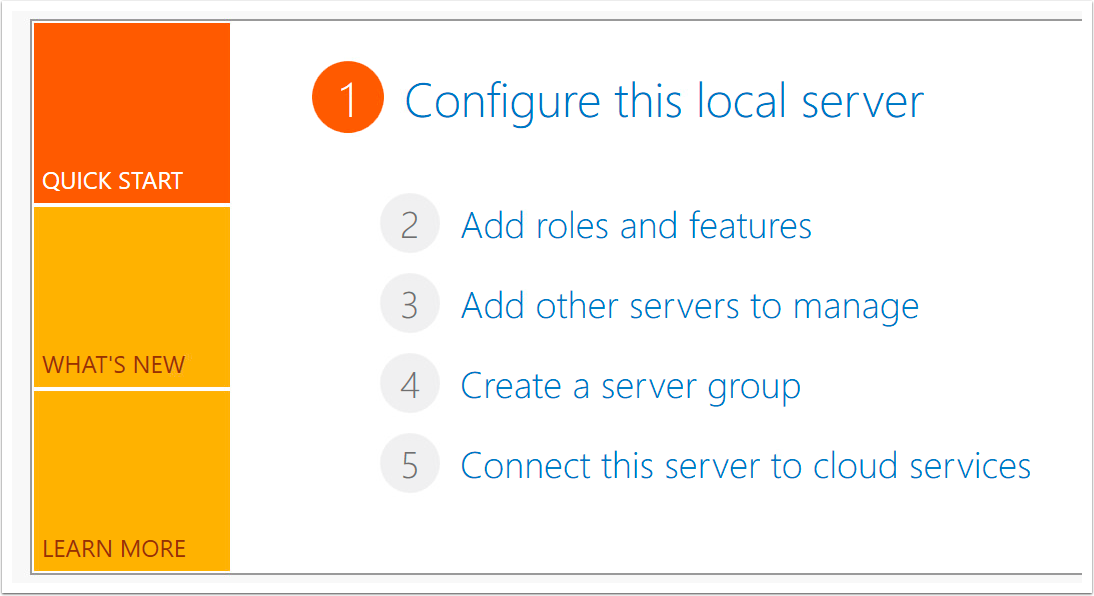
- Click Next on the Before You Begin page.
- Select Role-based or feature-based installation and click Next.
- Select a destination server and click Next.
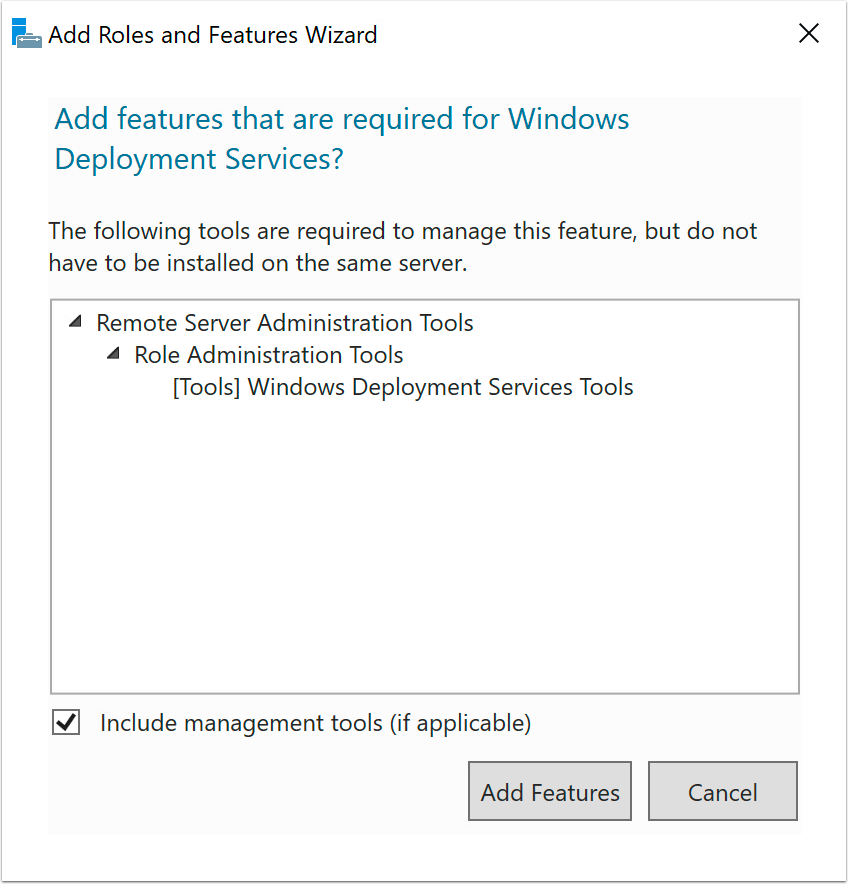
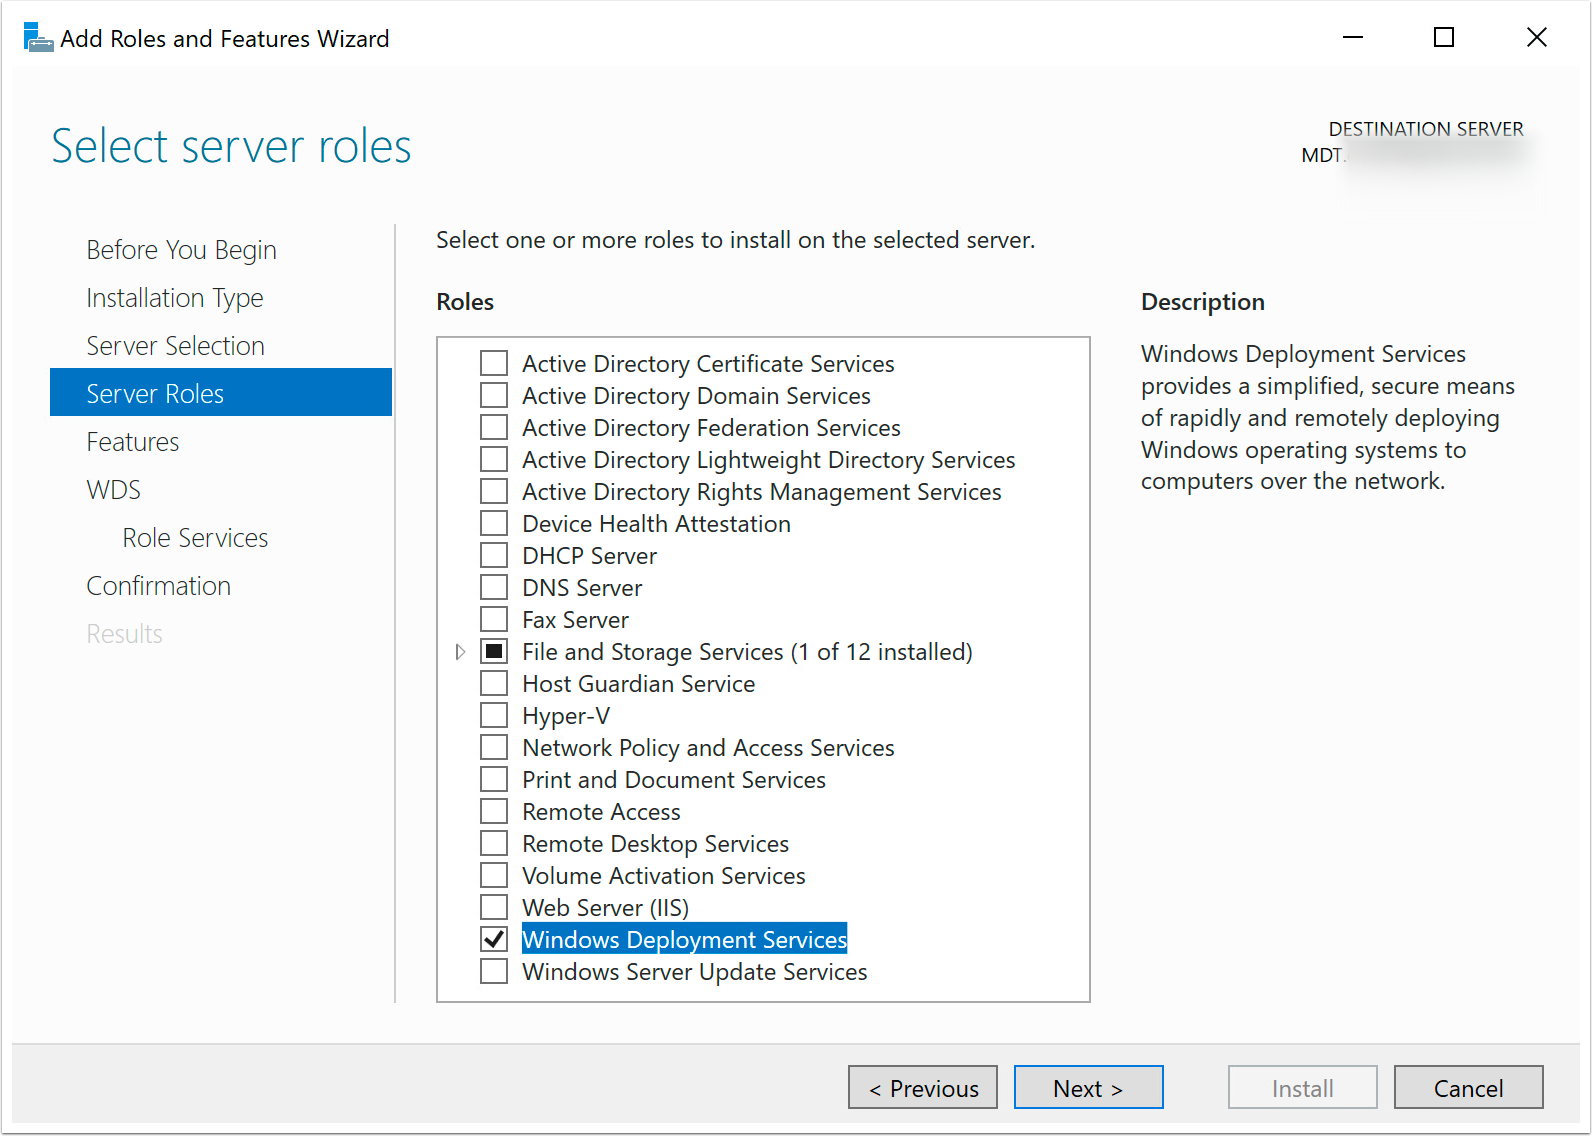
- Select Windows Deployment Services.
- Click Add Features.
- Select the Windows Deployment Services server role and click Next.
- Click Next on the Select Features page.
- Click Next on the WDS page.
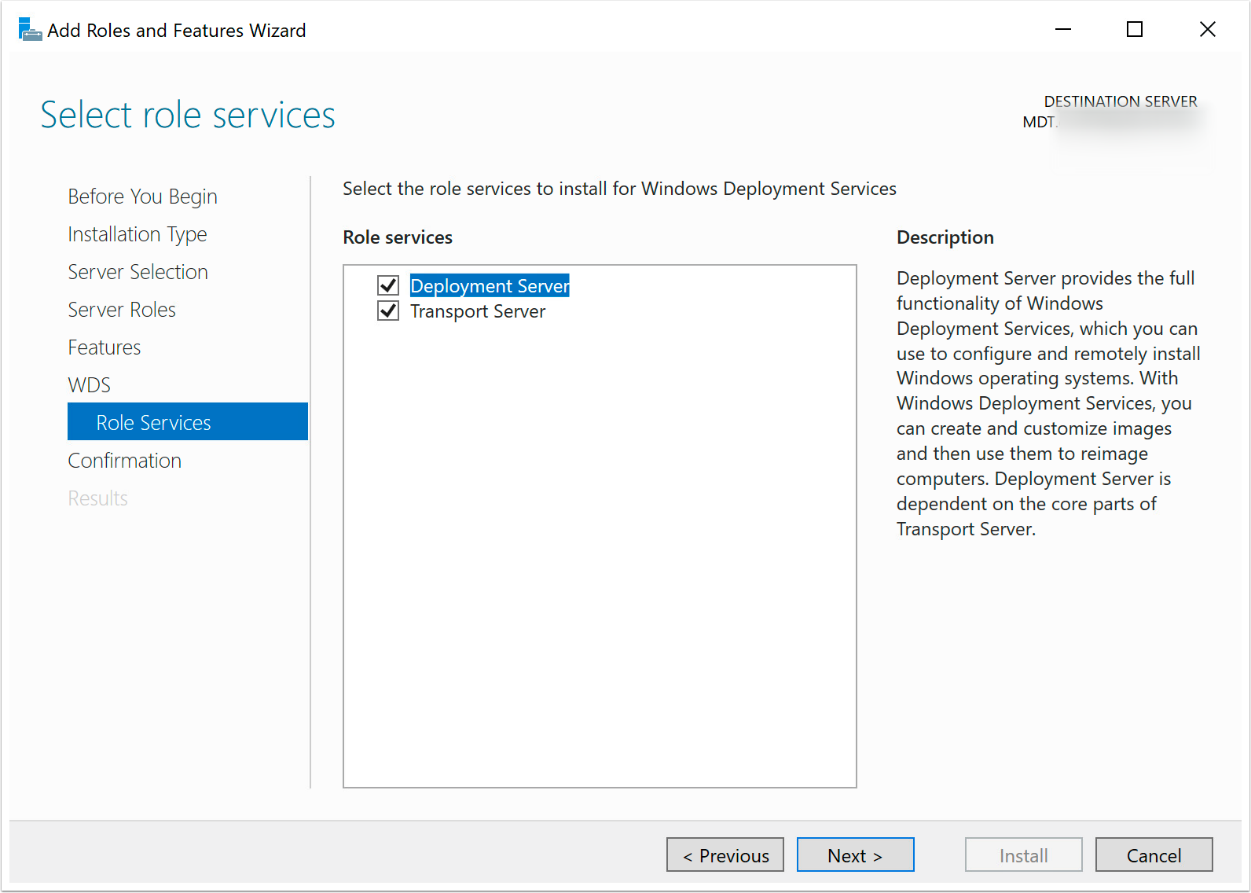
- Select both WDS role services and click Next.
- Click Install to begin installation.
- Click Close and exit Server Manager.
Manual Configuration
The following process gives a high-level overview of the applications and features that need to be configured on the deployment server when not using the MDT Environment Automation tool,
Enable SQL Server Protocols and Browser
In this section, you enable the Named Pipes protocol and the TCP/IP protocol and configure the TCP ports for the SQL Server database that you will create in a later section of this guide. You also enable the SQL Server Browser.
- To start SQL Server Configuration Manager, from the Start menu, navigate to Microsoft SQL Server 2019 and select SQL Server Configuration Manager.
- Select the Named Pipes protocol.
- Expand SQL Server Network Configuration.
- Select Protocols for SQLEXPRESS.
- Double-click Named Pipes.
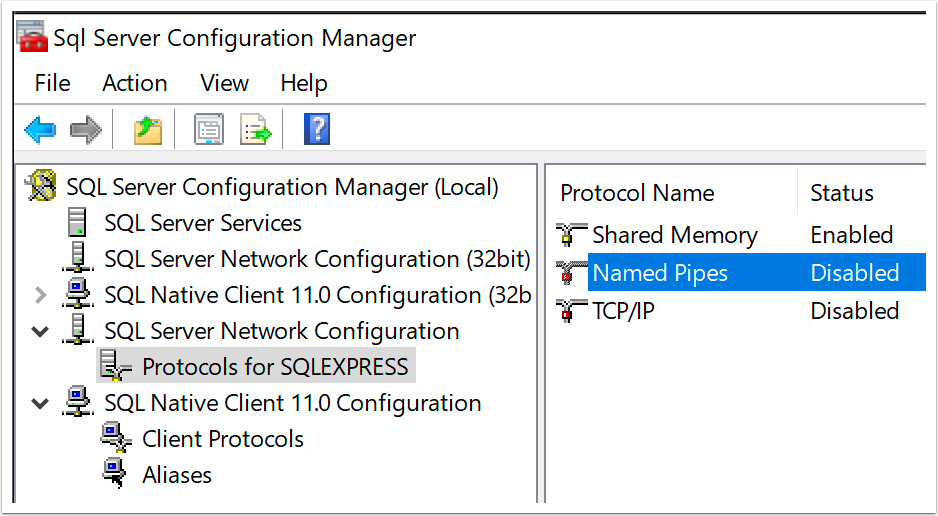
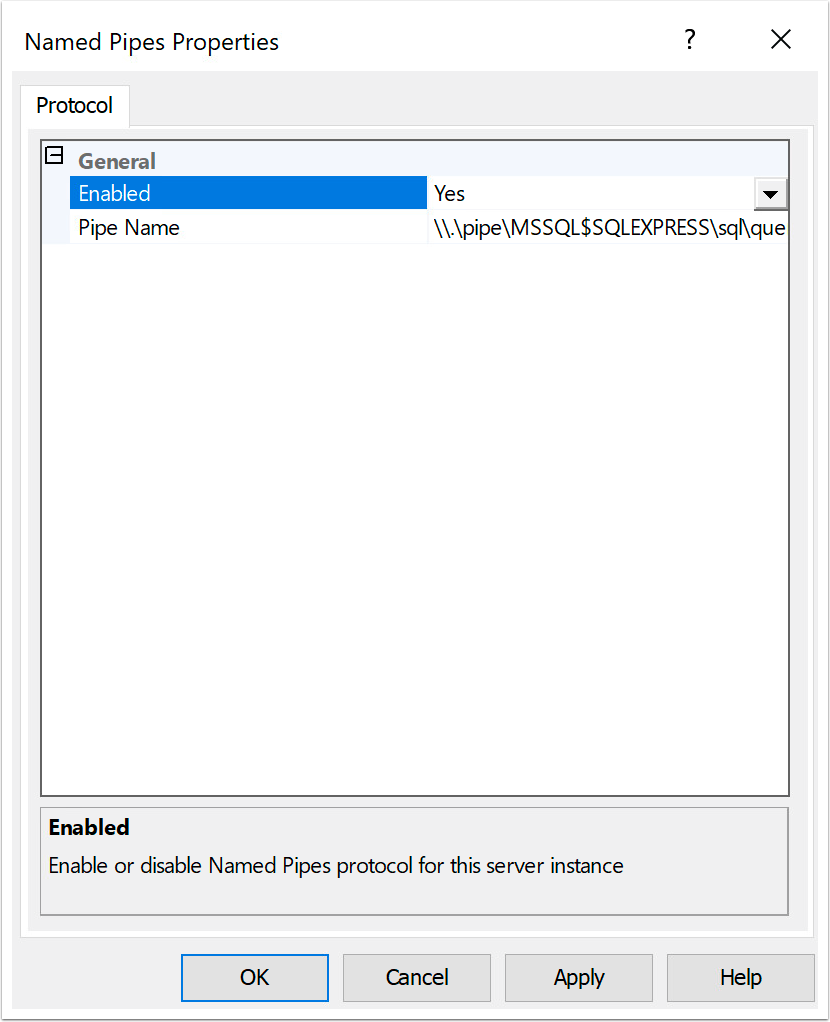
- Select Yes and click OK to enable named pipes.
- Right-click TCP/IP and select Properties.
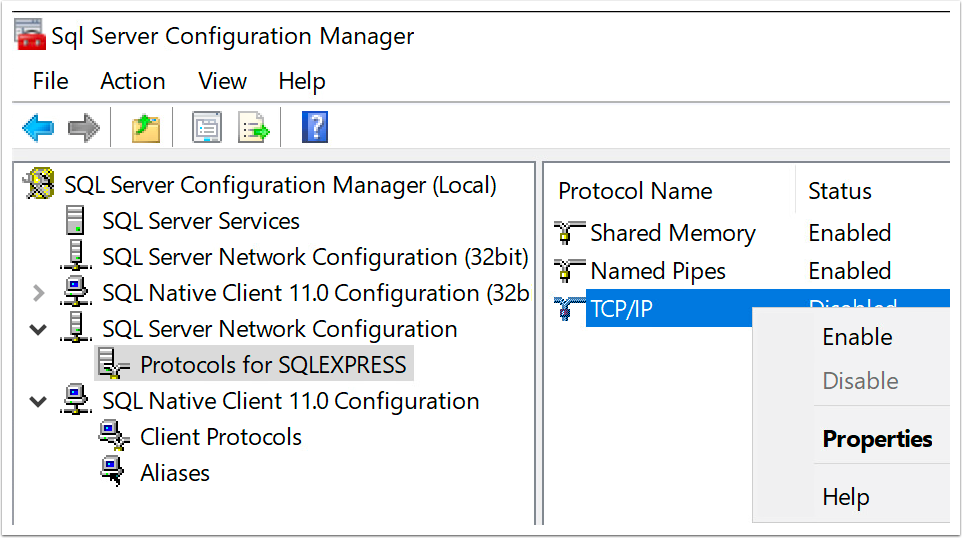
- Select Yes to enable the TCP/IP protocol.
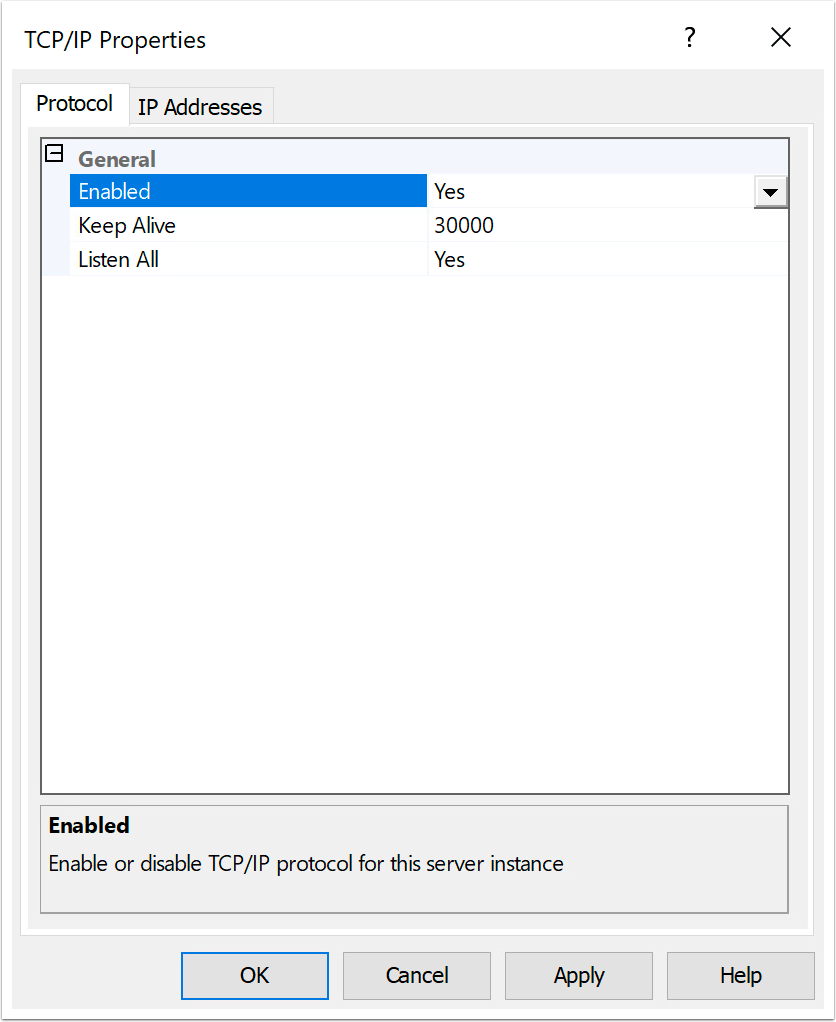
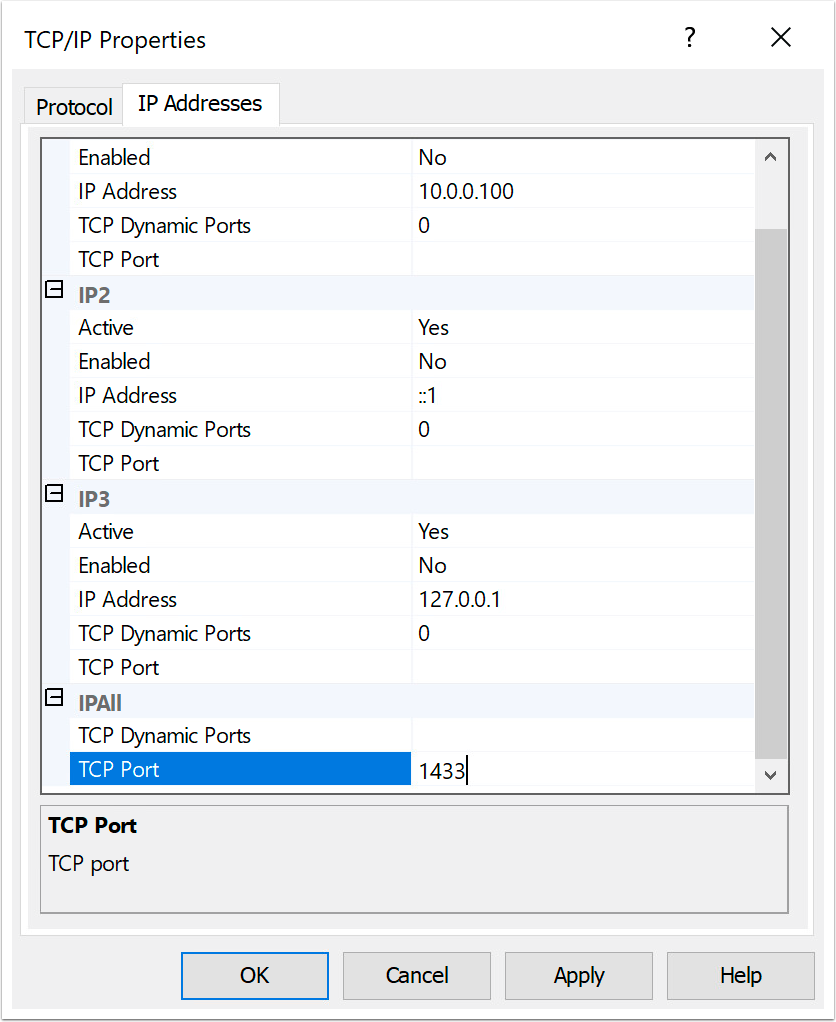
- Configure the TCP/IP ports.
- Click the IP Addresses tab.
- At the bottom of the page, under IPAll, make TCP Dynamic Ports blank.
- Enter 1433 as TCP Port.
- Click OK.
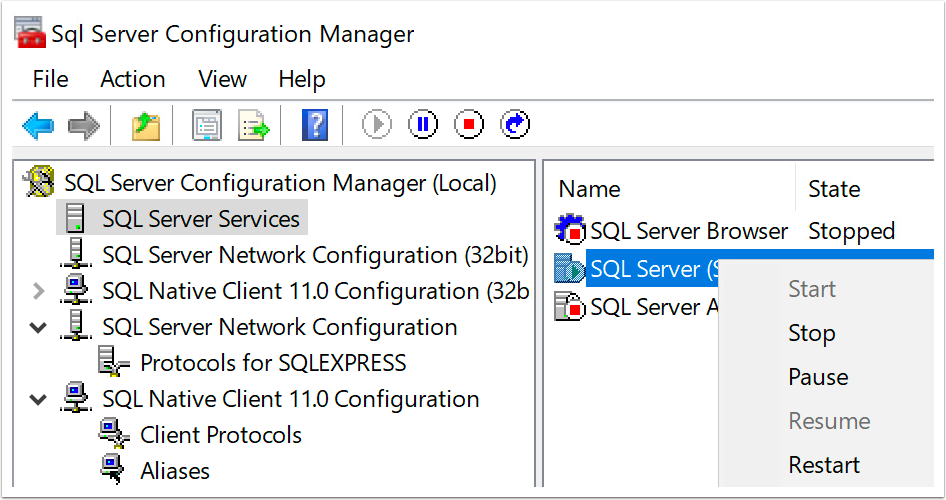
- To restart SQL Server services, select SQL Server services, right-click SQL Server, and select Restart.
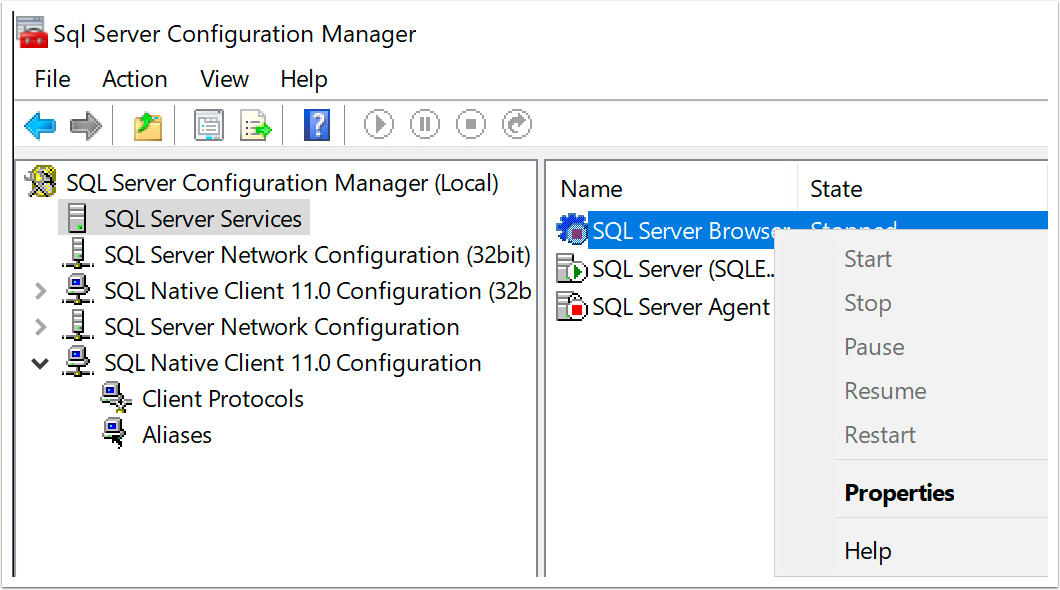
- To select the SQL Server Browser properties, right-click SQL Server Browser and select Properties.
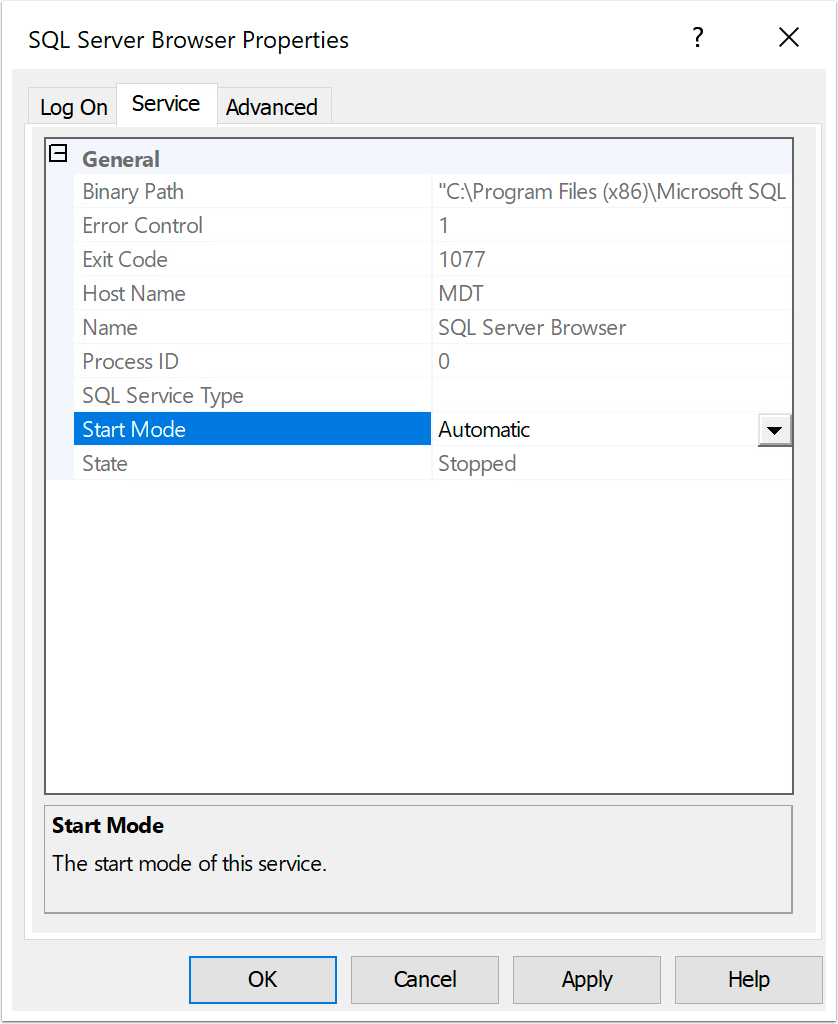
- Select Automatic for Start Mode and click OK.
- To start the SQL Server Browser service, right-click SQL Server Browser and select Start.
Allow SQL in Firewall
Use this procedure to create firewall rules that allow inbound connections on TCP port 1433 and UDP port 1434 from your SQL Server.
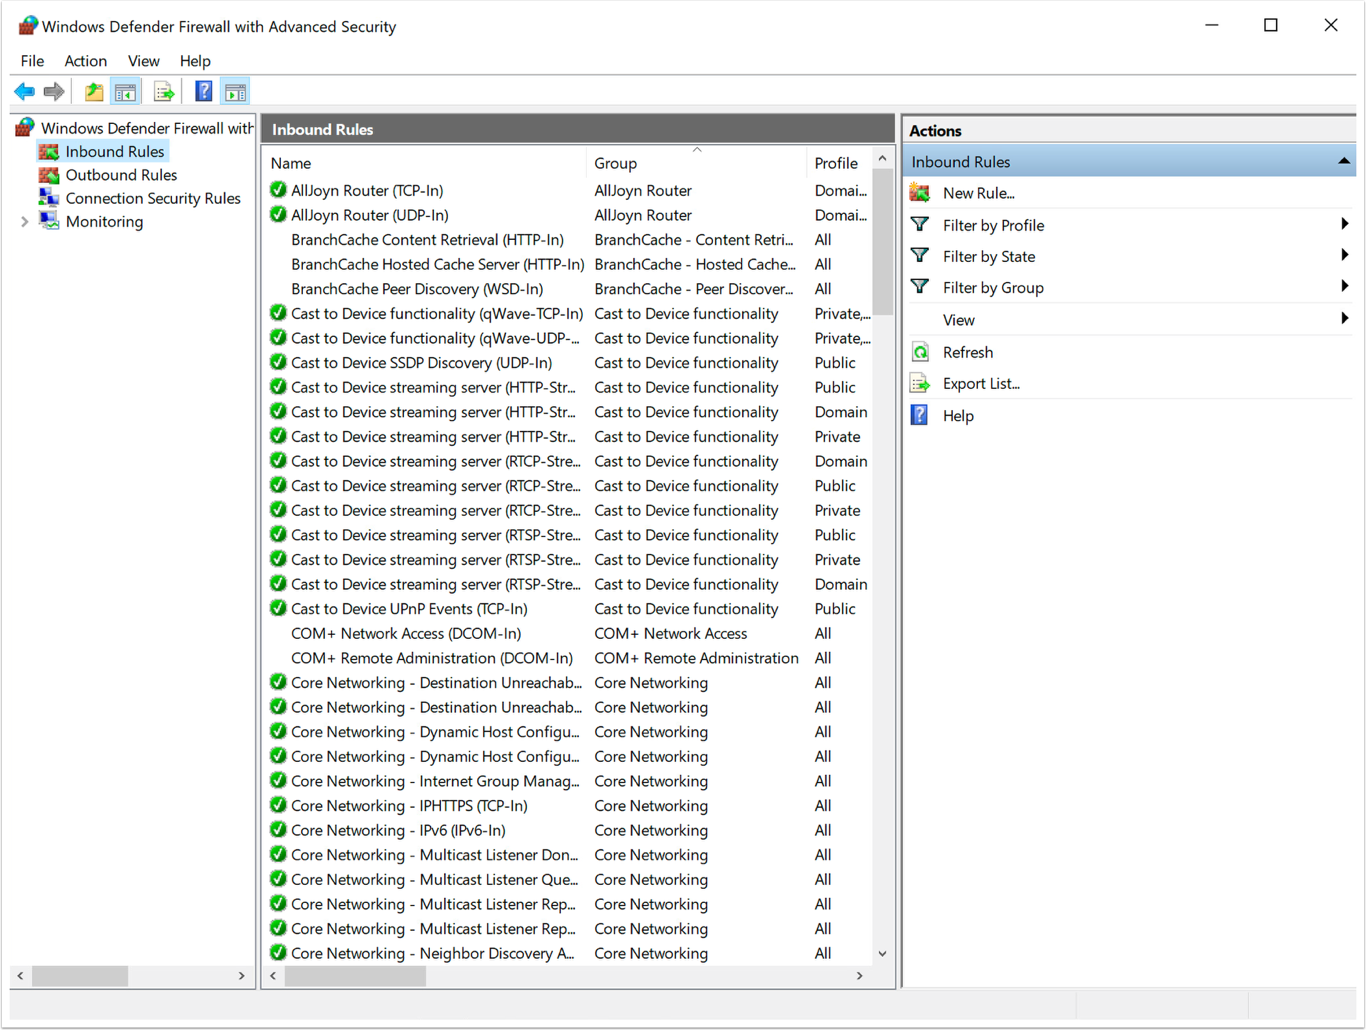
- Open your Windows Defender Firewall with Advanced Security (or any other firewall) application and click New Rule.
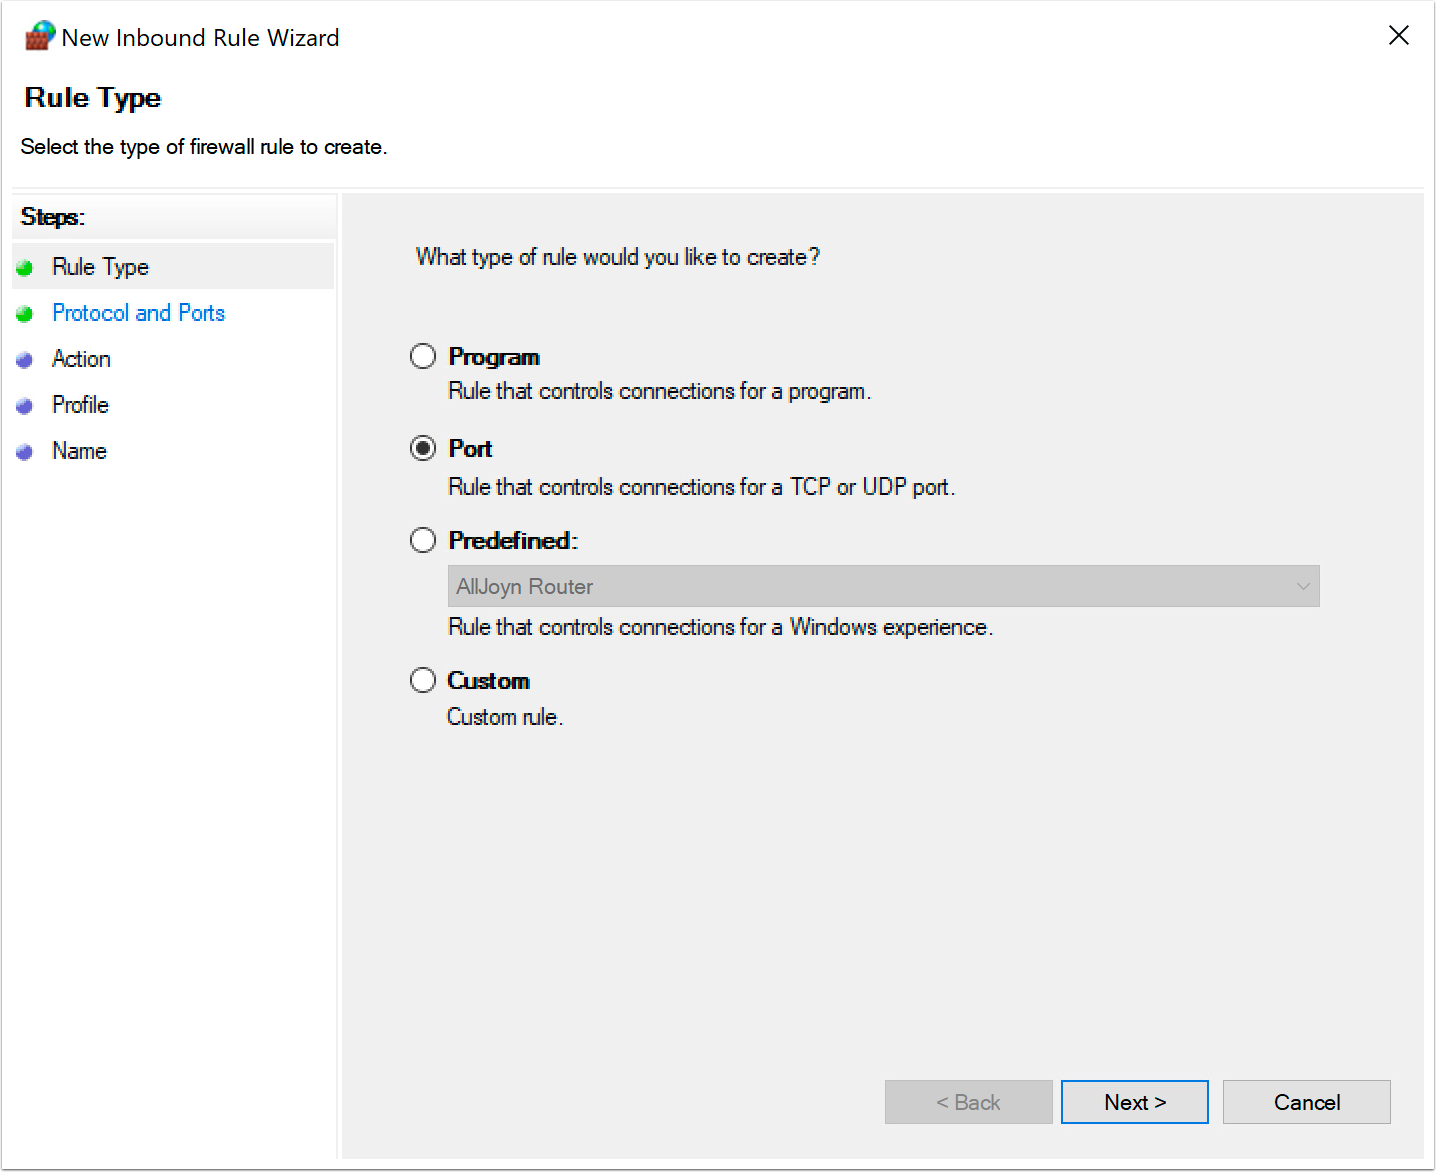
- Select Port and click Next.
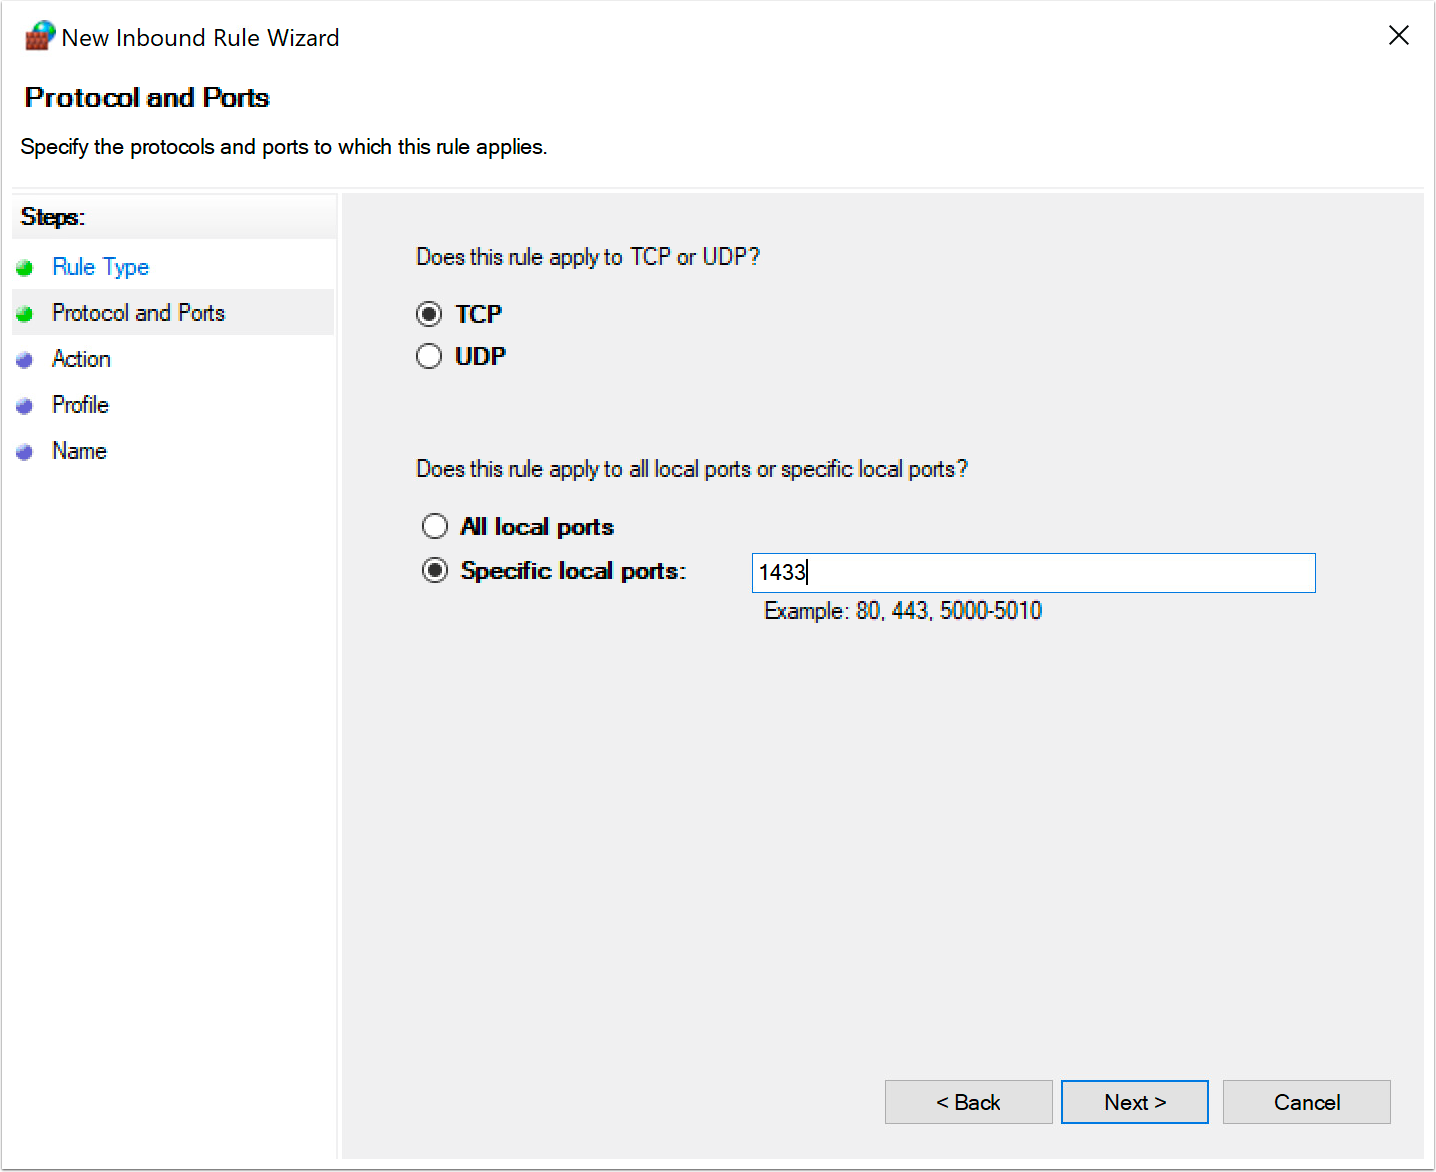
- For Specific local ports, enter 1433 and click Next.
- Select Allow the connection and click Next.
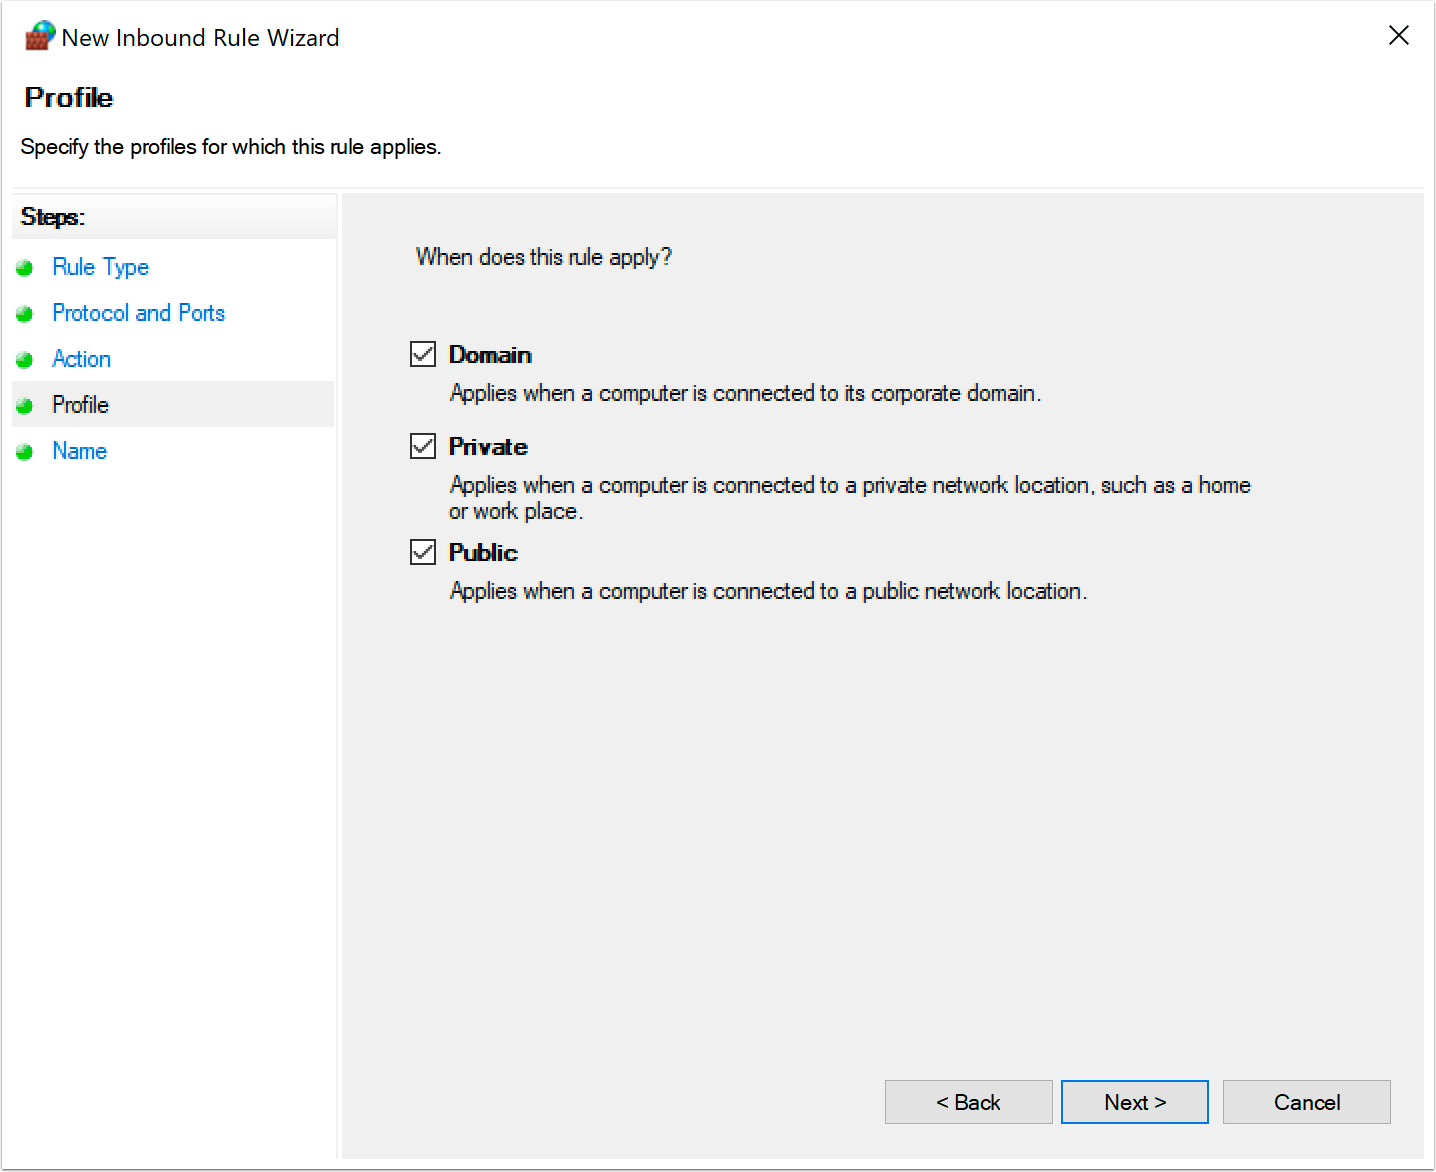
- Apply the rule to all profiles and click Next.
- Enter SQL Inbound TCP for Name and click Finish.
- Create a similar rule for UDP port 1434.
- Repeat the steps in this procedure for the UDP protocol and port 1434.
Create the Deployment Share
Use this procedure to create a deployment share that will store the boot images, applications, and drivers used to automatically create Windows images.
- From the Start menu, select and expand the Microsoft Deployment Toolkit folder, and select Deployment Workbench.
- Right-click Deployment Shares and select New Deployment Share.
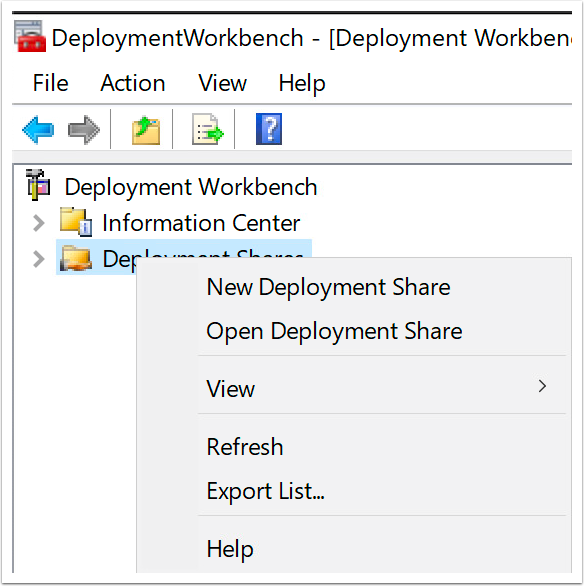
- Point to the second drive and click Next.
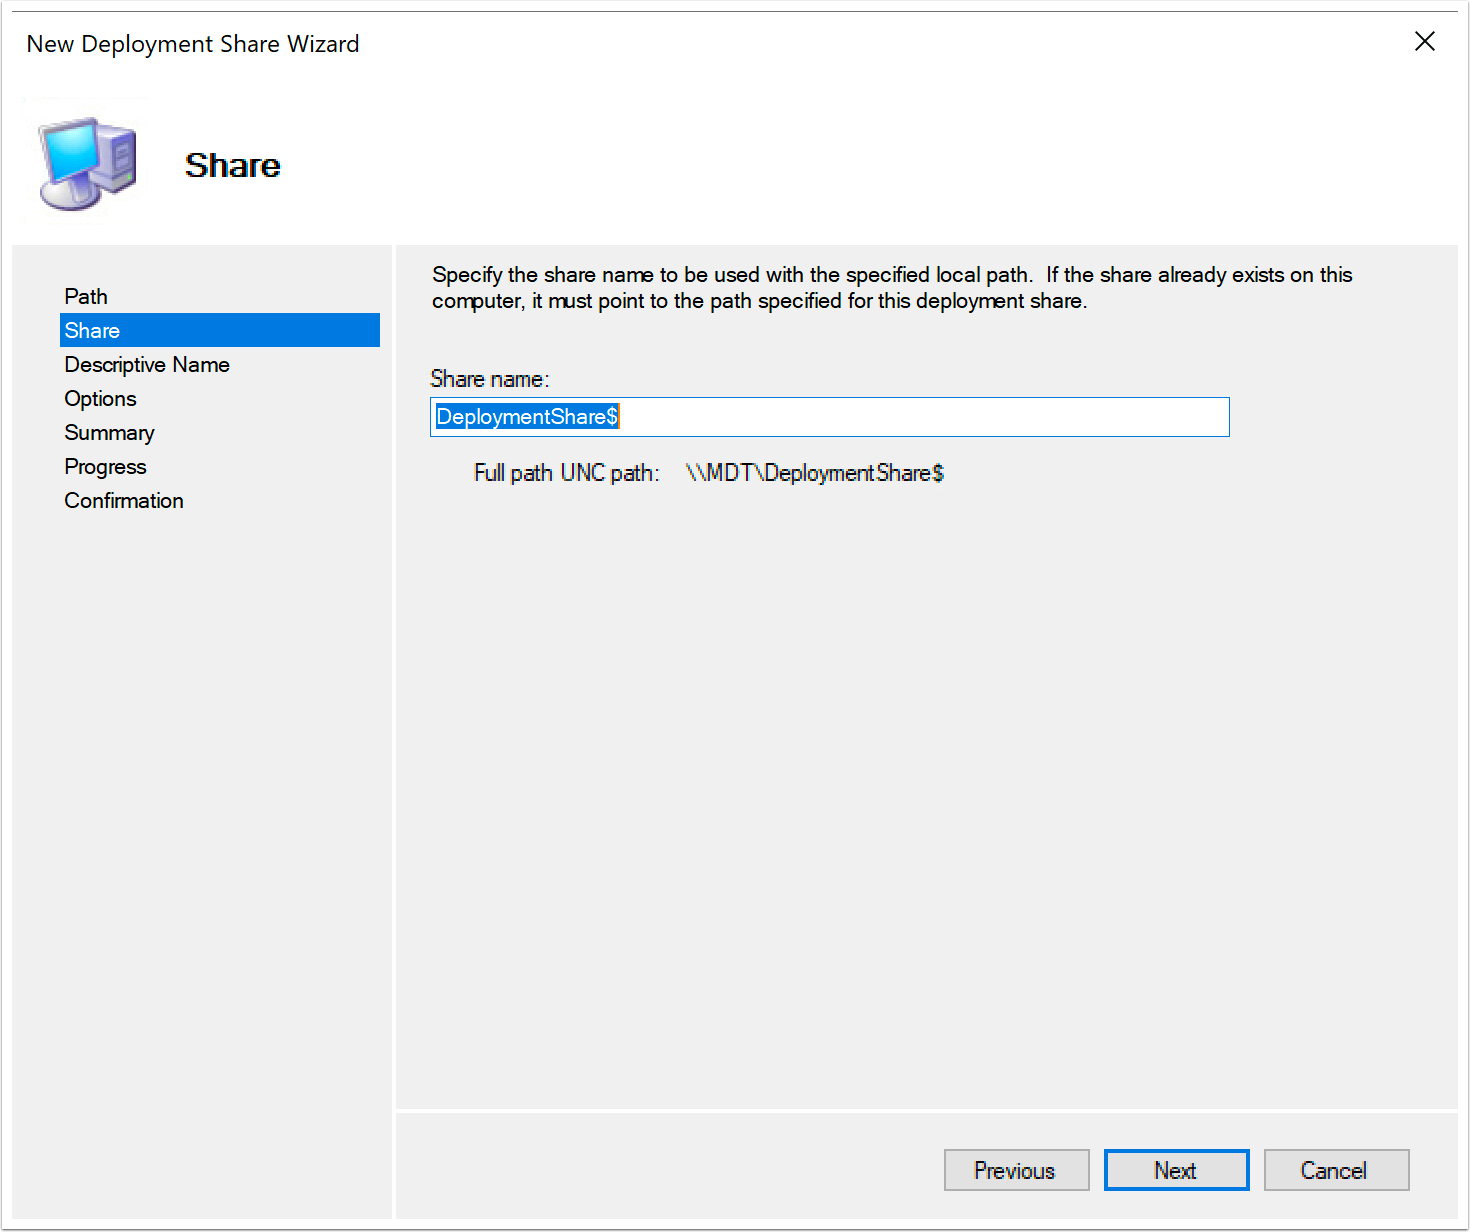
- Enter a share name and click Next.
- Enter a description and click Next.
- Deselect all wizard panes and click Next.

- Click Next.
- Click Finish to exit the wizard.
Add Out-of-Box Drivers
In this procedure, you import the network and SCSI adapter drivers into your deployment share. MDT injects these into your bootable image and adds them to the target during OS installation.
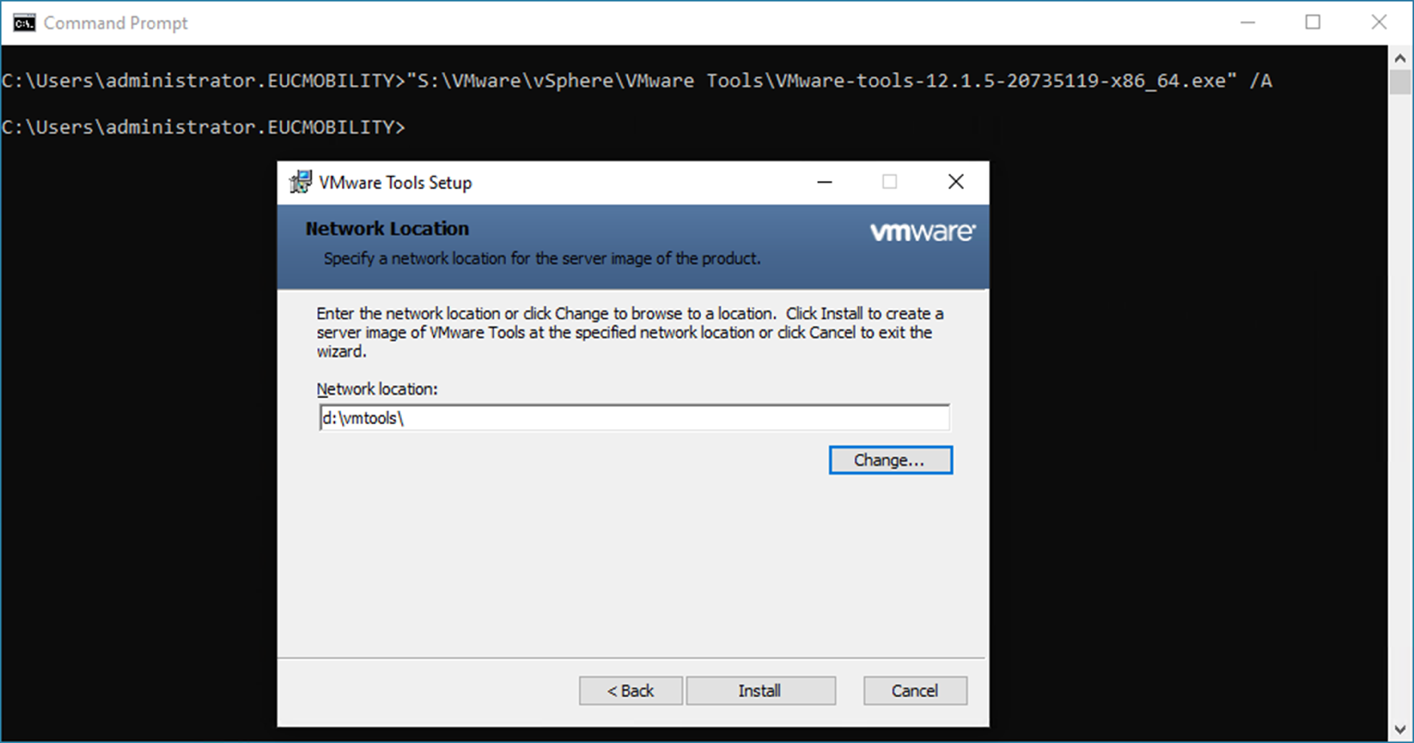
- Download VMware Tools from the VMware Downloads website.
- Extract the drivers from VMware Tools executable.
- Open a command prompt and run the following command, replacing the exe name with the version you downloaded.
VMware-tools-xx.x.x-yyyyyyyy-x86_64.exe /A - Follow the wizard and specify a location to store the extracted drivers.
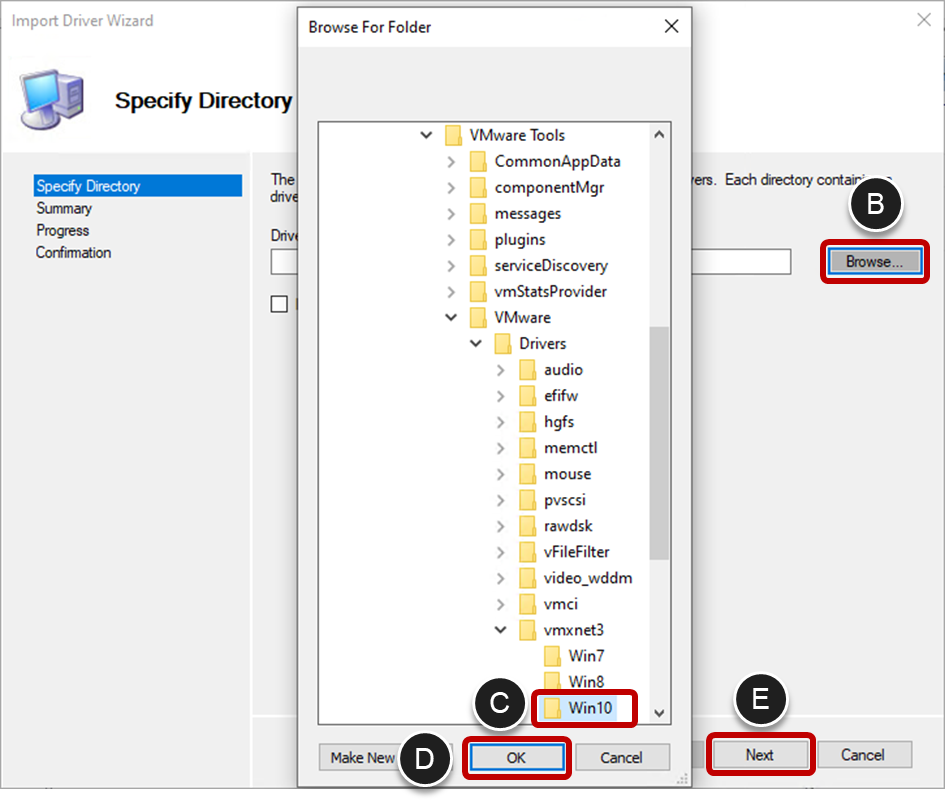
- Open the Deployment Workbench, navigate to the deployment share, and select Out-of-Box Drivers.
- Copy Windows 11 network driver.
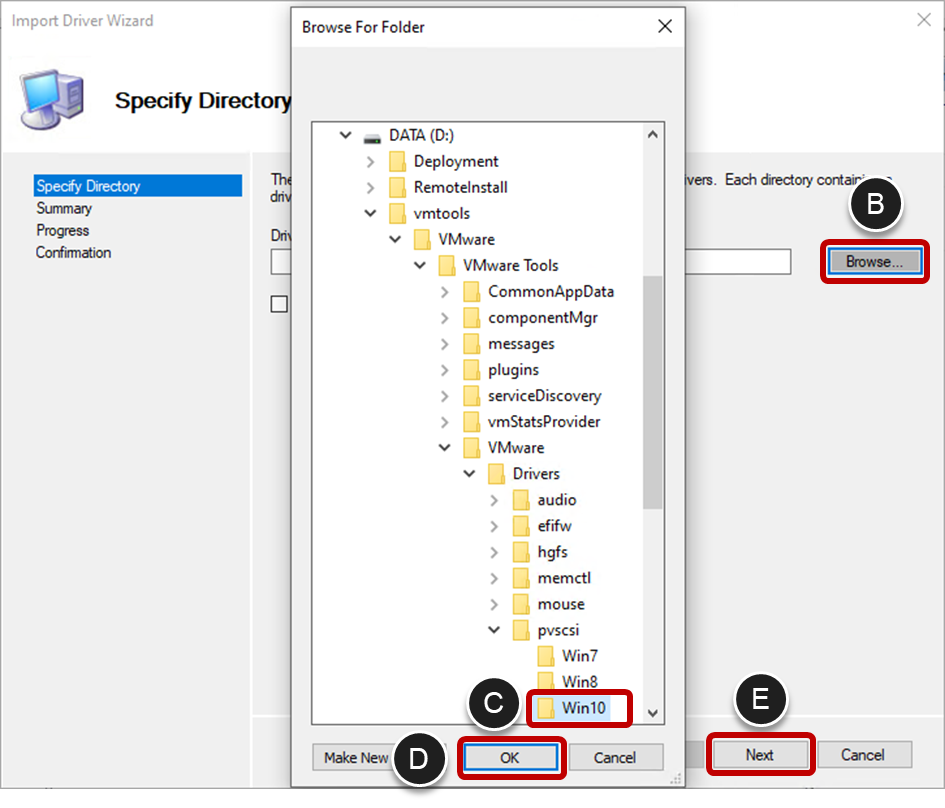
- Right-click and select Import Drivers.
- Browse to the files you extracted.
- Navigate to and select the VMware > VMware Tools > VMware > vmxnet3 > Win10 directory.
- Click OK.
- Click Next twice.
- Click Finish.
- Copy Windows 10 network driver.
- Right-click and select Import Drivers.
- Browse to the files you extracted.
- Navigate to and select the VMware > VMware Tools > VMware > vmxnet3 > Win8 directory
- Click OK.
- Click Next twice.
- Click Finish.
Note: You can rename the driver’s name in MDT to help identify the version of Windows it is intended to be used with.
- Copy Windows 11 SCSI adapter driver.
- Right-click and select Import Drivers.
- Browse to the files you extracted.
- Navigate to and select the VMware > VMware Tools > VMware > pvscsi > Win10 directory.
- Click OK.
- Click Next twice.
- Click Finish.
- Copy Windows 10 SCSI adapter driver
- Right-click and select Import Drivers.
- Browse to the files you extracted.
- Navigate to and select the VMware > VMware Tools > VMware > pvscsi > Win8 directory.
- Click OK.
- Click Next twice.
- Click Finish.
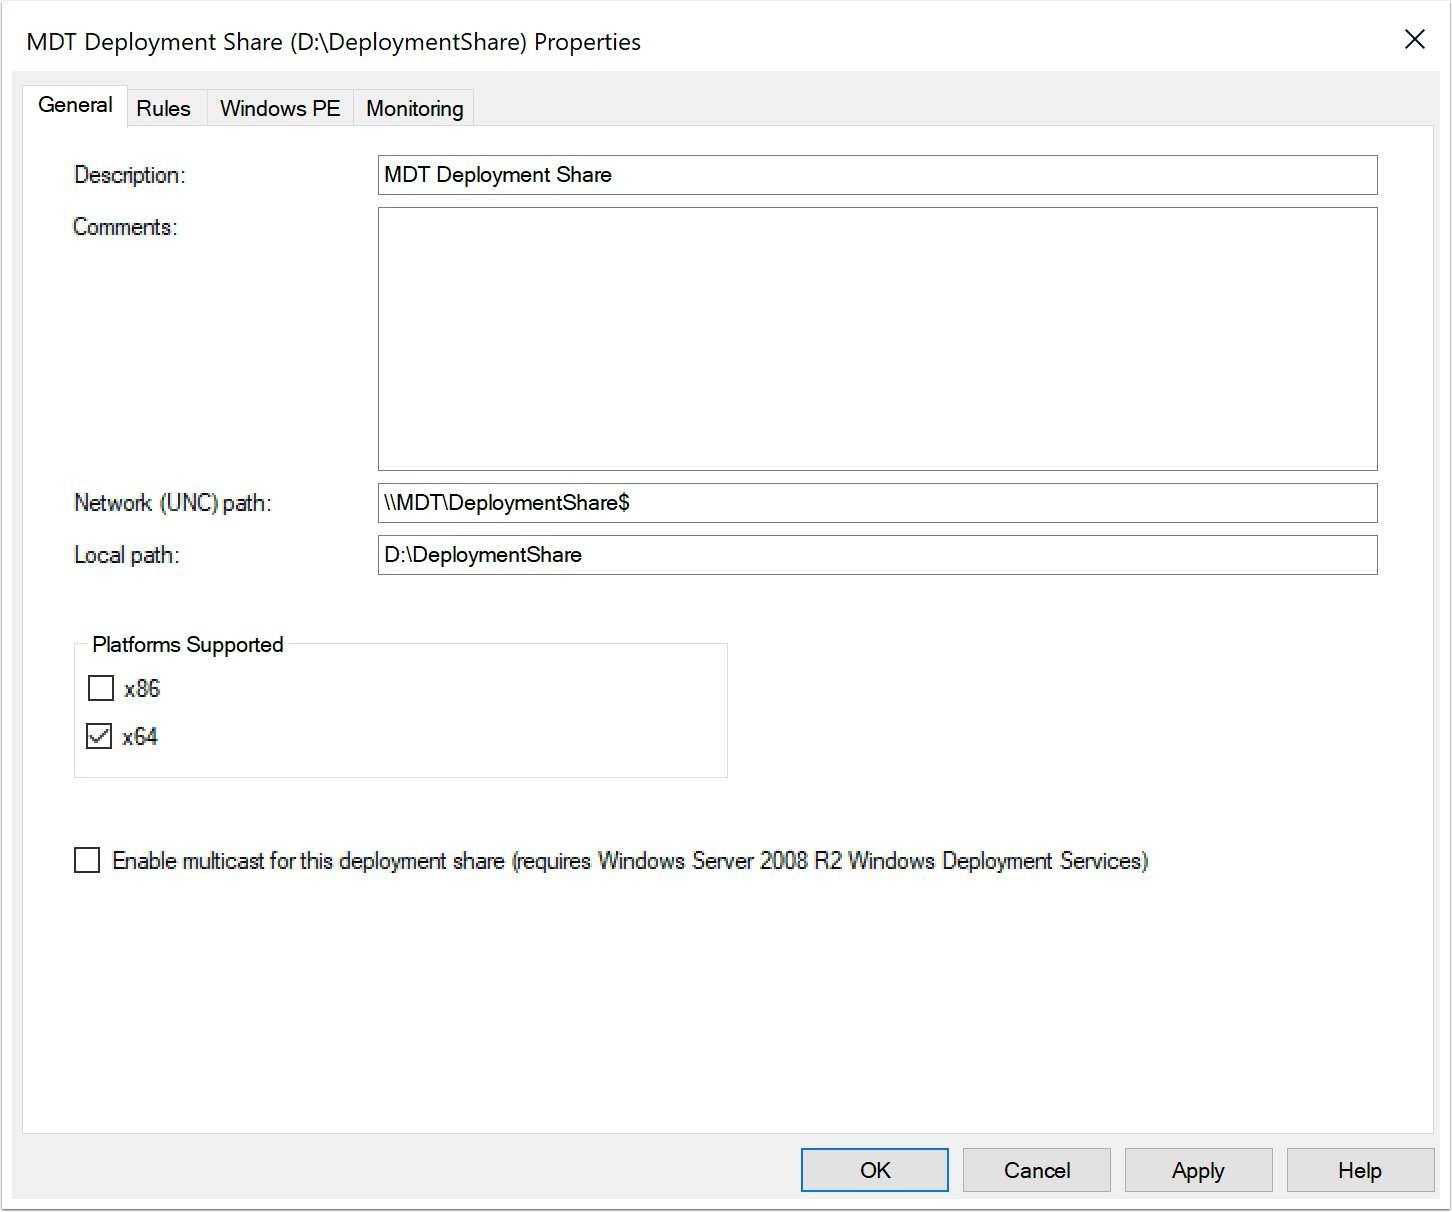
Set the Deployment Share Properties
In this procedure, specify architecture platforms you plan to use, add rules to skip various prompts during image creation, supply credentials, and include the drivers you imported during a previous exercise.
- In the Deployment Workbench, click the name of your new deployment share and click Properties.
- On the General tab, if you are not using the x86 platform, deselect x86.
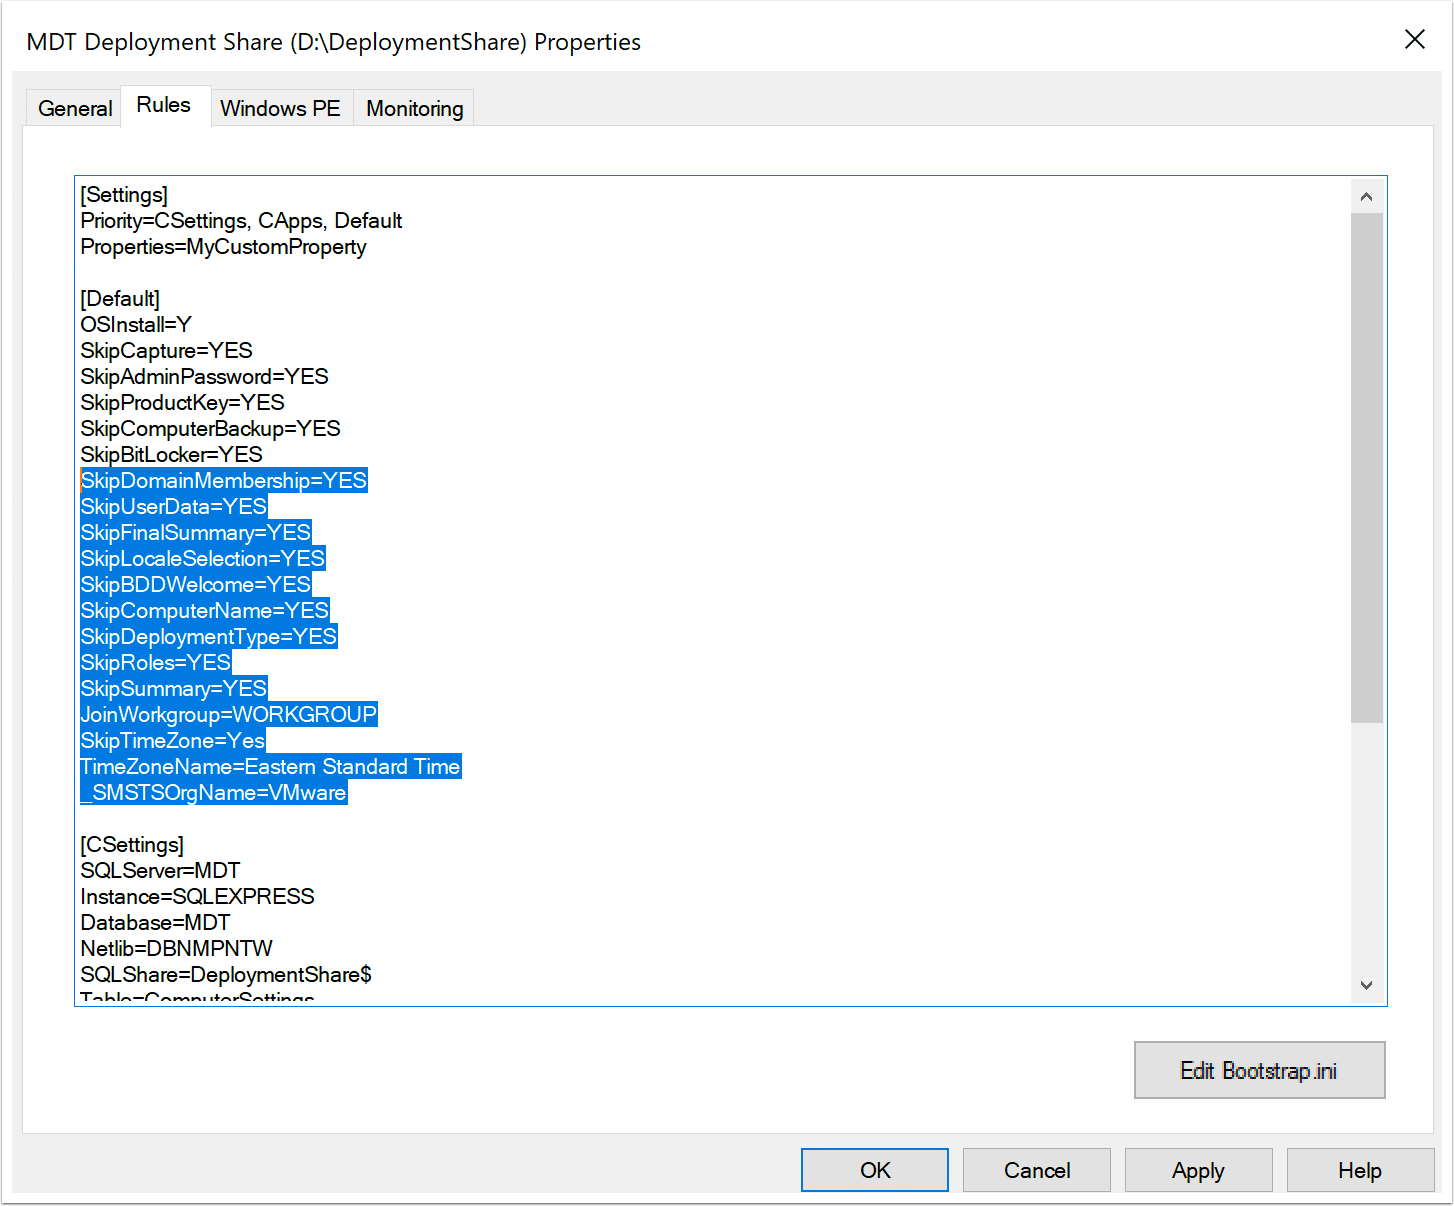
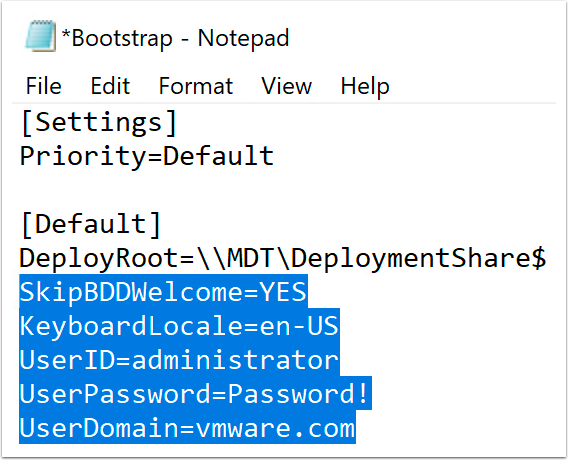
- On the Rules tab, add the following rules with your values and then click Edit Bootstrap.ini.
-
SkipDomainMembership=YES -
SkipUserData=YES -
SkipFinalSummary=YES -
SkipLocaleSelection=YES -
SkipBDDWelcome=YES -
SkipComputerName=YES -
SkipDeploymentType=YES -
SkipRoles=YES -
SkipSummary=YES -
JoinWorkgroup=WORKGROUP -
SkipTimeZone=Yes -
TimeZoneName=[your timezone] -
_SMSTSOrgName=[your company]
You can get your current timezone by running the following command on a Windows system:tzutil /g
Or, get the full list by running:tzutil /l
- Add the following rules before you close and save the file:
-
SkipBDDWelcome=YES -
KeyboardLocale=[your locale] -
UserID=[your MDT user] -
UserPassword=[your password] -
UserDomain=[your domain]
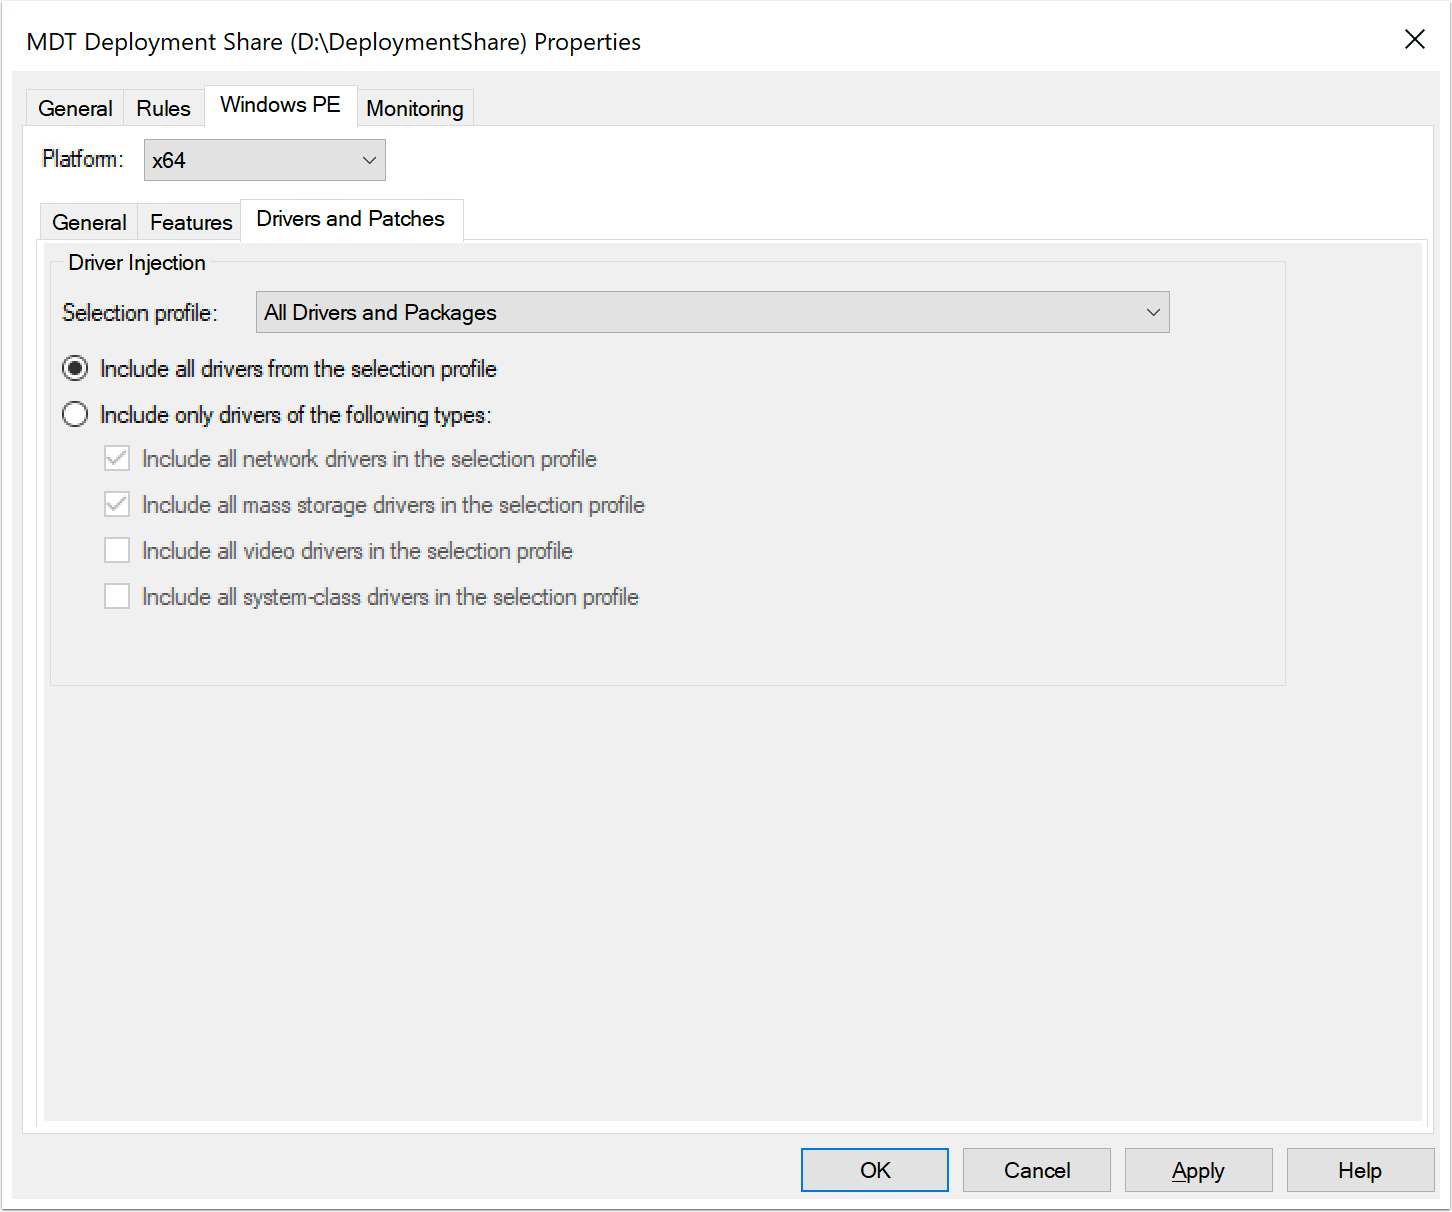
- Select and complete the Windows PE tab.
- Select x64 from the Platform drop-down list.
- Select All Drivers and Packages from the Selection profile drop-down list.
- Select Include all drivers from the selection profile.
- Click OK.
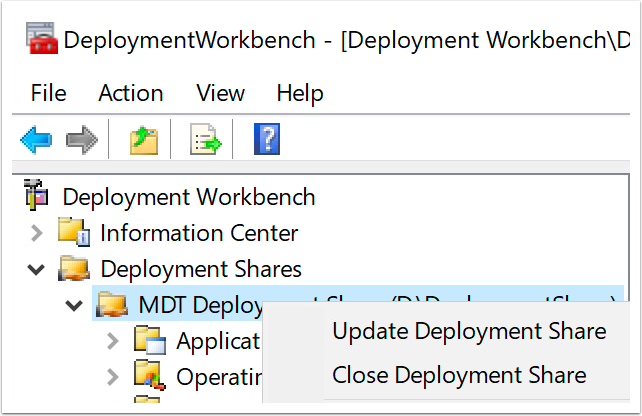
- Right-click the deployment share and select Update Deployment Share.
- Select Optimize the boot image updating process and click Next.
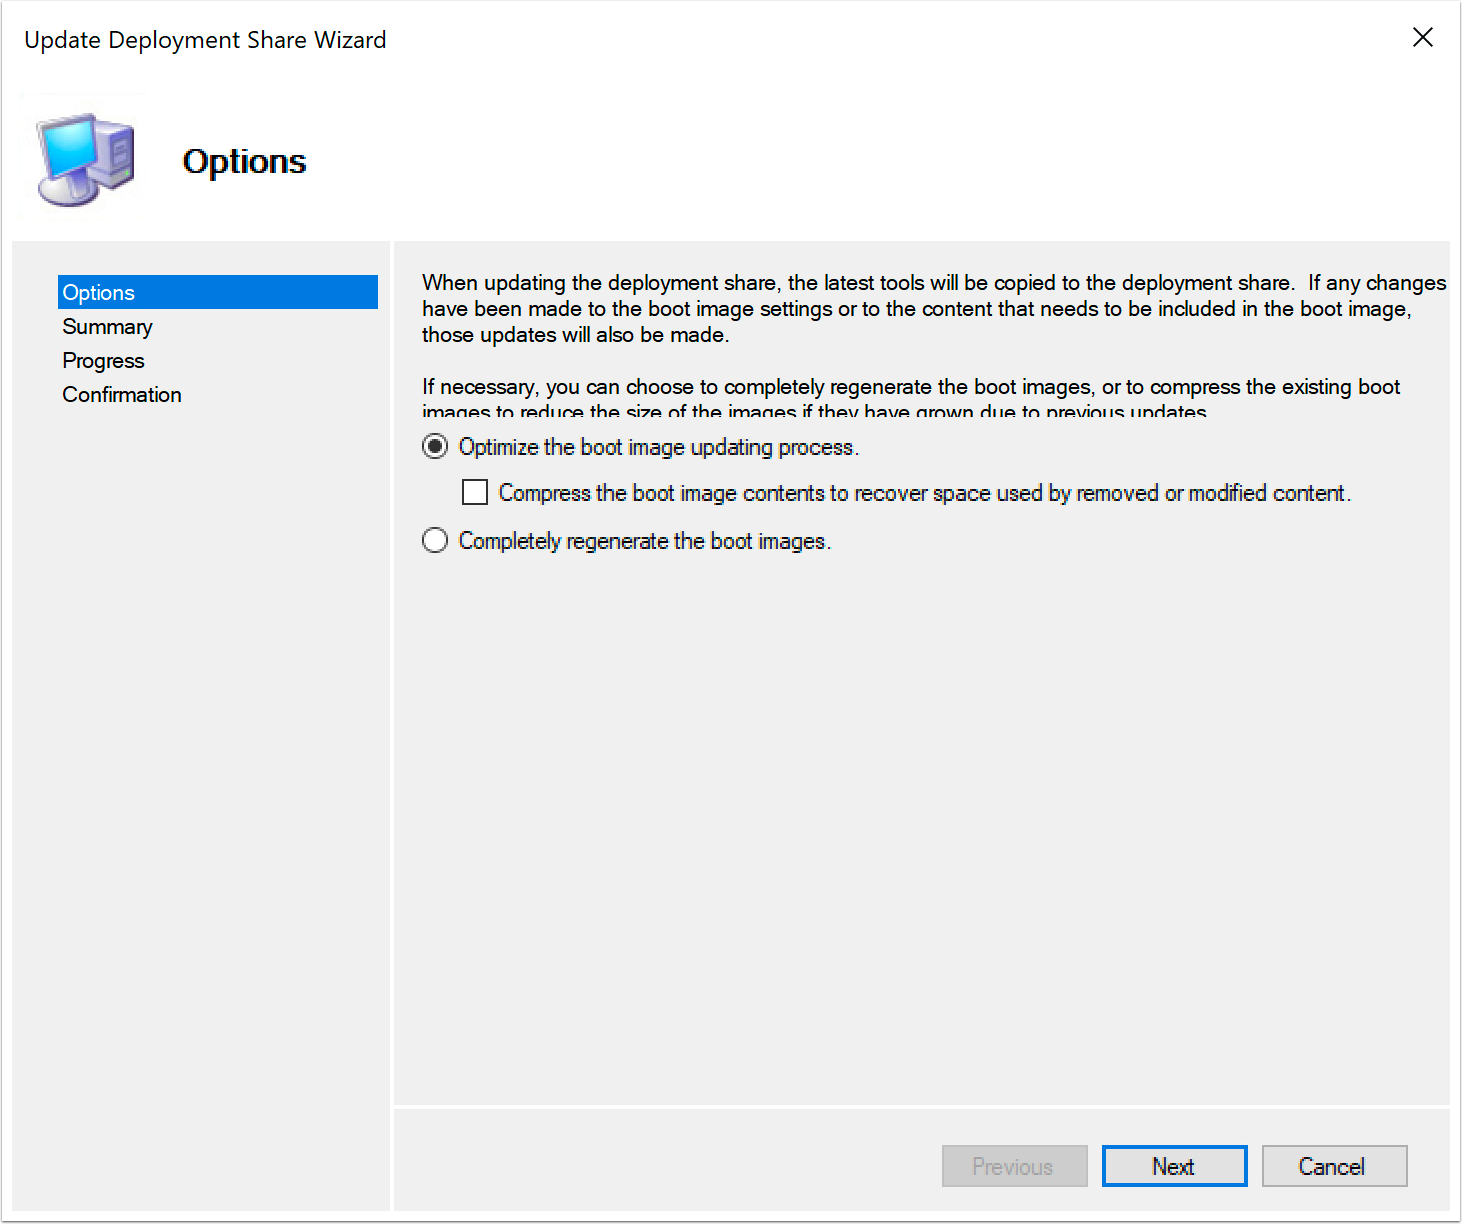
- Click Next to begin the update process.
- Click Finish to exit the wizard.
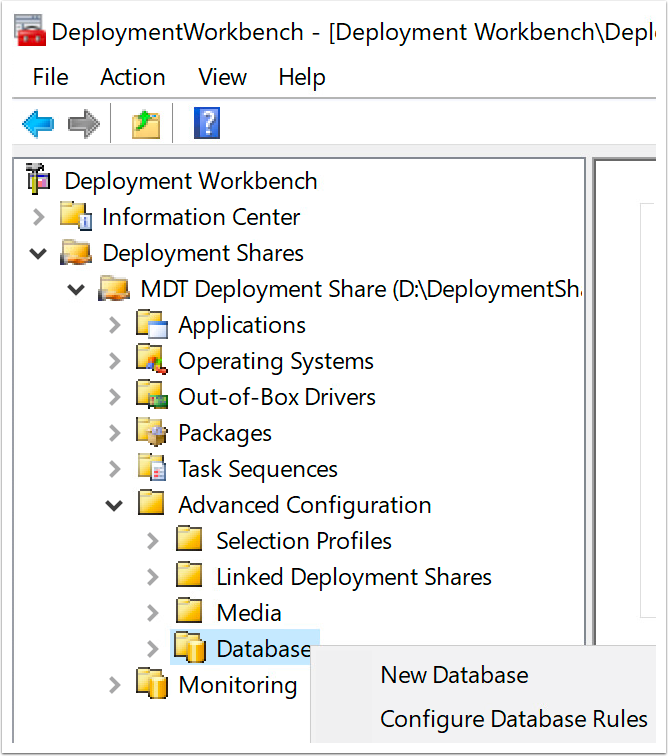
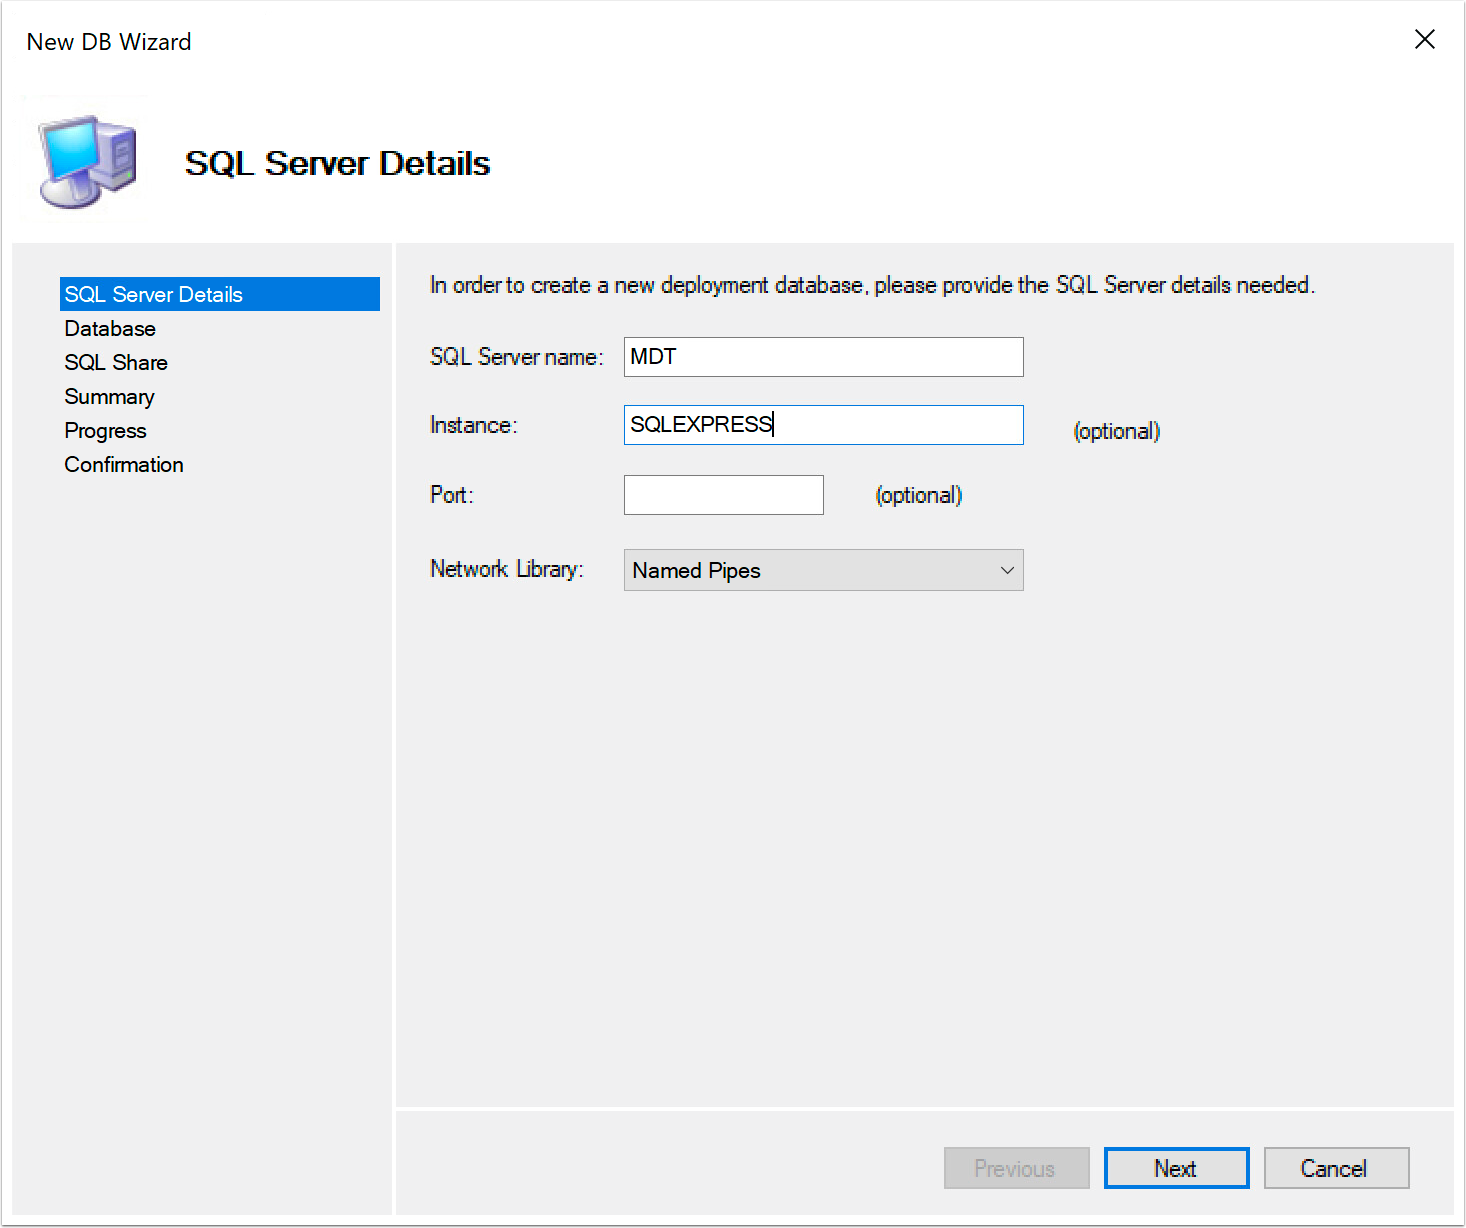
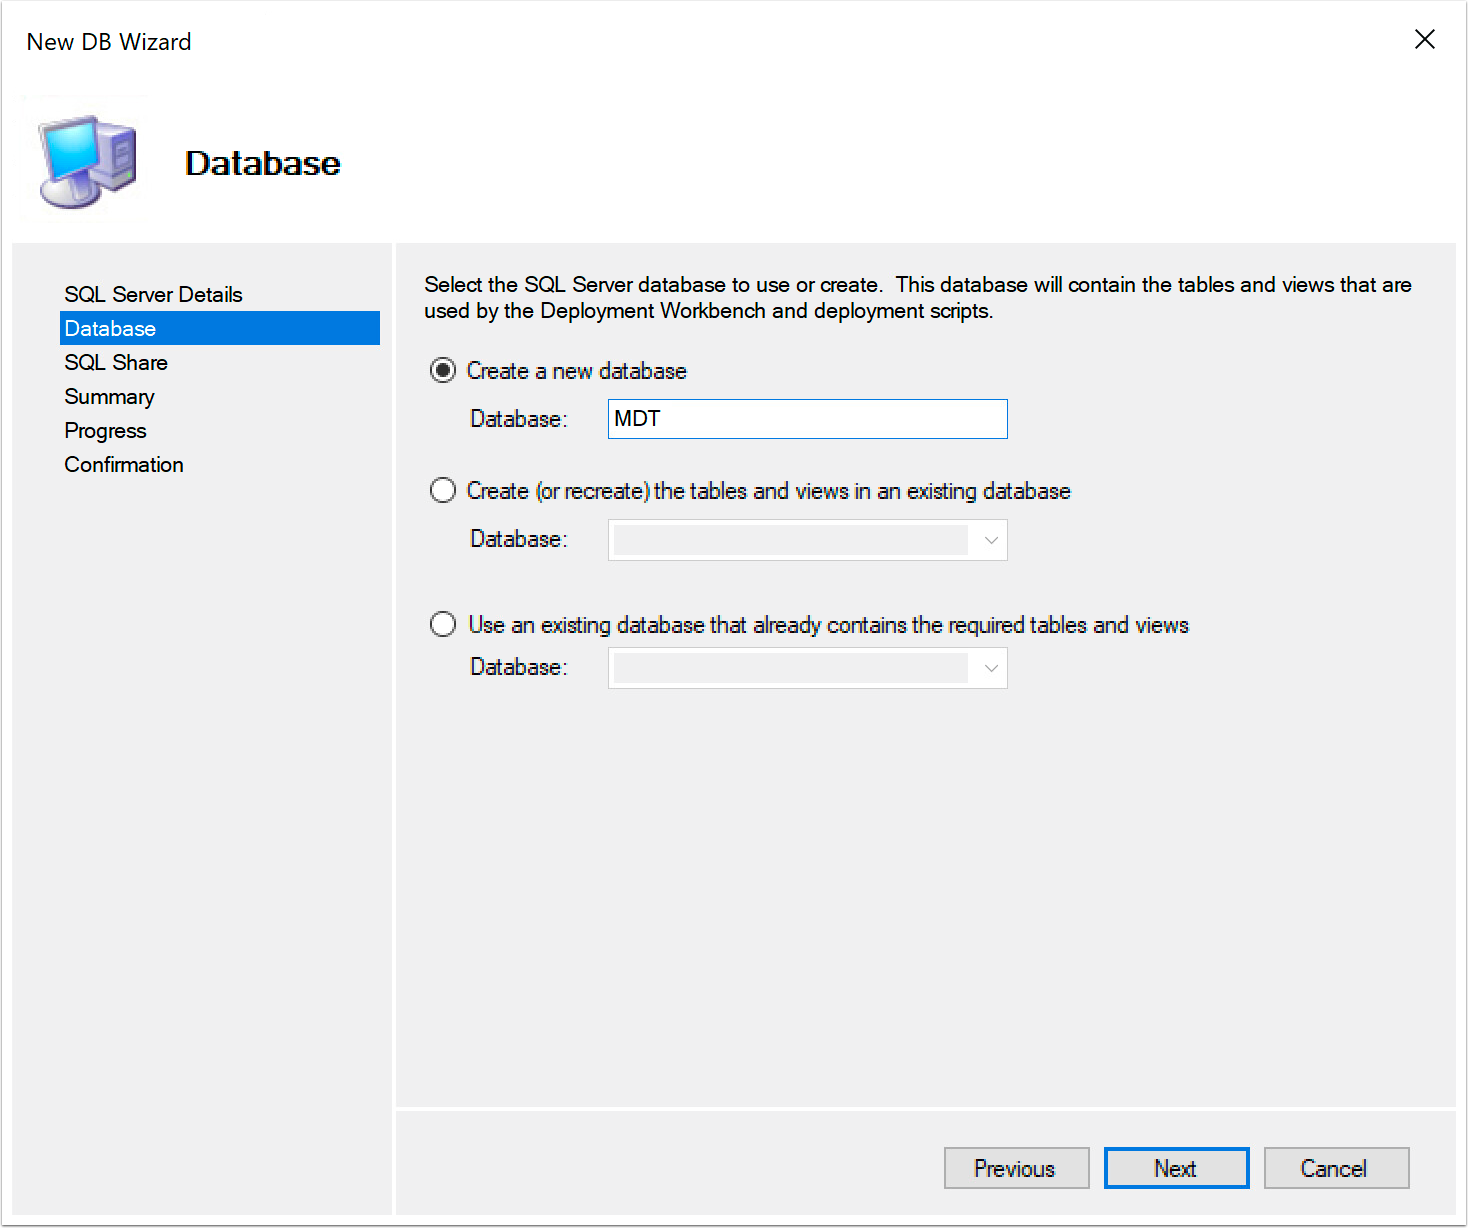
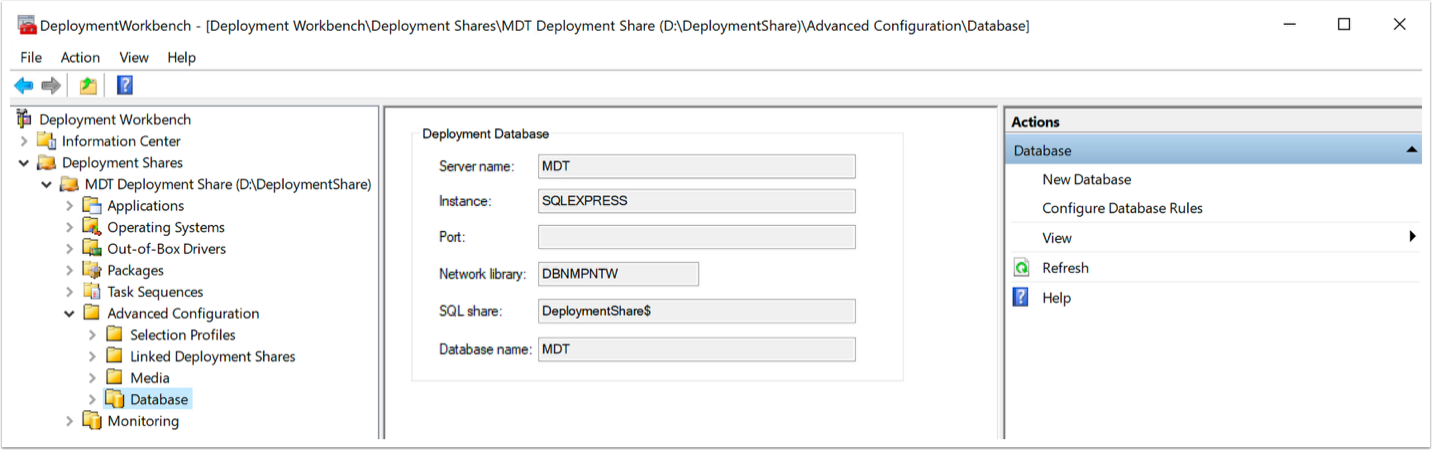
Create the Database Table and Configure Database Rules
In this procedure, you create a database on the SQL Server you created and configured in a previous exercise, and you configure the database for basic functionality.
- Start the new database wizard.
- In the Deployment Workbench, expand Deployment Shares.
- Expand the new deployment share you created in a previous exercise.
- Expand Advanced Configuration.
- Right-click Database.
- Select New Database.
- Enter the SQL Server name and Instance name (when not using the default) and click Next.
- Enter a table name and click Next.
- Enter the deployment share name and click Next.

- Click Next to begin database creation.
- Click Finish.
You are returned to the main Deployment Workbench window, with Database selected in the left pane, information about the new database in the middle pane, and a list of database actions in the right pane. - Click Configure Database Rules.
Note: For basic functionality, use the settings shown. For advance selections, use your own values.
- Select the following two options and then click Next:
- Query for computer-specific settings
- Query for applications to be installed on this computer
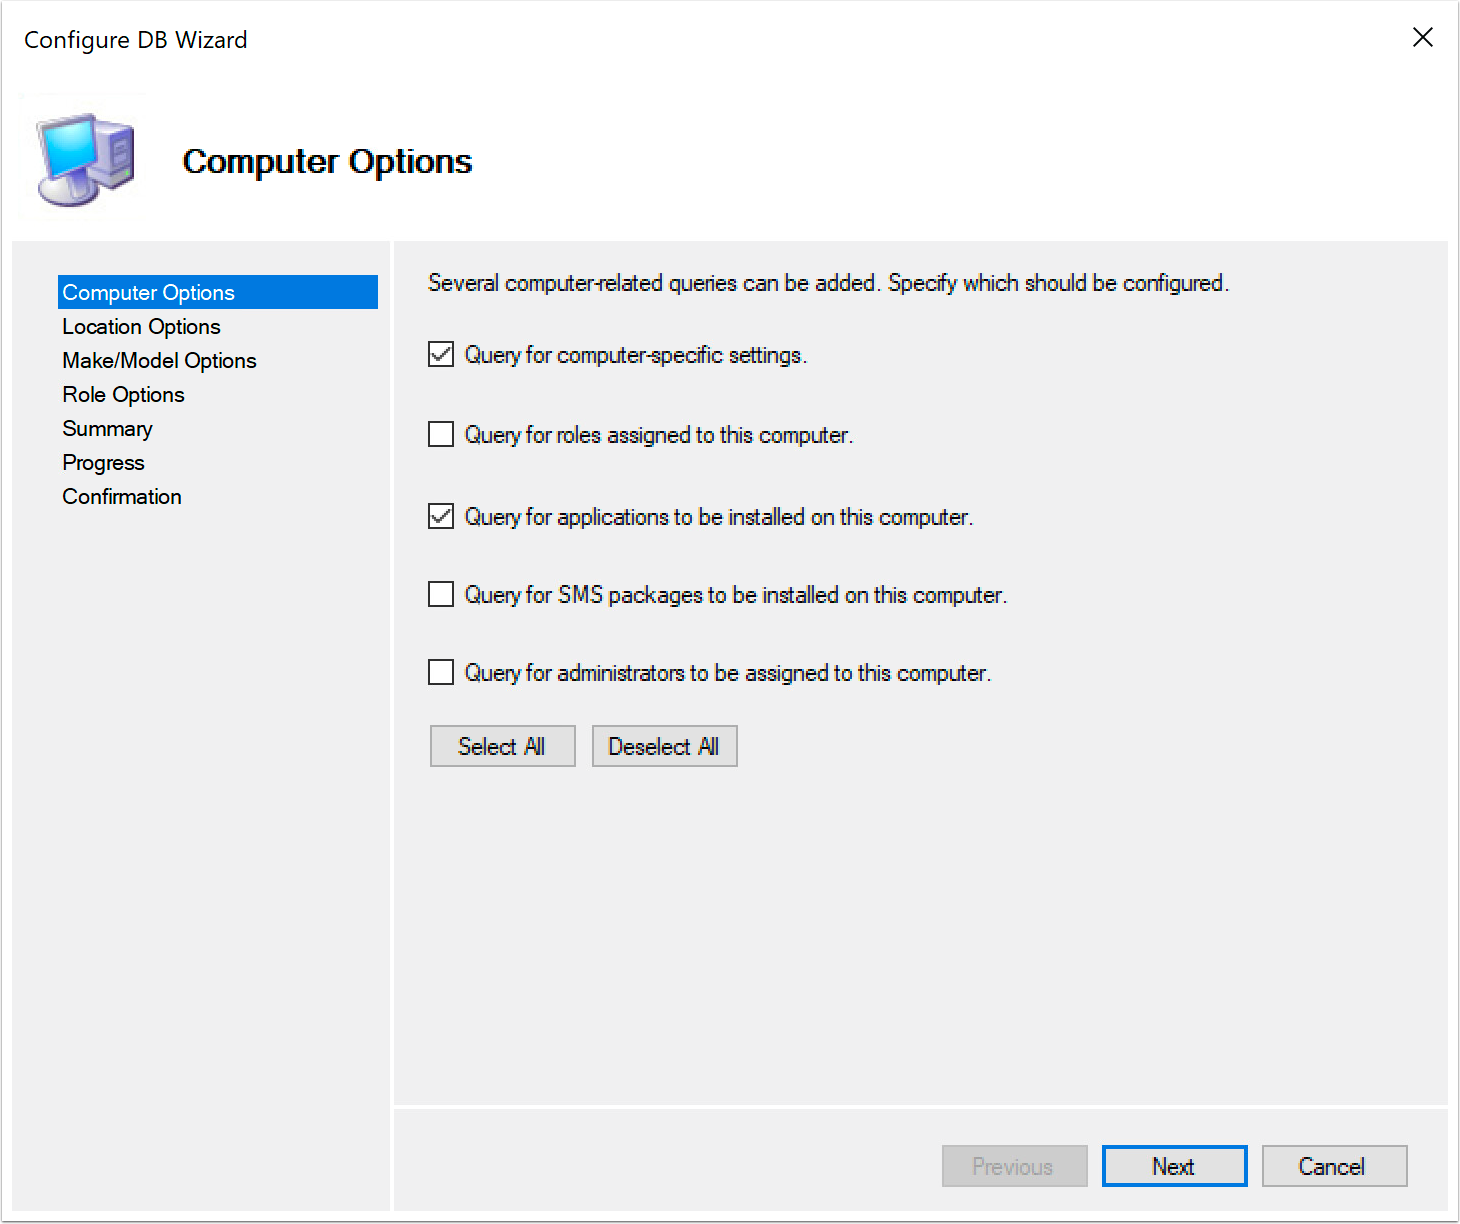
- Click Deselect All for Location Options and click Next.
- Click Deselect All for Make/Model Options and click Next.
- Click Deselect All for Role Options and click Next.
- Click Next to begin database configuration.
- Click Finish to exit the wizard.
Configure Windows Deployment Services and Add to DHCP
In this procedure, you configure the Windows Deployment Services PXE server to use the MDT-generated image, and you specify which types of computers to respond to. You also configure boot properties and Trivial File Transfer Protocol (TFTP) properties. After this configuration is complete, you set DHCP options for PXE boot.
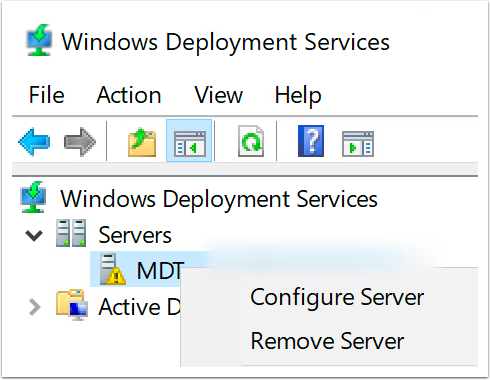
- To open Windows Deployment Services, from the Start menu, under Administrative Tools, select Windows Deployment Services.
- Right-click the local server and select Configure Server.
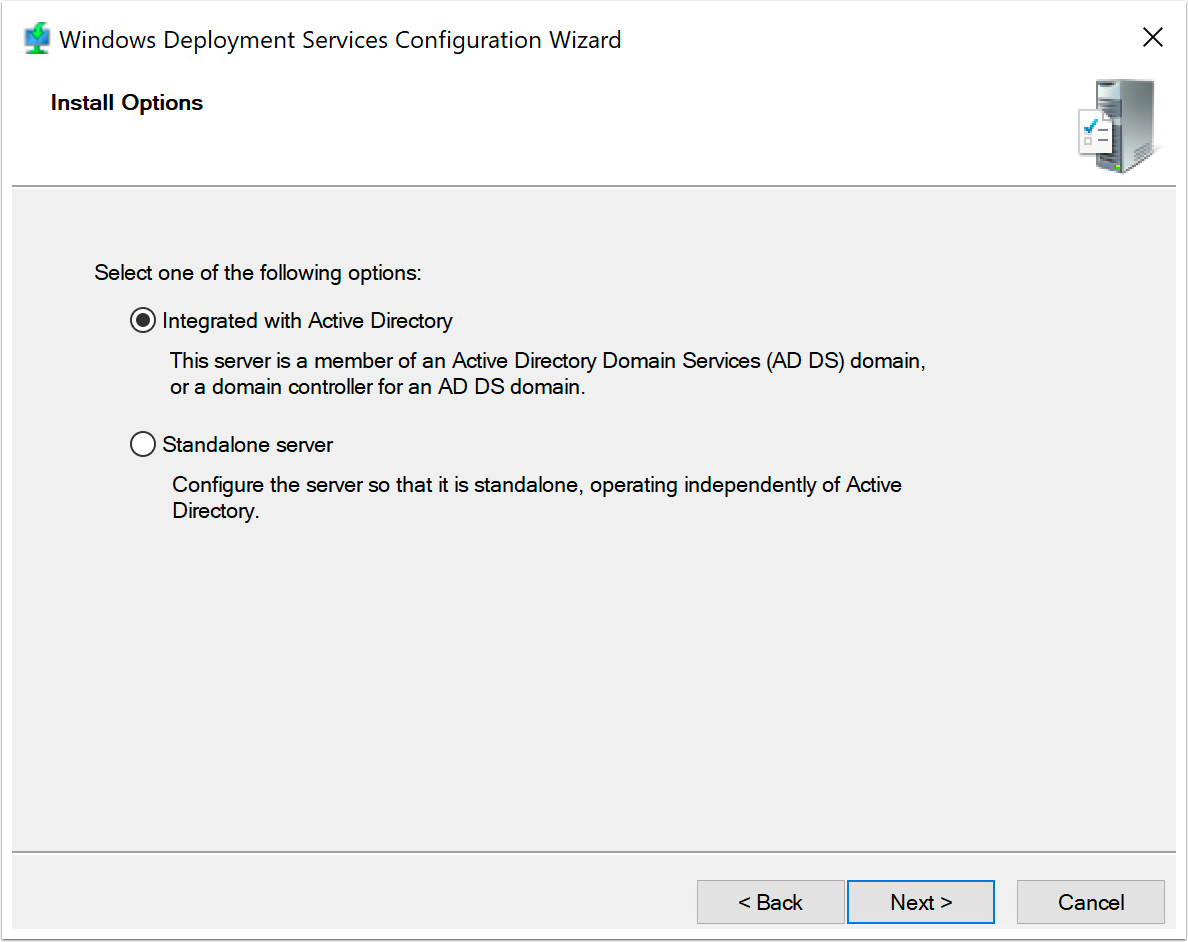
- Click Next on the Before You Begin page.
- Select Integrated with Active Directory and click Next.
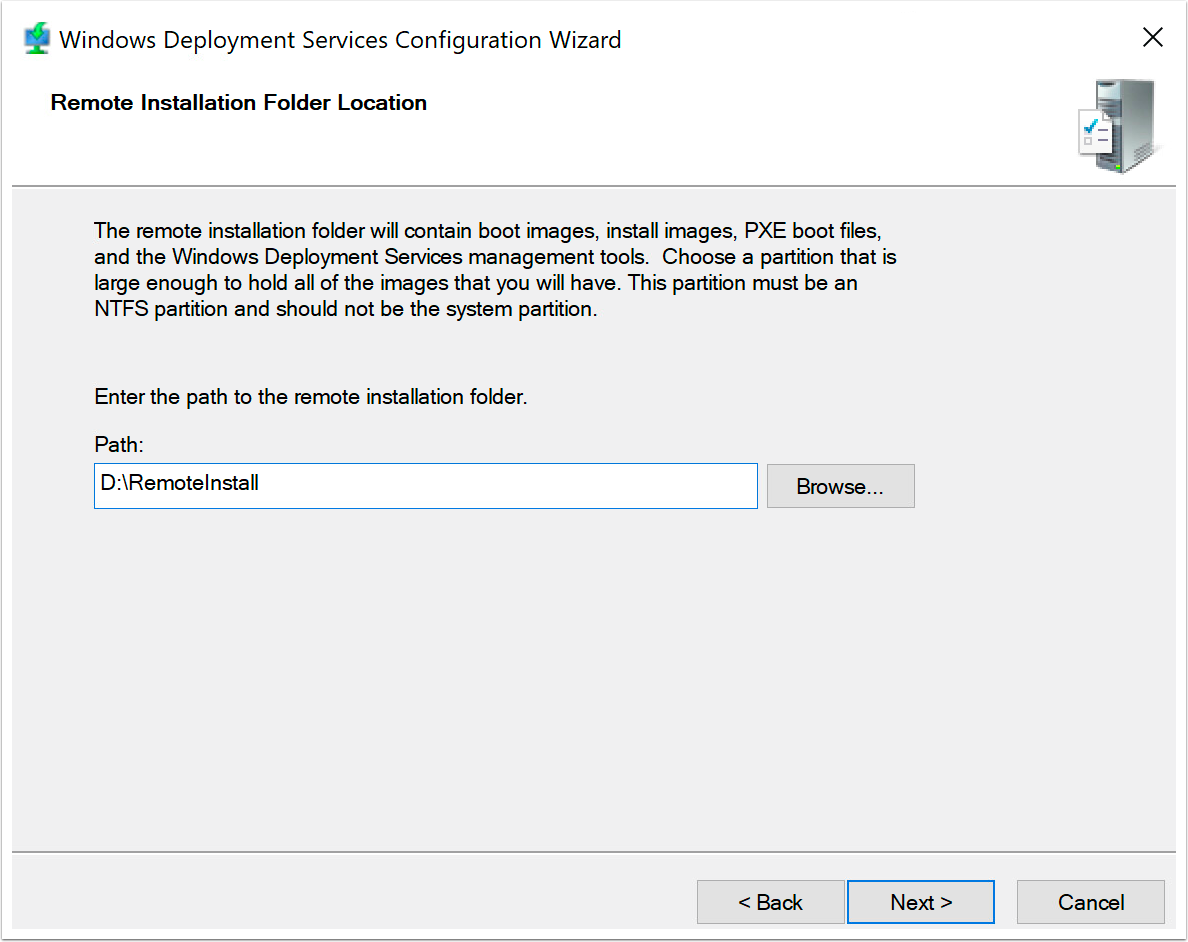
- Select a folder on the secondary drive and click Next.
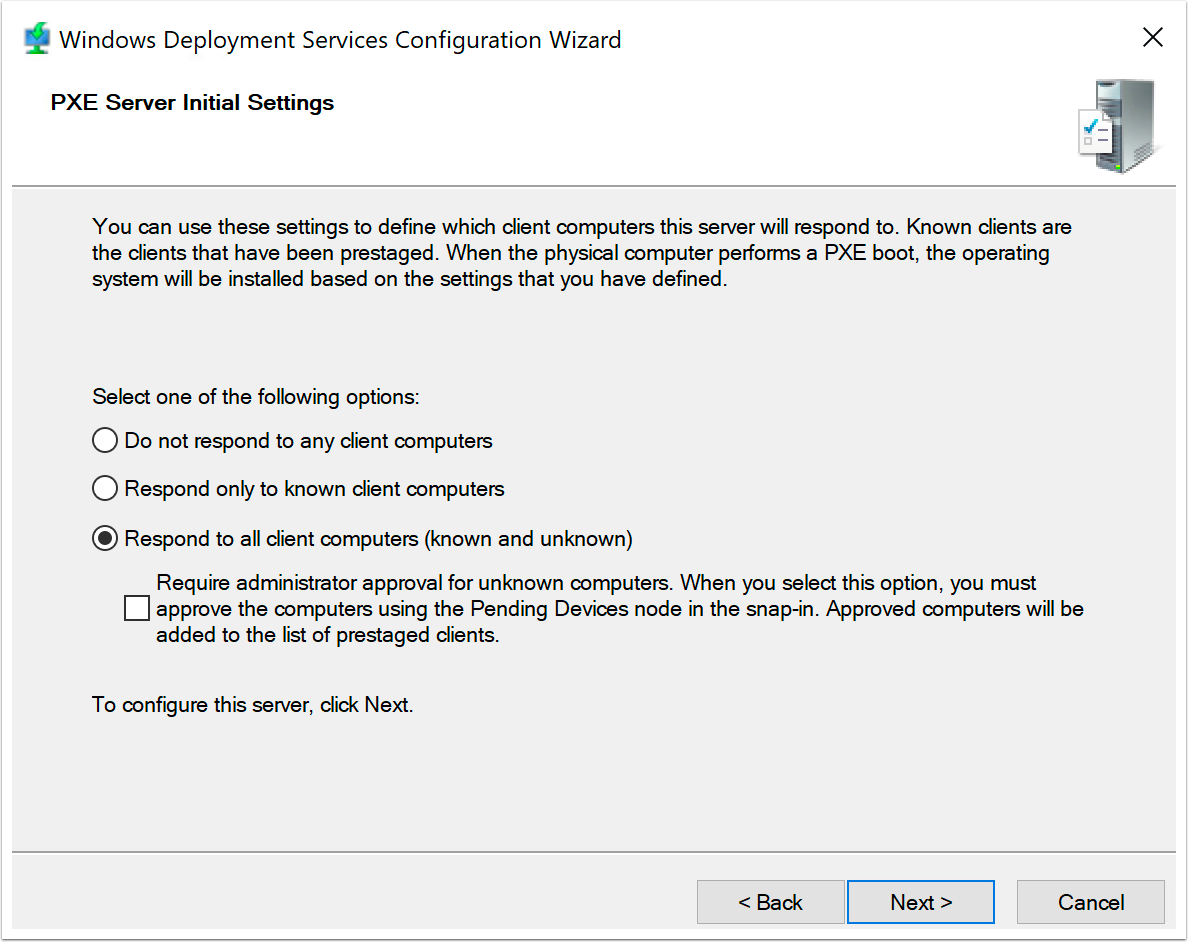
- Select Respond to all client computers and click Next.
- Deselect Add images to the server now, click Finish, and close the Deployment Workbench console.
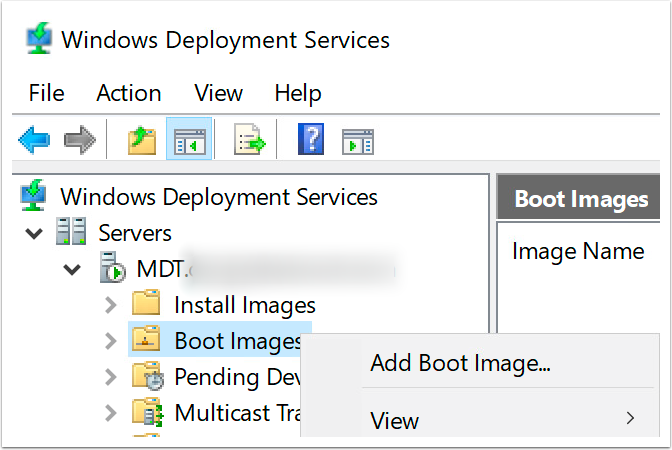
- To start the Add Image wizard, in the Windows Deployment Services window, under the local server, right-click Boot Images and select Add Boot Image.
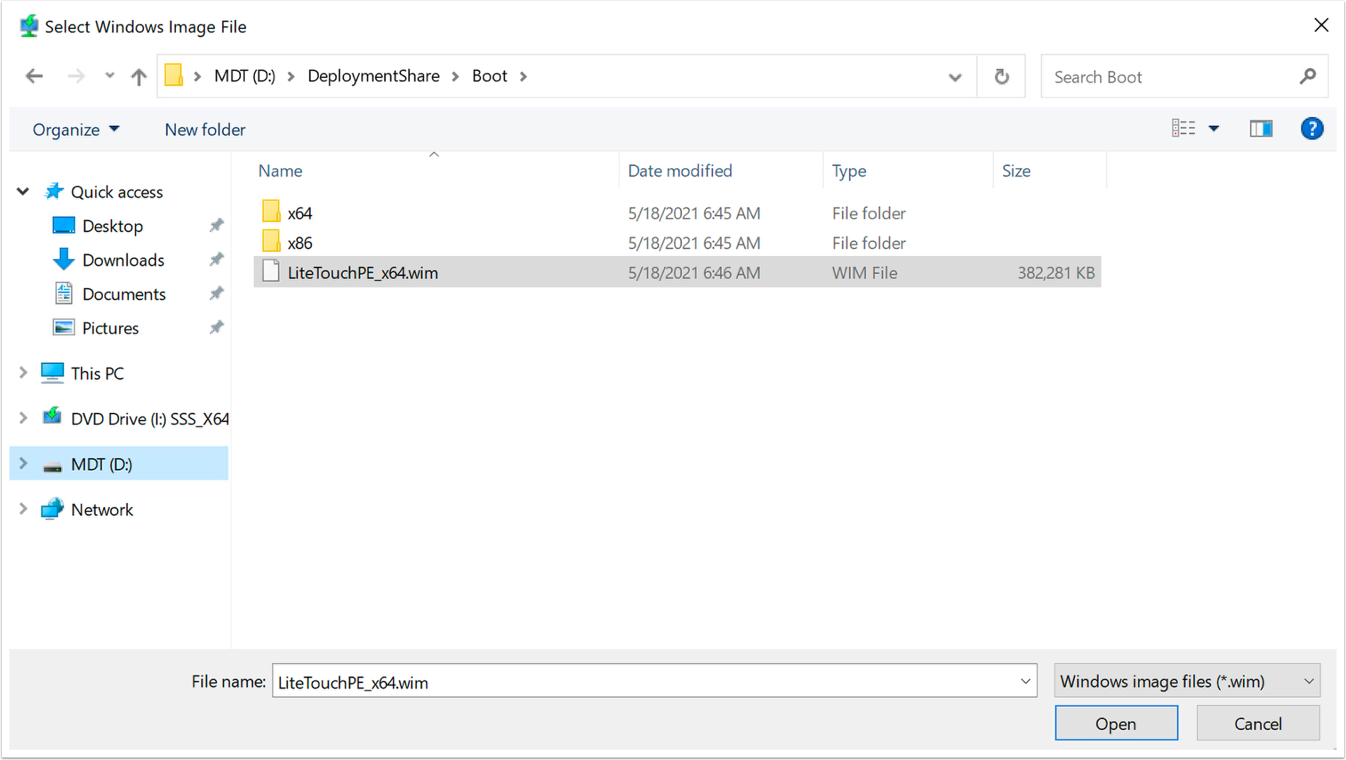
- Browse to and select the image file.
- Click Browse.
- Navigate to the Boot folder under the DeploymentShare.
- Select LiteTouchPE_x64.wim.
- Select the image file and click Open.
- Click Next on the Image File page.
- Click Next on the Image Metadata page.
- Click Next on the Summary page.
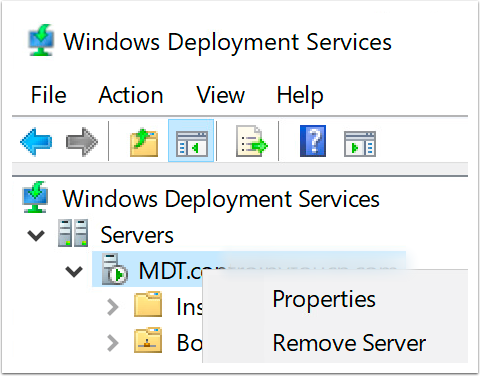
- To open the Properties editor for the local server, in the Windows Deployment Services window, right-click the local server and select Properties.
- To configure Boot properties, click the Boot tab and select Always continue the PXE boot for both Known clients and Unknown clients.
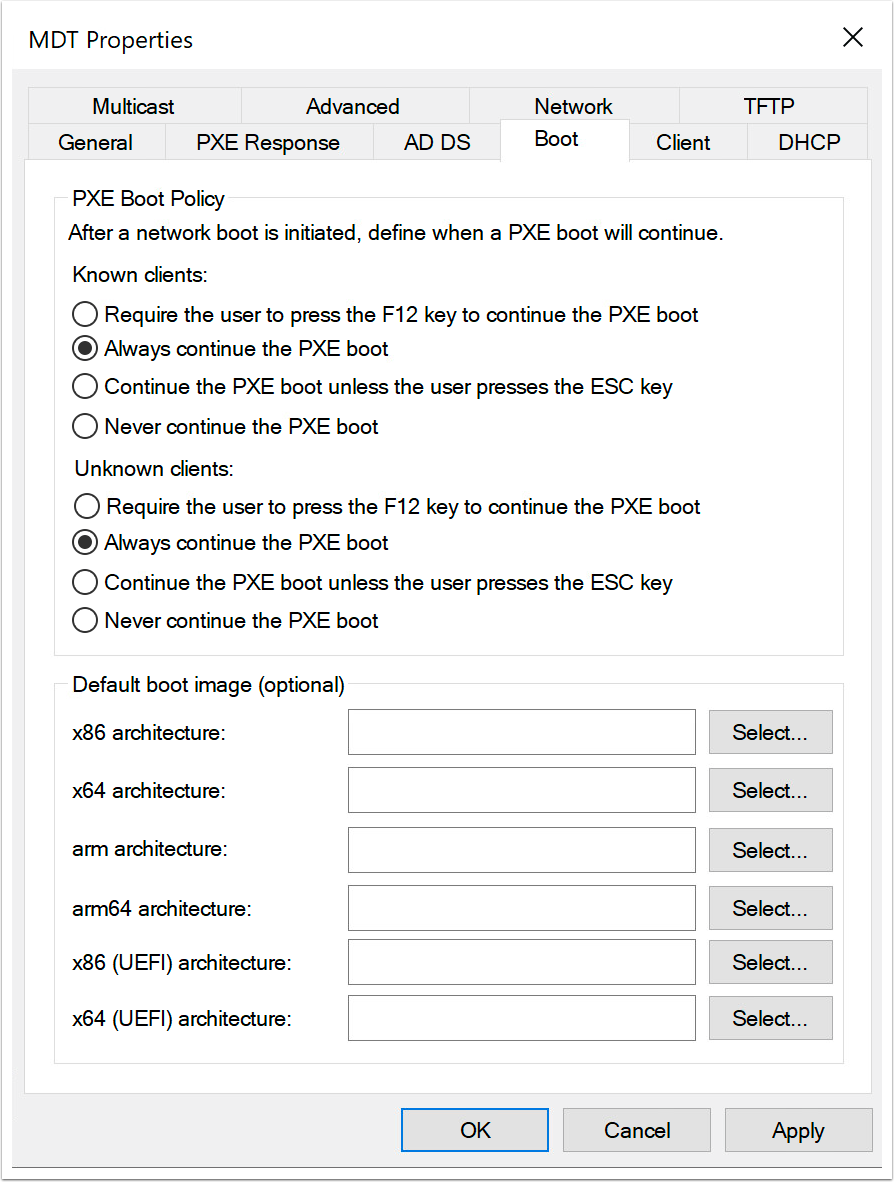
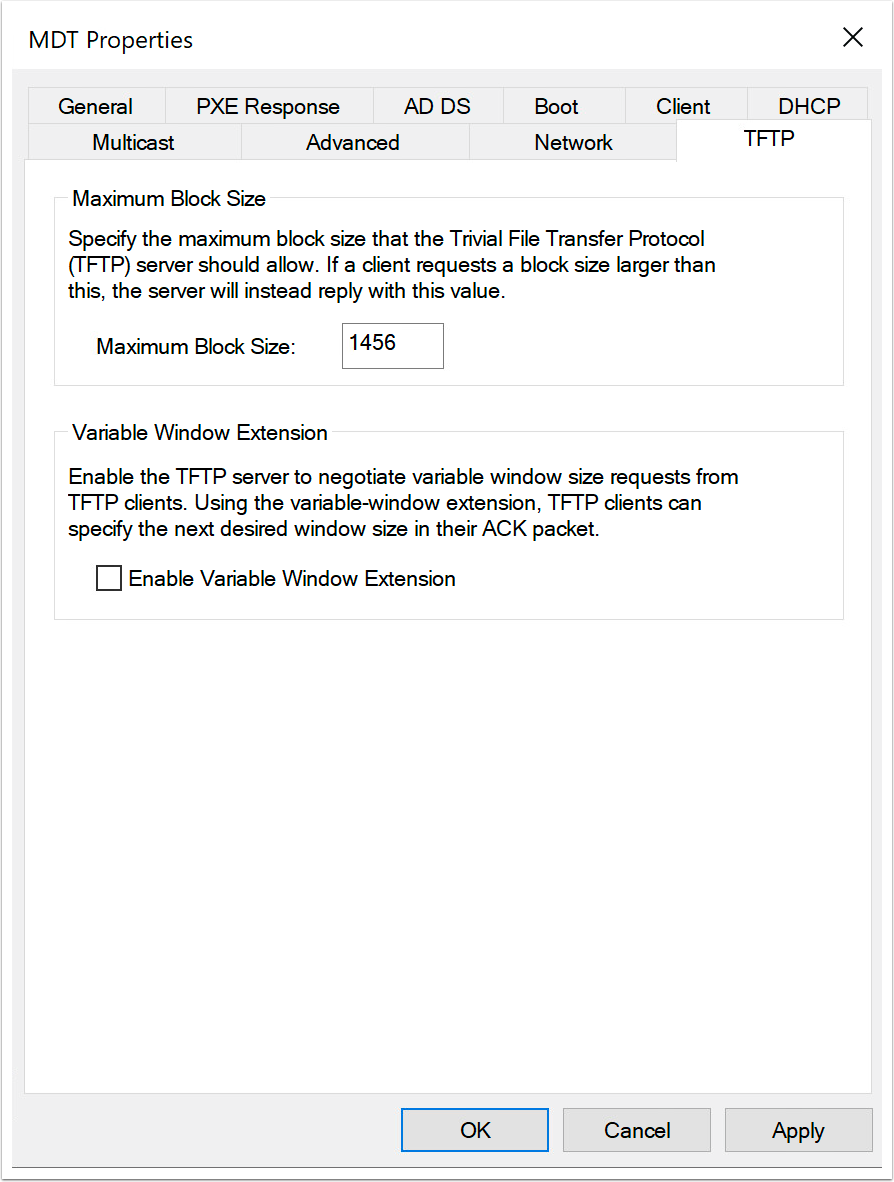
- To configure the TFTP properties, click the TFTP tab and enter 1456 as Maximum Block Size.
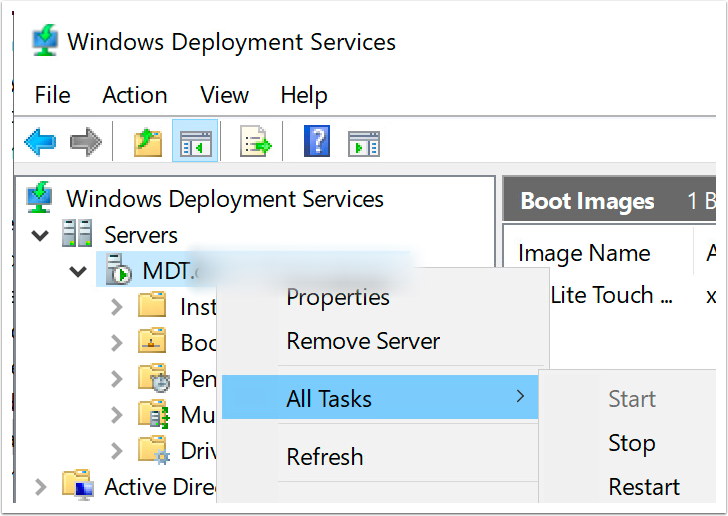
- To restart all tasks, right-click the local server, select All Tasks, select Restart, and close the Windows Deployments Services console.
- Configure your network to locate the deployment server as a network boot server, as described in the process in Specify the Location of the PXE Boot Server.
- If you are using the Windows 11, 22H2 version of the Windows Assessment and Deployment Kit (Windows ADK), which has a known issue, apply the fix, as described in Fix an MDT Known Issue.
Copy Required Applications to the Deployment Share
Follow the procedures to:
- Add Windows installation files using the process in Add Additional Operating Systems.
- Create a New Task Sequence.
- Add Applications to Microsoft Deployment Tool (optional).
- Add the VMware OS Optimization Tool Plugin for MDT.
- Add VMware Agents and Tools
Add the VMware OS Optimization Tool Plugin for MDT
Adding the VMware OS Optimization Tool plugin for MDT is a simple process of downloading a ZIP file and placing certain files and folders in a couple of locations.
- Download the VMware OS Optimization Tool plugin for MDT and extract the files from the ZIP file.
- Copy files and folders to the correct locations.
- Copy the contents of the Bin folder to
C:\Program Files\Microsoft Deployment Toolkit\Bin.
Important: Close the MDT console before copying the files. - Copy the Templates folder to the root of the deployment share.
- Copy the VMware folder to the root of the deployment share.
- Copy the contents of the Bin folder to
Add VMware Agents and Tools
In this procedure, you download various VMware agents and tools, as well as a couple of third-party tools, and copy these installers to the correct sub-folders of the VMware folder on the deployment share.
To perform this exercise, you need the following:
- VMware folder – You need to have completed the previous exercise, Add the VMware OS Optimization Tool Plugin for MDT. Part of that exercise involves downloading the OS Optimization Tool plugin for MDT, extracting its files and folders, and copying the VMware folder to the deployment share.
- Horizon Agent installer – This executable (
.exe) file is available from the Download VMware Horizon page. - App Volumes installer – VMware App Volumes is included with Horizon Enterprise Edition, available from the Download VMware Horizon page. The App Volumes installer is distributed as an ISO file. Extract the ISO contents to a folder so that you can copy the
App Volumes Agent.msifile. - Dynamic Environment Manager installer – The VMware Dynamic Environment Manager installer is available from the VMware Downloads page. The MSI installer file is included in a ZIP file.
To add the VMware agents and VMware Tools:
- Navigate to the VMware folder on the deployment share.
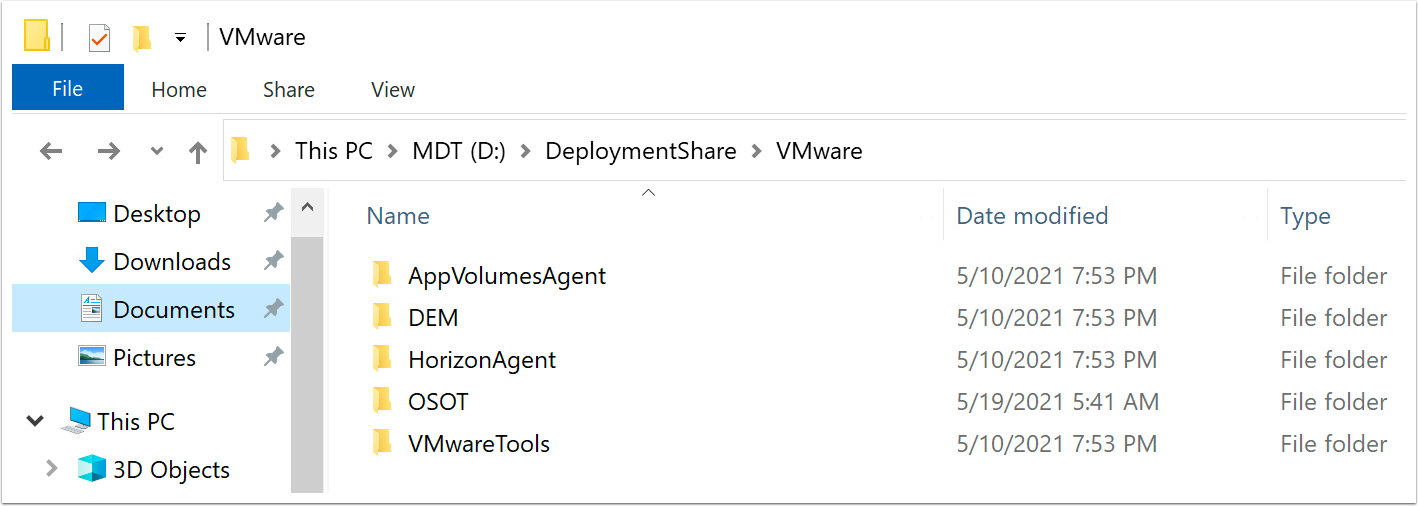
- Copy the
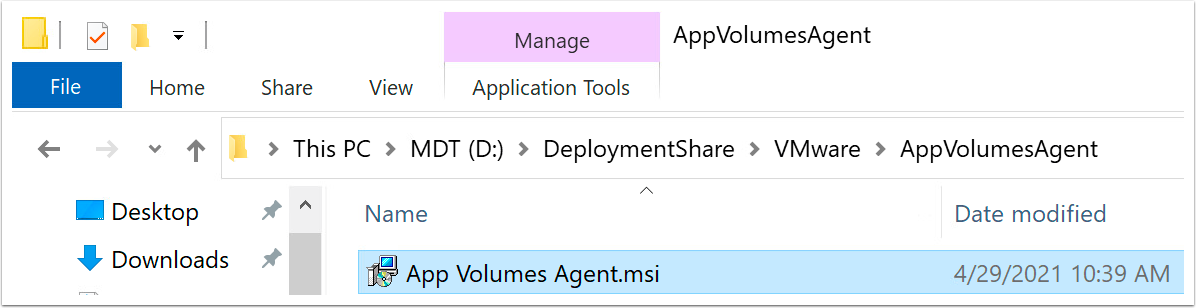
App Volumes Agent.msifile into the AppVolumesAgent folder if you use App Volumes.
- Copy the
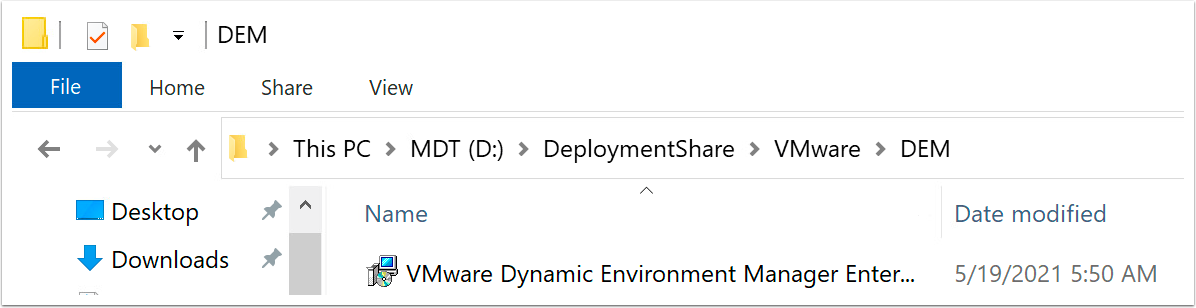
VMware Dynamic Environment*.msifile into the DEM folder if you use Dynamic Environment Manager.
- Copy the
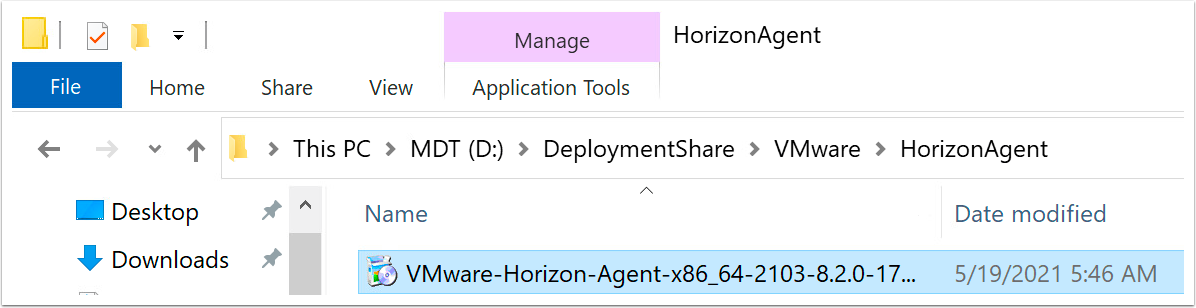
VMware-Horizon-Agent*.exefile into the HorizonAgent folder.
- Download and copy various tools files into the OSOT sub-folder, as follows:
- Download the Windows OS Optimization Tool for Horizon files and copy them into the OSOT folder.
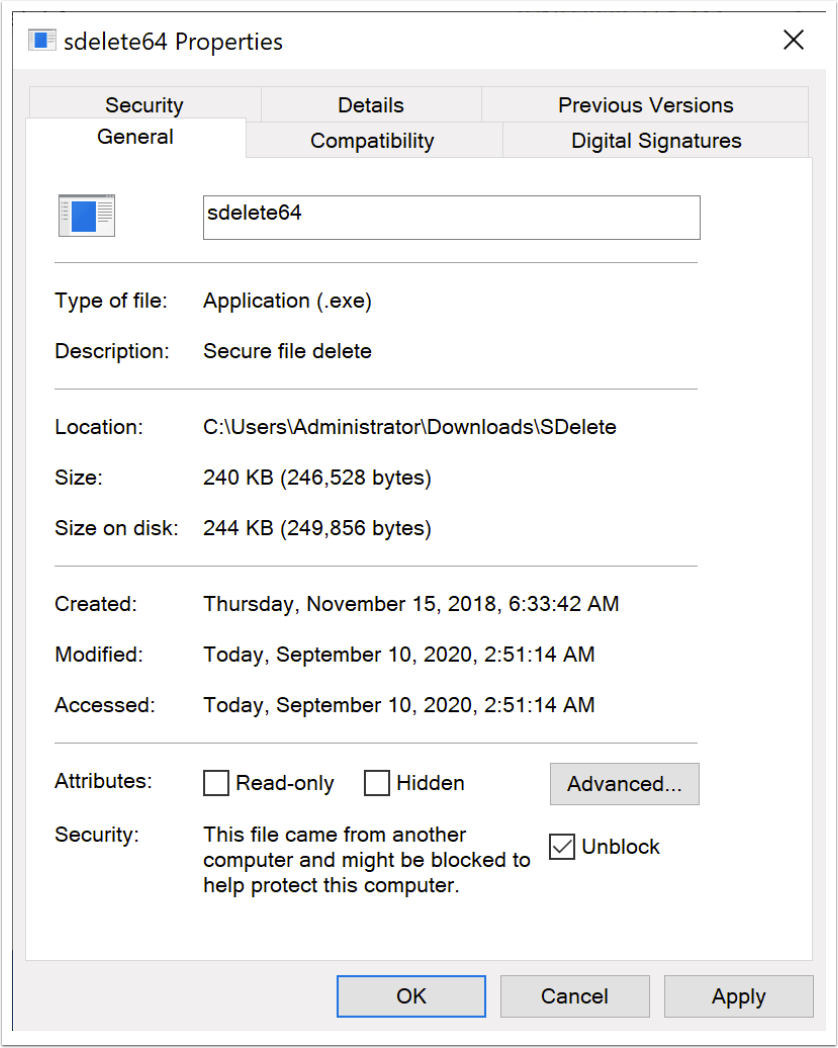
- Download and extract the third-party tools LGPO.exe (Local Group Policy Object Utility) and sdelete64.exe (Secure Delete) and copy the files into the OSOT folder.
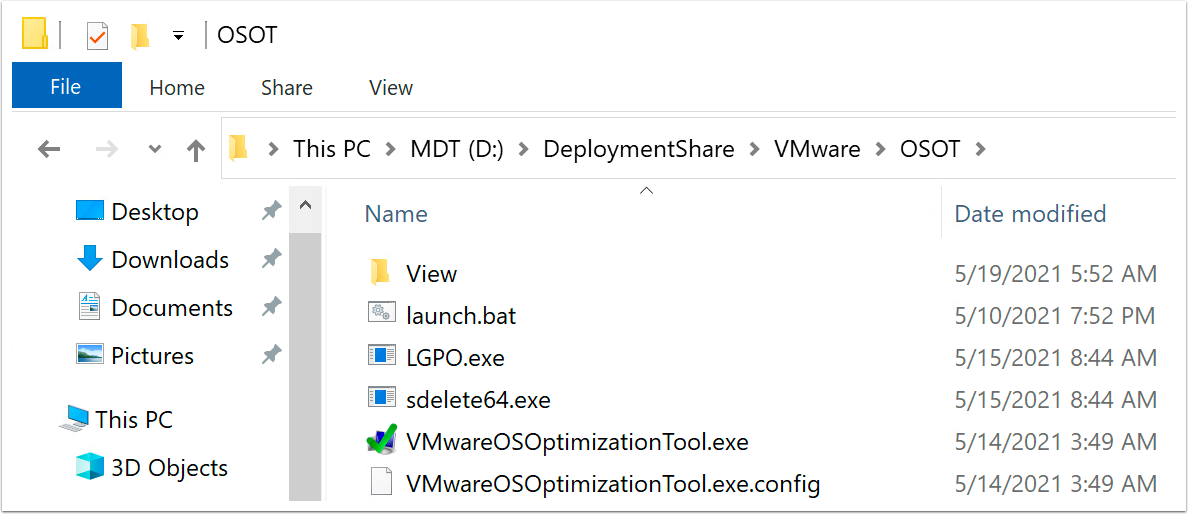
- To unblock the
LGPO.exeandsdelete64.exeexecutables, right-click each file (sdelete64.exeandlgpo.exe), select Properties, and in the Properties dialog box, select Unblock and click OK.
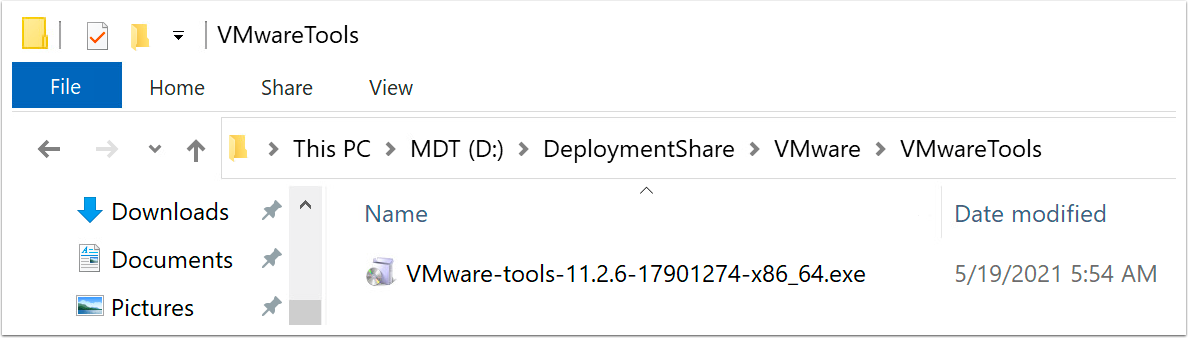
- Download the VMware-tools-*.exe file and copy it into the VMwareTools folder.
After updating tools and agents, the installers need to be extracted. Each task sequence should also be edited to ensure that it is configured to use the new version.
- Follow the procedure in Complete the Task Sequence Configuration.
Summary and Additional Resources
This guide shows you how to use the Microsoft Deployment Toolkit, along with the VMware OS Optimization Tool plugin for MDT and some VMware-provided PowerShell scripts, to automate all the manual tasks previously described in Manually Creating Optimized Windows Images for VMware Horizon VMs.
With the image optimization strategies in this guide, you can achieve a significant reduction in the amount disk space, CPU, and memory used by virtual desktop and RDSH server VMs and their vSphere hosts. The result is a corresponding savings in initial deployment time, user logon times, and IOPS. Installation of VMware agents is also included in the task sequences that are part of automation.
The procedures in this guide help you create an optimized Windows image that you can use in a VMware Horizon implementation or in other types of deployments. End users will have a great experience, whether they access their personalized virtual desktops or remote applications from company laptops, their home PCs, thin-client devices, Macs, tablets, or smartphones.
Additional Resources
- Manually Creating Optimized Windows Images for VMware Horizon VMs
- Evaluate VMware Products
- Horizon Support Center
- Horizon 8 Documentation
- Horizon 7 Documentation
- Dynamic Environment Manager Documentation
- App Volumes Documentation
- VMware Product Guide
- VMware Product Interoperability Matrices
- VMware Professional Services
- VMware vSphere documentation
Changelog
The following updates were made to this guide:
| Date | Description of Changes |
| 2023.11.15 |
|
| 2023/01/26 |
|
| 2021/07/01 |
|
About the Authors and Contributors
Graeme Gordon is a Senior Staff EUC Architect in VMware Technical Marketing.
Hilko Lantinga is a Staff Engineer 2 in VMware EUC R&D.
Feedback
Your feedback is valuable.
To comment on this paper, contact VMware End-User-Computing Technical Marketing at euc_tech_content_feedback@vmware.com.