
Evaluation Guide for VMware Horizon 8
Technical Introduction and Features
This Evaluation Guide for VMware Horizon 8 provides a technical overview of the VDI (virtual desktop infrastructure) and published-applications components of VMware Horizon®. Published applications are offered through Microsoft Remote Desktop Session Host (RDSH). Both VDI and RDSH publishing are done through a single Horizon platform, which simplifies desktop administration and operations, and enhances user experience.
In comparison to physical desktops, delivering Horizon virtual desktops as a service enhances the security of applications and data and improves IT responsiveness, while at the same time reducing costs. The user enjoys a consistent and responsive experience across devices and locations, while maintaining IT-approved levels of customization.
Important: The exercises in this tutorial walk you through the process of setting up a VMware Horizon environment that uses a VMware vSphere® infrastructure. A vSphere infrastructure can reside either on-premises or on one or more cloud platforms, including:
- VMware Horizon® on VMware Cloud™ on AWS
- VMware Horizon® on Azure VMware® Solution (AVS)
- VMware Horizon® on Google Cloud VMware® Engine (GCVE)
- VMware Horizon® on VMware Cloud™ on Dell EMC
- VMware Horizon® on Oracle Cloud VMware® Solution
In addition, you can create manual Horizon desktop pools in Amazon Workspaces, and you can deploy Horizon 8 server components and Windows Remote Desktop Services host (RDSH) servers on the Amazon EC2 machines.
The exercises in this guide assume you are using an on-premises environment. For information about deploying Horizon on vSphere in other environments, which is beyond the scope of this guide, see the following documents:
- Deploying VMware Horizon on VMware Cloud on Dell EMC
- Deploying VMware Horizon on VMware Cloud on AWS
- Deploying VMware Horizon on Azure VMware Solution
- Deploying VMware Horizon 8 on Native Amazon EC2
- Deploying VMware Horizon 8 on Amazon Workspaces
- Google Cloud VMware Engine Documentation
- Oracle Cloud VMware Solution Documentation
This tutorial does not include exercises for using the Horizon Cloud Service, which is a VMware-managed virtual desktop and application solution that provides desktops as a service using a Microsoft Azure or IBM Cloud public cloud infrastructure:
- VMware Horizon® Cloud Service™ next-gen
- VMware Horizon® Cloud Service™ on IBM Cloud
Purpose of This Guide
This guide is provided to help you evaluate VMware Horizon. The first chapter provides an overview of the key VDI and RDSH features. Exercises in the remaining sections allow you to evaluate some of the product's key features. Each exercise includes a video that demonstrates how to perform the task. For your convenience, following the video are the written-out steps. This way, you can consume the information in the format that you prefer: video, text, or both.
Note: This guide is designed for evaluation purposes only. It uses the minimum required resources for a basic deployment and does not explore every feature. Do not use this evaluation environment as a template for a production environment. For information beyond the considerations of this tutorial, see VMware Horizon Documentation.
This guide is intended for IT administrators, architects, engineers, and product evaluators who want to install Horizon and deploy a VDI environment. Both current and new users can benefit from using this tutorial. You should be familiar with VMware vSphere and VMware vCenter Server®. Familiarity with other technologies is also helpful, including networking and storage in a virtual environment, Active Directory, identity management, directory services, and RSA SecurID.
Advantages of Using VMware Horizon
VMware Horizon is a centralized desktop virtualization solution that enables organizations to deliver virtualized desktop services and applications to employees as a managed service. Horizon has advantages for both end users and IT administrators:
- End users are no longer restricted to one specific machine and can access their system and files across many supported devices and locations.
- As an IT administrator, you can use Horizon to simplify and automate the management of Windows and Linux desktops and applications, and you can securely deliver desktops as a service to users from the data center or cloud. You can quickly create virtual desktops on demand based on location and profile.
A single administration console provides detailed levels of control, allowing you to customize the end-user experience, access, and personalization to support corporate policy. End users get a familiar, personalized environment that they can access from any number of devices anywhere throughout the enterprise or from remote locations. And as an administrator, you have centralized control, efficiency, and security by storing desktop data in the data center.
Packaging and Licensing
Horizon is available as a subscription service, with many types of editions. For more information, see the Compare Horizon Editions and Pricing section of the VMware Horizon product page.
Also see the VMware Horizon Subscription Comparison Matrix. The Horizon universal license provides a single subscription license for all Horizon products.
Features
Horizon offers many features that help IT efficiently deploy and scale full-featured, personalized digital workspaces from a single control plane with rapid provisioning, automation, and simplified management. For an overview of the key capabilities, see What Is VMware Horizon?
Components and Architecture
Horizon contains key components and integrated products that work together. The following diagram shows the logical architecture of a typical Horizon implementation.

Figure 1: Logical Architecture for VMware Horizon
This figure shows how Horizon components work together to provide access to virtual desktop pools, RDSH desktop and application pools, and more. From the top of the diagram down, the components are:
Horizon Clients – VMware Horizon® Client for Windows, macOS, iOS, Linux, Chrome, or Android is installed on every endpoint so that end users can access their virtual desktops and published applications from a variety of devices such as smartphones, zero clients, thin clients, PCs, laptops, and tablets.
Horizon Client software can be downloaded for free from app stores or from VMware, or users can open a browser and enter the server URL to use the VMware Horizon® HTML Access™ web client, which does not require installing any software on the client device.
Unified Access Gateway – VMware Unified Access Gateway™ provides a secure gateway that allows users to access their desktops and applications from outside a corporate firewall. Unified Access Gateway appliances typically reside in a demilitarized zone (DMZ) and act as a proxy host for connections inside your trusted corporate network.
Although Unified Access Gateway is included with VMware Horizon, this guide does not include exercises for deploying and configuring the Unified Access Gateway appliance. For that information, see Deploying VMware Unified Access Gateway: VMware Workspace ONE Operational Tutorial.
Horizon Connection Servers – Users connect to a Connection Server, often through a Unified Access Gateway, to access their virtual desktops and native, virtual, or RDSH-based applications. The Connection Server provides the following management capabilities:
- Authenticating users
- Entitling users to specific desktops and applications
- Managing local and remote desktop and application sessions
- Establishing secure connections between users and desktops or applications
- Enabling single sign-on
- Setting and applying policies
- Managing an instant-clone engine
Horizon Control Plane and Horizon Edge (optional) – One key concept in a Horizon environment design is the use of pods. A pod is made up of a group of interconnected Connection Servers that broker connections to desktops or published applications. Horizon Control Plane is a cloud-based service that unifies and simplifies management across pods, providing monitoring as well as image, application, and lifecycle management. In addition, a global entitlement layer connects Horizon pods, letting end users access their desktop in any connected pod or cloud.
The Horizon Edge Gateway appliance is a virtual appliance that you pair with a Connection Server in an on-premises pod so that the pod can be connected to the Horizon Control Plane. This pairing also requires the use of subscription licensing.
Workspace ONE Access (optional) – VMware Workspace ONE Access™ (formerly called VMware Identity Manager) is a solution that provides application provisioning, a self-service catalog of applications and virtual desktops, conditional access controls, and single sign-on (SSO) for software as a service (SaaS), web, and cloud resources. When Workspace ONE Access is used to integrate Workspace ONE with Horizon, users can use the Workspace ONE Intelligent Hub app to launch their Horizon desktops and published apps.
RDSH server farms and virtual desktop pools – The virtual machines in these pools are created from a golden VM image. The Horizon Agent, which you install in the virtual desktop or RDSH server, communicates with Horizon Client on the end user’s device to determine which applications and desktops to provide to the user. Horizon Agent also provides features such as connection monitoring, client drive redirection, VMware integrated printing, and access to locally connected USB devices.
vCenter Server and vSphere hosts – The vSphere product family includes VMware ESXi™ hosts and VMware vCenter Server, and it is designed for building and managing virtual infrastructures. The vCenter Server system provides key administrative and operational functions, such as provisioning, cloning, and VM management features, which are essential for VDI. For more information, see VMware vSphere Documentation.
Dynamic Environment Manager (optional, not pictured) – VMware Dynamic Environment Manager™ (formerly called User Environment Manager) lets administrators configure user-specific Windows desktop and application settings. The settings are applied in the context of the client device, location, or other conditions. Policies are enforced when users log in or when they launch an app, reconnect, or when some other triggering event occurs. Settings are also available for configuring folder redirection to store personal user data, including documents, pictures, and so on.
For a quick-start tutorial on Dynamic Environment Manager, see Quick-Start Tutorial for User Environment Manager.
App Volumes managers and packages (optional, not pictured) – VMware App Volumes™ uses application containers called App Volumes packages, which are virtual disks that contain all the components that are required to run an application, such as executables and registry keys. When a package is deployed, it is available for use within seconds without end-user installation. Applications can be deployed once to a single central file and accessed by thousands of desktops. This simplifies application maintenance, deployment, and upgrades.
For a quick-start tutorial on App Volumes, see Evaluation Guide for VMware App Volumes 4.
Sketch of the Quick-Start Steps
After completing the exercises in this guide, you will have a small Horizon environment with several published applications and a virtual desktop pool. The applications are delivered using RDSH servers.
Both the server farm and the desktop pool are created using instant-clone provisioning. This vSphere-enabled technology for cloning desktops and RDSH servers allows administrators to quickly create VMs that share virtual disks with a golden image, conserving disk space and simplifying the management of OS patches and updates. No separate server or database required.
Below is a graphical summary of your accomplishments by the time you reach the end of this guide.
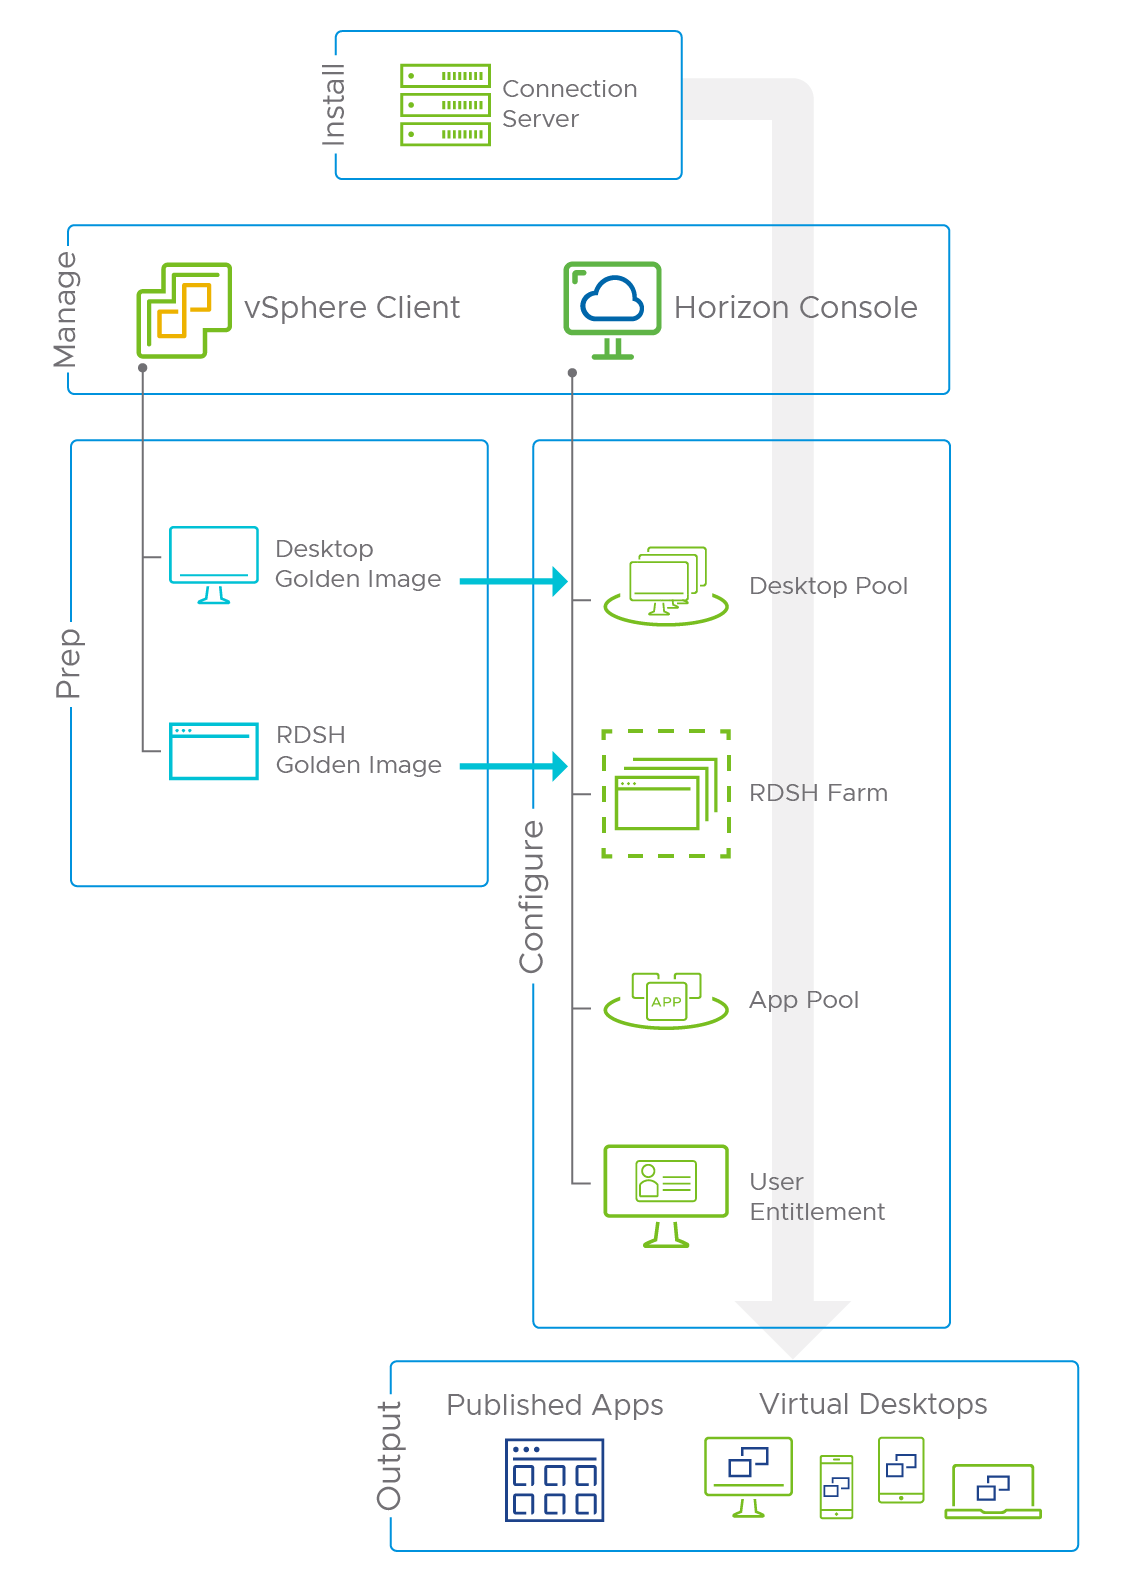
Figure 2: Workflow for Creating Virtual Desktops and Published Apps with Horizon
- Install – You begin by installing the server software (Horizon Connection Server) that manages sessions between users and their virtual desktops and published apps and that enables automated creation of virtual desktops and RDSH servers. The web-based Horizon Console is included when you install a Connection Server.
- Prep – Next, you use vSphere Web Client to create golden images of the Windows desktop and the RDSH server and that will host applications. Besides configuring the operating system on these VMs, you will install the agent software (Horizon Agent) that communicates with the Horizon servers and the clients.
- Configure – Once these Horizon infrastructure elements are set up, delivering apps and desktops is very simple. For virtual desktops, you will use the Horizon Console to create a desktop pool from the golden image, which automatically clones the number of desktops you specify.
- Configure – For published applications:
- Use the Horizon Console to create an RDSH server farm from the golden image, which automatically clones the number of servers you specify.
- Publish one or multiple application pools with one trip through the Add Application Pool wizard.
- Configure – After the desktop and application pools are ready, use the Horizon Console to entitle users or groups to the apps and desktops.
- On client devices, you will download the free Horizon Client software from app stores or from VMware to install on iOS, Android, Chromebook, Windows, macOS, or Linux clients, or just open a browser and enter the server URL to use the HTML Access web client.
How to Install Horizon
The exercises in this installation chapter are sequential and build on one another. For this reason, be sure to complete each exercise before moving on to the next.
Exercise: Download Horizon Installers
If you have already purchased Horizon, you can download the installers (installation files) from the Download VMware Horizon page. This exercise shows you which installers to download and how to download the installers from the VMware Product Evaluation Center, which gives you a free 60-day trial.
Note: The following video, Starting a Free Trial of VMware Horizon 8, demonstrates how to download a free trial from the VMware Horizon Product Evaluation Center. For your convenience, the steps are also provided in text format below the video.
To download the installers:
- On any web browser, navigate to the VMware Horizon Product Evaluation Center, and log in.
If you do not already have an account, you can create one here. - If prompted, register for the product.
- On the License & Download tab, scroll down to the License Information section, and make a note of the Horizon Enterprise license.
You will use this license key after you run the installer. - Continue scrolling down to Download Packages section, expand VMware Horizon Enterprise Binaries, if necessary, and download the following packages:
- Horizon Connection Server (64-bit)
- Horizon Agent (64-bit)
- Horizon GPO Bundle
- If you do not already have a vSphere environment set up, scroll down and expand the Hypervisor and Management Server Binaries section, and download the following packages:
- VMware vCenter Server Appliance
- VMware vSphere Hypervisor (ESXi ISO) image
- On the client device you plan to use—desktop computer, laptop, Chromebook, tablet, or phone—navigate to the Download VMware Horizon Clients page and download the appropriate client installer for that device type.
The exercise in this guide provides instructions for accessing virtual desktops and published apps using a Windows device.
Verify Infrastructure Requirements Are Met
Before you begin the installation exercises in this guide, make sure that your environment meets the following infrastructure requirements:
- VMware vSphere and vCenter Server – Before you can perform the exercises in this guide, you must have a VMware vSphere infrastructure that contains at least one VMware ESXi host and one VMware vCenter Server instance. This guide does not provide instructions for installing these vSphere components. For instructions, see the vSphere Product Documentation.
- Active Directory domain controller – The authentication infrastructure for your setup must include Active Directory, DNS, and DHCP. The Connection Server joins to Active Directory and sets up a lightweight directory service instance for the storage of Horizon configuration information.
- TLS/SSL certificate – (Optional) By default, Horizon servers include a self-signed certificate that can be used for testing purposes. For a production environment, we recommend that you replace the self-signed certificate with an approved certificate signed by a certificate authority, a trusted entity that issues digital certificates verifying another digital entity’s identity on the Internet.
- SQL database server – This is the database server on which you will create the Events database, which records actions that occur on the Horizon servers. For the example in this exercise, we used Microsoft SQL Server 2019.
For the most up-to-date information about supported databases, see the VMware Product Interoperability Matrix at https://interopmatrix.vmware.com/Interoperability. At the top of the screen, select 3rd Party Solution Interoperability. For Solution 1, select the VMware Horizon and select the version. Under Select 3rd Party Solutions, select the category Databases. To see a list of all supported databases, leave the Solution field empty, so that the default remains All Solutions. Click CHECK INTEROPERABILITY. The result should look similar to the following screenshot.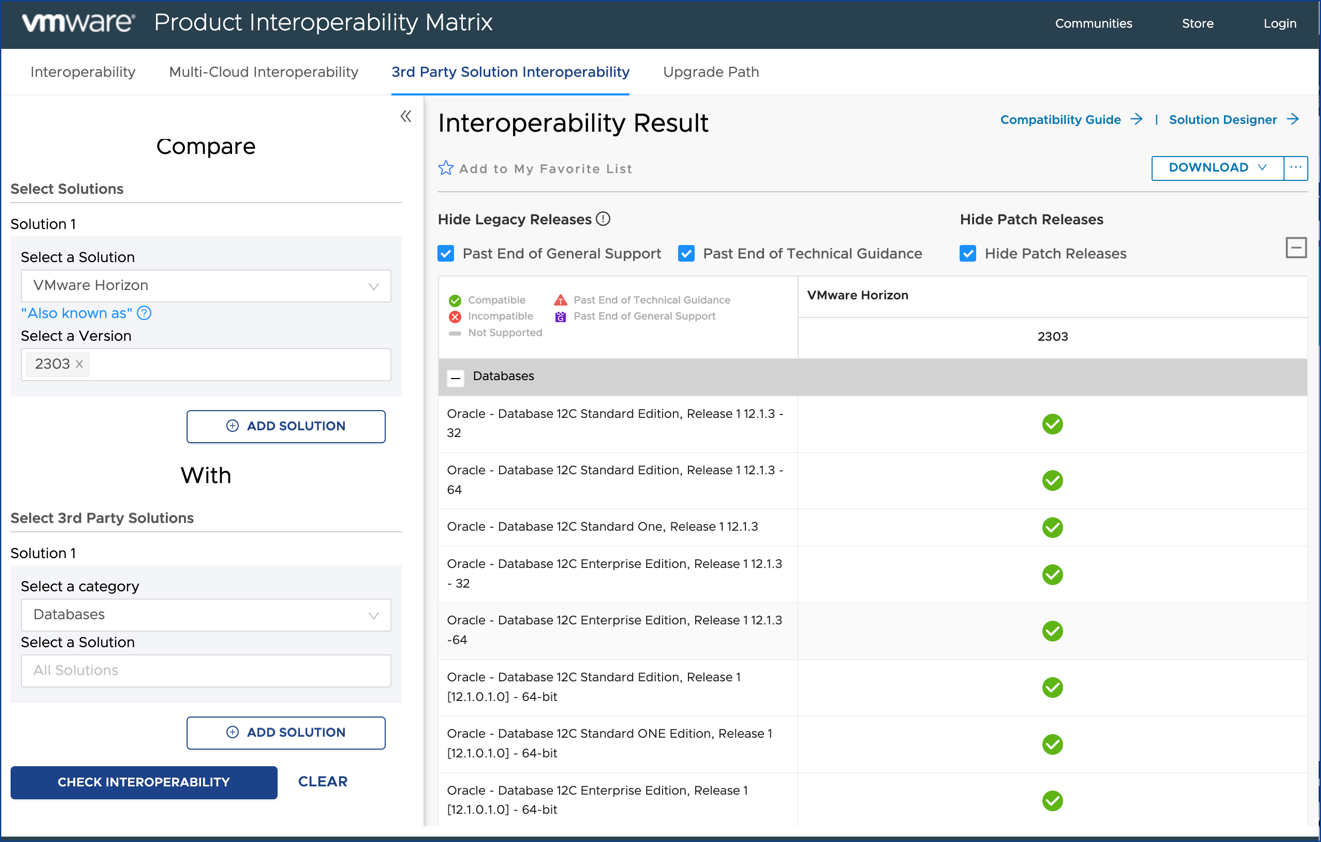
If you need to create a VM to host a database server, you can follow the instructions in the section Create VMs for the Connection Server and Database Server.
Note: You can download and install Microsoft SQL Server Management Studio and Microsoft SQL Server 2019 Express to get both database and management tools, or use an existing SQL server in your environment. - Network and storage – VMware recommends a network connection speed of at least 1 Gbps between all the required Horizon components and desktops. The standard vSphere network is sufficient for a Horizon environment. Similarly, for a Horizon test environment, you can use the local storage on a vSphere ESXi host if you do not have separate storage or VMware vSAN™.
Create VMs for the Connection Server and Database Server
For the exercises in this guide, you must have VMs on which to install the Connection Server and the database server. For this purpose, you can create a VM template and clone it to create the required VMs for the server components.
Tip: If you are using a small test environment, it is possible to use one VM to host both the Connection Server and, for example, a Microsoft SQL Server Express database server.
Note: If you are already using a vSphere environment in production and have production VMs with Windows Server installed, you might be able to use those or clone them, if they meet the virtual hardware requirements. If not, you can use the procedure in this exercise.
Outline for creating a server VM:
- Using the step-by-step instructions in the guide Manually Creating Optimized Windows Images for VMware Horizon VMs or the guide Using Automation to Create Optimized Windows Images for VMware Horizon VMs, create a Windows Server VM.
Note: When specifying the number of vCPUs, memory, disk size, and so on, use the following specifications, which are adequate for a test environment:
CPU – 4
Memory – 4 GB
New Hard Disk – 40 GB
New SCSI Controller – LSI Logic SAS
Network Adapter Type – VMXNET3 - Be sure to complete all the tasks involved in creating the vSphere-based VM. After you install the Windows Server operating system, install VMware Tools and the .NET Framework 3.5, and then update Windows. You will not need to install any Horizon agents on the machine, since you are creating a server component of Horizon.
- Clone the virtual machine you just created to a virtual machine template, which you can use to easily create the server VMs you need.
For instructions, see the vSphere documentation topic Clone a Virtual Machine to a Template. - Deploy the Connection Server VM and, if necessary, the database server VM from the template you just created.
For instructions, see the vSphere product documentation topic Deploy a Virtual Machine from a Template.
Important: These VMs must have an IP address that does not change. In an IPv4 environment, configure a static IP address for each VM. In an IPv6 environment, machines automatically get IP addresses that do not change.
Now that you have VMs for your Horizon servers, you can copy the Horizon Connection Server installer to the VM and run the wizard, as described in the following exercise.
Exercise: Install the Horizon Connection Server
The Connection Server acts as a broker for client connections by authenticating and directing incoming user desktop requests. When you install the Connection Server, the Horizon Console is installed as well. The Horizon Console is the web-based interface for the management, provisioning, and deployment of virtual desktops. As an administrator, you can centrally manage thousands of virtual desktops from a single Horizon Console.
There are several prerequisites for installing the Connection Server:
- User account – When you log in to the OS to run the installer, the account you use must have administrative privileges.
- Installer – If necessary, you can download the installer from the Download VMware Horizon page or the VMware Horizon Product Evaluation Center. You must download and copy the installer file to the Connection Server VM, or, alternatively, you can copy it to a location accessible to the system.
- Connection Server VM – Verify that you have performed the exercise Create VMs for the Connection Server and Database Server so that you have a server VM with the required virtual hardware, a supported Windows OS, and a static IP address.
For more information about virtual hardware requirements, see Hardware Requirements for Horizon Connection Server in the Horizon Installation and Upgrade guide. For a complete list of supported operating systems, see the VMware Knowledge Base article Supported Operating Systems and MSFT Active Directory Domain Functional Levels for VMware Horizon 8 2006 (78652).
Note: The following video, Installing the VMware Horizon Connection Server, demonstrates how to perform this procedure. For your convenience, the steps are also provided in text format below the video.
To install Horizon Connection Server:
- Navigate to the Connection Server installation file that you downloaded earlier, right-click the file, and select Run as administrator to start the installation wizard.
The file name has the formatVMware-Horizon-Connection-Server-x86_64-x.x.x-build_number.exe, where x.x.x is the version number. - If prompted to allow the app to make changes to your device, click Yes.
The Welcome page of the wizard appears. - Follow the prompts to the Installation Options page, and select the following options before clicking Next:
- Horizon Standard Server – This is the default. For information about the other types of Connection Servers you can install after first installing a standard server, see Installing the Horizon Connection Server Software in the Horizon Installation guide.
- Install HTML Access – This is the default. HTML Access is the web-based Horizon Client, which lets you access virtual desktops and applications that do not have any client software installed.
- IP protocol version – You must install all VMware Horizon components, including the Horizon Agent on desktop VMs and RDSH server VMS, with the same IP version.
- On the Data Recovery page, enter the password you want to use for recovering data backups of the Connection Server.
- On the Firewall Configuration page, accept the default, which is Configure Windows Firewall automatically.
- On the Initial Horizon Administrators page, for this exercise and for simplicity, we recommend authorizing an Active Directory domain group.
- On the User Experience Improvement Program page, you can deselect the Join the VMware Customer Experience Improvement Program option to opt out of the program.
- On the Ready to Install page, leave the default for the drop-down list, which is General, to indicate that you are deploying the Connection Server in an on-premises environment, and click Install.
- On the Installer Completed page, click Finish.
- Launch the Horizon Console by using one of the following methods:
- If you are logged in to the server on which you installed the Connection Server, either double-click the Horizon Administrator Console desktop shortcut or open a browser and enter the following URL:
https://localhost/admin/. - If you are accessing the Horizon Console from a machine other than the one you used for installation, open a browser, and enter the following URL:
https://<connection-server-hostname>/admin/.
If you see a security warning, use the necessary UI controls to continue. For example, for Firefox, you would click the Advanced button and then scroll down and click Accept the risk and continue. You see this warning because the default self-signed security certificate is being used.
- Log in to Horizon Console using an account that belongs to the user or group account you specified when completing the Horizon Connection Server installation wizard.
For more information about installation and all the options, see the Horizon Installation and Upgrade guide.
Initial Configuration
The exercises in this chapter are about configuring the Connection Server so that you can create pools of VDI desktops and RDSH-published applications. In subsequent chapters, you will create and monitor desktop and application pools.
Exercise: Create a Domain User and OUs in AD for Clone Operations
In this exercise, you perform the following preliminary tasks so that instant-clone desktops and RDSH servers can be automatically joined to a specified domain as they are created:
- Create a user account in Active Directory that has the required permissions for creating and deleting cloned desktops.
- Create one organizational unit (OU) in Active Directory for instant-clone desktops and another for instant-clone RDSH servers.
Tip: This exercise shows how you would typically create an OU in a production environment and set the minimum required Active Directory domain privileges. However, for a test environment, you can deploy the instant-clone virtual machines (VMs) to your existing Computers OU, and use an existing domain user account for the instant-clone domain. If you use an existing OU and domain user account, be sure to delegate control of the OU to the domain user account, as described in this exercise.
Important: To perform this exercise, you must have a user account for logging in to the domain controller as an administrator and creating users and OUs in Active Directory.
Note: The following video, Creating an AD Domain User and OUs for Horizon Clone Operations, demonstrates how to perform this procedure. For your convenience, the steps are also provided in text format below the video.
To create a user account and OUs for instant clones:
- To launch Active Directory Users and Computers, log in to the Active Directory Domain Controller machine as an administrator, and go to Start button > Administrative Tools > Active Directory Users and Computers.
- Add a user, as follows:
Note: If you would rather use an existing domain user account in your test environment, you can skip this step.- Expand the domain, right-click Users, select New, and select User.
- Complete the New Object - User dialog box that appears, as follows:
- For the username, enter a logon name such as hzn8-domain-user into both the Full name text box and the User logon name text box, and click Next.
- Enter a password of your choosing.
- De-select User must change password at next logon, just for simplicity in this test environment.
- Select Password never expires, just for simplicity.
Now that you have a domain user account to use specifically for creating cloned VMs, you can add this user to the Active Directory OUs that will contain the VM computer accounts, as described in the steps that follow.
- Create an organizational unit for instant clones, as follows:
Note: If you would rather use an existing OU, such as the Computers OU, in your test environment, you can skip this step.- At the top of the domain tree, right-click the domain name, select New, and select Organizational Unit.
- In the New Object - Organizational Unit dialog box that appears, enter a name, such as Horizon Instant Clones, and click OK.
This OU is the Active Directory container in which the instant-clone computer accounts will be created. After you complete the text box, you can find the OU under the domain.
- Right-click this OU you just created (which is the container), select Delegate Control,
and complete the Delegation of Control wizard appears, as follows:- Click Next on the Welcome page and click Add on the Users or Groups page.
- Enter the name of the domain user you just created; for the example in this exercise, we use hzn8-domain-user, click Check Names, to verify that the name can be found in Active Directory, and click OK.
- When you are returned to the Users or Groups page, click Next.
- On the Tasks to Delegate page, select Create a custom task to delegate, and click Next.
- On the Active Directory Object Type page, select the following check boxes before clicking Next:
- Computer objects
- Create selected objects in this folder
- Delete selected objects in this folder
- On the Permissions page, select the following check boxes in the Permissions section before clicking Next:
- Create All Child Objects
- Delete All Child Objects
- Read All Properties
- Write All Properties
- Reset password
- On the last page of the wizard, click Finish.
The user account now has the following complete list of required permissions, including permissions that are assigned by default:
- On the last page of the wizard, click Finish.
- List Contents
- Read All Properties
- Write All Properties
- Read Permissions
- Reset password
- Create Computer Objects
- Delete Computer Objects
- If you plan to perform the exercise for creating an instant-clone farm of RDSH servers, which is recommended, repeat this procedure to create an OU for the RDSH server computer accounts.
You might name the OU something like Horizon RDSH Servers.
Exercise: Complete Licensing
The first step of initial configuration after installing the Connection Server is to add a product license. The first time you log in to the Connection Server, the Horizon Console opens to the Product Licensing and Usage page.
At the time of the publication of this document, to get a free-trial license, you can either get a term license key from the VMware Horizon Product Evaluation Center, or you can go to the 60-Day Trial of Horizon Universal Subscription page and sign up for a free trial, as described in the exercise in this section. You can also do both if you first add a term license but then decide you want to see the additional features offered by a Horizon Universal license.
Note: For production environments, VMware recommends purchasing and using a universal subscription license, which provides a single subscription license for all Horizon products, encompassing on-premises, Horizon subscription, and Horizon Cloud. For more information, on the Horizon product page, see Compare Horizon Editions and Pricing.
Note: The following video, Adding a License for VMware Horizon 8, demonstrates how to perform this procedure. For your convenience, the steps are also provided in text format below the video.
To add a license for Horizon 8:
- If you plan to use a term license key, which contains 25 characters, in the format of XXXXX-XXXXX-XXXXX-XXXXX-XXXXX, use the Horizon Console for the Horizon Connection Server that you installed in Exercise: Install the Horizon Connection Server, as follows:
- Open a browser and enter a URL in the following format, which points to the connection server:
https://<connection-server-hostname>/admin/.
If you see a security warning, use the necessary UI controls to continue. For example, for Firefox, you would click the Advanced button and then scroll down and click Accept the risk and continue. You see this warning because the default self-signed security certificate is being used. - If the License and Usage page is not already displayed, navigate to Settings > Product Licensing and Usage, and then click the Edit button.
- Enter the serial number of the product license key and click OK.
- Verify that the licenses for Desktop, Application Remoting, and Instant Clone are all enabled.
Important: If you do not plan to also obtain a Horizon Universal Subscription license, which is optional, you can skip the rest of the steps in this procedure, and go to Exercise: Add a vCenter Server Instance and a Domain Admin.
- Open a browser and enter a URL in the following format, which points to the connection server:
- If you want to obtain a 60-day free trial of the Horizon Universal Subscription license, to connect to your on-premises Horizon Connection Server, complete the following steps:
- Go to https://www.vmware.com/horizon-universal-license-trial.html, fill out the form, selecting the Trial Deployment Option of Horizon On-Premises, and click Submit.
- Check your email for the Welcome to Workspace ONE and Horizon Cloud email and click the Get Started button in that email.
- When prompted, log in to VMware Cloud Services, using the same VMware Customer Connect account (email) you used for signing up for the free trial.
- When prompted, supply information to set up your organization profile.
When this process is complete, you are taken to the Workspace ONE Cloud Admin Hub, and the title My Workspace appears at the top of the page.
- Access the Next-Gen Horizon Control Plane, as follows:
Note: The Horizon Control Plane is a cloud-based service that simplifies management, providing monitoring as well as image, application, and lifecycle management. In addition, a global entitlement layer connects Horizon pods, letting end users access their desktop in any connected pod or cloud.- From the Workspace ONE Cloud Admin Hub, which is titled My Workspace, in the Services section, on the tile named Horizon Cloud Service, click MANAGE.
Tip: To get to the Workspace ONE Cloud Admin Hub, if you have logged in to the VMware Cloud Services console, in the My Services section, on the tile named Workspace ONE, click LAUNCH SERVICE. Clicking this button takes you to the Workspace ONE Cloud Admin Hub.
Important: Once in the Workspace ONE Cloud Admin Hub, if you do not see a tile named Horizon Cloud Service, refresh your browser. - If this is your first time going to the Horizon Cloud Service, when prompted, specify the region, and on the Horizon Cloud Control Plane page, select Next-Gen Horizon Control Plane.
- Click Continue to launch the service.
- On the Welcome to VMware Horizon Universal Console page, on the Horizon 8 tile, click SELECT.
- From the Workspace ONE Cloud Admin Hub, which is titled My Workspace, in the Services section, on the tile named Horizon Cloud Service, click MANAGE.
- Add a Horizon Edge, as described in the Tech Zone document Deploying a Horizon Edge Gateway for Horizon 8 Environments.
Adding a Horizon Edge includes the following tasks:- Prepare the environment by creating a DNS entry to be used for the Horizon Edge Gateway virtual appliance, which has a static IP address.
- Use the Horizon Universal Console to add a Horizon Edge.
- Use vSphere Web Client to deploy the Horizon Edge Gateway appliance from a template. The Horizon Edge Gateway is a virtual appliance that you pair with a Connection Server in an on-premises pod so that the pod can be connected to the Horizon Control Plane.
- Connect the Horizon Edge to the Horizon Connection Server.
Tip: Deploying a Horizon Edge Gateway for Horizon 8 Environments includes links to several step-by-step videos, the first of which is Deploying a Horizon Edge Gateway – DNS Configuration. You can follow along with that video and then click the suggested video at the end to watch the next video in the series of 4.
If you run into problems, see the Edge deployment troubleshooting guide.
- After the Horizon Edge is deployed and connected to your on-premises Horizon Connection Server, in the Horizon Universal Console, click Subscriptions in the left pane to see your subscription license information.
- Log in to the Horizon Console admin UI (
https://<connection-server-hostname>/admin) and verify that the licenses for Desktop, Application Remoting, and Instant Clone are all enabled.
If you would like to read product documentation for using a subscription license and onboarding your Connection Server (pod), see Deploying a Horizon 8 Edge for Use with Horizon 8 Deployments and the Horizon Cloud - next-gen Control Plane and see Enabling VMware Horizon for Subscription Licenses and Horizon Control Plane Services in the Horizon Installation guide.
Exercise: Add a vCenter Server Instance and a Domain Admin
Because the exercises in this tutorial walk you through the process of setting up a Horizon environment that uses a VMware vSphere infrastructure, the next task is to add a vCenter Server instance. vCenter Server creates and manages the virtual machines used in Horizon desktop pools. The Connection Server uses a secure channel (TLS/SSL) to connect to the vCenter Server instance.
To add a vCenter Server instance, you need a vCenter Server user account that has the correct permissions. For simplicity, in this evaluation exercise, we will use that same Horizon domain admin that we created in Exercise: Create a Domain User and OUs in AD for Clone Operations. In a production environment, you would likely use different user accounts for these distinct functions.
In this exercise, you will first add this user and assign the Administrator role in vCenter Server, and later, you will add this user as a domain administrator in the Horizon Console.
Important: There are a couple of prerequisites for this exercise:
- User account for connecting to vCenter Server – Either create a user account as described in Exercise: Create a Domain User and OUs in AD for Clone Operations, or determine which AD user account in the Connection Server domain you want to use as the vCenter Server user.
- vCenter Server account with enough privileges to add permissions for other users – For example, you might use the Administrator@vsphere.local account or some other account that has a role that includes the Permissions.Modify permission privilege for the vCenter Server object.
Note: The following video, Adding a vCenter Server and Domain Admin to VMware Horizon 8, demonstrates how to perform this procedure. For your convenience, the steps are also provided in text format below the video.
To add a vCenter Server instance and a domain admin:
- To add a vCenter Server user with the required permissions, use the vSphere Client and log in to vCenter Server, select the vCenter instance, and on the Permissions tab, click ADD.
- Complete the Add Permissions dialog box in vCenter Server, as follows, and then click OK:
- Domain – Select the domain in which the Horizon Connection Server resides.
- User/Group – Enter the name of the domain user you created in the earlier exercise; for this example, Horizon-domain-user, or enter the username of some other account you want to use.
- Role – Leave the default, which is Administrator, for the purposes of this exercise. For a production environment, you might want to create or use a role whose permissions are more restricted. In that case, see Configure a vCenter Server User for VMware Horizon in the Horizon Installation guide.
- Propagate to children – Select this check box.
- To add a vCenter Server instance to Horizon, log in to the Horizon Console, navigate to Settings > Servers, which takes you to the vCenter Servers tab, and click the Add button.
- On the Add vCenter Server page, complete the following text boxes before clicking Next:
- Server address – Enter the fully qualified domain name (FQDN) of the vCenter Server instance.
- Username and Password – Use the format
name@domain.comfor the name of the vCenter Server user account. This is the user you just gave the Administrator role in vCenter Server. - Deployment Type – Leave the default, which is General, for a vCenter Server that is deployed on-premises. For a production environment, you can deploy vCenter Server any of several cloud options, including various Azure, Google, Dell EMC, Oracle, and AWS options.
- You can leave the default settings for the other text boxes.
- If an Invalid Certificate Detected prompt is displayed:
- Click View Certificate.
- In the Certificate Information window that appears, review the thumbprint of the default self-signed certificate that was generated during installation, and click Accept.
- Click Next on the rest of the wizard pages to accept the defaults, and on the Ready to Complete page, click Submit.
Note: By default, the View Storage Accelerator is enabled. This feature uses the Content Based Read Cache (CBRC), so that instead of reading the entire OS or application from the storage system over and over, the vSphere host reads data from its cache, thus reducing IOPS and improving performance.
You are returned to the Servers > vCenter Servers tab, and the server you just added appears in the list.
Note: For more information about this task, including a complete list of requirements, see Add vCenter Server Instances to VMware Horizon 8, in the Horizon Installation and Upgrade guide. - To add an instant-clone domain administrator, navigate to Settings > Domains, and on the Domain Accounts tab, click the Add button.
- On the Add Domain Admin dialog box that appears, select the domain from the list, enter the username and password for the user you used in Exercise: Create a Domain User and OUs in AD for Clone Operations, and click OK.
This account will be used for joining instant-clone VMs to the Active Directory domain.
You are returned to the Domain Accounts page, and the user account you just added appears in the list. - If you would like to add an App Volumes Manager instance to Horizon, see Exercise: Deliver Horizon Published Apps on Demand, in the Evaluation Guide for VMware App Volumes 4.
Exercise: Create and Configure the Events Database
In this exercise, you create an Events database to log Horizon events to an SQL Server instance, making the event data available to analytics software. For example, you can find the following types of events in the database:
- Alerts that report system failures and errors
- End-user actions, such as logging and starting desktop and application sessions
- Administrator actions, such as adding entitlements and creating desktop and application pools
- Statistical sampling, such as recording the maximum number of users over a 24-hour period
For details about the types of information recorded, see Integrating VMware Horizon with the Event Database in the Horizon Administration guide. The Events database is not required for every Horizon environment. Alternatively, or in addition to using the Events database, you can configure the Connection Server to send events to a Syslog server or create a flat file of events written in Syslog format. See Configure Event Logging to File or Syslog Server in VMware Horizon 8 in the Horizon Installation guide.
Important: There are several prerequisites for this exercise:
- Database server – This is the database server on which you will create the Events database. For the example in this exercise, we used Microsoft SQL Server 2019 Express Edition, which is acceptable for a test environment but not recommended for a production environment.
For the most up-to-date information about supported databases, see the VMware Product Interoperability Matrix at https://interopmatrix.vmware.com/Interoperability. At the top of the screen, select 3rd Party Solution Interoperability. For Solution 1, select the VMware Horizon and select the version. Under Select 3rd Party Solutions, select the category Databases. To see a list of all supported databases, leave the Solution field empty, so that the default remains All Solutions. Click CHECK INTEROPERABILITY. - Microsoft SQL Server Management Studio – For the example in this exercise, we used Microsoft SQL Server Management Studio 19.0.2. The instructions might differ slightly for different versions of SQL Server Management Studio.
- Microsoft SQL Server Configuration Manager – For the example in this exercise, we used SQL Server 2019 Configuration Manager, which was installed by the database server installer. The instructions might differ slightly for different versions of SQL Server Configuration Manager.
- SA credentials – To create the necessary logins for the database, you will log in to the SQL Server instance as the sysadmin (SA) or as a user account with SA privileges. For a newly installed SQL Server, if you do not know the SA credentials, you might need to first log in using Windows authentication, enable the SA login, and set a password for it.
Note: The following video, Creating and Configuring the VMware Horizon Events Database, demonstrates how to perform this procedure. For your convenience, the steps are also provided in text format below the video.
To create the Events database and its login user:
- On the VM where SQL Server and SQL Server Management Studio are installed, start SQL Server Management Studio.
- Complete the Connect to Server dialog box as follows before clicking Connect:
- Server type – Select Database Engine.
- Server name – If the server name does not appear by default, select it.
- Authentication – Select SQL Server Authentication.
- Login and Password – Use the SA account credentials.
Tip: If you do not know the SA credentials, you might need to first log in using Windows authentication, select the SA account in the Security > Logins folder, enable the SA login (on the Status tab), and set a password for it (on the General tab).
- Create a database for Horizon events, as follows:
- In Object Explorer, right-click Databases, and select New Database from the submenu.
- Name the database and click OK.
For this example, the database name is HorizonEvents. This database now appears in the list when you expand the Databases folder in the Object Explorer.
- To create a login so that the Connection Server can access the database to log events, expand the Security folder, right-click Logins, select New Login, and complete the settings as follows:
- From the Select a Page list on the left, select General, and enter a login name to use for the Connection Server machine, using ASCII characters only; for example, HorizonDBuser.
- Select SQL Server authentication, and create a password.
- De-select Enforce password policy. For this exercise, you do not need to use password policies.
- Either leave master as the default database or select the HorizonEvents database as the default database.
- Do not click OK yet because you must fill out the other pages.
- From the Select a Page list on the left, select Server Roles, and select the sysadmin check box on that page.
- From the Select a Page list on the left, select User Mapping, and in the Users mapped to this login box, select the check box for the HorizonEvents database, and click OK.
The login user is added in the Object Explorer pane, under the Security > Logins folder, and under the Databases > HorizonEvents > Security > Users folder.
- Configure TCP/IP properties for the database server, as follows:
- In the VM where SQL Server and SQL Server Configuration Manager are installed, start SQL Server Configuration Manager.
- Expand SQL Server Network Configuration, select Protocols for <server name>, and in the list of protocols, right-click TCP/IP, and select Properties.
- In the TCP/IP Properties window that appears, on the Protocol tab, set or verify that the Enabled property is set to Yes, and then click the IP Addresses tab.
- On the IP Addresses tab, set or verify that the TCP port for IPAll is set to the default port 1433, and click OK.
- Use the Horizon Console to configure the Events database, as follows:
- In the Horizon Console, navigate to Settings > Event Configuration.
- In the Event Database section, click the Edit button.
- Complete the Edit Event Database page, as follows, before clicking OK:
- Database Server – Enter the FQDN.
- Database Type – Accept the default, Microsoft SQL Server.
- Port – Accept the default port number (1433) used to access the database server.
- Database Name – Enter the event database name created on the database server; for this example, HorizonEvents.
- Username and Password – Enter the credentials for the user you created for this database; for this example, the username is HorizonDBuser.
- Table Prefix – Enter VE_ (for View Events).
The configuration settings you entered are displayed on the Event Configuration page.
- To verify that the connection to the database is working, in the Horizon Console, navigate to Monitor > Events, and verify that some log entries appear in the table.
Creating Single-User Desktop Pools
With single-user desktops, each virtual machine allows a single end-user connection at a time. In contrast, with session-based desktops, one RDSH server can accommodate many concurrent user connections. In the next exercise, you will create an instant-clone single-user desktop pool.
A shared-session, RDSH desktop pool has different characteristics than a single-user automated desktop pool. Creating an RDSH desktop pool is beyond the scope of this quick-start tutorial, but if you are interested in this topic, see Create a Published Desktop Pool in the guide Windows Desktops and Applications in Horizon 8. In a later chapter of this tutorial, you will complete an exercise for creating an RDSH server farm and a published application pool.
Besides Windows-based desktops, you can create Linux-based desktops. For more information, see the document Linux Desktops and Applications in Horizon 8.
Exercise: Deploy an Instant-Clone Desktop Pool
A clone is a copy of a golden VM image, with a unique identity of its own, including a MAC address, UUID, and other system information. VMware instant-clone provisioning improves and accelerates the process of creating cloned VMs over the previous Horizon Composer linked-clone technology. In addition, instant clones require less storage and less expense to manage and update because the desktop can be deleted when the user logs out, and a new desktop is created using the latest golden image.
Creating an instant-clone desktop pool or RDSH server farm is a two-part process:
- Publishing, also called priming, the golden VM image
- Provisioning the VMs in the pool or farm
Publishing the golden image can take from 7 to 40 minutes, depending on the type of storage you are using. Provisioning the VMs takes only 1 or 2 seconds per VM. You can perform these tasks at separate times, so that the provisioning process occurs either at a scheduled time or immediately after the publishing process is complete.
The Add Desktop Pool wizard or the Add Farm wizard in the Horizon Console guides you through the process of publishing the golden image. Completing the wizard for instant clones is like adding any pool or farm.
Important: If your session in the Horizon Console is idle for more than a few minutes, you might be automatically logged out, and if you are in the middle of creating a desktop pool, your changes will be lost. You can increase the session timeout interval by navigating to Settings > Global Settings and editing the Horizon Console Idle Session Timeout setting.
There are several prerequisites for this exercise:
- Golden VM – Before you can deploy a pool of desktops, you must create a golden VM image, which includes installing and configuring a Windows operating system in a VM, installing VMware Tools, and installing the Horizon Agent. For step-by-step instructions, see the guide Manually Creating Optimized Windows Images for VMware Horizon VMs or the guide Using Automation to Create Optimized Windows Images for VMware Horizon VMs.
Also see the topics Prepare a Guest Operating System for Remote Desktop Deployment and Install Horizon Agent on a Virtual Machine, in the Windows Desktops and Applications in Horizon 8 guide. - VM snapshot –After you create and configure the golden VM, use vSphere Web Client to power it off and take a VM snapshot. For instructions, see the topic Take a Snapshot of a Virtual Machine, in the vSphere Virtual Machine Administration guide.
- AD OU and instant-clone domain administrator – You must have determined which Active Directory OU to use for storing instant-clone computer accounts, and then delegated the required permissions to the account that will act as the domain administrator. For instructions, see Exercise: Create a Domain User and OUs in AD for Clone Operations.
- VM folder – (Optional) Having a specific VM folder in the vCenter Server inventory helps you locate and manage the virtual desktops in the instant-clone pool. For instructions, see the topic Create a Folder, in the vCenter Server and Host Management guide.
Note: The following video, Deploying an Instant-Clone Desktop Pool with VMware Horizon, demonstrates how to perform this procedure. For your convenience, the steps are also provided in text format below the video.
To run the Add Pool wizard and deploy an instant-clone desktop pool:
- In the Horizon Console, navigate to Inventory > Desktops, and click the Add button.
Note: The format of the URL for accessing the web-based console is:https://<connection-server-FQDN>/admin. - In the Add Pool wizard that opens, with Type selected in the left pane, select Automated Desktop Pool, and click Next.
- On the vCenter Server page, select Instant Clone, and click Next.
The vCenter Server you added during initial configuration should appear and be selected in the vCenter Server list. - On the User Assignment page, select Floating, and click Next.
Instant-clone pools can use either floating or dedicated user assignment. For this exercise, we use floating assignment.
- Dedicated assignment – Each desktop is assigned to a specific user. A user logging in for the first time gets a desktop that is not assigned to another user. The user always gets this same desktop after logging in, and this desktop is not available to any other user.
- Floating assignment – Users get a random desktop every time they log in. When a user logs out, the desktop is deleted. With automatic deletion, you keep only as many VMs as you need at one time.
- On the Storage Optimization page, select Use separate datastores for replica and OS disks, and click Next.
For this exercise, if possible, use separate datastores so that you can see the extra settings in the next window. With separate datastores, you can place the replica VM on a solid-state, disk-backed datastore. Solid-state disks have low storage capacity but high read performance, typically supporting 20,000 IOPS. Separate datastores are used in tiered-storage models.
Note: For information about VMware Virtual SAN, see the VMware vSAN product page. - On the Desktop Pool ID page, complete the settings, as follows, before clicking Next:
- ID – For this exercise, use the pool ID Win10-inst-clones.
- Display Name – For this exercise, use Windows 10 Desktops.
Users will see this display name when they log in using Horizon Client or the HTML Access web client. If you do not provide a display name, the pool ID is used for the display name. - Access Group – If you do not specify an access group, the pool is placed in the root access group. For more information about access groups, see the product documentation topic Manage and Review Access Groups in the Horizon Administration guide.
- On the Provisioning Settings page, complete the settings, as follows, before clicking Next:
- Naming Pattern – For this exercise, you use w10-hzn8-. This naming pattern helps you identify Windows 10 instant clones in Horizon Console.
- Provision Machines – Select Machines on Demand, and use the default minimum of 1.
- Desktop Pool Sizing – Set Maximum Machines to 10 (for the purposes of this exercise) and set Spare (Powered On) Machines to 1.
In a production environment, instant-clone pools have been tested to support up to 4,000 desktops (2,000 is recommended, however). - Use the defaults for the other settings.
- On the vCenter Settings page, complete the Default Image settings, as follows:
- For the Parent VM in vCenter setting, click Browse to select the golden Windows 10 VM you created according to the instructions in the guide Manually Creating Optimized Windows Images for VMware Horizon VMs or the guide Using Automation to Create Optimized Windows Images for VMware Horizon VMs, and click Submit.
- For the Snapshot setting, click Browse to select the snapshot you created as part of the prerequisites for this exercise, and click Submit.
The snapshot will be used as the default image for creating the pool. For instructions on creating the snapshot, see the topic Take a Snapshot of a Virtual Machine, in the vSphere Virtual Machine Administration guide. - In the Virtual Machine Location section, click Browse to select a VM folder if you created one as described in the prerequisites for this exercise.
- In the Resource Settings section, click Browse to select the appropriate vCenter resource for each setting.
As with the other settings on this page, to complete each setting, you will select from the resources already set up in your vCenter Server and specific to your environment.
Important: For the Network setting, leave the default, which means the Use network from current parent VM image check box is selected. - With the vCenter Settings page completed, click Next.
- On the Desktop Pool Settings page, leave the defaults and click Next.
Note: To learn more about any of these settings, see the topic Worksheet for Creating an Instant-Clone Desktop Pool, in the Windows Desktops and Applications in Horizon 8 guide. - Complete the Guest Customization page, as follows:
- Verify that the correct domain and domain admin account are selected. This is the account you created in Exercise: Create a Domain User and OUs in AD for Clone Operations.
- For AD container, click Browse and select the OU that you created in Exercise: Create a Domain User and OUs in AD for Clone Operations.
- Leave the other default settings, and click Next.
- On the Ready to Complete page, click Submit.
You are returned to the Inventory > Desktops page, called Desktop Pools. - To monitor pool creation, click the name of the desktop pool in the list.
If you do not see the name in the list, click the Refresh icon above the table.
Because the VM image must be published before the instant clones can be created, the process might take several minutes. - On the pool details page for the instant-clone pool, scroll down to the vCenter Server section, and note the State field and the Pending Image field.
The Pending Image field shows the progress of the publish operation. When the pool is finished being created, the State field shows Published.
Exercise: Push a New Image to an Instant-Clone Desktop Pool
To manage OS patches and software updates with instant clones, you use the push-image operation. Because the provisioning of instant clones takes so little time, it is not necessary to plan for maintenance windows.
When a user logs out of their desktop, the desktop can be deleted and recreated. This approach to desktop deletion and recreation staggers the patching operation across desktops, eliminates boot storms, reduces storage IOPS, and creates less of a load on the vCenter Server.
To perform this exercise, you must satisfy the following prerequisites:
- Instant-clone desktop pool – You must have completed Exercise: Deploy an Instant-Clone Desktop Pool.
- New VM snapshot – You must have a new image to push to the desktop pool. Therefore, use vSphere Web Client, select the VM that you created for deploying the instant-clone pool, and create a new VM snapshot. For details, see the topic Take a Snapshot of a Virtual Machine, in the vSphere Virtual Machine Administration guide.
Note: The following video, Managing OS Patches and Updates with Horizon Instant Clones, demonstrates how to perform this procedure. For your convenience, the steps are also provided in text format below the video.
To push a new image to a desktop pool:
- In the Horizon Console, navigate to Inventory > Desktops and click the name of the desktop pool in the list.
The Summary tab for that desktop pool appears. - Click the Maintain button and select Schedule from the drop-down list.
The Schedule Push Image wizard appears. - On the Image page, select the new snapshot you created, as mentioned in the prerequisites, and click Next.
For this exercise, we select a new snapshot taken of the same golden VM, but you can also use this page to navigate to a different VM and one of its snapshots. - On the Schedule page, leave the defaults, and click Next.
Because you are using the default start time, the push starts after you complete the wizard.
Note: The default is Wait for users to log off. If, instead, you select to force users to log off, you can give users a warning and a grace period of 5 minutes, by default. To edit this setting, navigate to Settings > Global Settings, and click Edit on the General Settings tab. - On the Ready to Complete page, click Finish.
You are returned to the Summary tab for the desktop pool, where the pending image for the push operation is displayed in the vCenter Server section. You can watch the progress under the Pending Image field. The state changes from Publishing to Published, and then the current image will be unpublished. - Click the Machines (Instant Clone Details) tab to monitor which desktops are using which image.
Creating RDSH-Published Applications
VMware Horizon published desktops and applications are based on sessions to RDSH servers. That is, administrators use Microsoft Remote Desktop Services (RDS) to provide users with desktop and application sessions on RDS hosts. Delivering published applications and desktops is a very simple process:
- Create an RDSH server farm from a golden VM image, which automatically clones the number of servers you specify.
- Publish one or multiple application pools with one trip through the Add Application Pool wizard.
- Publish a desktop pool so that multiple users can access session-based shared desktops from RDSH servers.
This tutorial does not include an exercise for publishing a desktop pool. Instead, see Creating Published Desktop Pools, in the Windows Desktops and Applications in Horizon 8 guide.
Note: It is also possible to enable Windows Server machines to be used as single-user desktops rather than RDSH session-based shared desktops. For information, see the topic Prepare Windows Server Operating Systems for Desktop Use in the guide Windows Desktops and Applications in Horizon 8. - Perform image maintenance tasks for RDSH servers.
This tutorial does not include an exercise for refreshing RDSH server VMs from a golden image virtual machine. Instead, see Schedule Maintenance for an Automated Instant-Clone Farm in Horizon, in the guide Windows Desktops and Applications in Horizon 8.
The exercises that follow walk you through creating an instant-clone server farm and publishing Windows applications. On client devices, a published application looks and behaves like it would if it were a locally installed application, providing seamless integration into the user experience of the client operating system. For example, on Windows client devices, the application icon for the published application appears in the taskbar just as it would for a locally installed application.
Important: This chapter describes publishing applications that are hosted on RDSH servers. With Horizon, you can also publish applications that are hosted on virtual desktops, such as a Windows 10 or 11 desktop pool. This feature is especially important if you want to publish applications that are certified only on Windows 10 or 11 or that require drivers that are not supported on RDSH servers. For more information, see Deploying Applications That Run on Desktop Pools with VM Hosted Applications in the guide Windows Desktops and Applications in Horizon 8.
Besides Windows applications, you can create Linux-based applications. For more information, see the document Linux Desktops and Applications in Horizon 8.
Exercise: Create an Instant-Clone RDSH Server Farm
A farm can contain from 1 to 500 RDSH servers. For the exercises in this guide, you create an automated farm of RDSH servers, which is like creating an automated pool of instant-clone desktops. With this feature, you do not need to create and configure each RDSH server separately.
There are several prerequisites for this exercise:
- Golden VM – Before you can deploy a farm of RDSH servers, you must create an optimized golden image, which includes installing and configuring a Windows operating system in a VM, installing VMware Tools, and installing the Horizon Agent. For step-by-step instructions, see the guide Manually Creating Optimized Windows Images for VMware Horizon VMs or the guide Using Automation to Create Optimized Windows Images for VMware Horizon VMs.
Note: When you install Horizon Agent on an RDSH server, you must select the Instant Clone component to be included in the installation. This component is not selected by default, as it is when you install Horizon Agent on a desktop machine.
Important: The golden VM for RDSH servers must have the appropriate RDSH roles and services installed. See the topics Prepare an RDS Host Golden Image Virtual Machine and Prepare Windows Server Operating Systems for Remote Desktop Services (RDS) Host Use in the Windows Desktops and Applications in Horizon 8 guide. - VM snapshot –After you create and configure the golden VM, use vSphere Web Client to power it off and take a VM snapshot. For instructions, see the topic Take a Snapshot of a Virtual Machine, in the vSphere Virtual Machine Administration guide.
- AD OU and instant-clone domain administrator – You must have determined which Active Directory OU to use for storing instant-clone computer accounts, and then delegated the required permissions to the account that will act as the domain administrator. For instructions, see Exercise: Create a Domain User and OUs in AD for Clone Operations.
- VM folder – (Optional) If desired, create VM folder in the vCenter Server inventory for the farm. Having a specific folder helps you locate and manage the RDSH servers in the instant-clone farm. For instructions, see the topic Create a Folder, in the vCenter Server and Host Management guide.
- Applications – The applications you provide to end users can be either installed directly on the RDSH server or dynamically attached as VMware App Volumes packages. Before you begin this exercise, install any applications that you want to have in the base image, available for all users.
Note: To install applications directly on an RDSH server, place the host into RD-Install mode, install the desired applications, and place the host back into RD-Execute mode. For more information, see the Microsoft TechNet article Learn How to Install Applications on an RD Session Host Server. If you plan to use App Volumes packages, be sure to install the App Volumes Agent, as described in the guide Manually Creating Optimized Windows Images for VMware Horizon VMs or the guide Using Automation to Create Optimized Windows Images for VMware Horizon VMs.
Note: The following video, Deploying an Instant-Clone Server Farm with VMware Horizon, demonstrates how to perform this procedure. For your convenience, the steps are also provided in text format below the video.
To run the Add Farm wizard to deploy an instant-clone RDSH server farm:
- In the Horizon Console, navigate to Inventory > Farms, and click the Add button.
Note: The format of the URL for accessing the web-based console is:https://<connection-server-FQDN>/admin. - In the Add Farm wizard that opens, with Type selected in the left pane, select Automated Farm, and click Next.
- On the vCenter Server page, select Instant Clone, and click Next.
The vCenter Server you added during initial configuration should appear and be selected in the vCenter Server list. - On the Storage Optimization page, click Next.
Note: Although you are not using Virtual SAN for this exercise, if you would like information about VMware Virtual SAN, see the VMware vSAN product page. - On the Identification and Settings page, complete the settings, as follows, before clicking Next:
- ID – For this exercise, in the example in the video, we use the ID Hzn8-servers.
- Access Group – If you do not specify an access group, the pool is placed in the root access group. For more information about access groups, see the product documentation topic Manage and Review Access Groups in the Horizon Administration guide.
- Leave the defaults for the other settings.
- On the Load Balancing and Settings page, click Next.
For more information about these settings, see Load Balancing Settings in the guide Windows Desktops and Applications in Horizon 8. - On the Provisioning Settings page, complete the settings, as follows, before clicking Next:
- Naming Pattern – For this exercise, in the example in the video, we use hzn8-rdsh-. This naming pattern helps you identify RDSH server instant clones in Horizon Console.
- Farm Sizing – Set Maximum Machines to 10 (for the purposes of this exercise) and set Minimum Number of Ready (Provisioned) Machines to 1.
- On the vCenter Settings page, complete the Default Image settings, as follows:
- For the Parent VM in vCenter setting, click Browse to select the golden RDSH server VM you created according to the instructions in the guide Manually Creating Optimized Windows Images for VMware Horizon VMs or the guide Using Automation to Create Optimized Windows Images for VMware Horizon VMs, and click Submit.
- For the Snapshot setting, click Browse to select the snapshot you created as part of the prerequisites for this exercise, and click Submit.
The snapshot will be used as the default image for creating the server farm. For instructions on creating the snapshot, see the topic Take a Snapshot of a Virtual Machine, in the vSphere Virtual Machine Administration guide.
- In the Virtual Machine Location section, click Browse to select a VM folder if you created one as described in the prerequisites for this exercise.
- In the Resource Settings section, click Browse to select the appropriate vCenter resource for each setting.
As with the other settings on this page, to complete each setting, you will select from the resources already set up in your vCenter Server and specific to your environment.
Important: For the Network setting, leave the default, which means the Use network from current parent VM image check box is selected. - With the vCenter Settings page completed, click Next.
- Complete the Guest Customization page, as follows:
- Verify that the correct domain and domain admin account are selected.
This is the account you created and added as part of the prerequisites for this exercise. - For AD container, click Browse and select the OU that you created as part of the prerequisites for this exercise.
- Leave the other default settings, and click Next.
- Verify that the correct domain and domain admin account are selected.
- On the Ready to Complete page, click Submit.
You are returned to the Inventory > Farms page. - To monitor farm creation, click the name of the farm in the list.
If you do not see the name in the list, click the Refresh icon above the table.
Because the VM image must be published before the instant clones can be created, the process might take several minutes. - On the farm details page for the instant-clone farm, scroll down to the vCenter Server section, and note the State field and the Secondary Image field.
The Secondary Image field shows the progress of the publish operation. When the farm is finished being created, the State field changes from Publishing to Published.
Note: To see details of the particular instant clone you just created, scroll up to the top of the page, click the RDS Hosts tab.
Exercise: Publish Applications Hosted on RDSH Servers
The published applications feature supports a wealth of remote-experience features, which include client-drive redirection, access to locally connected USB devices, file-type association, Windows media redirection, content redirection, printer redirection, location-based printing, 3D rendering, smartcard authentication, and more.
After applications are published, end users launch Horizon Client, or the HTML Access web client, to access a catalog of published applications. Selecting an application from the catalog opens a window for that application on the local client device, and the application looks and behaves as if it were locally installed.
For example, on a Windows client computer, an item for the application appears in the taskbar and looks identical to the way it would look if it were installed on the local Windows computer. Users can also create shortcuts for published applications, and the shortcuts appear on the client desktop, just like shortcuts for locally installed applications.
To publish applications, administrators create an application pool. Horizon automatically enumerates the installed applications on the RDSH servers. Administrators can select which of the applications to deploy and entitle users to.
Important: To perform this exercise, you need to have completed Exercise: Create an Instant-Clone RDSH Server Farm. Although it is possible to actually create the RDSH server farm as part of using the Add Pool wizard, the steps in this exercise direct you to select an existing server farm.
Note: The following video, Creating an Application Pool in VMware Horizon, demonstrates how to perform this procedure. For your convenience, the steps are also provided in text format below the video.
To run the Add Application wizard to create an application pool:
- In the Horizon Console, navigate to Inventory > Applications, click the Add button, and select Add from Installed Applications.
For this exercise, you will use installed applications. For information about adding an application pool manually, see Worksheet for Creating an Application Pool Manually in the guide Windows Desktops and Applications in Horizon 8. For information about adding App Volumes applications, see the video Delivering Horizon Published Apps on Demand with VMware App Volumes.
Note: The format of the URL for accessing the web-based console is:
https://<connection-server-FQDN>/admin. - For Application Pool Type, leave the default, which is RDS Farm.
The server farm you created in the previous exercise should be displayed in the drop-down list.
For information about the application pool type called Desktop Pool, see Deploying Applications That Run on Desktop Pools with VM Hosted Applications in the guide Windows Desktops and Applications in Horizon 8. - Complete the Select Applications page, as follows, before clicking Next.
- In the Select installed applications list, select the check boxes for the desired applications. In this example, we selected Calculator and Paint. A separate application pool will be created for each application you select.
- De-select the Entitle Users After Adding Pool check box. You will entitle users in a later exercise.
- Leave the defaults for the other settings. The Multi-Session Mode option pertains to the desired behavior in the following situation: You open a session by launching a published application on one device, say, an iPad, and then you go to another device, say an Android tablet, and launch that same published application or another published application from the same server farm. The question is, do you want the first session, on the iPad, to disconnect and then re-connect on the Android tablet? Or do you want that first session, on the iPad, to remain open and start a second session (multi-session) on the Android?
- On the Edit Applications page, add RDSH- to the beginning of the display name. This way, if you later open the published app on a Windows computer, you will be able to distinguish between the locally installed app and the RDSH-published app.
- Click Submit.
You are returned to the Inventory > Applications page, called Application Pools, and the application pools you just created appear in the list.
We used the default settings in most cases. For details about all the settings, see Worksheet for Creating an Application Pool Manually in the guide Windows Desktops and Applications in Horizon 8.
Performing Maintenance on a Server Farm
When you use automated instant-clone RDSH server farms, you can rapidly change the size of the farm, refresh the servers back to their original state and disk size, or update the servers to use a new golden image. Performing maintenance on an instant-clone farm means deleting the VMs in the farm and either recreating them from the current golden image or creating VMs from a new golden image, or snapshot.
- Set a recurring maintenance schedule – Administrators create a recurring maintenance schedule to restore the operating system disk of each VM in the farm to its original state and size, reducing storage costs. The VM is deleted and recreated from the currently selected golden image. With this option, you can keep the same snapshot or choose a new VM and snapshot.
- Set an immediate, one-time maintenance schedule – Administrators schedule immediate maintenance to change the golden image used by the VMs in the farm, such as to apply an urgent security patch. This operation is like pushing a new VM image to a desktop pool, which you did in Exercise: Push a New Image to an Instant-Clone Desktop Pool.
- Publish a secondary image – You can optionally publish a secondary image, which you can use to update a subset of the machines in the farm while leaving the rest unchanged.
You can use both types of schedules at the same time, and if you specified a minimum number of provisioned servers to be available during maintenance operations, your end users might never have their work interrupted.
Performing maintenance on a server farm is beyond the scope of this quick-start guide. For instructions, see Managing Farms in the guide Windows Desktops and Applications in Horizon 8.
Entitling Users to Desktops and Apps
You can entitle users to an application pool or desktop pool either at the time you create the pool or after the pool is created.
- To entitle users when you create the pool, at the end of the Add Application Pool wizard or Add Desktop Pool wizard, you can select the Entitle users after this wizard finishes check box.
- To create user entitlements after the pool is created, for application pools, you can select multiple application pools, and entitle users to all the selected pools. For desktop pools, you must select one pool at a time.
It is also possible to set up the system so that end users can access RDSH application pools without having to authenticate at all. For more information, see Configuring Unauthenticated Access in the Horizon Administration guide.
Note: For this exercise, you create local entitlements, which entitle users to desktops within one Horizon pod. A pod is a group of interconnected Connection Servers, running in the same LAN segment, that broker desktops or published applications. For information about using the Cloud Pod Architecture feature to create global entitlements, which entitle users to multiple desktops across multiple pods in a pod federation, see the guide Cloud Pod Architecture in Horizon 8.
Exercise: Entitle End Users to Applications and Desktops
Entitling users means specifying which users and groups are allowed to access the desktop or application. For this exercise, you create user entitlements after the pool is created.
Important: Before you can entitle users, you must have created a desktop or application pool. Exercises for performing these tasks are included in the chapters Creating Single-User Desktop Pools and Creating RDSH-Published Desktops and Applications.
Note: The following video, Entitling End Users to VMware Horizon Desktops and Apps, demonstrates how to perform this procedure. For your convenience, the steps are also provided in text format below the video.
To entitle users to desktops and apps:
- Start the Add Entitlements wizard for the desired desktop pool or application pools, as follows:
- In the Horizon Console, and navigate to Inventory > Desktops or, for application pools, navigate to Inventory > Applications.
The format of the URL for accessing the console is:https://<connection-server-FQDN>/admin - Select the check box next to the name of the pool you want to entitle users to.
Important: If you are entitling users to application pools, you can select multiple pools, and entitle users to all the selected pools. For desktop pools, you must select one pool at a time. - Click the Entitlements button and select Add Entitlements.
- In the Add Entitlements dialog box, click Add.
- Use the Find User or Group dialog box to search for users.
For example, for this exercise, you could select Starts with and enter a D so that all user and group names that begin with D will be returned, such as Domain Users. If you leave the text boxes empty, all users and groups are returned. - From the list of users and groups returned, select the users or groups to entitle, and click OK.
- In the Add Entitlements dialog box, verify that the desired users or groups now appear in the list, and click OK.
Note: The Add button in this dialog box is for adding additional users to the list. The check boxes are for selecting a user or users you want to remove.
You are returned to the Application Pools page or the Desktop Pools page. - To verify that the entitlements have been added, click the name of the desktop or application pool in the list of pools, and select the Entitlements tab.
Note: You can also use the buttons on the Entitlements tab to add and remove user entitlements for a specific pool.
Launching Remote Desktops and Applications from Client Devices
After you have finished deploying virtual desktops or published applications and entitling users, you are ready to explore end-user connection options. End users can connect to desktops and applications using different Horizon Clients, including desktop and mobile clients. VMware provides native Horizon Clients for iOS, Android, Chrome, macOS, Windows, and Linux.
Alternatively, you can use the HTML Access web client by entering the URL of your Connection Server, using the following format:
https://<FQDN or IP address>
On the VMware Horizon web portal page that appears, you can click either the icon that takes you to the Horizon Clients download page or the icon for logging in using the HTML Access web client.
Exercise: User Horizon Client to Access Desktops and Apps
Important: There are several prerequisites for this exercise:
- Endpoint PC – You can use a Mac, Linux, or Windows PC.
- Horizon Client installed – Go to the Download VMware Horizon Clients page and download and install the free Horizon Client software.
- User account with admin privileges – To install the Horizon Client software, you must log in to the endpoint device as a user with administrative privileges.
- Connection Server address – Verify that you have the fully qualified domain name of the Connection Server that brokers connections to the desktop and application pools you created in earlier exercises.
- Desktop or application pools – Exercises for creating pools are included in the chapters Creating Single-User Desktop Pools and Creating RDSH-Published Desktops and Applications.
Note: The following video, Using VMware Horizon Client to Access Desktops and Apps, demonstrates how to perform this procedure. For your convenience, the steps are also provided in text format below the video.
To launch a virtual desktop or published app with Horizon Client:
- On your client computer, start VMware Horizon Client the same way you would start any application.
For example, on a Windows PC, double-click the desktop icon. - In the VMware Horizon Client window, click the New Server button.
- When prompted, enter the FQDN of the Connection Server, and click Connect.
- If you receive a security warning, click Continue to bypass the certificate warning.
If you install a CA-signed security certificate on the machine that hosts the Connection Server, this warning does not appear. - In the Login dialog box, enter the username and password of a user who is entitled to the desktop or published applications, and click Login.
- To launch an application or desktop, double-click the icon for the application or desktop.
- In the Sharing dialog box, click Allow to allow access to files on your client device, as well as locally connected storage devices such as USB thumb drives, while using virtual desktops and published applications.
- Verify that you have successfully logged in to your desktop or application.
For this example, we have successfully logged in to an instant-clone VM from the Windows 10 Desktop pool. - To disconnect from the virtual desktop or published app, click the X in the upper-right corner, as you would for any other Windows application or window, and, for desktops, confirm that you want to disconnect.
This exercise showed you how to use Horizon Client on a desktop or laptop computer. You can also use Horizon Client on a tablet or phone. For OS-specific instructions, go to the VMware Horizon Documentation page, scroll down to the Horizon Clients section, and select the guide for the type of client you have the applicable version.
Exercise: Use the HTML Access Web Client
You can connect to virtual desktops and published applications from an HTML5-enabled web browser. All the latest browsers are supported and are listed in the VMware Horizon HTML Access User Guide.
Important: To perform this exercise, you need the following:
- Connection Server address – Verify that you have the fully qualified domain name of the Connection Server that brokers connections to the desktop and application pools you created in earlier exercises.
- Desktop or application pools – Exercises for creating pools are included in the chapters Creating Single-User Desktop Pools and Creating RDSH-Published Desktops and Applications.
- Chrome browser – (Optional) To display the Allow H.264 decoding setting, which is pictured in one of the following steps, you must use a Google Chrome browser.
Note: The following video, Using Horizon HTML Access to Launch Desktops and Apps, demonstrates how to perform this procedure. For your convenience, the steps are also provided in text format below the video.
To access a virtual desktop or published app by using HTML Access:
- Open a supported web browser and enter the address of your Connection Server. The URL format is
https://<connection-server-FQDN>
Note: If you do not have a CA-signed security certificate, you might be prompted to add a security exception to your browser. - When the VMware Horizon page appears, click VMware Horizon HTML Access.
- Enter credentials of a user who is entitled to the desktop or application pool, and click Login.
Important: For the username, use the syntax<user>@<domain>because there is no domain selector. After the credentials are validated, you can see the available desktops and applications. - To mark a desktop or application shortcut as a favorite, click a star in the corner of the icon.
This feature is convenient if you have many desktops and applications and do not want to have to scroll to find the applications and desktops you use most frequently. You can also use the Search box to quickly locate an application or desktop if you know its display name. - Click the desktop icon to display the virtual desktop in your browser.
- Click the tab on the left side of the screen to open the navigation sidebar.
- Hover your cursor over each toolbar button to display its tooltip. You can use the toolbar at the top of the sidebar to:
- Send Ctrl+Alt+Del to the application work area
- Transfer files, if the feature is enabled
- Open the Copy & Paste panel
- Open the Settings menu
- Click the Open Menu icon on the right end of the toolbar, and select Settings.
- Review all the settings available to provide a rich user experience, and then click Close.
When you use a Chrome browser and use the VMware Blast Extreme display protocol, the Allow H.264 decoding setting causes the graphics processor on the client device to do the work involved in playing back video and images. Hardware decoding offloads the work to the GPU, so that CPU consumption is reduced, resulting in less device power consumed, for longer battery life.
Important: To make the setting take effect, you must disconnect and reconnect to the desktop or application.
For information about the Shadow Session Display Fit to viewer setting, see Sharing Remote Desktop Sessions. - Click an application in the sidebar to launch it.
Note: In the sidebar, you can click the star icon to the right of an application or desktop name to designate the item as a favorite, and click the star above the list to display only favorites. - From the Running list, which displays the names of running desktops and applications, click the Menu toolbar button next to the desktop name. You can then select Close, which disconnects you from the desktop, or select Log off.
This exercise described using the HTML Access web client, which does not require installing any software on the client device. For information about HTML Access features such as copying and pasting or transferring files between your local client system and the virtual desktop or published application, go to the VMware Horizon Documentation page, scroll down to the Horizon Clients section, and select the Horizon HTML Access Guide for the version of the Horizon Connection Server you are using.
Monitoring Horizon Components
Most of the monitoring you do for Horizon 8 will be from the Horizon Console dashboards. If you have a Horizon Universal subscription license, you can monitor some additional components, such as the Horizon Edge and pod provider by using the Workspace ONE Cloud Admin Hub.
Exercise: Take a Tour of the Horizon Dashboards
In this exercise, you will take a brief tour through the dashboards of both administrative interfaces.
Important: In order to have components that appear in your dashboards, such as desktop and application pools, RDSH server farms, and the machines included in these components, you are encouraged to perform all the earlier exercises in this guide.
To perform the steps that relate to Horizon Cloud Services, you must have deployed a Horizon Edge and must have a Horizon Universal subscription license (purchased or free-trial).
Note: The following video, Monitoring VMware Horizon Components, demonstrates how to perform this procedure. For your convenience, the steps are also provided in text format below the video.
To monitor Horizon components:
- To log in to the Horizon Console, open a supported web browser and enter the address of your Connection Server. The URL format is
https://<connection-server-hostname>/admin - At the top of the Horizon Console navigator, click on issue numbers to view details about component issues.
- Navigate to Monitor > Dashboard.
- In the System Health section at the top of the page:
- Click expander buttons to see details of any components that have issues. For example, you might see an item for the Connection Server if it is using a self-signed certificate.
- Click the VIEW link and then click through the list on the left side of the window that appears, to examine the health of the various Horizon infrastructure components. For each one, click the various tabs in the upper area of the pane on the right.
- Scroll down to the charts in the Sessions section and click the VIEW link to see details for each session.
- Scroll down to the Machine Status section and examine all the items listed for the various tabs: vCenter, RDS Hosts, Other.
If you do not have Horizon Cloud Services connected to your on-premises Horizon Connection Server, you can skip the rest of the steps in this exercise. - To monitor your Horizon Edge and Horizon Connection Server, log in to the Horizon Universal Console, as follows:
- Log in to the VMware Cloud Services console (https://console.cloud.vmware.com/).
- On the Services page, click LAUNCH SERVICE on the Workspace ONE tile.
- On the My Workspace page, click Manage on the Horizon Cloud Services tile.
- In the Horizon Universal Console, navigate to Resources > Capacity, and do the following:
- Click the Horizon Edge that appears in the table, to go to the Summary tab for the Horizon Edge.
- Click the Infrastructure Monitoring tab, and in the table that appears, click the View link for your Horizon Connection Server.
- Scroll down to examine all the details for the server: CPU and memory usage, sessions, users, usage chart, and status of all the services running on the Connection Server.
- To see the dashboard for Horizon Cloud next-gen monitoring, in the Horizon Universal Console:
- Click Home at the top of the navigator, scroll down to the Actionable Insights and Analytics section, and click LAUNCH INTELLIGENCE.
- In the VMware Cloud Services console that appears, in the My Services section, click LAUNCH SERVICE on the Workspace ONE tile.
- In the navigator pane, click Virtual Apps & Desktops > Horizon Cloud next-gen.
- Click the various charts to drill down on information, and examine all the tiles, clicking VIEW or VIEW DASHBOARD for any tiles that have collected data.
Note: You might need to collect intelligence data for 60 days or more in order to chart useful information over time.
Summary and Additional Resources
This quick-start tutorial demonstrated just how quickly and easily you can use VMware Horizon to create VDI desktops and RDSH-published applications using a Horizon-on-vSphere infrastructure. You completed simple wizards to install and configure a Connection Server, which streamlines provisioning of RDSH servers and cloned desktops.
You then created an automated desktop pool and an automated RDSH server farm. With one simple wizard, you created multiple application pools. Next, you entitled end users to applications and desktops. In addition, this guide provided an overview of features, architecture, and components.
Finally, you enjoyed the end-user experience of launching desktops and published applications from the Windows-based Horizon Client and the web-based HTML Access client. The native Horizon Client software can be installed on Windows, macOS, Linux, Chrome, iOS, and Android endpoint devices.
Because this guide is meant to get you started quickly, it does not delve into details of all the options and features that provide a rich user experience:
- Support for use cases such as graphics-intensive 3D applications with NVIDIA GRID vGPU
- Quick and easy access to a user’s files from their virtual desktops and applications with file-type association
- Support for the most commonly used peripherals, including printers, scanners and imaging devices, smart cards, and USB storage devices
- Performance optimizations to increase application responsiveness
For information about these and other notable features, see the items listed in the Additional Resources section.
Additional Resources
'%3E%3Cpath id='Rectangle_1' data-name='Rectangle 1' d='M0,0H800V300H0Z' transform='translate(2297 1132)' fill='%23E2F0D9'/%3E%3Cg id='Group_5' data-name='Group 5' transform='translate(-6 -3)'%3E%3Ctext transform='translate(2534 1280)' font-size='50' font-family='Roboto-Regular, Roboto'%3E%3Ctspan x='0' y='0'%3ECurated Assets%3C/tspan%3E%3C/text%3E%3Ctext transform='translate(2611 1333)' font-size='20' font-family='Roboto-Regular, Roboto'%3E%3Ctspan x='0' y='0'%3ETile View (with image and controls)%3C/tspan%3E%3C/text%3E%3C/g%3E%3C/g%3E%3C/svg%3E)
Changelog
The following updates were made to this guide.
| Date | Description of Changes |
| 2023-06-28 |
|
| 2021-01-05 | Added a contributor. |
| 2020‑12‑08 | Initial publication date. |
About the Author and Contributors
This tutorial was written by Caroline Arakelian, Senior Technical Marketing Manager, End-User-Computing Technical Marketing, VMware, with appreciation and acknowledgement for assistance from:
- Jim Yanik, Senior Manager, End-User-Computing Technical Marketing, VMware
- Barak Nissim, Lead Solution Engineer, Digital Workspace, End User Computing, VMware
- Donal Geary, Senior Technical Marketing Architect, EUC Technical Marketing, VMware
- Dobrinka Boeva, Senior Staff Technical Writer, Information Experience, VMware
- Gina Daly, Technical Marketing Manager, EUC Technical Marketing, VMware
To comment on this paper, contact VMware End-User-Computing Technical Marketing at euc_tech_content_feedback@vmware.com.