
Evaluation Guide for VMware App Volumes 4
VMware App Volumes 4Overview
This Evaluation Guide for VMware App Volumes 4 is a comprehensive technical overview to help you evaluate VMware App Volumes®. App Volumes provides real-time application delivery and lifecycle management. IT can use App Volumes to quickly deliver applications and data to users without compromising the user experience.
Purpose of This Guide
This guide introduces you to App Volumes 4 and explains how it fits into the VMware End-User-Computing vision. You learn about App Volumes architecture and components, including storage, network, and security. The installation and configuration sections present a basic App Volumes 4 deployment.
Exercises in the remaining sections allow you to evaluate some of the product's key features. Each exercise includes a video that demonstrates how to perform the task. For your convenience, following the video are the written-out steps. This way, you can consume the information in the format that you prefer: video, text, or both.
Although App Volumes can be used with VMware Horizon®, Horizon Cloud Service™ on Microsoft Azure, Citrix Virtual Apps and Desktops, and Remote Desktop Service Hosts (RDSH), this document focuses on one of the possible integrations: VMware vSphere®-based VMware Horizon environments. Exercises include attaching App Volumes packages to Horizon desktops and RDSH servers in a Horizon server farm.
Note: This guide is designed for evaluation purposes only. It uses the minimum required resources for a basic deployment and does not explore every feature. Do not use this evaluation environment as a template for a production environment. For information beyond the considerations of this tutorial, see the VMware App Volumes Documentation and the Tech Zone App Volumes Architecture document.
Audience
This tutorial is intended for IT administrators and product evaluators who are familiar with VMware vSphere and VMware vCenter Server®. Familiarity with networking and storage in a virtual environment, Active Directory, and Microsoft SQL Server is assumed. Knowledge of other technologies, such as VMware Horizon is also helpful.
What Is App Volumes?
App Volumes is a real-time application delivery and lifecycle management tool. Enterprises use App Volumes to centrally manage applications that are deployed to desktops with virtual disks. You do not need to configure individual desktops or applications. App Volumes scales easily and cost effectively without compromising the end-user experience.
Key Benefits
App Volumes 4 offers several benefits:
- Handles unique business cases and exceptions with flexible assignments – Decouple package management from application delivery, enabling application owners and packagers to work freely and respond quickly to user requests.
- Decreases IT infrastructure costs – Provide more flexible delivery of applications to users, groups, and devices without changing the existing infrastructure, thereby reducing computing, network, and storage costs.
- Provides consistent, highly personalized desktops, apps, and user settings – Support fully customizable desktops with the option for end users to install their own applications on writable volumes. Users get a persistent user experience in a nonpersistent environment.
- Maintains and updates apps in one place – Manage the entire application lifecycle, from initial installation, through updates and upgrades, to seamless replacement. Application owners can manage the full lifecycle of an application by updating a new version and publishing it through a workflow.
- Reduces the time required for managing images – Manage a common base image while also providing applications outside of the image to specific users and groups in an easily customized and componentized fashion. With regards to RDSH server farms, this can mean eliminating the need to manage multiple farms.
App Volumes and the VMware End-User-Computing Vision
App Volumes complements the VMware End-User-Computing portfolio by integrating with existing VMware Horizon components, such as Horizon desktops and VMware Dynamic Environment Manager™. It also integrates with application and desktop solutions, such as Citrix XenApp and Citrix XenDesktop, and with Microsoft Remote Desktop Session Host (RDSH) environments.
The following table lists the desktop solutions that can integrate with App Volumes.
Table 1: Desktop Solutions and App Volumes Integrations
| Desktop Solution | App Volumes Integration |
| VMware Horizon Apps | Deliver package-based applications to multiple desktops and RDSH servers. |
| VMware Horizon desktops | Attach packaged applications to virtual desktops to deliver applications to users. |
| VMware Dynamic Environment Manager | Manage App Volumes–based application settings on a detailed level as easily as native application settings. |
| Microsoft RDSH | Deliver packaged applications to multiple users who access the same RDSH server concurrently. |
| Citrix XenDesktop | Attach packaged applications to XenDesktop-based virtual desktops to deliver applications to users. |
| Citrix XenApp | Deliver packaged applications from a XenApp server to users. |
Packaging and Licensing
App Volumes is available in two editions: App Volumes Advanced and App Volumes Standard. For a feature comparison of the editions, scroll down to the “Compare” section of the App Volumes product page.
Each App Volumes edition is available in two license models:
- Per named user – for virtual environments with staff that need dedicated access to a virtual machine throughout the day.
- Per concurrent connection – for virtual environments with a high number of shift workers where machines are shared between workers throughout the day; for example, students, shift workers.
For information about which Horizon editions and subscription licenses include App Volumes, see the App Volumes FAQ. Also see the VMware Product Guide.
You can obtain a free 60-day evaluation license from the VMware App Volumes Product Evaluation Center.
Architecture and Components
With App Volumes 4, the simplified application management strategy involves working with applications, packages, and programs. These components provide granular control over the application lifecycle and improve administrative workflows.
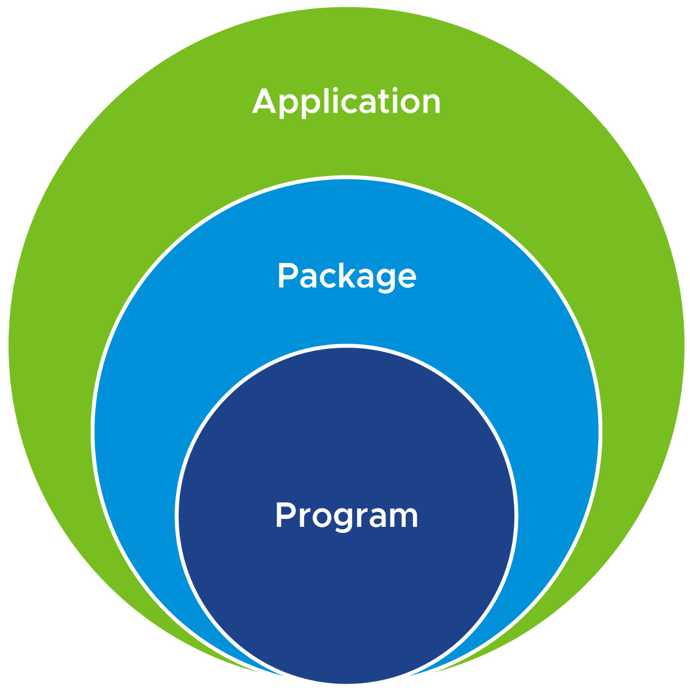
Figure 1: Components of App Volumes Simplified Application Management
These components interact in the following workflow:
- Applications – You create the application first. An application in App Volumes represents one or more packaged versions of software. Assignments are done at the application level to Active Directory users, groups, computers, or organizational units. Assignments can be made directly to a specific package in the application or to the package with the CURRENT marker.
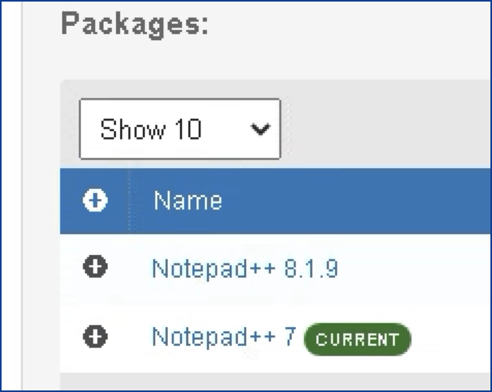
Figure 2: CURRENT Marker Next to a Package on the Notepad++ Application Page - Packages – Next, you use a packaging VM to capture application bits to a virtual disk for distribution to users and computers.
You can optionally provide a label for the lifecycle stage—such as New, Tested, Published, or Retired—to each package at creation, and you can change the stage as the package goes through its lifecycle. These labels are purely to help you keep track of the lifecycle stage. The labels have no effect on the way the workflow functions. - Programs – Finally, the program is auto-generated during package creation. The name of the program is automatic, and executables and actual bits are captured during package creation. Each program represents one software application. An application package can contain multiple programs.
How App Volumes Works
In App Volumes 4, applications are associated with certain VMDK or VHD files, which are called packages. (They were called AppStacks earlier, in App Volumes 2.x.) One or more packages are assigned to an application, and it is at the application level that you assign the packages to desktops or servers through user, group, or computer assignment. Administrators manage this process with the App Volumes Manager, a web-based interface that is integrated with Active Directory (AD) and vSphere.
With App Volumes, applications are presented to the operating system (OS) as if they were natively installed. Quickly providing users with applications that require no installation reduces infrastructure strain and overhead and simplifies application lifecycle management. When an application is no longer required, you can easily remove it.
For end users who require the ability to install their own applications, administrators can provide these users with App Volumes writable volumes.
Applications delivered by App Volumes follow users seamlessly across sessions and devices. Administrators can assign, update, or remove applications at the next user login or application launch. Writable volumes perform a similar function for user-installed applications and user-specific application data, allowing users to access data and user-installed applications across sessions and devices.
Dynamic Environment Manager solutions can complement writable volumes capabilities by managing the data within the writable volume at a detailed level and provide rules to enforce policy based on certain conditions or events.
App Volumes Architecture
App Volumes uses management servers configured to connect to deployed virtual desktops or RDSH servers that run the App Volumes Agent. Administrators assign application packages and writable volumes, which are located on shared storage, to users, groups, and virtual machines (VMs).
For VDI, single-user virtual machines run on VMware vSphere hosts. Each VM has the App Volumes Agent installed, and the agent communicates with the App Volumes Manager. Application packages and writable volumes are attached to the VMs. Because an application package is assigned to a user or group, it can be attached at user login or on-demand, when the user launches the app from the Start menu or a desktop shortcut.
For published applications, the RDSH server is a VM that has the App Volumes Agent installed on it. As with VDI, the App Volumes Agent on the RDSH server VM communicates with the App Volumes Manager, and application packages are attached to the RDSH server. Because, for RDSH servers, an application package is assigned to a computer account, the package is usually attached when the server OS has finished loading and before a user has logged in. For on-demand app packages, the app is delivered to the user when the user launches the app from an app shortcut.
For more details about each App Volumes component, see Introduction to VMware App Volumes, in the VMware App Volumes 4 Installation Guide.
Storage Considerations
Storage that is assigned to App Volumes contains the VMDK or VHD files used by application packages and writable volumes.
The following are recommendations and considerations for application package storage:
- For production environments, use dedicated application package datastores to optimize storage for read-only traffic during application start and use.
- Disk operations and network traffic are increased as more users concurrently mount virtual disks at login and as the applications are started. Scaling infrastructure resources to meet this demand is recommended. See the VMware Knowledge Base article VMware App Volumes Sizing Limits and Recommendations (67354).
- For production environments, VMware recommends flash-based storage arrays.
For more information, see the Storage section of the App Volumes Architecture chapter in the VMware Workspace ONE and VMware Horizon Reference Architecture.
Storage Groups
You can use storage groups to group datastores together. Storage groups replicate packages to each datastore in the storage group, which increases performance in concurrent user scenarios. Writable volume storage groups distribute volumes across datastores, which also improves performance.
When using storage groups for application packages, the App Volumes Manager optimizes the connection to the relevant application based on the location and number of attachments across all the datastores in the group.
For more information, see the Storage Groups section of the App Volumes Architecture chapter in the VMware Workspace ONE and VMware Horizon Reference Architecture. For information about storage limits, see the VMware Knowledge Base article VMware App Volumes Sizing Limits and Recommendations (67354).
Network Considerations
App Volumes and its associated database require opening the ports that are usually required for server-agent communication: ports 443 for HTTPS and 1433 for the SQL Server.
Optionally, you might want to use ports 80 for HTTP and 5985 for PowerShell web services. For information about other ports that might be used with App Volumes, see the VMware Knowledge Base article Network connectivity requirements for VMware App Volumes 2.5.X and later (2097818).
If you are using network-attached storage (NAS), keep its traffic local to the vSphere hosts, and configure the environment to allow for the smallest number of network hops between the vSphere hosts and the App Volumes desktop VMs. Each vSphere host with virtual desktops running the App Volumes Agent must be able to communicate with and attach to the NAS device.
Security Considerations
To enhance security in an App Volumes production environment, adhere to the following recommendations:
- Replace the default self-signed SSL certificate for App Volumes Manager with a certificate signed by a trusted certificate authority. For more information, see Using SSL Certificates with App Volumes Manager, in the VMware App Volumes Administration Guide.
- Use a dedicated, read-only Active Directory service account for the App Volumes Manager configuration. This account does not require interactive login permissions.
App Volumes Manager Installation and Initial Configuration
For the purpose of these exercises, install only one App Volumes Manager and use the MS SQL Express Server database that is included with App Volumes Manager.
Exercise: Install App Volumes Manager
You install App Volumes Manager on a Windows server and use its web-based interface to orchestrate the delivery of applications to end users. With App Volumes Manager, you can manage and automate the assignment of application packages, collect usage information, and maintain a history of administrative actions.
Important: To perform some of the exercises in this guide, specifically having to do with Horizon published apps on demand, you need to install App Volumes 4 Manager, version 2212 or later.
There are several prerequisites:
- To set up the required user accounts and security groups in Active Directory and vCenter Server, see User Accounts and Credentials, in the VMware App Volumes Installation Guide.
- For requirements regarding the server operating system, hypervisor, file share access, and networking, see System Requirements, in the VMware App Volumes Installation Guide.
Note: Note the FQDN (fully qualified domain name) of the server on which you will install App Volumes Manager. You will need this hostname for the configuration exercise that follows installation. - Verify that .NET Framework 3.5 or later is enabled on the server you plan to use for App Volumes Manager.
- To run the App Volumes installer, your account must have local administrator privileges on the target server.
- To download the App Volumes ISO installer, go to one of the following locations:
- Evaluation center – (For a 60-day free trial license)
https://my.vmware.com/web/vmware/evalcenter?p=app-volumes - Download center – (If you have purchased a license)
https://my.vmware.com/web/vmware/info/slug/desktop_end_user_computing/vmware_app_volumes/4_x
- Evaluation center – (For a 60-day free trial license)
Note: The following video, Starting a Free Trial of VMware App Volumes, demonstrates how to download a free trial from the App Volumes Evaluation Center.
Note: The App Volumes installer is distributed as an ISO file. You can either mount the ISO on the server where you want to create the App Volumes component, or you can extract the ISO contents to a shared folder. This latter option allows you to install each component without mounting the ISO each time.
Note: The following video, Installing VMware App Volumes Manager, demonstrates how to perform the installation procedure. For your convenience, the steps are also provided in text format below the video.
- Either mount the App Volumes installation media (ISO file) to the Windows Server VM or extract the ISO contents to a shared folder accessible to the VM.
Be sure to use App Volumes 4, version 2212 or later. - In the Installation folder, double-click the setup.msi file. The installation wizard opens.
- On the VMware App Volumes Installation Wizard page, click Next.
- On the License Agreement page, select I accept the terms of the license agreement, and click Next.
- On the App Volumes Install Screen page, select Install App Volumes Manager, and click Install.
- On the Welcome to the App Volumes Manager Setup Wizard page, click Next.
- On the Choose a Database page, select Install Local SQL Server Express Database, and click Next.
Note: For this exercise, the App Volumes installer will install an SQL Server Express database. For a list of all supported databases, see System Requirements, in the VMware App Volumes Installation Guide. - On the Database Server page, deselect the Enable SQL Server certificate validation check box, and click Next.
Note: Installing the database might take several minutes. Microsoft SQL Server is installed in C:\Program Files. - On the Choose Network Ports and Security Options page, click Next.
- On the Custom Setup page, click Next.
- On the Ready to Install App Volumes Manager page, click Install.
- On the Completed the App Volumes Manager Setup Wizard page, click Finish. This step might take several minutes.
Exercise: Configure App Volumes Manager for the First Time
After you have installed App Volumes Manager, you are ready to configure App Volumes, which includes licensing, Active Directory, vCenter Server, and VMware ESXi™.
There are several prerequisites:
- To download the product license file if you have purchased one, go to the Download VMware App Volumes page, find the edition of App Volumes, and click Go to Downloads. You can download the license key file to a location that is accessible to the VM.
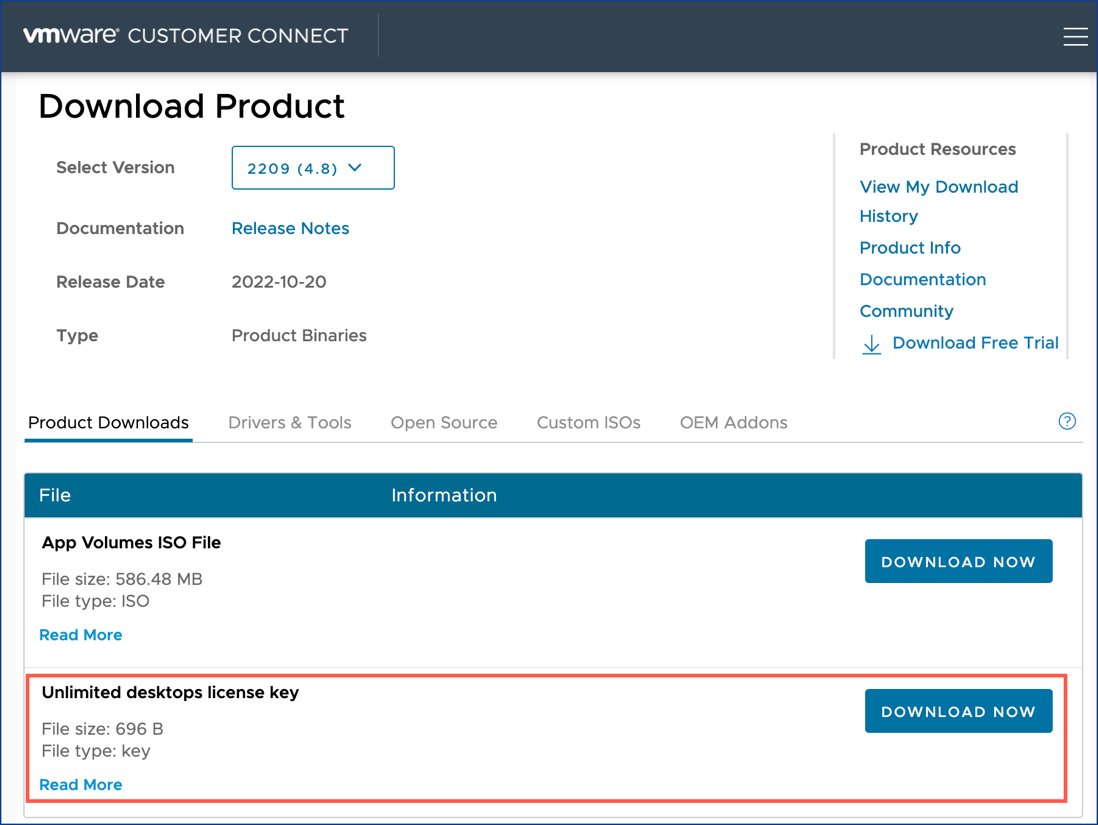
Note: An evaluation license is already included with the App Volumes installer, and you can use that for the purposes of this exercise. - To set up the required user accounts and security groups in Active Directory and vCenter Server, see User Accounts and Credentials, in the VMware App Volumes Installation Guide.
Note: During the exercise that follows, you will be prompted for the following information:- For Active Directory – AD domain name, the credentials of an AD user with read access to the domain, and the name of the security group you want to administer App Volumes.
- For vCenter Server – FQDN of the vCenter Server, along with credentials for a vCenter Server service account with administrator privileges.
- To set up the datastores that you will use for application package storage and writable volumes storage, you must create or decide which datastore or datastores to use from which vCenter Server. You will select these datastores in the following procedure.
Note: The following video, Configuring App Volumes Manager for the First Time, demonstrates how to perform this procedure. For your convenience, the steps are also provided in text format below the video.
- Start a web browser and connect to
https://<appvolumesHostname>, where<appvolumesHostname>is the host name of the App Volumes Manager server. Because this is the first time you are accessing the console, the Welcome page appears. - Click Get Started.
- On the License Information page, either click Next or click Edit and browse to and select the license file.
- On the AD Domains tab, you may leave some of the fields blank, but be sure to enter the following information, and then click Register.
- Active Directory Domain Name – Enter the fully qualified AD domain name.
- Username – As was mentioned in the prerequisites, this user account must have read access to the Active Directory domain. Administrator privileges are not required.
- Password – Enter the password for the account.
- Security – From the drop-down menu, select LDAP over TLS, and, for the purposes of this exercise, select Disable certificate validation (insecure).
- Use LDAP for a proof-of-concept environment, but it is recommended to use LDAPS for a production environment.
- On the Active Directory Domains page, verify that the domain you just registered appears in the list, and click Next.
- On the Admin Roles tab, use the Search Groups field to find the Active Directory group used to administer App Volumes, select the group from the Choose Group list, and click Assign.
- Verify that the AD group you specified appears in the list, and click Next.
- On the Machine Managers tab, configure details for a machine manager and click Save.
- Type – Select vCenter Server from the drop-down menu.
- Hostname – Enter the FQDN of the vCenter Server machine.
- Username – Enter the user name for the service account that has administrative privileges within vCenter Server.
- Password – Enter the password for the service account.
- You can leave the defaults for the rest of the fields. For more information about these settings, see Configure and Register the Machine Manager, in the VMware App Volumes Administration Guide.
Note: If you see a certificate warning, click Accept.
- Verify that the vCenter Server you specified appears in the list, and click Next.
- On the Storage tab, enter the default storage location details for your application packages and writable volumes, and click Next.
Note: You can change the folder names. - In the Confirm Storage Settings dialog box, click Set Defaults.
- On the Upload Templates page, for Host, select Use vCenter, select the check boxes next to the files in the list, click Upload, and confirm the upload.
The templates are uploaded to the storage location you specified. - On the Settings tab, click Save. If you would like to learn more about these settings, see App Volumes Manager Configuration Settings Page, in the VMware App Volumes Administration Guide.
App Volumes is now configured.
Setup of Packaging VMs and Endpoint VMs
With App Volumes, you use a packaging VM to capture application bits to a virtual disk (VMDK or VHD file) for distribution to users and computers. One or more versions of these application packages are contained in an App Volumes application.
To create a package, you must set up a packaging machine (VM). This machine should match, as closely as possible, the operating system version and OS patch level of the endpoint machines you plan to use. You must install the App Volumes Agent software on both the packaging machines and the endpoint machines. This chapter covers all these topics.
vSphere and Horizon Infrastructure Requirements
As was mentioned that the beginning of this guide, although App Volumes can be used with VMware Horizon, Horizon Cloud Service on Microsoft Azure, Citrix Virtual Apps and Desktops, and Microsoft Remote Desktop Service Hosts (RDSH), this document focuses on one of the possible integrations: vSphere-based VMware Horizon environments. Exercises include attaching App Volumes packages to Horizon desktops and RDSH servers in a Horizon server farm.
Providing instructions on setting up vSphere and Horizon environments is beyond the scope of this guide. You will need vSphere virtual machines managed by vCenter Server because that is the infrastructure required for a VMware Horizon deployment.
With regards to Horizon, you will need to create Horizon desktop pools and Horizon RDSH server farms, as described in the following section Setting Up the Endpoint Machines.
You will also need to install VMware Horizon® Client™ in the machine that you use for accessing the Horizon virtual desktop or RDSH-published application. To download and install the free Horizon Client software, go to the Download VMware Horizon Clients page.
Setting Up the Packaging Machines
To set up the desktop and RDSH server machines used for packaging, complete the following tasks:
- If you do not already have a desktop VM and an RDSH server VM set up for the exercises in this guide, follow the step-by-step instructions in Manually Creating Optimized Windows Images for VMware Horizon VMs, but when you get to the point of installing virtual desktop agents, install only the App Volumes Agent. Do not install the Horizon Agent or the Dynamic Environment Manager agent (FlexEngine) on the packaging machine.
Important: Be sure to install App Volumes 4 Agent, version 2212 or later.
Manually Creating Optimized Windows Images for VMware Horizon VMs covers VM creation, OS installation and configuration, and optimization of both Windows Desktop operating systems and Windows Server operating systems.
Tip: Step-by-step instructions for installing App Volumes Agent are included later in this chapter, in Exercise: Install the App Volumes Agent.
Important: As was mentioned earlier, the packaging machines should match, as closely as possible, the operating system version and OS patch level of the endpoint machines you plan to use. - After you finish creating the packaging machines, power them off and take a VM snapshot.
This way, after you use the machine to package an application, you will be able to revert to the original pre-package state (VM snapshot) and use the machine to create other packages.
Important: Note the machine name for use in later exercises.
Setting Up the Endpoint Machines
To set up the endpoint machines, complete the following tasks:
- To create the golden images that you will use to provision virtual desktop pools and RDSH (Remote Desktop Services Hosts) server farms, also follow the step-by-step instructions in Manually Creating Optimized Windows Images for VMware Horizon VMs.
In this case, install the various virtual desktop agents in the particular order listed:
- Horizon Agent 2212 or later
- App Volumes 4 Agent, version 2212 or later
Tip: Step-by-step instructions for installing App Volumes Agent are included in the next section, Exercise: Install the App Volumes Agent.
- For desktop VMs, create an instant-clone desktop pool using the golden image with Horizon Agent and App Volumes Agent installed.
If you are not familiar with Horizon desktop pools and do not know how to create them, see the Quick-Start Tutorial for VMware Horizon 8, especially the chapter Creating Single-User Desktop Pools. - After you create the desktop pool, use the Horizon Console to entitle the user account to that pool.
For instructions, see Entitling Users, in the Quick-Start Tutorial for VMware Horizon 8. - For RDSH server VMs, create an instant-clone server farm using the golden image with Horizon Agent 2212 and App Volumes 4 Agent, version 2212, installed.
If you are not familiar with Horizon server farms and do not know how to create them, see the Quick-Start Tutorial for VMware Horizon 8, especially Create an Instant-Clone RDSH Server Farm.
Important: Before creating the server farm, determine which Active Directory OU to use for storing instant-clone computer accounts. You will later need to specify this OU in App Volumes Manager, when assigning the application. For RDSH, you will entitle users in the Horizon Console, rather than in App Volumes Manager.
Exercise: Install the App Volumes Agent
After you install the App Volumes Agent on your packaging machines and the VMs that you use to create desktop pools and server farms, this agent communicates with the App Volumes Manager server to attach, or deliver, the correct applications.
Important: To perform some of the exercises in this guide, specifically having to do with Horizon published apps on demand, you need to install App Volumes 4 Agent, version 2212 or later.
There are a few prerequisites for installing the App Volumes Agent:
- To run the App Volumes installer, your account must have local administrator privileges on the target machine.
- To download the App Volumes ISO installer, go to one of the following locations:
- Evaluation center – (For a 60-day free trial license)
https://my.vmware.com/web/vmware/evalcenter?p=app-volumes - Download center – (If you have purchased a license)
https://my.vmware.com/web/vmware/info/slug/desktop_end_user_computing/vmware_app_volumes/4_x
- Evaluation center – (For a 60-day free trial license)
Note: The App Volumes installer is distributed as an ISO file. You can either mount the ISO on the machine where you want to create the App Volumes component, or you can extract the ISO contents to a shared folder. Best practice is to use a shared folder so that the ISO itself is not included in the packaging machine or the virtual desktops or servers that the end users connect to. Also, this option allows you to install each component without mounting the ISO each time.
- To configure the agent to communicate with App Volumes Manager, you must have the FQDN (fully qualified domain name) of the App Volumes Manager machine.
Note: The following video, Installing the App Volumes Agent in Packaging Machines and Golden Images, demonstrates how to perform this procedure. For your convenience, the steps are also provided in text format below the video.
- Either mount the App Volumes installation media (ISO file) to the VM (packaging machine or parent VM for pool or server farm), or extract the ISO contents to a shared folder accessible to the VM.
Be sure to use App Volumes 4, version 2212 or later. - In the Installation folder, double-click the setup.msi file. The installation wizard opens.
- On the VMware App Volumes Installation Wizard page, click Next.
- On the License Agreement page, select I accept the terms of the license agreement, and click Next.
- On the App Volumes Install Screen page, select Install App Volumes Agent, and click Install.
- On the Welcome to the App Volumes Agent Setup Wizard page, click Next.
- On the Server Configuration page, enter the FQDN of the App Volumes Manager server. For this exercise, select the Disable Certificate Validation with App Volumes Manager check box. Click Next.
- On the Ready to Install App Volumes Agent page, click Install.
- On the Completed the App Volumes Agent Setup Wizard page, click Finish.
- When prompted, restart the VM.
- To verify that the App Volumes Agent is installed correctly, log in to App Volumes Manager and on the DIRECTORY > Computers tab, find the machine in the list.
This listing confirms both that the agent is installed and that communication with App Volumes Manager is successful.
Simplified Application Management with App Volumes
After you have created your golden image, packaging machine, and desktop pools or server farms, you are ready to explore App Volumes application management. The following capabilities are key to simplified application management (SAM) in App Volumes 4:
- Decoupling packaging from delivery of applications
- Managing the application lifecycle
- Packaging once, deploying anywhere
The major features of App Volumes 4 that enable these capabilities are:
- Single-app packaging, so that you can package individually and deliver in any combination
- Dynamic assignments using markers, so that when a new package gets the CURRENT marker, that package becomes available to anyone assigned to receive the current version
You work with App Volumes applications, packages, and programs. These components provide you with granular control over the application lifecycle and improve administrative workflows.
Each application can contain one or more packages, and each package can contain one or more programs. For example, the following scenario shows how these constructs work together:
- Application – In an application we will call App A, you might have two packages that represent various versions related to different stages of the application lifecycle.
- Packages – Package v1 might represent the version that is currently deployed in production, and Package v2 might represent an update that is currently being tested.
- Programs – Inside Package v1 might be one or more programs, representing applications that you installed singly or together on the packaging machine. The programs in Package v2 include updated versions of those programs.
The point at which the applications are delivered depends on whether you packaged the applications to use classic mode or on-demand mode.
With the classic delivery mode, the packaged application is delivered when:
- An assigned end user logs in to a virtual desktop
- An RDSH server from the assigned Active Directory OU starts up
With the on-demand delivery mode, the packaged application is delivered when:
- An assigned end user opens the application shortcut on the virtual desktop or the virtual desktop’s Start menu
- An end user who is entitled to the RDSH-published app selects the app shortcut in the Horizon Client app or in the browser-based Horizon web client (HTML Access)
For the exercises in this guide, the delivery mode is on-demand. For more information, see the product documentation topic Understanding Package Delivery Modes in App Volumes.
Important: The exercises in this guide show you how to use the App Volumes Manager console to package applications. You can alternatively use the App Volumes Application Capture Command-Line Program to easily automate the process of capturing applications by working with packages outside of App Volumes Manager console.
For information, see Using the App Volumes Application Capture Command-Line Program. Also see the video App Volumes App Capture Feature Walk-Through.
Exercise: Create an Application and Package for a Virtual Desktop
Packaging application installation is a simple process. A packaging VM is used to capture one or more installations, and the output is a VMDK file or VDH file, which can be distributed to Active Directory objects such as users, groups, and organization units (OUs).
With App Volumes 4, using the application, package, and program constructs simplifies and streamlines administrative tasks. In this exercise, you create an application and an application package.
There are a few prerequisites:
- Verify that you have installed and configured App Volumes Manager, including uploading the templates, as described in App Volumes Manager Installation and Initial Configuration.
- Verify that you have completed the tasks described in Setup of Packaging VMs and Endpoint VMs, including installing the App Volumes 4 Agent.
Important: The packaging machine must be running and must not have any attached packages, AppStacks, or writable volumes. - On a network share that is accessible to the packaging machine, download two versions of an application installer, such as Notepad++, which you will use in the packaging process. You will use the later version in the software update exercise. You install the application from a network share so that the application installer is not included in the packaging of the application.
Important: The application you use must have either a Start menu shortcut or a desktop shortcut. Although the app will be delivered on-demand, the way it is delivered is by the user clicking the application shortcut.
Note: The following video, Creating an Application Package with App Volumes, demonstrates how to perform this procedure. For your convenience, the steps are also provided in text format below the video.
- Start a web browser and navigate to
https://<appvolumesHostname>, where<appvolumesHostname>is the FQDN of the App Volumes Manager server. - Log in as an administrator, and on the INVENTORY > Applications tab, click Create.
- On the Create Application page, provide a name; for this example, the name is Notepad++. Click Create, and click Create again in the confirmation box.
Note: The name does not contain a version number because inside the application, you will create multiple versions. - On the Packages tab that is automatically generated for the application, provide the following information, and click Create:
- Name – Package name that includes the version number of the earlier version; for this example, the name is Notepad++ 7.
- Storage – Verify that this item shows the datastore you selected when you configured App Volumes Manager, in Exercise: Configure App Volumes Manager for the First Time.
- Delivery – For this exercise, select On-demand.
Note: You are on the INVENTORY > Packages tab because, when you created the application, the Create a Package check box was selected. If the check box had not been selected, you would have selected the application on the Applications tab, and then clicked Create Package.
- In the Confirm Create Package dialog box, select Perform in the background, and click Create.
The application and package are created. If you click the application name in the list of applications on the Applications tab, you can see details of both the application and the package. If you click the package name, you can also see package details on the Packages tab.
The status of the package is Unpackaged at this point because you must capture installation of the application on the packaging machine. - On the INVENTORY > Packages tab, locate and click the package.
Note: The status for the package must be Unpackaged. - On the Notepad++ package page that appears, click Package.
- On the Package For page that appears:
- Search for the machine name of the computer you want to use to package the application.
- Select the radio button next to the computer in the list, and click Package.
- When prompted, click Start Packaging.
The package is attached to the computer. You can now log in to the packaging machine and install the application.
- Use vSphere Web Client or RDP to log in to the packaging machine as an administrator, run the application installer from a network share, and configure the application after installation is complete.
Important: When you log in, you see the VMware App Volumes - Packaging in Progress dialog box. Do not click OK in this box until after you finish installing the application.
Tip: If this dialog box does not appear, reboot the VM before installing the application. - After you install the application, if you are prompted to reboot, do so, and only when installation is completely finished, click OK in the Packaging dialog box.
- In the Installation Complete? dialog box, click Yes.
A Packaging message appears, along with a Finalize Package dialog box. - Click Finalize in the Finalize Package dialog box, and when prompted, click Yes to reboot the machine.
- After the reboot is complete, log in to the packaging machine again, and click OK in the Packaging successful! dialog box.
- Log in to App Volumes Manager, click the INVENTORY > Packages tab, click the package you just created, and verify that the status is now Enabled.
You also see the program appear in the Programs list. - On that same page, click Set CURRENT, and when prompted, confirm that you want to set this package as the current one.
Exercise: Assign the Application to an End User
For this exercise, you will assign an application to an end user by using a Marker assignment type, so that the package you just created, which has the CURRENT marker, will be used.
Note: It is also possible to assign an application by using a package name, rather than by using a marker. For example, you might want most of your end users to receive the current version of the application, but you might want a few other users to test a new version. In this case, you could use the Package assignment type for those few users. For information about the Package assignment type, see Assign an Application to an Entity, in the VMware App Volumes Administration Guide.
There are a few prerequisites for this exercise:
- Create a restricted Remote Desktop Users group in Active Directory. For more information, see the product documentation topic Configure the Restricted Groups Policy.
- Verify that you have created a virtual desktop pool from a VM with the App Volumes Agent installed, and that you have entitled an end user account to that pool, as described in Setting Up the Endpoint Machines.
- As part of this exercise, you will use Horizon Client to access a virtual desktop and test launching the application. If you do not already have Horizon Client installed, go to the Download VMware Horizon Clients page.
Note: The following video, Assigning an App Volumes Application to an End User, demonstrates how to perform this procedure. For your convenience, the steps are also provided in text format below the video.
- Log in to App Volumes Manager and on the INVENTORY > Applications tab, click the application; for this example, the application is Notepad++.
- On the Notepad++ application page, click Assign.
- On the Assign Application page:
- Search for the user account.
- Select the check box next to the user account in the Entity list.
- Verify that the assignment type is Marker.
- Click Assign, and when prompted, confirm the assignment.
The assignment is now listed on the application page, in the Assignments section.
- Use VMware Horizon Client to log in to an endpoint machine (virtual desktop from a desktop pool) as the user you just assigned.
Note: This virtual desktop is the one you set up as directed in the earlier section Setting Up the Endpoint Machines. - In the Windows taskbar, search for and open the Add or remove programs app and verify that Notepad++ is not yet installed.
Because you opted to deliver this app on-demand, it is not installed until you start it from a desktop or Start menu shortcut. - Click the Start menu and select the Notepad++ shortcut that appears in the Recently added list.
A message box appears, notifying you that app delivery is in progress. - After Notepad++ starts up and the application window appears, open the Add or remove programs app and verify that Notepad++ is now installed.
- Log out of the virtual desktop OS.
Important: You must log out of the OS at this point so that when you log in again after deploying a new version of the software, you will be able to see the new version, as described in the next exercise.
Exercise: Deploy a New Version of an Application
Updating a package provides a way to make incremental changes instead of creating an entirely different application from scratch. With simple application management, each updated version of an application can follow its own lifecycle.
For this exercise, you create a package that contains a newer version of the application. You simply set that package to have the CURRENT marker, and then the assigned users get this new software version the next time they log in to their desktop.
Note: The following video, Using Marker Assignments to Deploy a New Version of an App Volumes App, demonstrates how to perform this procedure. For your convenience, the steps are also provided in text format below the video.
- Use vSphere Web Client to revert the packaging machine to the VM snapshot you took before you packaged the earlier version of the software, as follows:
- Select the packaging VM and power it off.
- Select the packaging VM and select ACTIONS > Snapshots > Manage Snapshots.
- Select the snapshot you want to use, click REVERT, and click REVERT again in the confirmation box.
By reverting to the snapshot, you remove the earlier version of Notepad++. - Power on the packaging machine VM.
Note: At this point, the VM should be powered on but not have any users logged in.
- Log in to App Volumes Manager and on the INVENTORY > Applications tab, click the application; for this example, the application is Notepad++.
- On the Applications page, click Create Package, and complete the page, as follows:
- Use a package name that reflects the newer version of the software; for this example, the package name is Notepad++ 8.1.9.
- Verify that the desired storage location and template are selected.
- For delivery mode, select On-demand.
- Click Create, and when prompted, confirm package creation.
- After the new package appears in the Packages list near the bottom of the page, and its status displays Unpackaged, build a package with the new software version. Use the same procedure you completed in Exercise: Create an Application and Package for a Virtual Desktop.
- On the Packages page for the new version of Notepad++ (8.1.9), click Set CURRENT.
- Setting this new package to CURRENT means that assigned users will get this new software version when they log in to their desktop and start the application.
Note: Only one package in the list can be marked as CURRENT. - Use Horizon Client to log in to an endpoint (virtual desktop from a desktop pool) as the same assigned user, start Notepad++ from the Start menu shortcut, and verify that the new version of Notepad++ is successfully deployed.
Important: If you do not see the new version, log out and log back in again. You will not see the new version of the software unless you previously logged out of the desktop, as directed in the last step of Exercise: Assign the Application to an End User.
Exercise: Assign Package Lifecycle Stages
You can assign a label to a package to indicate which stage it is at in its lifecycle. Stage labels help App Volumes packagers, testers, and application owners keep track of a package as it goes through its lifecycle.
These stage labels currently include New, Tested, Published, and Retired. The stage labels are for informational purposes only, and do not affect functionality or workflows associated with a package.
Note: The following video, Assigning Lifecycle Stages to App Volumes Packages, demonstrates how to perform this procedure. For your convenience, the steps are also provided in text format below the video.
- Log in to App Volumes Manager and on the INVENTORY > Applications tab, click the application; for this example, the application is Notepad++.
- On the Notepad++ application page, in the Packages section, note the Stage column, and click the package with the newer version of the application.
- On the Packages page, click Edit.
- On the Edit Package page, from the Stage list, select Published, and click Save.
- Click the Packages tab, and note that the newly assigned stage also appears on this page.
Exercise: Create a Published App and Package for RDSH
Microsoft Remote Desktop Session Host (RDSH) enables remote users to share applications installed on server hosts in the data center and to share session-based desktops. App Volumes supports packaged application integration with Microsoft RDSH desktops and applications.
Note: App Volumes also integrates with Citrix XenApp servers and Citrix XenDesktop to optimize management of Citrix XenApp published applications and Citrix XenDesktop applications. For more information, see:
There are several prerequisites for using App Volumes with RDSH.
- Verify that you have completed the tasks described in Setup of Packaging VMs and Endpoint VMs, including installing the App Volumes 4 Agent, version 2212 or later.
Important: The packaging machine must be running and must not have any attached packages, AppStacks, or writable volumes.
- On the packaging machine, or on a network share that is accessible to the packaging machine, download an application installer that you can use in the packaging process. For the example in this exercise, the free drawing application Krita is used.
Important: This application must have either a Start menu shortcut or a desktop shortcut. Although the app will be delivered on-demand, the way it is delivered is by the user clicking the application shortcut.
Note: The following video, Creating an App Package for Published Apps, demonstrates how to perform this procedure. For your convenience, the steps are also provided in text format below the video.
- Start a web browser and navigate to
https://<appvolumesHostname>, where<appvolumesHostname>is the FQDN of the App Volumes Manager server. - Log in as an administrator, and on the INVENTORY > Applications tab, click Create.
- On the Create Application page, provide a name; for this example, the name is Krita. Click Create, and click Create again in the confirmation box.
Note: The name does not contain a version number because inside the application, you will create multiple versions. - On the Packages tab that is automatically generated for the application, provide the following information, and click Create:
- Name – Package name that includes the version number; for this example, the name is Krita 5.1.3.
- Storage – Verify that this item shows the datastore you selected when you configured App Volumes Manager, in Exercise: Configure App Volumes Manager for the First Time.
- Delivery – For this exercise, select On-demand.
- In the Confirm Create Package dialog box, select Perform in the background, and click Create.
The status of the package is Unpackaged at this point because you must capture installation of the application on the packaging machine. - On the INVENTORY > Packages tab, locate and click the package.
Note: The status for the package must be Unpackaged. - On the application package page that appears (for this example, Krita), click Package.
- On the Package For page that appears:
- Search for the machine name of the computer you want to use to package the application.
- Select the radio button next to the computer in the list, and click Package.
- When prompted, click Start Packaging.
The package is attached to the computer. You can now log in to the packaging machine and install the application.
- Use vSphere Web Client or RDP to log in to the packaging machine as an administrator.
Important: When you log in, you see the VMware App Volumes - Packaging in Progress dialog box. Do not click OK in this box until after you finish installing the application.
Tip: If this dialog box does not appear, reboot the VM before installing the application. - Change the Windows server to install mode, as follows:
- Click Start, and then click Run.
- In the Open box, type
cmd, and then click OK. - At the command prompt, type
change user /install, and then press ENTER. The following message appears: “User session is ready to install applications.” - Type
exitand press ENTER.
- Run the application installer and configure the application after installation is complete, if necessary.
After you install the application, if you are prompted to reboot, do so. - Change the server back to execute mode, as follows:
- Click Start, and then click Run.
- In the Open box, type
cmd, and click OK. - At the command prompt, type
change user /execute, and then press ENTER. The following message appears: “User session is ready to execute applications.” - Type
exitand press ENTER.
For more information about using install and execute modes, see the VMware knowledge base article Provisioning an App Volumes AppStack on a RDSH or Citrix XenApp server (2105428).
- In the Packaging dialog box, click OK.
- In the Installation Complete? dialog box, click Yes.
A Packaging message appears, along with a Finalize Package dialog box. - Click Finalize in the Finalize Package dialog box, and when prompted, click Yes to reboot the machine.
- After the reboot is complete, log in to the packaging machine again, and click OK in the Packaging successful! dialog box.
- Log in to App Volumes Manager, click the INVENTORY > Packages tab, click the package you just created, and verify that the status is now Enabled.
- On that same page, click Set CURRENT, and when prompted, confirm that you want to set this package as the current one.
Using the CURRENT marker with apps on demand is a very powerful feature. For example, say a user logs in in the morning but does not launch an application until later in the day. If there is a change to the current version during that day, so that the marker points to a newer version in the afternoon, the user will get the most current version when they finally launch the application in the afternoon.
Note: In the next exercise, you will use the new feature called Horizon published apps on demand. In order for the feature to work and for this package to appear in the list of apps in the Horizon Console Add App Pool wizard, this package must use the CURRENT maker in App Volumes Manager.
Exercise: Deliver Horizon Published Apps on Demand
With Horizon published apps on demand, Horizon administrators can entitle users to RDSH-published application packages without the need for duplicate entitlements in App Volumes. For example, you can even deliver Microsoft Office in a package!
End users see a published app appear in an application window on their client endpoint, rather than as an application they launch from inside a virtual desktop.
In in this exercise, you will use the Horizon Console to:
- Add an App Volumes Manager server.
- Associate an App Volumes Manager with a Horizon RDSH server farm.
- Create a Horizon application pool using the new Add from App Volumes Manager option.
You will then try out the end-user experience by using Horizon Client to launch the published app.
Important: Although best practice is to have the packaging machine match, as closely as possible, the Windows OS version of the endpoint machines, this practice is no longer a requirement. For example, in many cases, you can package an application on a Windows 10 machine and add that packaged app to an application pool for an RDSH server farm.
There are several prerequisites for using App Volumes with Horizon RDSH server farms:
- You must have Horizon Connection Server 2212 or later set up and running. For more information, see the Horizon Installation and Upgrade guide.
- Verify that you have created an RDSH server farm from a VM with the correct agents installed, as described in Setting Up the Endpoint Machines.
Important: In the golden image for the RDSH server farm, you must have installed App Volumes 4, version 2212 or later, and Horizon Agent 2212 or later.
- Create a restricted Remote Desktop Users group in Active Directory. For more information, see the product documentation topic Configure the Restricted Groups Policy.
- Verify that you have created an application package in App Volumes Manager and set its marker to CURRENT. The package must have been created with App Volumes 4, version 2111 or later. This procedure is described in Exercise: Create a Published App and Package for RDSH.
Important: This application must have either a Start menu shortcut or a desktop shortcut. Although the app will be delivered on-demand, the way it is delivered is by the user clicking the application shortcut.
- If you do not already have Horizon Client installed on the machine that you want to use for accessing the published app, go to the Download VMware Horizon Clients page.
- For the App Volumes Manager server, if you do not have a CA (certificate authority)-signed security certificate, you will need to import the self-signed certificate into the Trusted Certificates store on the Horizon server, as described in the following procedure.
Note: The following video, Delivering Horizon Published Apps on Demand with VMware App Volumes, demonstrates how to perform this procedure. For your convenience, the steps are also provided in text format below the video.
- If your App Volumes Manager server does not use a TLS/SSL security certificate from a trusted certification authority to verify its identity, perform the following procedure:
- Log in to the App Volumes Manager server and locate the self-signed certificate file (
app_vol_self_vmware.com.crt), at:
- Log in to the App Volumes Manager server and locate the self-signed certificate file (
C:\Program Files (x86)\CloudVolumes\Manager\nginx\conf\app_vol_self_vmware.com.crt
- Copy the
app_vol_self_vmware.com.crtfile to the Horizon server’s file system. - On the Horizon server, open the Manage Computer Certificates app.
- In the navigation tree, under Certificates – Local Computer, right-click Trusted Root Certification Authorities, and select All Tasks > Import.
- In the wizard that opens, follow the prompts to browse to and open the
app_vol_self_vmware.com.crtfile and select Place all certificates in the following store: Trusted Root Certification Authorities. - After you finish the wizard and see the notification that the import was successful, in the Start menu, type services.msc to open the Services app, and restart the VMware Horizon View Connection Server service.
You can now add the App Volumes Manager server in the Horizon Console, which is described next.
- Log in to the Horizon Console as an administrator.
The URL is
https://<connectionServerHostName>/admin, where<connectionServerHostName>is the FQDN of the connection server that hosts Horizon Console. - Navigate to the Settings > Servers page, and click the App Volumes Managers tab.
- Click Add and complete the Add App Volumes Manager dialog box and click OK:
- Server Address – Enter the fully qualified domain name (FQDN) of the App Volumes Manager server, or if you are using a load-balanced group of App Volumes servers, enter the FQDN of the load balancer.
- Port – Leave the default, 443.
- User Name – Enter the user name for the service account that has administrative privileges within vCenter Server. You specified this user name when configuring App Volumes Manager, in Exercise: Configure App Volumes Manager for the First Time.
Tip: The format for entering the user name is
domain\username; for example:acme\service-username, without the “.com” in the domain name. - Password – Enter the password for the service account.
The App Volumes Manager server name appears in the list on the App Volumes Managers tab.
- Navigate to the Inventory > Farms page and select the check box next to the farm you want to use.
- From the More Commands menu, select Associate App Volumes Manager, and in the dialog box that appears, select the App Volumes Manager from the drop-down list and click OK.
Important: Each farm can be associated with only one App Volumes Manager, but the same App Volumes Manager can be associated with many farms.
- Navigate to the Inventory > Applications page, and click Add > Add from App Volumes Manager.
If you get an error message, make sure any other farms or desktop pools you have are in a good state. If you have any problem VMs or if you try to edit a desktop pool or farm and see any errors, you might need to delete that farm or desktop pool, even if the farm is not associated with an App Volumes Manager.
- On the Select Applications page, click to select the check box next to the application or applications and click Next. For this example, select Krita (x-64). If you see multiple items for the same application, just select one.
Important: You might see an app listed multiple times. That is because during packaging, App Volumes records all the locations that you can execute the application from. For example, the list might include locations for desktop shortcuts and install location shortcuts. Also, in the case of the Krita application, you might see Google Chrome in the application list because Krita might use Chrome to launch itself.
- On the Edit Applications page, edit the ID, display name, or both, if desired, and click Submit.
- On the Add Entitlements page, click Add, search for and select the users or user groups to entitle, click OK, and click OK again to confirm.
- Use Horizon Client to log in as the user you just entitled and select the published app.
In the desktop and app selector, you see shortcut icons for the Krita app, or any other app you added to the pool. If an icon does not look as expected, you might need to edit the application pool and select a different application item for that app, if there were duplicates.
After the application starts and the application window appears, you also see the application shortcut in the taskbar (for Windows) or the Dock (for MacOS), just as if it were a natively installed application.
Exercise: Create a Writable Volume for User-Installed Apps
With App Volumes, a user-installed application (UIA) can be captured on a user-assigned writable volume. The writable volume persists across user sessions, allowing the data to move across desktops with the user.
When a user is assigned a writable volume, the App Volumes Agent running on the user’s virtual desktop redirects all user-installed applications and settings to the writable volume. The agent also presents all previously captured UIAs and settings to the user.
With writable volumes, local user profile configurations and application preferences follow AD users as they connect to different desktops and OS versions. This local user profile capability can complement and augment other enterprise profile solutions.
Available templates for writable volumes:
- UIA only – Saves a user’s changes to an application in a read-write container. You can use this template with a third-party profile solution or VMware User Environment Manager. For more information, see the blog post VMware User Environment Manager with VMware App Volumes.
- UIA and user profile – Captures a user’s changes to applications and local profile information. Use this template if a profile solution is not in place.
Note: The following video, Creating a User-Writable Volume with App Volumes, demonstrates how to perform this procedure. For your convenience, the steps are also provided in text format below the video.
- Start a web browser and navigate to
https://<appvolumesHostname>, where<appvolumesHostname>is the FQDN of the App Volumes Manager server. - Log in as an administrator, and on the INVENTORY > Writables tab, click Create.
- On the Create a Writable Volume page, complete the page as follows:
- In the Search Active Directory text box, enter a user name for the writable volume assignment and click Search.
- Select the box to the right of the user name.
- From the Source Template drop-down list, select template_uia_only.vmdk.
Tip: if this drop-down list is empty (“No templates found”), check your App Volumes configuration. On the CONFIGURATION > Storage tab, make sure that the correct path is set for the writable volumes storage location and upload the templates to that location. - Select Delay writable creation for group/OU members until they login.
Note: It is important to select this option when creating user-writable volumes for a large group or OU. If this option is not selected, a series of create requests are sent to vCenter Server, which can degrade performance. - Click Create.
- In the Confirm Create Writable Volumes dialog box, select Create Volumes in the background, and click Create.
The writable volume is created. If you click the Writables tab, you can see details. - Use Horizon Client to log in to an endpoint machine (virtual desktop from a desktop pool) as that same user for whom you created the writable volume.
This will probably be the same desktop pool that you used for Exercise: Create an Application and Package for a Virtual Desktop. - After you are logged in to the operating system, use the Start menu to go to Computer Management.
- Select Disk Management to see the writable volume.
Note: You cannot see the attached writable volume in Windows Explorer. - Open a browser on the virtual desktop and download and install an application.
Important: If you download and install Notepad++, be sure to use a version that is different from the versions you used in the earlier exercises, when you created and updated application packages. For example, if you used Notepad++ 7 and Notepad 8.1 for those exercises, use a version such as Notepad 8.2 for this exercise. - Start the application, to verify that it is installed correctly.
- Log out of the desktop, so that the instant-clone desktop is shut down and deleted.
- Use Horizon Console to create another desktop pool according to the requirements listed in Setting Up the Endpoint Machines, and entitle it to this same end user account.
Tip: The machines in the desktop pool must have the App Volumes Agent installed. If you already have another desktop pool you can use, verify that App Volumes Agent is installed and that the end user is entitled to that pool. - Use Horizon Client to log in to that second desktop as that same user for whom you created the writable volume.
- Verify that the user-installed application (such as that same version of Notepad++) is installed.
- Open the Computer Management app and select Disk Management to verify that the writable volume is attached and has followed you to this second virtual desktop.
Summary and Additional Resources
This tutorial provided an overview of App Volumes features, architecture, and components, and demonstrated simplified application management, which includes the administrative workflow components called applications, packages, and programs. You completed exercises that walked you through:
- Installing and setting up App Volumes
- Creating one App Volumes application for a virtual desktop and another one for an RDSH-published app
- Creating three application packages, two of which included different versions of the same application
- Capturing the program bits for each application package
- Marking a package as the current version
- For virtual desktops, assigning that current version to an end user
- For RDSH, assigning the current version to the Active Directory OU that contains the RDSH computer accounts
- Assigning a lifecycle stage to an application package
- Creating a writable volume and installing a user-installed application in the writable volume
Note: This tutorial does not contain exercises for all App Volumes features. For complete information about each version of App Volumes, go to the VMware App Volumes Documentation page.
Additional Resources
In addition to the many resources referenced earlier, in the body of this guideS, see the following resources, many of which are available on Digital Workspace Tech Zone:
- What Is VMware App Volumes? (blog post)
- DEMO: App Volumes 4.0 Feature Review (interactive demo)
- App Volumes Activity Path
- VMware App Volumes Documentation (includes Release Notes, Installation Guide, and Administration Guide)
Changelog
The following updates were made to this guide.
| Date | Description of Changes |
| 2023-02-27 |
|
| 2023-01-27 |
|
| 2022-11-18 |
|
| 2020‑02‑04 |
|
About the Author and Contributors
The following authors, contributors, and subject-matter-expert reviewers collaborated to create this tutorial.
Authors
- Caroline Arakelian is a Senior Technical Marketing Manager, End-User-Computing Technical Marketing, VMware.
- Josh Spencer, Group Product Line Manager, End-User Computing, VMware, wrote the App Volumes 4 Beta Guide, on which much of this tutorial is based.
- Gina Daly, Technical Marketing Manager in End-User-Computing Technical Marketing, VMware, wrote the Quick-Start Tutorial for App Volumes 2.x, on which much of this tutorial is based.
Additional Video Narrators and Editors
- Emiliya Ivanova-Nikolova, Senior Technical Writer, Information Experience, VMware
- Ben Consuegra, Senior EUC Content Strategist, End-User Computing, VMware
- Gina Daly, Technical Marketing Manager in End-User-Computing Technical Marketing, VMware
Contributors
- Jim Yanik, Senior Manager in End-User-Computing Technical Marketing, VMware
- Jeff Ulatoski, Senior Product Manager, Virtual Workspace, End-User Computing, VMware
- Cindy Carroll, Technical Marketing Manager, End-User-Computing Technical Marketing, VMware
Reviewers
The following people reviewed the original version of this document:
- William Uhlig, Solution Engineer, End-User Computing, VMware
- Raymond Wiesemann, Manager, Solution Engineering, End-User Computing, VMware
- Vernon Lihou, Lead Solution Engineer, End-User Computing, VMware
Feedback
To comment on this paper, contact VMware End-User-Computing Technical Marketing at euc_tech_content_feedback@vmware.com.