
Using Intelligent Hub hubcli to Manage macOS Updates
Overview
VMware Workspace ONE® UEM provides a comprehensive management solution for macOS devices, supporting operating systems version 10.15 and later. With the ability to manage Corporate-Dedicated, Corporate Owned or Employee Owned (BYOD) devices, Workspace ONE UEM offers enterprises the flexibility to meet their employees’ needs at any level.
One area where organizations require a significant amount of flexibility and customization is managing OS updates and patches. Apple regularly releases minor updates for macOS that include feature enhancements, bug fixes, and security patches. Major OS updates, released less frequently, often contain new functionality, and in some cases, a completely new code base for the OS itself. Apple has included a Software Update utility within the OS that typically requires user intervention to initiate.
Workspace ONE UEM provides IT administrators with the ability to configure Software Update utility settings, such as the following:
- How to install updates (manually or automatically)
- What updates to install (all or recommended only)
- How often to check for updates
- Restart behaviors (force restart, allow deferrals, max number of deferrals, etc.)
The Software Update utility does provide organizations with the ability to maintain updates and patches on their macOS devices. However, it is limited in two ways. First, it relies on some end user intervention when it comes to updates and patches being applied. Second, it does not provide IT administrators with the ability to control which specific updates and patches get applied.
For example, if an organization is dependent on a specialized suite of software that requires a specific version of macOS be installed, IT administrators may wish to control the OS updates until the software can be validated on the updated platform. It might also be necessary to keep users from updating to the latest OS version as soon as the update is released. Workspace ONE UEM provides admins with the granular control needed to ensure that devices are patched and updated to meet corporate standards.
With the release of the Intelligent Hub, version 2212, Workspace ONE supports native Apple MDM commands for downloading, initiating, and managing software updates. The Workspace ONE hubcli commands provide granular control over the macOS update process. With a combination of leveraging and supporting native MDM update functionality as well as a more programmatic approach enabled by Freestyle Orchestrator, Mac Administrators have the toolset they need to fully support OS updates for their end users.
hubcli Commands
The hubcli for macOS is a client-side command-line tool built-in to Workspace ONE Intelligent Hub that provides you with an easy way to perform a limited set of configuration, API, and notification actions. It is important to remember that these actions are limited to the device on which hubcli runs. As of Intelligent Hub, version 2212, the hubcli offers the following commands:
| Command | Description |
| sync | This command will trigger Intelligent Hub to sync with Workspace ONE UEM. |
| notify | Using this command, IT admins can display a custom notification to the current user on the device. |
| config | This command allows admins to view or change certain Hub configuration settings. |
| logs | Admins can use this command to collect Hub diagnostics from a device and send them to the UEM console. |
| profiles | This command will request the UEM server to list or install assigned profiles. |
| restartdevice | Admins can use this command to request that UEM sends a restart command to a specific device. |
| sensors | With this command, users can perform certain sensor operations, like listing all sensors or triggering a sensor. |
| mdmcommand | This command can be used to trigger a custom command for native software update MDM actions. |
In this tutorial, you will use the notify and mdmcommand hubcli commands. The other commands in the above list will not be discussed.
Parameters for hubcli mdmcommand
The mdmcommand provides a series of parameters that can be used to control specific macOS update actions. These parameters give IT admins granular control over the entire update process. The following table explains the purpose of each parameter.
|
Parameter |
Description |
|
--osupdatescan |
This parameter schedules a background scan for OS updates on the device. |
|
--forceupdatescan |
This parameter will force the device to initiate an immediate OS update scan. |
|
--osupdate |
This parameter initiates an OS update on the device. You use this parameter in conjunction with others in this table to control the behavior of the update. |
|
--productversion |
You use this parameter in conjunction with |
|
--productkey |
This parameter specifies the product key of the specified version of macOS. |
|
--installaction |
The
|
|
--maxuserdeferrals |
This parameter sets the maximum number of user deferrals allowed before the update is automatically installed. This is only available when you use -- |
|
--priority |
This parameter sets the scheduling priority for downloading and preparing the update. This is only supported for minor OS updates (for example, 13.x to 13.y). The priority options are |
The following are examples of how to use the mdmcommand for macOS updates.
- Request an OS update for macOS 13.1
hubcli mdmcommand --osupdate --productversion “13.1”
- Request an OS update for macOS 13.1 to be downloaded, but not installed
hubcli mdmcommand --osupdate --productversion “13.1” --installaction DownloadOnly
- Request an OS update for macOS 13.1 to be downloaded and allow the user to defer the installation for up to 3 days
hubcli mdmcommand --osupdate --productversion “13.1” --installaction InstallLater --maxuserdeferrals 3
Purpose of This Tutorial
This tutorial will guide you through the creation of the required sensors, scripts, and Freestyle Orchestrator workflow for managing macOS updates and patches. The tutorial is divided into two sections. The first section provides an example of managing major macOS updates using scripts, sensors, and a Freestyle Orchestrator workflow. The second section will discuss using a script for managing minor macOS updates and patches.
The steps outlined in this tutorial are sequential and build upon each other. It is important that you follow the steps as described.
Audience
This operational tutorial is intended for IT professionals and Workspace ONE administrators of existing production environments.
Both current and new administrators can benefit from using this tutorial. Familiarity with macOS, XML, and basic scripting is assumed.
Knowledge of additional technologies such as VMware Workspace ONE® Intelligence and VMware Workspace ONE® UEM is also helpful.
Validation Environment
The content created for this operational tutorial used the following software and hardware versions for testing:
- Workspace ONE UEM version 2302
- Workspace ONE Intelligent Hub version 2301
- Apple macOS 12.6.3 (major OS update from 12.6.3 to 13.1)
- Apple macOS 13.1 (minor OS update from 13.1 to 13.2)
The content in this tutorial may be applicable to earlier Workspace ONE UEM and Hub versions but this was not specifically tested.
Software Update Device Profile
The macOS Software Update Utility regularly checks for updates and can be configured to automatically download and install OS updates. However, you may wish to have more granular control over what updates are installed on your devices. You can manage automatic updates with a device profile in Workspace ONE UEM.
In this section, you will create a device profile that configures the Software Update Utility to not automatically check for updates.
Create a Software Update Device Profile
To get the desired result, perform the following steps:
- On your desktop, double-click the Google Chrome icon.
- Navigate to the VMware Workspace ONE UEM Console.
For example, navigate tohttps://<WorkspaceONEUEMHostname>where WorkspaceONEUEMHostname is the host name of the Workspace ONE UEM console. - Enter your Username, for example,
administrator. - Click Next. The Password text box is displayed.
- Enter your Password, for example,
VMware1!. Click Login.
Note: If you see a Captcha, be aware that it is case sensitive. - Select Resources, and then click on Profiles & Baselines.
- Select Profiles.
- From the Add dropdown menu, select Add Profile.
- Select the Profile Platform by clicking macOS.
- For the Context, select Device Profile.
- Enter macOS Updates for the profile name.
- Scroll down the list of payloads until you find Software Update. Click Add.
- For Install macOS Updates, select Don’t automatically check for updates from the dropdown. You will notice that all other options become unavailable.
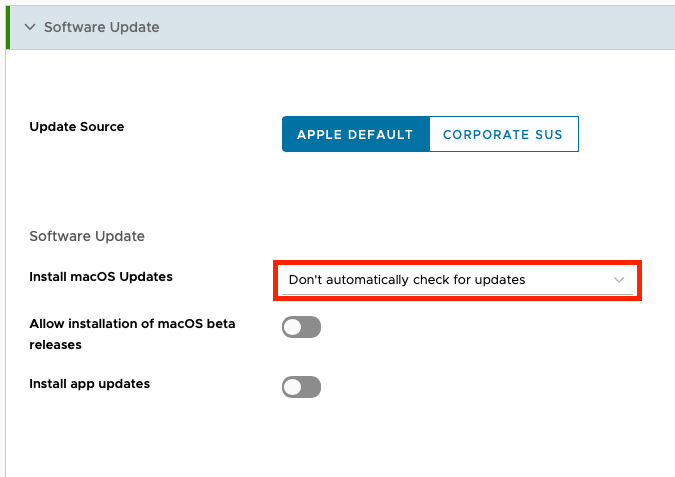
- Click Next.
- Scroll down to view Assigned Groups and click in the search box. From the list of Assignment Groups that appear, select the appropriate group. For example, select
All Devices (your@email.shown.here). - Select Auto for the Assignment Type.
- Click Save and Publish.
- You should now see your macOS Update device profile within the list on the Profiles window.
Managing Major macOS Updates
Introduction
Major macOS updates can be a disruptive experience for end users. These updates sometimes take up to an hour to complete, which can potentially leave the user without access to work resources during the update process. IT admins must balance the need to maintain their fleet of devices with accommodating the end user’s needs. It is important to provide the end user with as much flexibility as possible while ensuring that the update gets applied within a time frame that is acceptable to your organization’s policies.
For this exercise, you will be upgrading macOS Monterey, version 12.6.3 (and earlier) to macOS Ventura, version 13.1. The steps in this exercise can be adjusted for any combination of supported versions.
In this section, you will use a combination of sensors and scripts to create a Freestyle Orchestrator workflow that will notify the end user of a pending update, give them options for deferrals, and force the update once a specified deadline has been reached.
You will create the following resources in Workspace ONE UEM.
| Resource Name | Resource Type | Description |
| macos_version | Sensor | A sensor that checks the macOS version currently installed on the device. This will be used to determine if the device requires the update. |
| current_date | Sensor | This sensor checks the current date and time on the device. This will determine if the device has reached the deadline for installing the update. |
| macos_install_majorupdate | Script | This script will notify the user that an update is required, and it will begin the download/install process. The user will not have the option to defer the update. |
| macos_notify_majorupdate | Script | This script will notify the user that an update is required, and it will give the user the option to begin the download/install process, or defer the update until later. |
These four resources will be used in a Freestyle Orchestrator workflow that will manage the download and installation of the major update across your macOS devices. The process outlined in this document is designed to serve as an example. It is only one of several ways that this can be accomplished using the hubcli and Freestyle Orchestrator.
The following diagram explains the steps for the process you will be creating in this section.
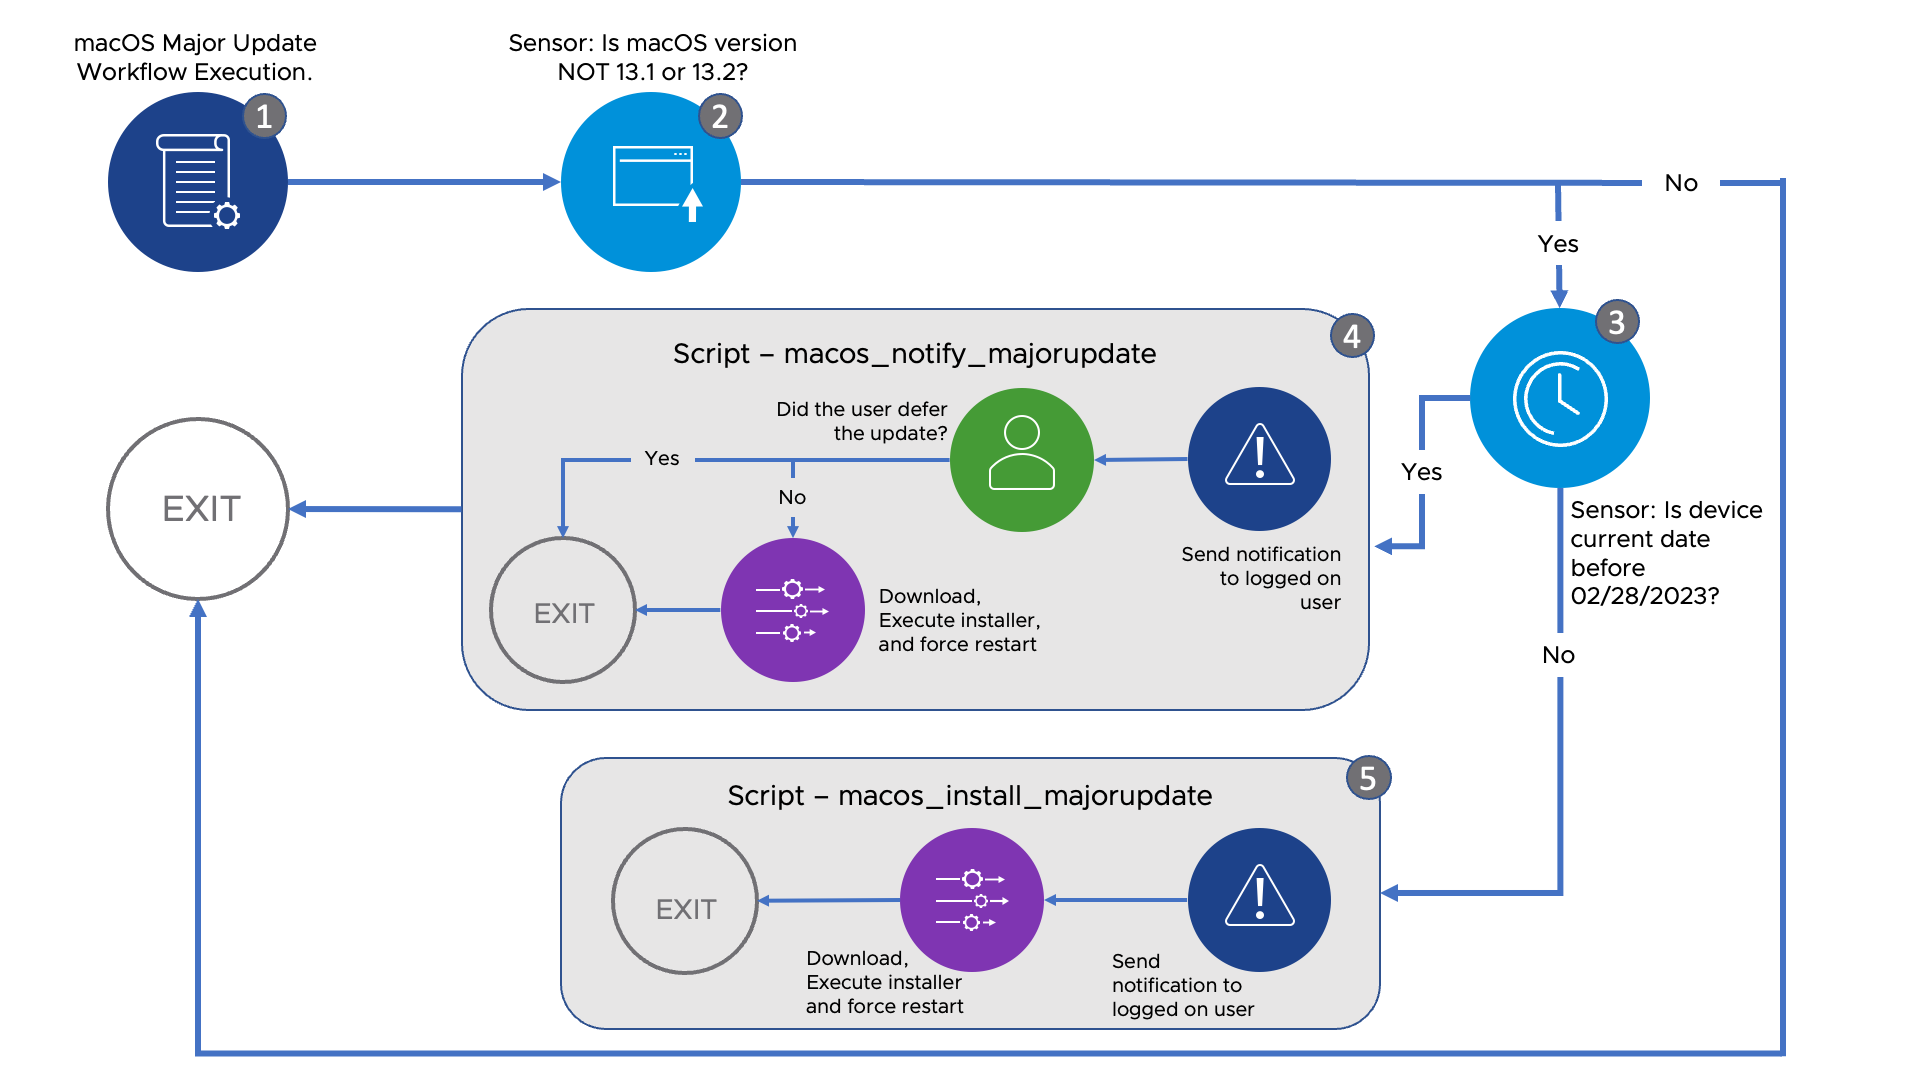
- The workflow executes on the macOS device.
- The macos_version sensor checks what version of macOS is installed on the device. If the version is NOT 13.1 or 13.2, the workflow will move to step 3. If it is 13.1 or 13.2, the workflow will exit.
- The update_deadline sensor will check to see if the current date on the device is before the required install date for the update. If current date is before the required install date, the workflow will move onto step 4. Otherwise, it will move to step 5.
- The workflow will execute the macos_notify_majorupdate script. This script will notify the user of the impending update, and give them the opportunity to proceed or defer the update for later. If the user decides to proceed, the script will initiate the download of the installer and begin the update. If the user defers the update, the script will exit, and the workflow will exit.
- The workflow will execute the macos_install_majorupdate script. This script will notify the user of the impending update, and then initiate the download and installation of the update. It will force the device to restart.
Create Smart Group for Device Updates
To target devices that are currently running macOS Monterey (12.6.x), you will use a Smart Group within Workspace ONE UEM to assign the devices to the workflow. A Smart Group is a customizable group that allows you to group specific platforms, devices, and users together for the purpose of application, policy, profile, and provisioning assignment.
In this exercise, you will create a Smart Group that will be used for assignment of the update workflow.
To get the desired result, perform the following steps:
- In the Workspace ONE UEM console, select Groups & Settings. Expand Groups and select Assignment Groups. Click Add Smart Group.
- Enter macOS Major Update for the group name.
- From the list of available criteria, expand Ownership. Click Selected and ensure that Corporate is the only item with a check mark.
- Expand Platform and Operating System. From the drop down, select Apple macOS. Change the condition to Less Than, and select macOS Ventura 13.0.0.
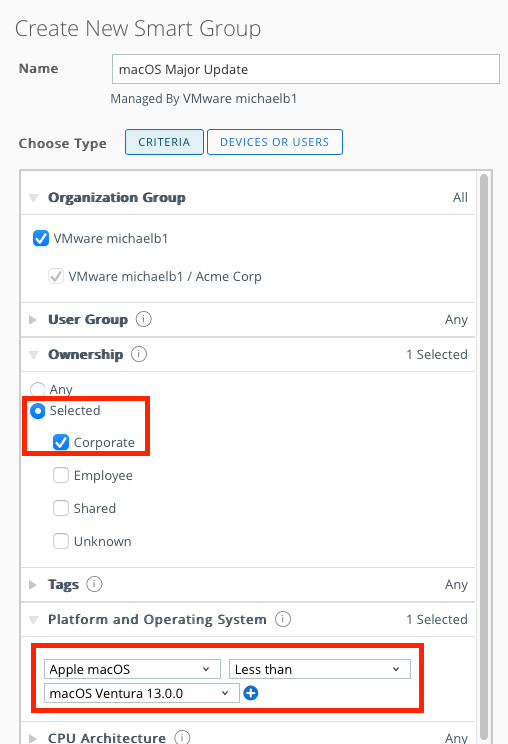
- Click Save.
Configure Sensor to Check macOS Version on Devices
The workflow will require a mechanism for determining if the update is required on a device. This will be done with a sensor that will retrieve the current version of macOS installed on the device. The workflow will compare the installed version with the update version.
To get the desired result, perform the following steps:
- In the Workspace ONE UEM console, select Resources. Then select Sensors.
- Click Add and select macOS from the dropdown menu.
- Enter macos_version for the sensor name. Click Next.
Note: Sensor names must be in all lower case letters, and cannot include spaces. - For Language, select Bash.
- Select System for Execution Context.
- Enter the following into the Code textbox:
#!/bin/bash
osvers=$(/usr/bin/sw_vers -productVersion)
echo $osvers
- Click Next.
- Click Save.
Note: For this exercise, it is not necessary to assign the script to an assignment group. The script will be assigned as part of the Freestyle Orchestrator workflow later in this tutorial.
Configure Sensor to Compare Current and Required Install Dates
If you are required to ensure that updates are applied by a certain date, you will need to create a script that compares the device’s current date to the required install date.
To get the desired result, perform the following steps:
- In the Workspace ONE UEM console, select Resources. Then select Sensors.
- Click Add and select macOS from the dropdown menu.
- Enter update_deadline for the sensor name. Click Next.
Note: Sensor names must be in all lower case letters, and cannot include spaces. - For Language, select Bash.
- Select System for Execution Context.
- Enter the following into the Code textbox:
#!/bin/bash
# enter the required date on which the update must be installed. Enter the date as YYYYMMDD
update_deadline=20230201
# gets current date from the device
current_date=$(date +"%Y%m%d")
# compares current date to the required install date
if [[ "$current_date" > "$update_deadline" ]] ;
then
   echo "true"
else
   echo "false"
fi
- Click Next.
- Click Save.
Note: For this exercise, it is not necessary to assign the script to an assignment group. The script will be assigned as part of the Freestyle Orchestrator workflow later in this tutorial.
Create Script to Notify User of Pending Update
This script will send a notification to the logged on user to let them know there is a pending update. The user will be given the opportunity to either begin the update or defer it for a later time. The script uses the hubcli notify command to the send the notification, and the mdmcommand to start the update. The following flags are available for use with the hubcli notify command.
|
Flag |
Description |
|
-t, --title |
This sets the title of the notification box. It is a required flag. |
|
-s, --subtitle |
This flag sets the subtitle for the notification box. |
|
-i, --info |
This sets the informative text for the notification box |
|
-a, --actionbtn |
This flag includes an action button in the notification box and sets the label for the button. |
|
-b, --script |
Use this flag to set a bash script to execute when the user clicks the action button. |
|
-c, --cancelbtn |
This provides an alternate label for the cancel button. Clicking this button will close the notification box. |
To get the desired result, perform the following steps:
- In the Workspace ONE UEM console, select Resources, and then click on Scripts.
- Select Add, and click on macOS.
- Name the script macos_notify_majorupdate. Leave App Catalog Configuration disabled. Click Next.
- Set the Language to Bash, and the Execution Context to System.
- Set the Timeout to 30.
- Enter the following into the Code textbox:
#!/bin/bash

/usr/local/bin/hubcli notify -t "Update to macOS Ventura" -s "This may take up to 1 hour." -i "Your machine will restart automatically. You will be notified when your device will be restarted. You have until Feb. 28th to update your device." -a "Begin" -b "/usr/local/bin/hubcli mdmcommand --osupdate --productversion 13.1 --installaction InstallASAP" -c "Update Later"
Note: You can change the behavior of the notification box by modifying the various flags mentioned earlier within the script.
- Click Next.
- Click Save.
Note: For this exercise, it is not necessary to assign the script to an assignment group. The script will be assigned as part of the Freestyle Orchestrator workflow later in this tutorial.
Create Script to Initiate the Update Download and Installation
This script will notify the logged in user that a pending update will be installed. Then, the script will initiate the download and installation of the update. The user will not have the option to defer the update.
To get the desired result, perform the following steps:
- In the Workspace ONE UEM console, select Resources, and then click on Scripts.
- Select Add, and click on macOS.
- Name the script macos_install_majorupdate. Leave App Catalog Configuration disabled. Click Next.
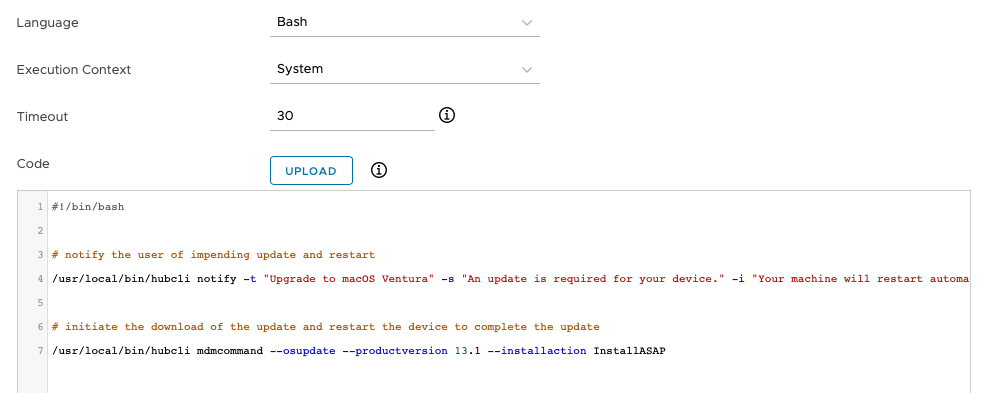
- Set the Language to Bash, and the Execution Context to System.
- Set the Timeout to 30.
- Enter the following into the Code textbox:
#!/bin/bash
# notify the user of impending update and restart
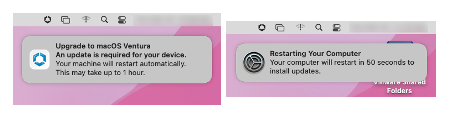
/usr/local/bin/hubcli notify -t "Update to macOS Ventura" -s "An update is required for your device." -i "Your machine will restart automatically. This may take up to 1 hour."
# initiate the download of the update and restart the device to complete the update
/usr/local/bin/hubcli mdmcommand --osupdate --productversion 13.1 --installaction InstallASAP
Note: You can change the behavior of the notification box by modifying the various flags mentioned earlier within the script.
- Click Next.
- Click Save.
Note: For this exercise, it is not necessary to assign the script to an assignment group. The script will be assigned as part of the Freestyle Orchestrator workflow later in this tutorial.
Deploy Freestyle Orchestrator Workflow to Manage Major Updates
Freestyle Orchestrator is a workflow orchestration platform integrated into Workspace ONE UEM that allows IT administrators to create low-code workflows for handling resource deployments that have complex conditions or sequencing. The Freestyle Orchestrator workflow that you will create for this exercise will manage the major update process by ensuring that the correct action is taken at the appropriate time on the specified devices.
Note: When the workflow is published and executed on a device, the user will receive notification of the pending update, and in some cases, be given the option to defer the update until later. It is important to note that the download and installation process takes time to complete. Between the initial notification and the restart notification, the end user will not see any visible activity on their device. It is important to communicate this to the end users to set appropriate expectations and ensure that they do not experience data loss.
For more information about using Freestyle Orchestrator to manage macOS devices, see the Getting Started with Freestyle Orchestrator on macOS Devices operational tutorial on VMware Tech Zone.
To get the desired result, perform the following steps:
- In the Workspace ONE UEM console, select Freestyle. Then select New.
Note: If this is the first time you are using Freestyle Orchestrator, you will click Get Started on the Getting Started with Workflows screen.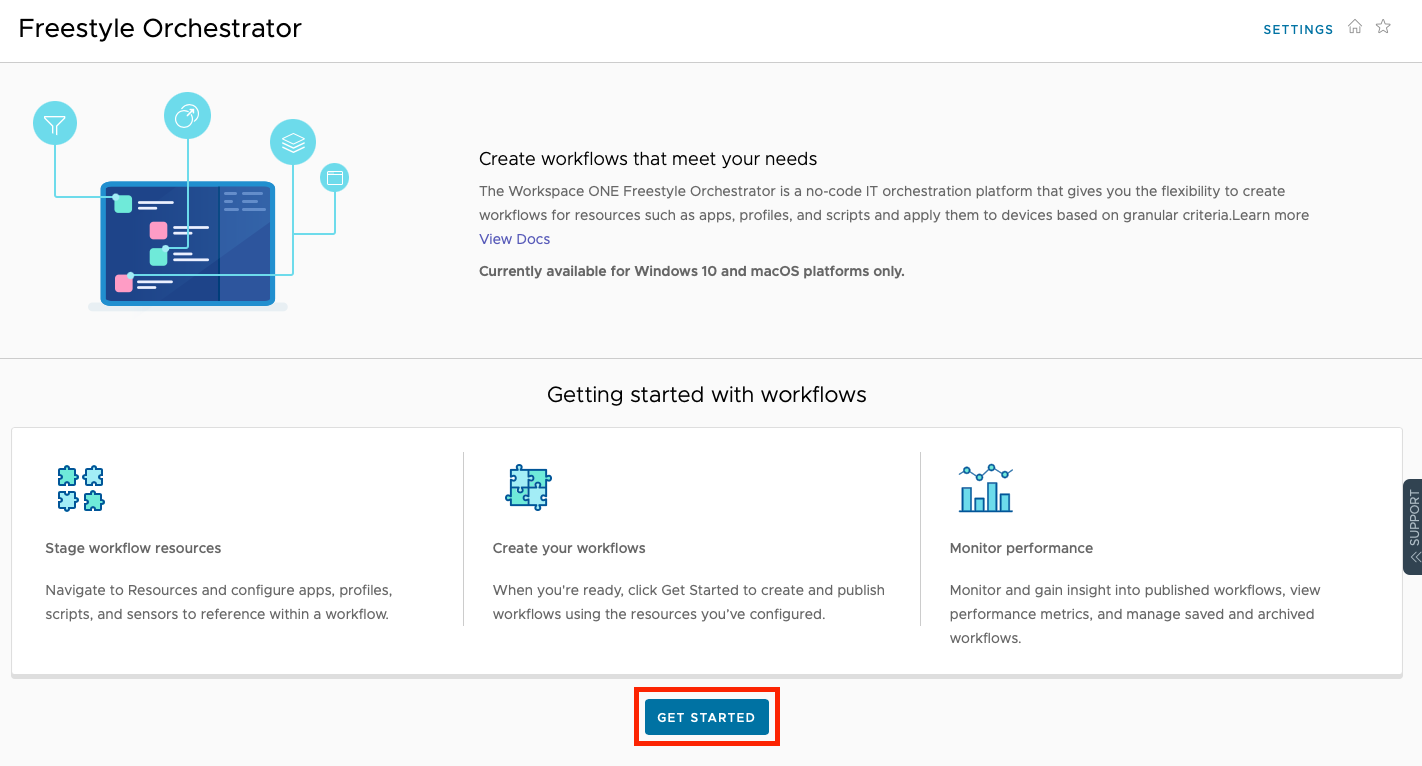
- Name the new workflow macOS Major Update.
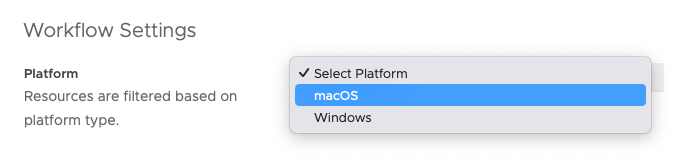
- Select macOS as the platform.
- Next to Smart Groups, click in the search box. From the list of Assignment Groups that appear, select the appropriate group. For this exercise, you will use the smart group you created earlier called macOS Major Update.
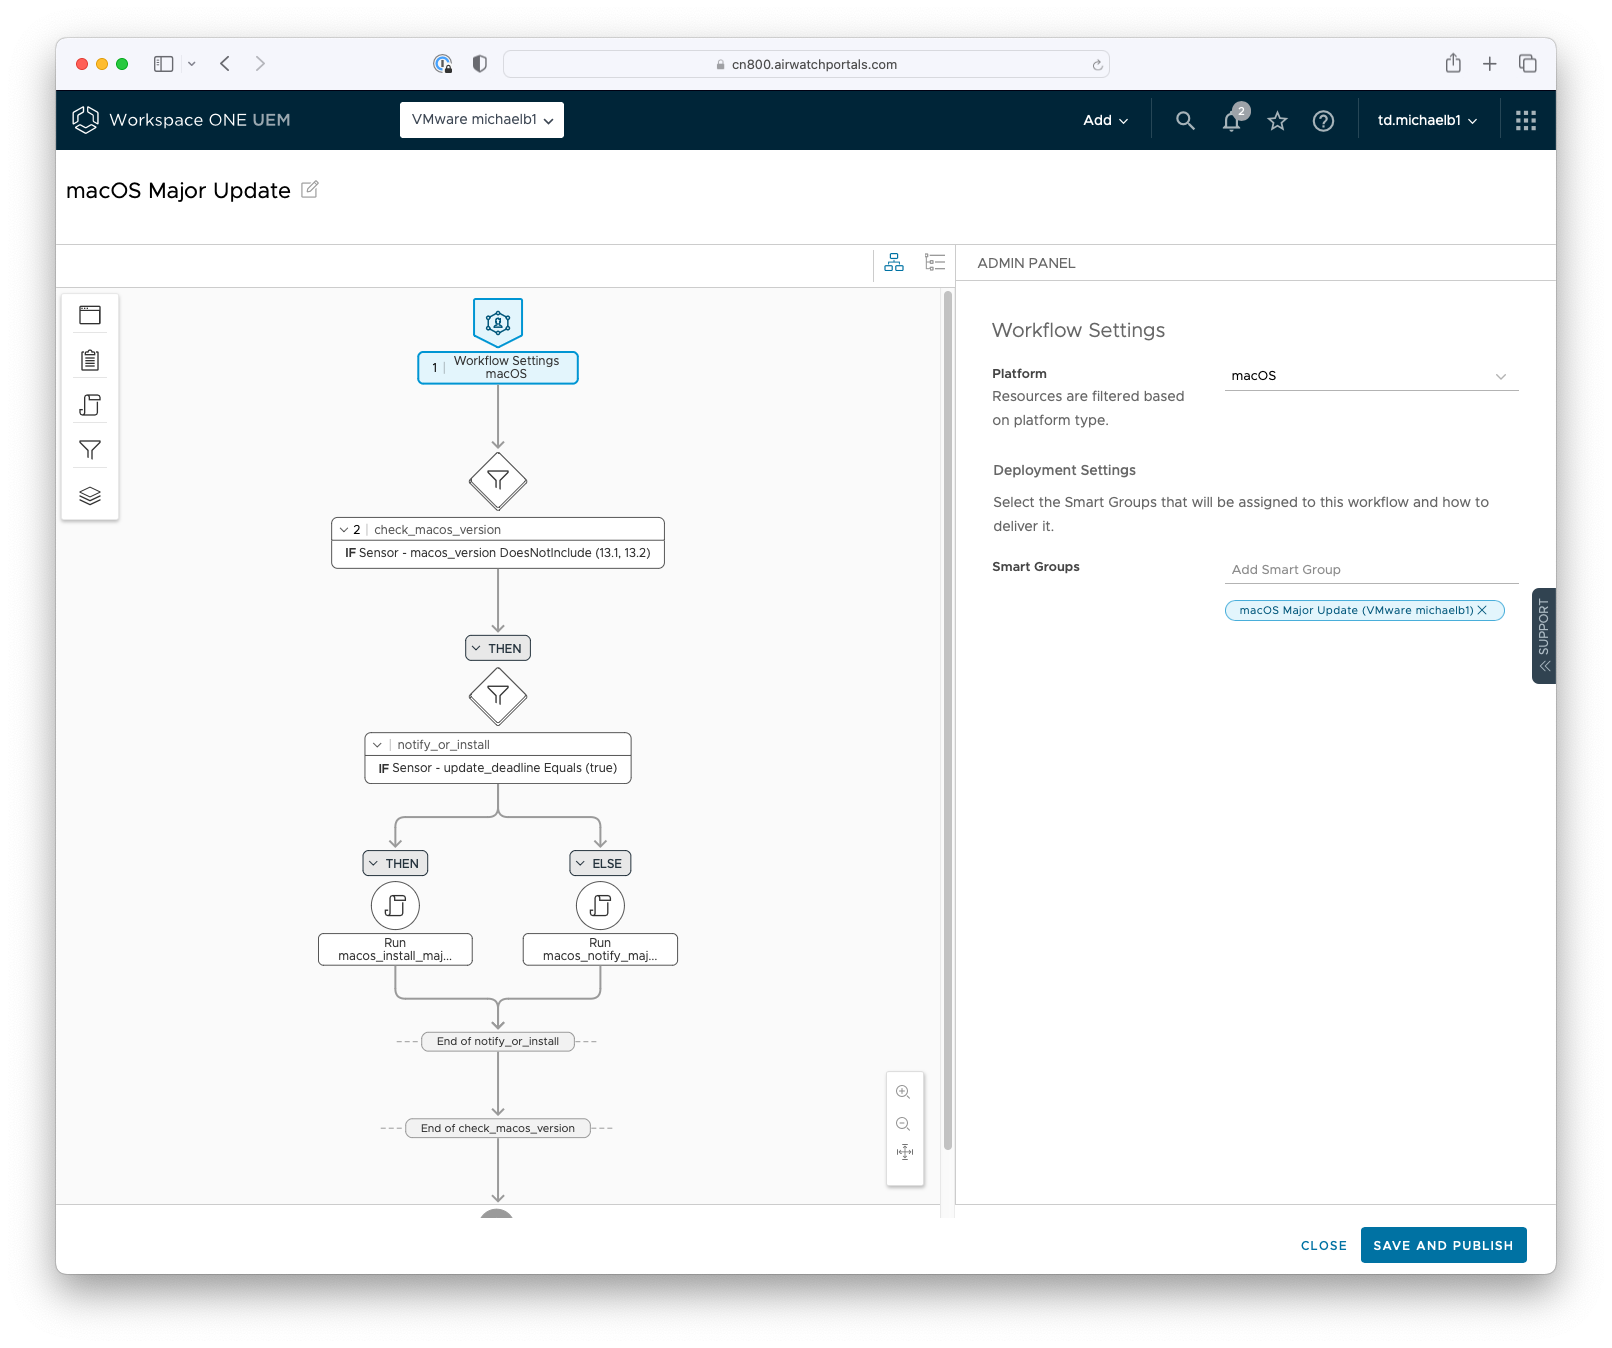
- In the workflow UI, click the plus sign (+) and select Condition. Name the condition check_macos_version.
- From the Select dropdown, choose Sensor. Search for the sensor you created earlier called macos_version. Select Does Not Include and enter 13.0, 13.1, 13.2. Click Then.
- Click Add. Select Condition. Name the condition notify_or_install.
- From the Select dropdown, choose Sensor. Search for the sensor you created earlier called update_deadline. Select Equals and enter True. Click Then.
- Click Add. Select Action and then click Script.
- Search for the application you created earlier called macos_install_majorupdate. Click Select.
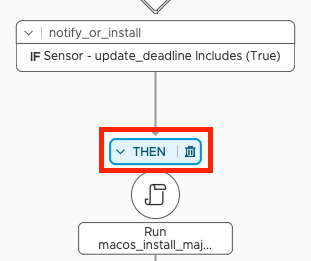
- Select the Then operator for the condition you created earlier called notify_or_install.
- In the Admin Panel, click Else.
- Click Add. Select Action and then click Script.
- Search for the script you created earlier called macos_notify_majorupdate. Click Select.
- With your workflow complete, click Publish.
- When the workflow executes on the device, the end user will receive several notifications. The first will come from Intelligent Hub and provide the user with the option to defer the update until later. If the user decides to proceed with the update, they will receive additional notifications from macOS, including one that will alert when the device is ready to restart.
Managing Minor macOS Updates
Introduction
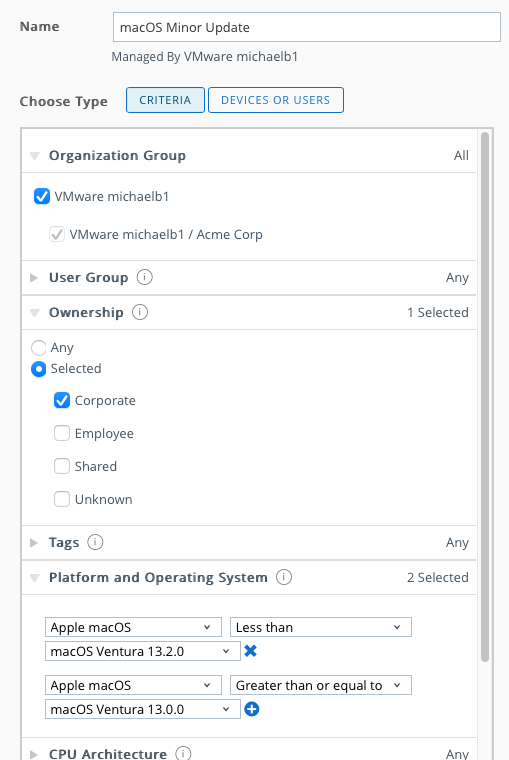
Although it is possible to manage minor macOS updates the same way as you did with major updates, it can also be handled in a much simpler fashion. The hubcli mdmcommand offers additional flexibility when it comes to minor updates. You can utilize the --maxuserdeferrals flag to specify the maximum number of user deferrals allowed before the update is automatically installed.
As with the major macOS updates, there are several ways that minor macOS updates can be managed and executed. The process listed in this tutorial should serve as an example. You can modify those per the needs of your organization.
This exercise purposely will not use Freestyle Orchestrator to show you an alternative method to managing updates. This exercise will only utilize a simple script for notifying the end user and executing the update.
Create Smart Group for Device Updates
To target devices that are currently running macOS Ventura (13.0 to 13.1), you will use a Smart Group within Workspace ONE UEM to assign the devices to the script. A Smart Group is a customizable group that allows you to group specific platforms, devices, and users together for the purpose of application, policy, profile, and provisioning assignment.
In this exercise, you will create a Smart Group that will be used for assignment of the update script.
To get the desired result, perform the following steps:
- In the Workspace ONE UEM console, select Groups & Settings. Expand Groups and select Assignment Groups. Click Add Smart Group.
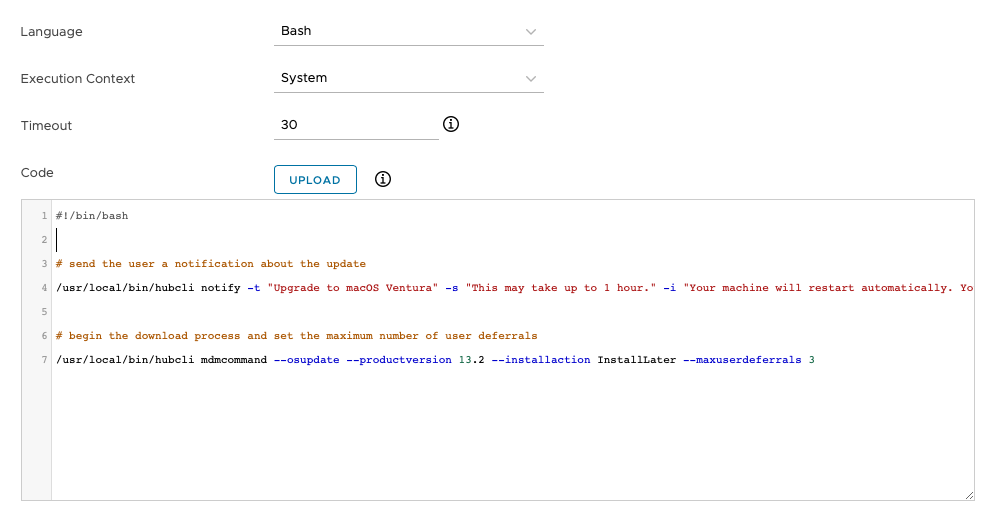
- Enter macOS Minor Update for the group name.
- From the list of available criteria, expand Ownership. Click Selected and ensure that Corporate is the only item with a check mark.
- Expand Platform and Operating System. From the drop down, select Apple macOS. Change the condition to Less Than, and select macOS Ventura 13.2.0. Click the plus sign (+) and select Apple macOS, Greater Than or Equal To, and macOS Ventura 13.0.0 from their respective dropdowns.
- Click Save.
Create Script to Notify User of Pending Minor Update
This script will send a notification to the logged on user to let them know there is a pending update. The user will be given the opportunity to either begin the update or defer it for a later time. A maximum number of deferrals is configured within the script. The hubcli notify command is used to the send the notification, and the mdmcommand to start the update.
To get the desired result, perform the following steps:
- In the Workspace ONE UEM console, select Resources, and then click on Scripts.
- Select Add, and click on macOS.
- Name the script macos_notify_minorupdate. Leave App Catalog Configuration disabled. Click Next.
- Set the Language to Bash, and the Execution Context to System.
- Set the Timeout to 30.
- Enter the following into the Code textbox:
#!/bin/bash

# send the user a notification about the update
/usr/local/bin/hubcli notify -t "Update to macOS Ventura" -s "This may take up to 1 hour." -i "Your machine will restart automatically. You will be given the option to defer the update up to three times."

# begin the download process and set the maximum number of user deferrals
/usr/local/bin/hubcli mdmcommand --osupdate --productversion 13.2 --installaction InstallLater --maxuserdeferrals 3
- Click Next.
- Click Save.
- In the Scripts list, check the new script you just created, and click Assign.
- Click New Assignment.
- Enter macOS Minor Updates for the Assignment Name.
- Next to Select Smart Groups, click in the search box. From the list of Assignment Groups that appear, select the appropriate group. For this exercise, you will use the smart group you created earlier called macOS Minor Update. Click Next.
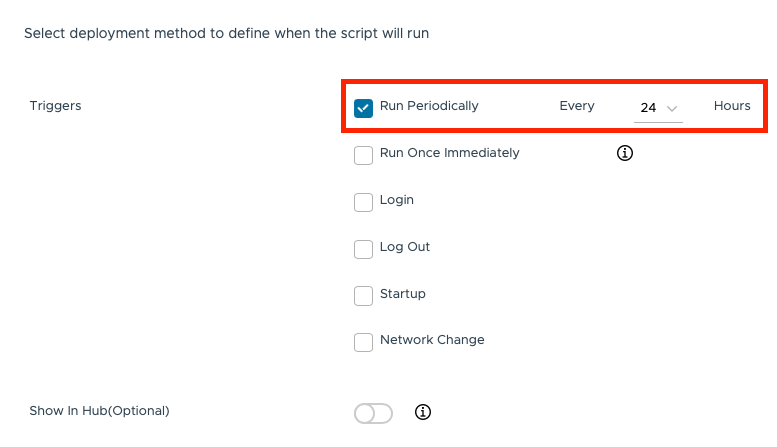
- Check Run Periodically and select an appropriate interval for your environment. For the purpose of this exercise, you will select 24. Then, click Add.
- Click Save & Publish, and then Publish.
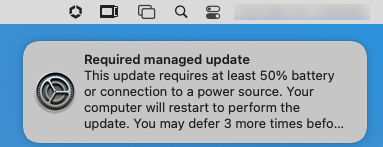
- When the script executes on the device, the end user will first receive an Intelligent Hub notification alerting them to the pending update. The user will then receive a notification from macOS when the update is ready to install. The second notification will provide the user with the option to defer the update.
Summary and Additional Resources
Introduction
This operational tutorial provided examples of how to use the Intelligent Hub hubcli to manage major and minor macOS updates.
Procedures included:
- Creating a Smart Group to target devices for major and minor updates.
- Creating required scripts and sensors for managing updates
- Deploying a Freestyle Orchestrator workflow for managing major updates
- Using scripts to manage minor macOS updates.
Additional Resources
For more information about Workspace ONE, explore the VMware Workspace ONE Activity Path. The activity path provides step-by-step guidance to help you level-up in your Workspace ONE knowledge. You will find everything from beginner to advanced curated assets in the form of articles, videos, and labs.
For more information on macOS, see Understanding macOS Management.
You may also wish to read these additional operational tutorials from macOS on VMware Tech Zone.
- Configuring Basic macOS Management
- Getting Started with Freestyle Orchestrator on macOS Devices
- Managing Updates with the macOS Updater Utility
- Distributing Scripts to macOS Devices
- Deploying a Third-Party macOS App
Changelog
The following updates were made to this guide:
| Date | Description of Changes |
| 04/25/2023 |
|
| 03/24/2023 |
|
About the Author and Contributors
This tutorial was written by:
- Michael Bradley, Senior Technical Marketing Architect, End-User-Computing Technical Marketing, VMware.
Considerable contributions were made by the following subject matter experts:
- Paul Evans, Product Line Manager, VMware.
Feedback
Your feedback is valuable.
To comment on this paper, contact VMware End-User-Computing Technical Marketing at euc_tech_content_feedback@vmware.com.