
Getting Started with Freestyle Orchestrator on macOS Devices
Overview
VMware Workspace ONE® UEM provides a comprehensive management solution for macOS devices, supporting operating systems version 10.15 and higher. With the ability to manage corporate-dedicated, corporate owned or employee owned (BYOD) devices, Workspace ONE UEM offers enterprises the flexibility to meet their employees’ needs at any level.
Freestyle Orchestrator
Freestyle Orchestrator is a workflow orchestration platform integrated into Workspace ONE UEM that allows IT administrators to create low-code workflows for handling resource deployments that have complex conditions or sequencing. Utilizing a canvas UI, administrators can drag and drop resources, such as applications, profiles, and scripts into a workflow, and control the deployment of those resources through conditional requirements and logic from sources such as sensors, application inventory, and more.
Among other things, IT administrators can use Freestyle Orchestrator to:
- Create complex workflows for onboarding of Windows and macOS device, including the deployment of applications, baseline profiles, and other configurations.
- Maintain the state of endpoint devices based on a specific condition, such as a sensor value.
- Manage complex app deployment sequencing to ensure that applications and configurations are applied in a certain order.
Components of a Workflow
A workflow in Freestyle Orchestrator consists of three key components. Each component is described below.

Resource
In a workflow, resources include applications, profiles, and scripts. All resources that you want to use in Freestyle Orchestrator must be added to the system inventory prior to using them in workflows. When a resource is added to a workflow, you define the actions to be taken for each resource, such as installing an application or running a script on the device assigned to the workflow. Actions on a resource are executed in the order they are defined in the workflow.
Condition
A condition defines the specified criteria on which actions are taken for resources. IT administrators can specify conditions based on sensors, application, file, and extended device inventory attributes data. Conditions have set properties using conditional operators and values to determine if the condition is met. Conditions can be complex using the And or Or operators, as well as include multiple branches and nested conditions. You can also specify whether the condition should be re-evaluated. If enabled, the condition will be re-evaluated every four hours.
Group
A group allows IT administrators to bundle resources that can be executed simultaneously together on devices. Applications, resources, and scripts can be added to a group. Like with resources, conditions can be configured to determine if a group is executed based on specified criteria.
Purpose of This Tutorial
This tutorial takes you through the steps to configure the workflow engine on macOS devices as well as a couple of sample workflows for managing macOS devices with Freestyle Orchestrator in Workspace ONE UEM. The exercises included in this tutorial are meant to emulate simple operations to give you a basic understanding of what is possible with Freestyle Orchestrator. For more information, see the Freestyle Orchestrator product documentation.
Audience
This operational tutorial is intended for IT professionals and Workspace ONE administrators of existing production environments.
Both current and new administrators can benefit from using this tutorial. Familiarity with macOS, XML, and basic scripting is assumed.
Knowledge of additional technologies such as VMware Workspace ONE® Intelligence and VMware Workspace ONE® UEM is also helpful.
Deploying the Intelligent Hub Workflow Engine
To use Freestyle Orchestrator on a macOS device, you must first configure the Intelligent Hub Workflow Engine. The Workflow Engine is not deployed by default during the installation of Intelligent Hub. With the release of Intelligent Hub version 21.04, a new setting is available to automate the deployment process of the Workflow Engine.
On Apple silicon macOS devices, Rosetta is an additional requirement for the Workflow Engine. Rosetta allows applications built for Intel processors to run on macOS devices using Apple silicon. Although Intelligent Hub is a universal app that can run on Intel and Apple silicon processors, the Workflow Engine is not. Rosetta should be installed automatically when the Workflow Engine deployed.
In this exercise, you will configure Workspace ONE UEM to automatically install the Workflow Engine during enrollment. Since Rosetta is critical to the functionality of the Workflow Engine, you will create a sensor will detect if Rosetta is present and reinstall Rosetta if necessary. This sensor will ensure that the Workflow Engine continues to function even if Rosetta is uninstalled accidently by another process, such as an upgrade.
Prerequisites
Before you can perform the exercises in this tutorial, you must meet the following requirements.
- Workspace ONE UEM console version 22.10 and later
- One device running macOS operating system version 10.15 and higher (can be Intel-based or Apple silicon)
- Local macOS account with administrator permissions
Note: This exercise uses sensors to gather specific data from the macOS devices. Due to privacy concerns, sensors will not collect data from employee-owned devices. To complete this exercise, you must use a corporate-owned macOS device.
Configure the Automatic Installation of the Workflow Engine
In this exercise, you will configure the automatic installation of the Workflow Engine after device enrollment into Workspace ONE UEM.
To get the desired result, perform the following steps:
- On your desktop, double-click the Google Chrome icon.
- Navigate to the VMware Workspace ONE UEM console.
For example, go tohttps://<WorkspaceONEUEMHostname>whereWorkspaceONEUEMHostname - Enter your Username, for example,
administrator. - Click Next. After you click Next, the Password text box is displayed.
- Enter your Password, for example,
VMware1!. Click Login.
Note: If you see a Captcha, be aware that it is case sensitive. - In the Workspace ONE UEM console, select Groups & Settings. Then select Devices & Users.
- From the menu, select Apple, and then Apple macOS.
- Select Intelligent Hub Settings.
- If your Current Setting is set to Inherit, select Override.
- Ensure that Install Hub after Enrollment is set to Enabled and set Install Workflow Engine after Enrollment to Enabled.

- Click Save.
Configure a Sensor to Deploy Rosetta to macOS Devices
In this exercise, configure a sensor that will determine if the underlying CPU architecture in macOS devices is Intel or Apple silicon, and then install Rosetta if required.
Note: Rosetta will be installed automatically when the Workflow Engine is deployed. If Rosetta is removed from the device, such as during an OS update, your workflows will cease to function. This sensor will detect if Rosetta is present on the device during the user login process and install Rosetta if not found.
To get the desired result, perform the following steps:
- In the Workspace ONE UEM console, select Resources. Then, select Sensors.
- Click Add and select macOS from the drop-down menu.
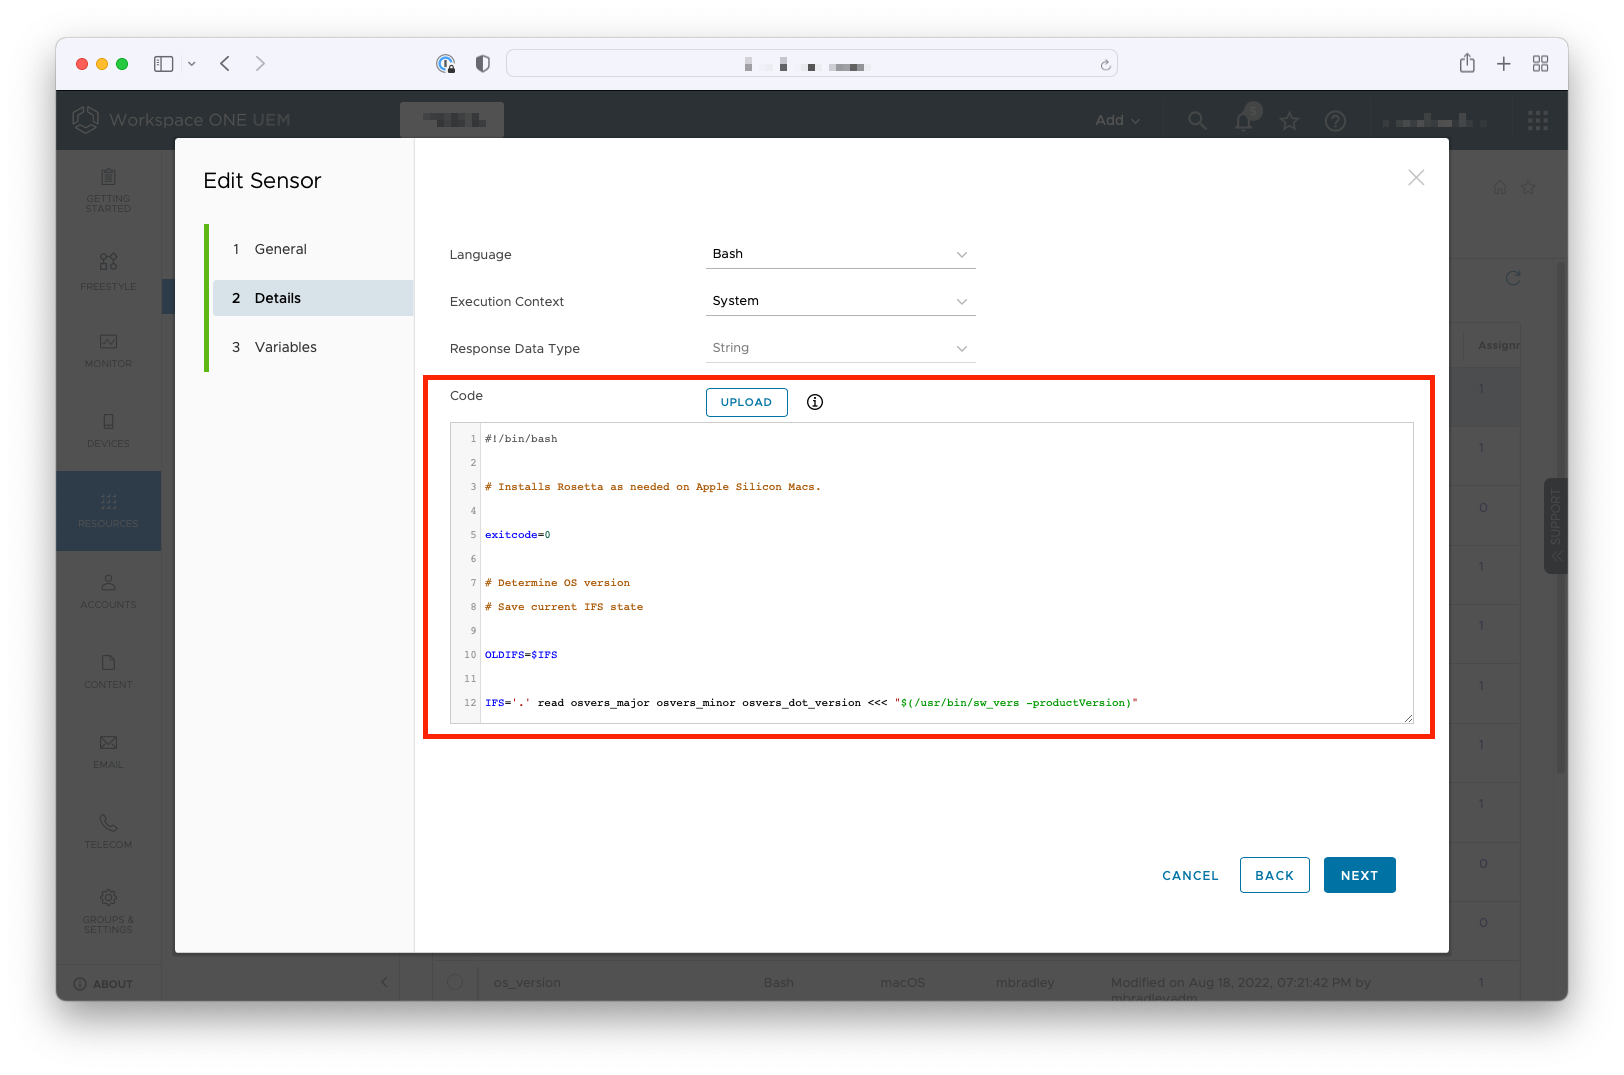
- Enter install_rosetta for the sensor name. Click Next.
- For Language, select Bash.
- Select System for Execution Context.
- Enter the following into the Code textbox:
#!/bin/bash
# Installs Rosetta as needed on Apple silicon Macs.

exitcode=0

# Determine OS version
# Save current IFS state

OLDIFS=$IFS

IFS='.' read osvers_major osvers_minor osvers_dot_version <<< "$(/usr/bin/sw_vers -productVersion)"

# restore IFS to previous state

IFS=$OLDIFS

# Check to see if the Mac is reporting itself as running macOS 11

if [[ ${osvers_major} -ge 11 ]]; then

  # Check to see if the Mac needs Rosetta installed by testing the processor

  processor=$(/usr/sbin/sysctl -n machdep.cpu.brand_string | grep -o "Intel")

  if [[ -n "$processor" ]]; then
    echo "$processor processor installed. No need to install Rosetta."
  else

    # Check for Rosetta "oahd" process. If not found,
    # perform a non-interactive install of Rosetta.

    if /usr/bin/pgrep oahd >/dev/null 2>&1; then
        echo "Rosetta is already installed and running."
    else
        /usr/sbin/softwareupdate --install-rosetta --agree-to-license

        if [[ $? -eq 0 ]]; then
         echo "Rosetta has been successfully installed."
        else
         echo "Rosetta installation failed!"
         exitcode=1
        fi
    fi
  fi
  else
    echo "macOS prior to Big Sur - no rosetta needed"
fi

exit $exitcode
- Click Next. Then, click Save & Assign.
- Click New Assignment.
- Enter All macOS Devices for the Assignment Name.
- Next to Select Smart Groups, click in the search box. From the list of Assignment Groups that appear, select the appropriate group. For example, select All macOS Devices (your@email.shown.here). Click Next.
- Select the Login from the list of triggers. Then, click Save.
- Click Close.
- To verify that the sensor has executed correctly, log into a macOS device that has an Apple silicon CPU architecture and is managed by your Workspace ONE UEM instance.
Launch Terminal, which can be found in Utilities in the Applications folder. - Enter the following code at the prompt:
/usr/bin/pgrep -q oahd && echo Yes || echo No
- If the response is Yes, then Rosetta has been installed.
Installing the Workspace ONE Intelligent Hub
You’ll start by downloading and installing Workspace ONE Intelligent Hub on your macOS device. This exercise will outline the steps to follow.
- Log in to the macOS device with your administrator credentials.
- Enter the username. For example,
administrator. - Enter the password. For example,
VMware1!. - Click the arrow icon or press ENTER.
- Enter the username. For example,
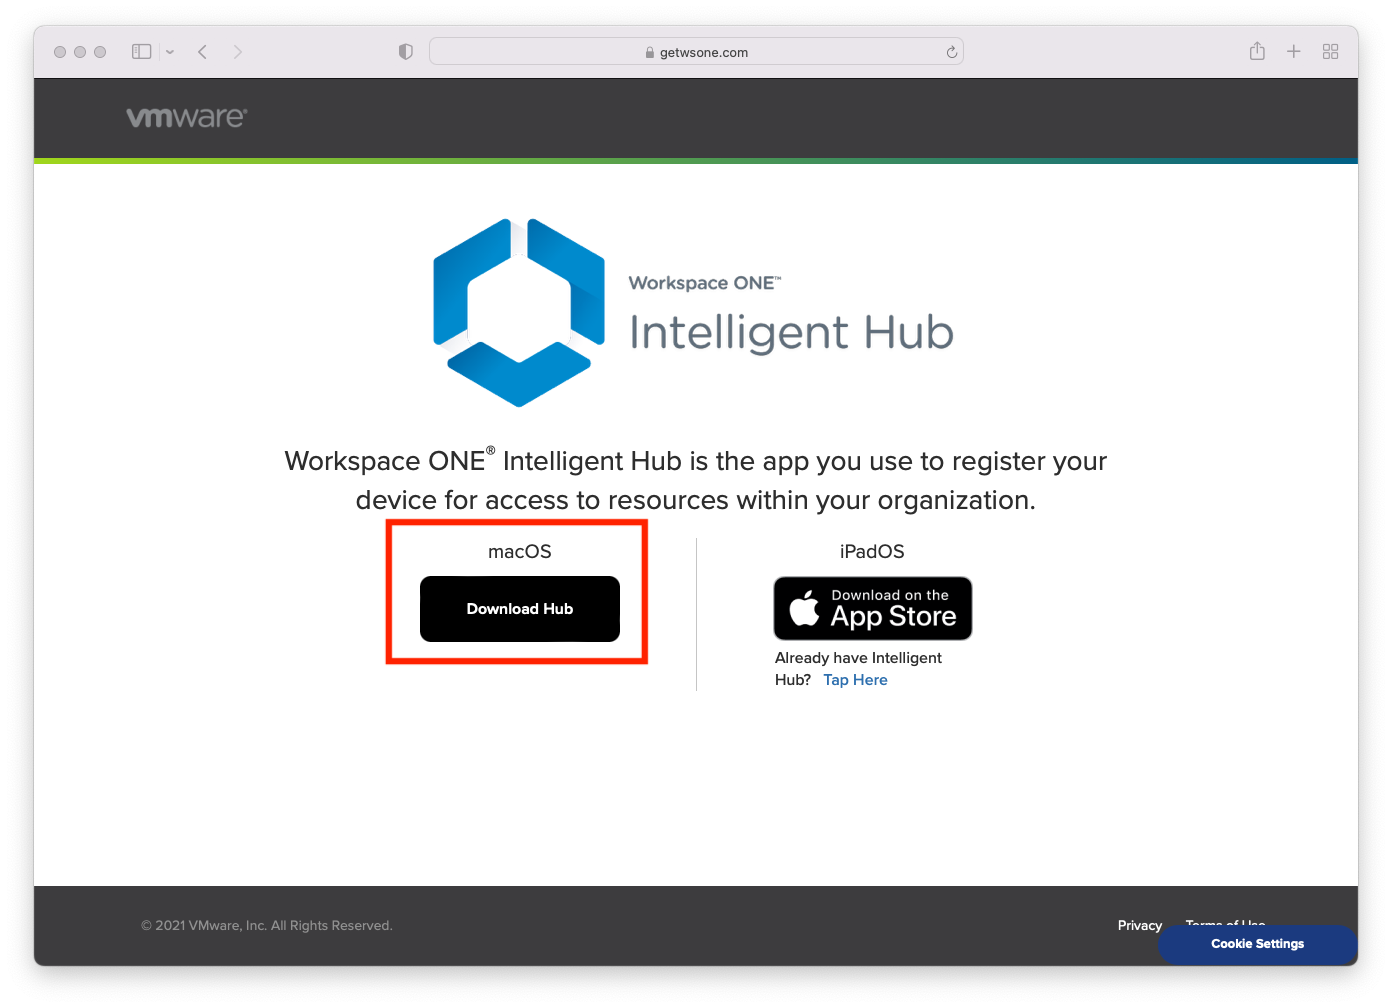
- Click the Safari icon (blue compass) to open the Safari browser.
- Enter https://getwsone.com in the URL field, then press ENTER.
- Click Download Hub beneath macOS. The Workspace ONE Intelligent Hub begins to download and will save to the Downloads folder by default.
- Launch the Intelligent Hub installer by clicking the Downloads folder in the dock (next to the Trash Bin).
- Click the VMwareWorkspaceONEIntelligentHub.pkg file to begin the installer.
- Review the Introduction. Click Continue.
- Review and Accept the Licensing Terms by clicking Continue and then click Agree (to the license terms).
- Click Install to perform a standard installation.
- Enter the admin username, for example,
Administrator. - Enter the password.
- Click Install Software.
- Click Close when the installer finishes.
- Click Move to Trash to move the installer to the trash.
Enroll the macOS Device in Workspace ONE UEM
In this exercise, you will enroll a macOS device into Workspace ONE UEM. Enrollment is the action that brings a device under management and control by Workspace ONE UEM. There are a few ways to enroll the various platforms (macOS included), but for this exercise, we will cover a basic enrollment scenario.
- After the Workspace ONE Intelligent Hub finishes installing, the Enrollment Wizard should start automatically. From within the Enrollment wizard window, click Server Detail.
Note: The Enrollment Wizard may take several minutes to launch. If you do not see the Enrollment Wizard immediately, be patient and wait for it to appear. If it does not automatically appear, you can launch it manually by clicking the Intelligent Hub icon. - Enter your Workspace ONE UEM URL, for example,
hol.awmdm.com. - Enter your Group ID.
Note: You can find your Group ID in the Workspace ONE UEM console by navigating to Group & Settings. Click Groups, and then click Organization Groups. Select the Details view. - Click Continue.
- Enter the enrollment username. For example,
testuser. - Enter the enrollment user password. For example,
VMware1!. - Click Continue.
- Select the ownership type for the device. For this exercise, select Corporate owned and click Dedicated from the drop-down menu. Click Next.

- Click Next to install Workspace Services. The installation and enablement of Device Management will begin.
- When the Profile window is displayed, click Install to approve the User-Approved Enrollment Profiles.

- When prompted, click Install to confirm the installation.
- When prompted, enter the password for your user account on the Mac. For example,
VMware1!. - Click OK.
- When the installation is complete, close the Profiles panel by clicking the red dot. Then, click Done.
- You can validate the enrollment by clicking the Hub icon in the upper-right corner of your screen.
- In the menu that appears, you can see the device’s status as
Enrolled. - The Workflow Engine will install automatically after the enrollment process has completed. To confirm the installation is complete, open Finder and browse to
\Library\Application Support\Workflow. Look for a file calledworkflowd.
NOTE: If your macOS device uses Apple silicon, you will need to reboot and log back in before the Workflow Engine installation will begin. Rosetta is required for the installation. The sensor you created earlier will install Rosetta at user logon, and the Workflow Engine installation will proceed after.

Installing and Configuring the Horizon Client
The purpose of this exercise is to provide an example of how you can use Freestyle Orchestrator to deploy and configure software to macOS devices. Although this exercise focuses on the Horizon Client, the steps described can be used for other software packages.
There are four parts to this exercise as outlined here. You will:
- Create a native app for the Horizon Client in Workspace ONE UEM.
- Configure a sensor to determine if the Horizon Client is installed on managed macOS devices.
- Create a device profile to configure the Horizon Client.
- Create a workflow that will install the Horizon Client if necessary and apply the previously created profile.
Note: The process described in this section can be accomplished in several ways, including as a single script that negates the need for sensors. However, the process has been broken into separate components in this tutorial to demonstrate the capabilities of Freestyle Orchestrator.
Prerequisites
Before you can perform the exercises in this tutorial, you must meet the following requirements.
- Workspace ONE UEM console version 22.10 and later
- Download the latest version of the Horizon Client from the VMware website
- Complete the tasks outlined in the above section entitled, Deploy the Intelligent Hub Workflow Engine
- One managed corporate-owned macOS devices with Intelligent Hub version 22.08 or later installed
- Local macOS account with administrator permissions
Note: This exercise uses sensors to gather specific data from the macOS devices. Due to privacy concerns, sensors will not collect data from employee-owned devices. To complete this exercise, you must use a corporate-owned macOS device.
Add the Horizon Client to Workspace ONE UEM
In this exercise, you will download the Workspace ONE Admin Assistant Tool and prepare the VMware Horizon Client for deployment through Workspace ONE UEM. Then, you will import the Horizon Client application into Workspace ONE UEM.
To get the desired result, perform the following steps:
- On a macOS device, double-click the Google Chrome icon.
- Go to the VMware Workspace ONE Admin Assistant Tool download website.
At the time of this document’s creation, the URL for the website was: https://my.workspaceone.com/products/Workspace-ONE-Admin-Assistant-Tool. - Select macOS for the platform. Select the latest version listed on the App Version drop-down menu. And select All to filter by console version.

- Click Installs and Upgrades.
- Click the latest version listed.
- Read and accept the End-User License Agreement.
- Launch the downloaded DMG file and double-click the VMware Workspace ONE Admin Assistant package file.
- Accept the default options for installation and install the application on your macOS device.
- When the installation is complete, launch the Workspace ONE Admin Assistant located in your Applications folder.
- Drag and drop the DMG file for the Horizon Client into the Admin Assistant tool. When the tool has finished parsing, click the folder icon next to the listed DMG file.
Note: The folder will contain three files: a PLIST file, a PNG file, and a DMG file.
- In the Workspace ONE UEM console, select Resources. Then, select Apps.
- Select Native, and then click Internal.
- From the Add drop-down menu, select Application File.
- Click Upload and select Choose File. Navigate to the folder that was created by the Workspace ONE Admin Assistant. Choose the DMG file and click Upload.
- Click Save.
- After the upload has completed, click Continue.
- You will upload the Metadata file by clicking Upload and choose the PLIST file from the same folder. Click Save.
- After the upload has completed, click Continue.
- Click Images and then select Click or drag files here to add the PNG file from the same folder as the other files.

- Click Save & Assign.
- Enter All macOS Devices for the Assignment Name.
- Next to Select Smart Groups, click in the search box. From the list of Assignment Groups that appear, select the appropriate group. For example, select All macOS Devices (your@email.shown.here).
- Click Create. Then click Save.
Create a Sensor to Detect if the Horizon Client is Installed
In this exercise, you will create a sensor that will detect if the VMware Horizon Client is installed on a macOS device.
- In the Workspace ONE UEM console, select Resources. Then, select Sensors.
- Click Add and select macOS from the drop-down menu.
- Enter is_horizon_installed for the sensor name. Click Next.
- For Language, select Bash.
- Select System for Execution Context.
- Enter the following into the Code textbox:
#!/bin/bash
IS_HORIZON_INSTALLED=$(mdfind "kMDItemFSName == 'VMware Horizon Client.app'" -onlyin /Volumes/Macintosh\ HD/Applications)
if [ "$IS_HORIZON_INSTALLED" = "/Applications/VMware Horizon Client.app" ]; then
echo "TRUE"
else
echo "FALSE"
fi
- Click Next.
- Click Save & Assign.
- Click New Assignment.
- Enter All macOS Devices for the Assignment Name.
- Next to Select Smart Groups, click in the search box. From the list of Assignment Groups that appear, select the appropriate group. For example, select All macOS Devices (your@email.shown.here). Click Next.
- Select the Login from the list of triggers. Then, click Save.
- Click Close.
Create a Sensor to Detect the Version of Horizon Client Installed
In this exercise, you will create a sensor that will detect if the VMware Horizon Client is installed on a macOS device.
- In the Workspace ONE UEM console, select Resources. Then, select Sensors.
- Click Add and select macOS from the drop-down menu.
- Enter horizon_client_version for the sensor name. Click Next.
- For Language, select Bash.
- Select System for Execution Context.
- Enter the following into the Code textbox:
#!/bin/bash
if [ -f "/Applications/VMware Horizon Client.app/Contents/Info.plist" ] ; then
/usr/bin/defaults read /Applications/VMware\ Horizon\ Client.app/Contents/Info.plist CFBundleShortVersionString ;
else
echo "0" ;
fi
- Click Next.
- Click Save & Assign.
- Click New Assignment.
- Enter All macOS Devices for the Assignment Name.
- Next to Select Smart Groups, click in the search box. From the list of Assignment Groups that appear, select the appropriate group. For example, select All macOS Devices (your@email.shown.here). Click Next.
- Select the Login from the list of triggers. Then, click Save.
- Click Close.
Create a Device Profile to Configure the Horizon Client
In this exercise, you will create a macOS device profile with a custom settings payload to configure the Horizon Client with specific settings.
Note: The XML included in this exercise uses example VMware Test Drive Horizon Connection Servers. If you wish to use your own Horizon Connection Servers, you will need to modify the XML prior to creating the device profile.
To get the desired result, perform the following steps:
- In the Workspace ONE UEM console, select Resources. Then select Profiles & Baselines.
- Select Profiles.
- From the Add drop-down menu, select Add Profile.
- Select Profile Platform by selecting macOS.
- For the Context, select Device Profile.
- Enter macOS Horizon Client Configs for the profile name.
- Scroll down the list of payloads until you find Custom Settings. Click Add.
- In the Custom Settings textbox, paste the following XML:
<dict>
 <key>PayloadUUID</key>
 <string>35E4D9F0-6C02-4B54-B60D-5E8E9D799419</string>
 <key>PayloadType</key>
 <string>com.apple.ManagedClient.preferences</string>
 <key>PayloadOrganization</key>
 <string>Workspace ONE</string>
 <key>PayloadIdentifier</key>
 <string>com.vmware.horizon.35E4D9F0-6C02-4B54-B60D-5E8E9D799419</string>
 <key>PayloadDisplayName</key>
 <string>VMware Horizon Settings</string>
 <key>PayloadVersion</key>
 <integer>1</integer>
 <key>PayloadEnabled</key>
 <true/>
 <key>PayloadContent</key>
 <dict>
  <key>com.vmware.horizon</key>
  <dict>
   <key>Forced</key>
   <array>
    <dict>
     <key>mcx_preference_settings</key>
     <dict>
      <key>defaultBroker</key>
      <string>https://horizon.testdrive.vmware.com:443/broker/xml</string>
      <key>promptedUSBPrintingServicesInstall</key>
      <true/>
      <key>broker-history</key>
      <array>
       <string>https://horizon.testdrive.vmware.com:443/broker/xml</string>
      </array>
      <key>trustedServers</key>
      <array>
       <string>https://horizon.testdrive.vmware.com:443/broker/xml</string>
      </array>
      <key>kAutoCheckForUpdates</key>
      <false/>
      <key>kAutoDownloadForUpdates</key>
      <false/>
      <key>kAllowDataSharing</key>
      <false/>
      <key>kAllowRemovableStorage</key>
      <false/>
     </dict>
    </dict>
   </array>
  </dict>
 </dict>
 <key>PayloadDescription</key>
 <string>Created by WS1 mobileConfig Importer</string>
</dict>
- Click Next.
- For this exercise, you will not assign this device profile to any Assignment Groups. Click Save & Publish.
You should now see your macOS Horizon Client Configs Device Profile within the list of the Profiles window.
Note: If you need to edit the profile, this is where you would do so.
Create a Workflow for Installing and Configuring the Horizon Client
- In the Workspace ONE UEM console, select Freestyle. Then, select New.
Note: If this is the first time you are using Freestyle Orchestrator, you will click Get Started on the Getting Started with Workflows screen.
- Name the new workflow macOS Horizon Client Install.
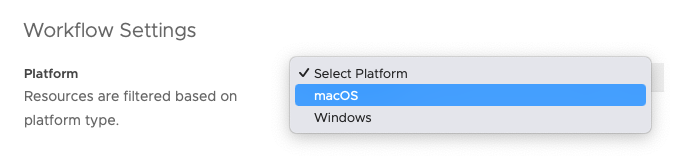
- Select macOS as the platform.
- Next to Smart Groups, click in the search box. From the list of Assignment Groups that appear, select the appropriate group. For example, select All macOS Devices (your@email.shown.here).
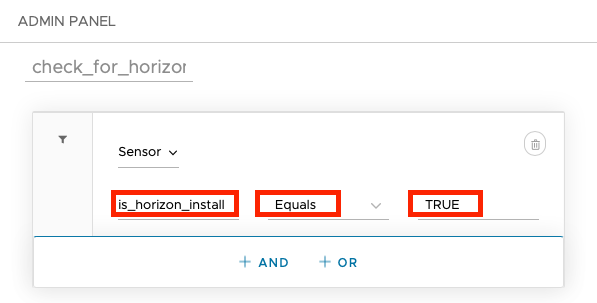
- In the workflow UI, click the plus sign (+) and select Condition. Name the condition check_for_horizon.
- From the Select drop-down menu, choose Sensor. Search for the sensor you created earlier called is_horizon_installed. Select Equals and enter TRUE. Click Then.
- Click Add. Select Condition. Name the condition check_horizon_version.
- From the Select drop-down menu, choose Sensor. Search for the sensor you created earlier called horizon_client_version. Select Does Not Include and enter 8.6. Click Then.
- Click Add. Select Resource and then click Application.
- Search for the application you created earlier called VMware Horizon Client. Click Select.
- In the workflow UI, click the plus sign (+) and select Resource and then click Profile.
- Search for the profile you created earlier called macOS Horizon Client Configs. Click Select.
- Select the Then operator for the condition you created earlier called check_for_horizon.

- In the Admin Panel, click Else.
- Click Add. Select Resource and then click Application.
- Search for the application you created earlier called VMware Horizon Client. Click Select.
- Select the Then operator for the condition you created earlier called check_horizon_version. Click Else.

- Click Add and select Proceed to next step.
- With your workflow complete, click Publish.

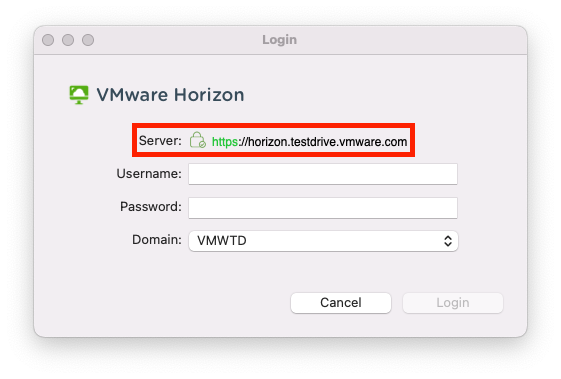
- To verify the results of this exercise, log in to a managed macOS device and check the Applications folder to see if the Horizon Client has been installed. Launch the Horizon Client. The server name will be populated with https://horizon.testdrive.vmware.com.
Installing Software Based on macOS CPU Type
This exercise will show you how to use a Freestyle Orchestrator workflow to deploy software to a macOS device based on the type of CPU in the device. In this example, you will use Microsoft’s .NET SDK, which comes with separate installers for Intel and Apple silicon devices. You will create a sensor to detect the type of CPU in a macOS device and use the appropriate installer to deploy the .NET SDK to the device.
There are three parts to this exercise; you will:
- Create two native apps for the Microsoft .NET SDK, one using the Intel installer and one with the Apple silicon installer.
- Configure a sensor to determine the CPU type on a macOS device.
- Create a workflow that will check the CPU type on a macOS device and use the appropriate installer to deploy the .NET SDK.
Prerequisites
Before you can perform the exercises in this tutorial, you must meet the following requirements.
- Workspace ONE UEM console version 22.10 and later
- One macOS device using an Apple silicon processor with Intelligent Hub version 22.08 or later installed
- One macOS device using an Intel processor with Intelligent Hub version 22.08 or later installed (optional if you wish to test both processor platforms)
- Local macOS account with administrator permissions
Add the .NET SDK to Workspace ONE UEM
In this exercise, you will utilize the Workspace ONE Admin Assistant Tool that you downloaded earlier. If you did not download the Workspace ONE Admin Assistant Tool, please review steps 1 through 10 in the section of this document entitled, Add the Horizon Client to Workspace ONE UEM.
To get the desired result, perform the following steps:
- On a macOS device, double-click the Google Chrome icon.
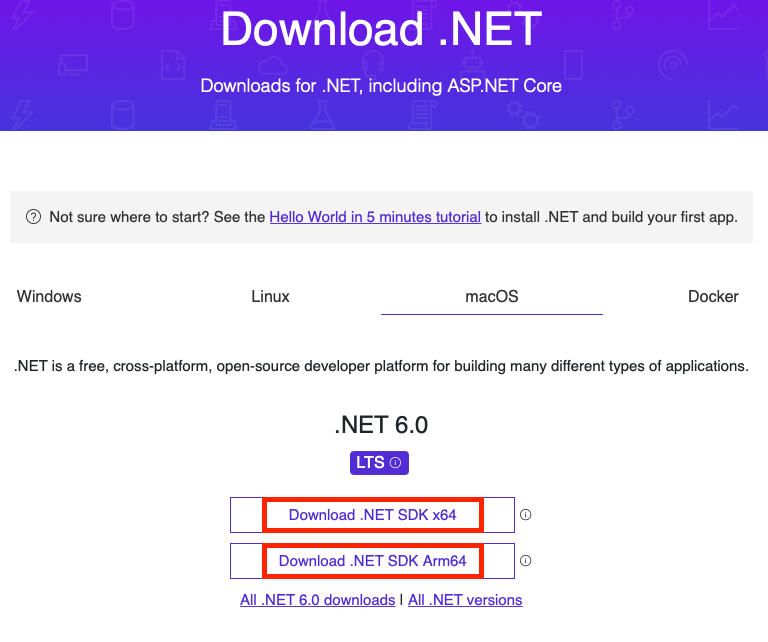
- Go to the Microsoft .NET website. At the time that this tutorial was created, the downloads were available at: https://dotnet.microsoft.com/en-us/download.
- Download the .NET SDK package for x64 processors and the package for Arm64 processors.
- Launch the Workspace ONE Admin Assistant Tool. Drag and drop x64 PKG file for the .NET SDK into the Admin Assistant tool. When the tool has finished parsing, click the folder icon next to the listed PKG file.
- Append _x64 to the folder name. Right-click the PLIST file and select Open With and click TextEdit.
- Search the XML for the line that contains the following:
<string>dotnet-sdk</string> - Append
-x64so that the line reads:<string>dotnet-sdk-x64</string>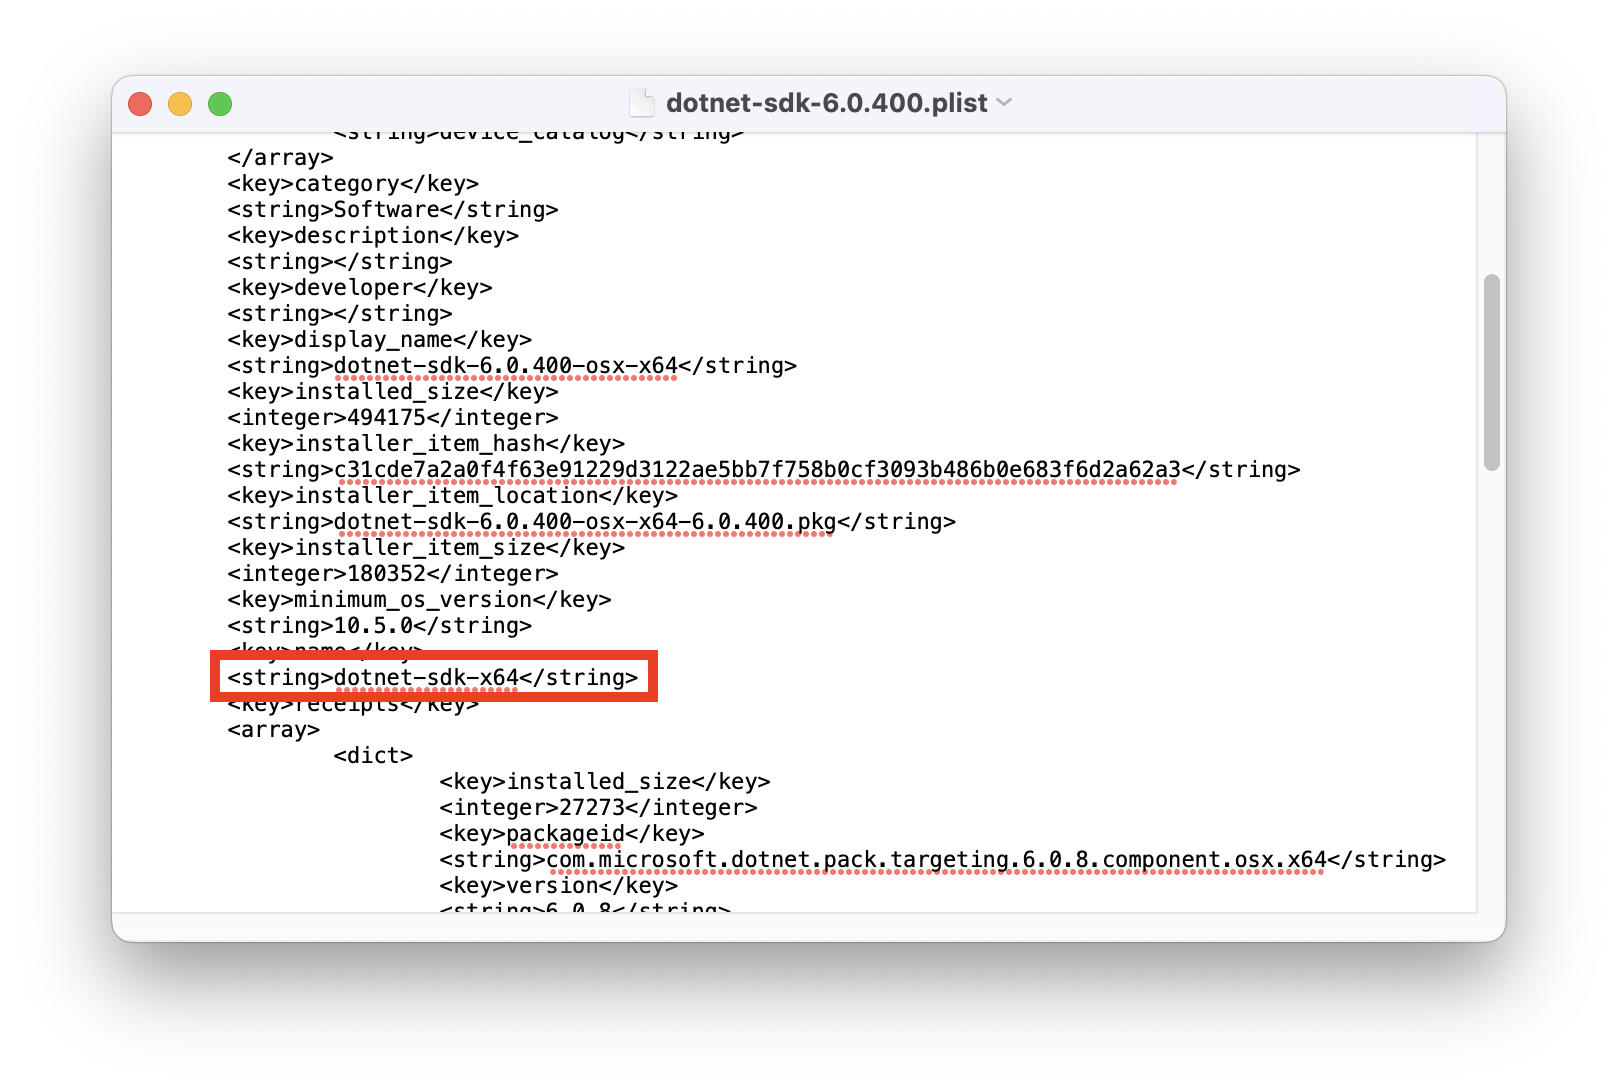
- Save the file.
- Drag and drop arm64 PKG file for the .NET SDK into the Admin Assistant tool. When the tool has finished parsing, click the folder icon next to the listed PKG file.
- Append _arm64 to the folder name. Right-click the PLIST file and select Open With and click TextEdit.
- Search the XML for the line that contains the following:
<string>dotnet-sdk</string> - Append
-x64so that the line reads:<string>dotnet-sdk-arm64</string> - Save the file.
- In the Workspace ONE UEM console, select Resources. Then select Apps.
- Select Native, and then click Internal.
- From the Add drop-down menu, select Application File.
- Click Upload and select Choose File. Navigate to the folder that was created by the Workspace ONE Admin Assistant. Choose the x64 PKG file and click Upload.
- Click Save.
- After the upload has completed, click Continue.
- You will upload the Metadata file by clicking Upload and choose the PLIST file from the same folder. Click Upload. Then click Save.
- After the upload has completed, click Continue.
- Click Save & Assign.
- Enter All macOS Devices for the Assignment Name.
- Next to Select Smart Groups, click in the search box. From the list of Assignment Groups that appear, select the appropriate group. For example, select All macOS Devices (your@email.shown.here).
- Click the button to disable Display in App Catalog.

- Click Create. Then click Save.
- Click Publish.
- In the Workspace ONE UEM console, select Resources. Then select Apps.
- Select Native, and then click Internal.
- From the Add drop-down menu, select Application File.
- Click Upload and select Choose File. Navigate to the folder that was created by the Workspace ONE Admin Assistant. Choose the arm64 PKG file and click Upload.
- Click Save.
- After the upload has completed, click Continue.
- You will upload the Metadata file by clicking Upload and choose the PLIST file from the same folder. Click Save.
- After the upload has completed, click Continue.
- Click Save & Assign.
- Enter All macOS Devices for the Assignment Name.
- Next to Select Smart Groups, click in the search box. From the list of Assignment Groups that appear, select the appropriate group. For example, select All macOS Devices (your@email.shown.here).
- Click the button to disable Display in App Catalog.
- Click Create. Then click Save.
- Click Publish.
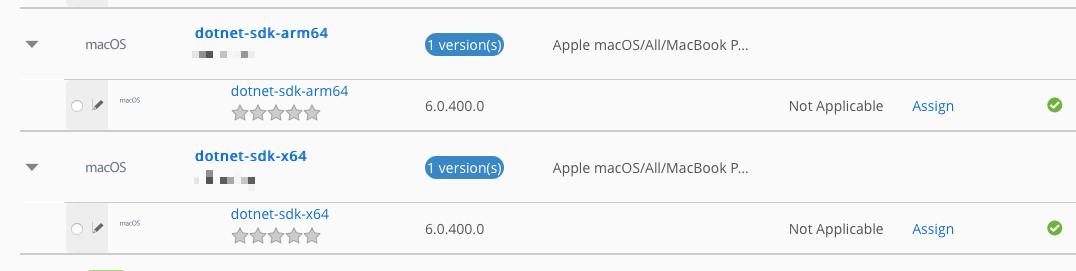
- You will see both apps in the List View for Internal apps.
Create Sensor to Detect CPU Type of macOS Devices
In this exercise, you will create a sensor that will detect the active IP address on a macOS device.
- In the Workspace ONE UEM console, select Resources. Then select Sensors.
- Click Add and select macOS from the drop-down menu.
- Enter macos_cpu_arch for the sensor name. Click Next.
- For Language, select Bash.
- Select System for Execution Context.
- Enter the following into the Code textbox:
#!/bin/zsh
PROC=$(/usr/bin/uname -m)
echo $PROC
- Click Next.
- Click Save & Assign.
- Click New Assignment.
- Enter All macOS Devices for the Assignment Name.
- Next to Select Smart Groups, click in the search box. From the list of Assignment Groups that appear, select the appropriate group. For example, select All macOS Devices (your@email.shown.here).
- Click Next.
- Select the Login from the list of triggers. Then, click Save.
- Click Close.
Create a Workflow to Deploy the .NET SDK
- In the Workspace ONE UEM console, select Freestyle. Then select New.
- Name the new workflow macOS .NET SDK.
- Select macOS as the platform.
- Next to Smart Groups, click in the search box. From the list of Assignment Groups that appear, select the appropriate group. For example, select All macOS Devices (your@email.shown.here).
- In the workflow UI, click the plus sign (+) and select Condition. Name the Condition cpu_type.
- From the Select drop-down menu, choose Sensor. Search for the sensor you created earlier called macos_cpu_arch. Select Equals and enter arm64. Click Then.
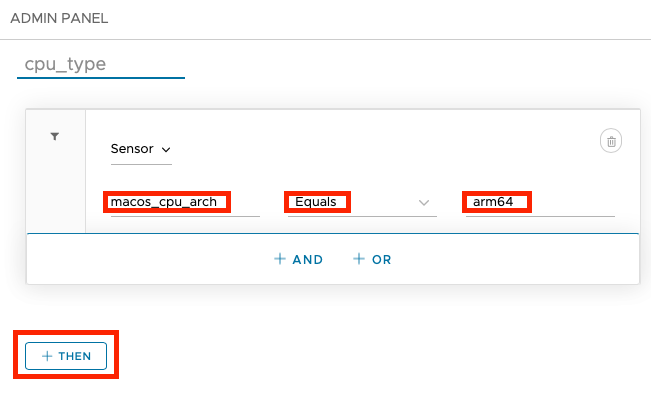
- Click Add. select Resource and then click Application.
- Search for dotnet-sdk-arm64. Click Select.
- Select the Then operator for the condition you created earlier called cpu_type. Click Else.
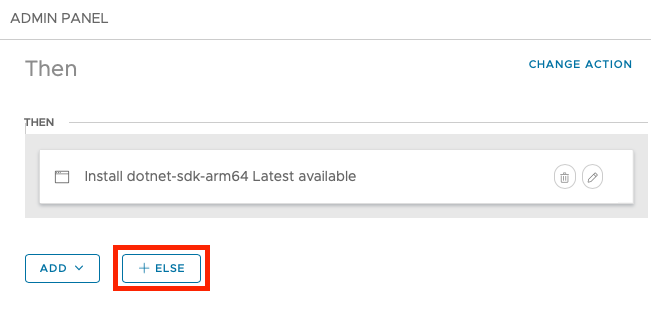
- Click Add. Select Resource and then click Application.
- Search for dotnet-sdk-x64. Click Select.
- With your workflow complete, click Publish.

- You can verify the results of the exercise by logging into your macOS device. This will trigger the sensor to collect the latest CPU architecture from the device.
- In the Workspace ONE UEM console, click Devices.
- Select List View and click the macOS device you used for this exercise.
- Click Sensors. Search for the sensor you created earlier called macos_cpu_arch. Confirm the CPU architecture for the device.

- Click Apps. Confirm that the correct version of the .NET SDK is installed.

Summary and Additional Resources
This operational tutorial outlined the steps for enabling the Intelligent Hub Workflow Engine on macOS devices to allow the use of Freestyle Orchestrator. It also included some example workflows to show what administrators can do with Freestyle Orchestrator on macOS devices. Examples included the deployment and configuration of the VMware Horizon Client, and the deployment of CPU specific apps based on the CPU architecture of the macOS device.
Additional Resources
For more information about Workspace ONE, explore the VMware Workspace ONE Activity Path. The activity path provides step-by-step guidance to help you level-up in your Workspace ONE knowledge. You will find everything from beginner to advanced curated assets in the form of articles, videos, and labs.
You can find additional information at the Freestyle Orchestrator resource page on VMware’s Digital Workspace Tech Zone. Here you will find videos and other resources to help you about Freestyle Orchestrator.
Additionally, you can check out the VMware Workspace ONE and VMware Horizon Reference Architecture which provides a framework and guidance for architecting an integrated digital workspace using VMware Workspace ONE and VMware Horizon.
For additional Workspace ONE UEM sensor examples for macOS, you can check out VMware {code}.
For more information on macOS, see Workspace ONE UEM for macOS Device Management.
Changelog
The following updates were made to this guide:
| Date | Description of Changes |
| 2022/09/27 |
|
About the Authors
This tutorial was written by:
- Michael Bradley, Senior Technical Marketing Architect, End-User-Computing Technical Marketing, VMware.
Considerable contributions were made by the following subject matter experts:
- Matthew Zaske, Solution Engineer, UEM – macOS/iOS, VMware.
- Paul Evans, Product Line Manager, End-User Computing, VMware.
Feedback
Your feedback is valuable.
To comment on this tutorial, contact VMware End-User-Computing Technical Marketing at euc_tech_content_feedback@vmware.com.