
Modernizing VDI for a New Horizon
Migrating Legacy Horizon Components to Modern AlternativesHorizon 8
Introduction
VMware has been providing VDI technology for well over a decade. As the product portfolio has matured, and as companies continue to adopt these technologies for new and innovative uses, a number of desktop and application models have emerged. Managing User Experience with VMware Horizon illustrates a number of models commonly used and is meant to help you determine the best model or models needed for your business’s requirements.
Some of these models can be built using legacy Horizon technologies such as View Composer and Persona Management, or you can use the preferred modern alternatives such as Instant Clone Technology and Dynamic Environment Manager.
- Instant Clone Technology – VMware Horizon® instant clones and View Composer linked clones are provisioning technologies that are conceptually similar but differ significantly in implementation. Instant Clone Technology is built on VMware vSphere® VMFork and is built into the VMware ESXi™ hypervisor. This eliminates the need for a dedicated server and external database, reduces overhead on VMware vCenter®, and dramatically improves provisioning times and efficiency. Instant clones were introduced several years ago with Horizon 7 version 7.0 and continue to coexist with View Composer.
- DEM – VMware Dynamic Environment Manager™ (DEM) persists user configuration data across virtual, physical, and cloud PCs. Like Persona Management, DEM persists user configuration data between sessions, while adding numerous capabilities, from drive and printer mappings to privilege elevation to integration with Horizon through Smart Policies. DEM relies on folder redirection or alternatives such as FSLogix Office Containers or App Volumes user-writable volumes to abstract and persist user data between user sessions.
Companies currently using Horizon are encouraged to migrate to modern components to take advantage of improvements in speed, stability, management capabilities, and overall user experience. As you can see in the VMware Lifecycle Product Matrix, all versions of Horizon 7 except 7.13 have reached the end of general support at the time of writing of this guide. Horizon users should be planning to upgrade at a minimum to a current Horizon 8 build. Your upgrade plan needs to include steps to migrate away from legacy components such as View Composer and Persona Management as these are no longer available with Horizon 8.
Purpose of This Guide
VMware Horizon 8 has been generally available since August 2020 and several legacy Horizon components were removed or deprecated. As already mentioned, lll releases of Horizon 7 except 7.13 have reached the end of general support at the time of the writing of this guide. This guide has been available since August 2020 to give organizations using Horizon 7 ample time to plan and complete a migration to Horizon 8. Now is the time to move from Horizon 7 to Horizon 8. The purpose of this guide is to provide options and guidance for migrating from View Composer, persistent disks, and Persona Management to modern alternatives.
Audience
This operational tutorial is meant for anyone currently using View Composer, persistent disks, or Persona Management. You can use this guide to migrate from these legacy components to modern alternatives to facilitate an upgrade to Horizon 8.
Definitions
The following definitions are used throughout this guide.
- Horizon 8 (2006) – First release version of Horizon 8
- Horizon 8 (2203) – Latest release of VMware Horizon at the time of this writing
- Group Policy Object (GPO) – Policy object applied to domain objects such as users, groups, and computers
- Windows profile – A Windows profile that consists of both user data and configuration data
- User data – Content created or consumed by end users and stored in the Windows profile
- Examples include documents, pictures, and videos.
- This content is typically stored in one of the predefined, standard Windows profile folders such as
Desktop,Pictures,Videos, andDocuments. Data stored within the profile but outside the standard profile folders is addressed, but not supported, in all scenarios. Data stored outside of the Windows profile is out of scope for the purposes of this guide.
- Configuration data – Windows and application configuration settings used to personalize the user experience
- Examples include setting custom language preferences in an application or setting the Windows background image.
- See the Windows Primer section of Managing User Experience with VMware Horizon for additional detail.
- Folder redirection – The practice of redirecting one or more standard Windows profile folders to a network location
- Redirecting these profile folders decouples management of the user data from other components of the profile and desktop.
- Folder redirection may be configured using Microsoft GPO, Persona Management GPO, or DEM.
- Nonpersistent and semi-persistent desktops – See Horizon Terminology of Managing User Experience with VMware Horizon for details.
- Dynamic Environment Manager personalization – Feature of DEM that persists Windows and application settings between desktop sessions
Note: Personalization persists configuration data but not user data.
Preparing for a Successful Migration
This chapter provides recommendations and best practices for getting started with the migration, as detailed in the following sections:
- Dynamic Environment Manager for All Horizon Scenarios
- Instant-Clone Provisioning for All Horizon Scenarios
- Building a Test Environment
- Assumptions About Your Environment
- Disclaimer
Dynamic Environment Manager for All Horizon Scenarios
Historically, DEM was included with Horizon 7 Enterprise licensing, or could be purchased stand-alone for use with Horizon Standard and Advanced licenses. Since the release of Horizon 8 (2006), DEM licensing was updated to make some DEM features available with all Horizon licenses.
- DEM Standard is now available for Horizon 8 (2203) Standard and Advanced. The Horizon Standard Subscription license also includes DEM Standard. In addition to Windows and application personalization, DEM Standard includes various features such as folder redirection configuration, condition sets, printer and drive mapping, and logon/logoff tasks.
- The full-featured DEM Enterprise continues to be bundled with Horizon Enterprise, as well as the Horizon Universal and Horizon Enterprise Plus subscription licenses. DEM Enterprise provides all the capabilities of DEM Standard plus application blocking, privilege elevation, and more.
Either edition of DEM may be used to assist you with your plans for migrating away from Persona Management or persistent disks. As you will see in the migration scenarios throughout this document, DEM may be used as a one-time migration tool, for ongoing administration, or both.
DEM may be configured by using Microsoft Group Policy Objects (GPO) or by using NoAD mode if using Active Directory is not an option. This document assumes GPO configuration, but you can easily adapt the guidance and use NoAD mode if you prefer.
Instant-Clone Provisioning for All Horizon Licenses
Historically, instant-clone provisioning was included with Horizon 7 Enterprise licensing only. Starting with Horizon 7 version 7.13 and Horizon 8 (2006), everyone who owns a Horizon Standard, Advanced, or Enterprise edition has access to instant-clone provisioning. Customers with subscription licenses such as Horizon Universal, Horizon Standard Plus, and Horizon Enterprise Plus also have instant-clone provisioning.
Building a Test Environment
We strongly recommend building an isolated, non-production lab environment where you can test your upgrade and migration plans before implementing them in production.
- DEM is not a direct replacement for Persona Management and requires some up-front work to personalize applications.
- Instant clones have some nuances in management capabilities that require familiarization.
- Persistent disks, which can be used with View Composer linked clones, have no direct replacement, though the same outcome can be achieved using alternative technologies.
If using an isolated lab is not an option, consider creating test user accounts, desktops pools, and any other components needed to test and validate your migration plan without impacting production users. The following are examples of test components created during the production of this guide:
- Dedicated Active Directory OU for Horizon desktops – This OU inherited all standard domain policies.
- Dedicated Horizon linked-clone and instant-clone pools – These pools were provisioned to the new OU.
- Duplicate GPOs for Horizon components – In the case of Persona Management, we already had a GPO in place to manage policy settings for the production environment. By duplicating this policy and applying the duplicate to the new OU, we could freely test updated policy settings, disabling the GPO, and other changes without risking any impact to production users or desktops.
- Duplicate network shares – Duplicate Persona Management, folder redirection, DEM, or other network shares were used as needed.
- Dedicated test user accounts – Having dedicated test accounts that can be used to test and validate the solution without risk of data loss is imperative to success. For best results, consider getting volunteers from outside the IT organization to create test profiles that mimic their production profiles.
In addition to testing in an isolated lab, be sure to practice due diligence by backing up user data before making any attempt to migrate. Migrating user data and user configuration data requires careful planning to ensure minimal downtime and zero data loss.
Assumptions About Your Environment
During testing for validating the procedures in this guide, some basic assumptions were made about the environments that need to be migrated. Because these may not all apply to your environment, some adjustments will be necessary.
- Your VMs are all running Windows 10 – While you may have older versions of Windows in your environment, upgrading the OS is outside the scope of this document. Windows 11 was not supported until Horizon 8 (2106) and this guide is written with migration from Horizon 7 to Horizon 8, so Windows 11 VMs are out of scope. If you plan to run Windows 11 VMs with Horizon 8, there are some things of which to be aware at the time of writing of this guide. Refer to this KB for details.
- You have the ability to refresh and recompose your linked-clone desktop pools – Whether floating-assignment or dedicated-assignment, nonpersistent desktop pools allow you quickly update all clones with new agents, policies, and other updates. We recognize some customers do not recompose their linked clone pools and that usage is out of scope for this guide.
- Your primary objective is to move away from using linked clones, Persona Management, persistent disks, or some combination of these – We assume you want to migrate from linked clones to instant clones, to migrate from using Persona Management or persistent disks to using modern alternatives, or some combination of these. While the impetus for these objectives might be a broader Horizon upgrade, upgrading Horizon is outside the scope of this document. See VMware Horizon product documentation to plan your Horizon upgrade.
- Persistent disks contain only user profile data – The intended purpose of View Composer persistent disks is to redirect the Windows profile to a local VMDK. It is also possible to use persistent disks to store Outlook OSTs, user-installed applications, or simply treat it as a secondary hard disk for storage. This tutorial focuses on profile migration scenarios. Although we do provide automation for migrating some data stored outside of the profile, it is your responsibility to ensure that all necessary data is migrated.
Disclaimer
VMware is not responsible for lost or corrupt user data. The information presented in this guide is meant to demonstrate basic migration workflows that you can build on. Use this document and any associated migration automation tools at your own risk.
FSLogix is one of many third-party solutions that work with VMware Horizon. Although this guide shows example models for integration, VMware assumes no responsibility to provide support for the use of FSLogix software with VMware products.
Although there are a number of approaches and strategies you may use to complete your migration, we recommend following these at a minimum:
- Before beginning your migration from one profile solution to another, use a test environment to build and verify that the proposed new solution is fully functional and works as expected.
- Before beginning your migration from View Composer linked clones to instant clones, provision and test all pool capabilities.
- Ensure that appropriate backups are in place and that you have a validated rollback strategy.
- Conduct a practice migration using fully functional but nonessential user accounts. Verify that data and functionality are restored, and that the solution works as expected.
Migration Paths
There are several VMware and third-party solutions, and many migration paths available to you. This guide is organized by scenarios that provide sample starting configurations and guidance for migrating to recommended alternatives. There are simply too many possible configurations to document all of them in this guide, so you may need to adapt one or more scenarios to your environment to achieve your desired outcome.
The following Q&A section is meant to help you determine your high-level migration tasks.
I Have Horizon 7 Version 7.12 or Earlier
Q: Should I upgrade Horizon and, if so, to which version?
A1: If you have Horizon 7 version 7.9 or earlier and require an ESB (extended service branch) release, consider upgrading to Horizon 8 (2111) rather than the current release. This KB provides information about eh Horizon 8 Extended Service Branch.
At the time of this writing, Horizon 8 (2111) is the current ESB release.
A2: Consider upgrading to Horizon 7 version 7.13 if the following apply to you:
- You are on a version of Horizon 7 that does not support the use of instant clones and you wish to use instant clones.
- You wish to migrate linked clone pools to instant clone pools before you upgrade to Horizon 8 using the method in this guide.
A3: Consider upgrading to Horizon 8 (2203) if the following apply to you:
- You want to run the latest Horizon release with the newest features – Instant-clone provisioning improvements and other enhancements are available with Horizon 8 (2203) for anyone running any edition of Horizon (Standard, Advanced, or Enterprise) or Horizon Universal and Horizon Plus subscription licenses.
- You have migrated to instant clones already – Horizon 8 (2012) removed View Composer
Q: Do I have to upgrade my entire Horizon environment to migrate my View Composer, persistent disks, or Persona Management implementation to a modern alternative?
A: The modern desktop models are supported in many previous versions of Horizon, so an upgrade may not be necessary. Consider the following:
- Instant clones were introduced in Horizon 7 version 7.0. Migrating from View Composer linked clones to instant clones is possible with Horizon 7 version 7.0 or later. More recent versions of Horizon 7 have closed many of the feature gaps in the initial release, so be sure to thoroughly test instant clones before you begin your migration.
- If you have a Horizon 7 Enterprise license, instant-clone provisioning has been available since version 7.0.
- If you have a Horizon 7 Standard or Advanced license, you will need to upgrade to Horizon 7 version 7.13 or Horizon 8 (2203) to get instant-clone provisioning. Horizon Universal and Horizon Plus subscription licenses also entitle you instant clones.
- If you are migrating from using Persona Management or persistent disks to using a modern alternative, and you plan to use DEM as part of that migration strategy, you need one of the following:
- A Horizon Standard, Advanced, or Enterprise license with current VMware Technical Support and Subscription Services (SnS)
- A Horizon Universal or Plus subscription license
- A DEM stand-alone license
Migrate Legacy Technologies to Modern Alternatives and upgrade to Horizon 8 (2203)
The following is just one possible path to complete your upgrade from Horizon 7 version 7.x to Horizon 8 (2006) and migration of legacy technologies. The intent is to make the process as streamlined as possible, but you may need to adjust the order of operations to meet your organizational needs.
Migrate from Persona Management Before Upgrading to Horizon 8 (2203)
If you are using Persona Management, your first step should be to migrate it to a modern alternative. Persona Management is not supported with instant clones or Horizon 8 (2203), so it is important to complete this migration before attempting an upgrade to Horizon 8 (2203).
If you are not using Persona Management, proceed to Upgrade to Horizon 8 (2203).
The following four Persona Management migration scenarios are covered in this document. Choose the one that best fits your needs and modify as necessary.
- Migrate to DEM + Folder Redirection
- DEM provides Windows and application personalization, and a variety of additional management capabilities. With the new DEM licensing model, DEM Standard is available if you have Horizon 7 or later.
- Folder redirection abstracts user data to a network share, making it easier to manage.
- Migrate to DEM + Folder Redirection + FSLogix Office Container
- DEM provides Windows and application personalization, and a variety of additional management capabilities. With the new DEM licensing model, DEM Standard is available if you have Horizon 7 or later.
- Folder redirection abstracts user data to a network share, making it easier to manage.
- FSLogix Office Container provides configurable caches for various Microsoft Office applications. If you plan to run Office 365 with nonpersistent Horizon desktops, the Office Container provides a dramatic improvement to the user experience.
- Migrate to FSLogix Profile Container
Conceptually similar to Persona Management, the FSLogix Profile Container abstracts the entire user profile from the guest operating system and stores it in a VHD(X) file. - Migrate to App Volumes User Writable Volume
Conceptually similar to Persona Management, the App Volumes user-writable volume abstracts the entire user profile from the guest operating system and stores it in a VMDK file.
Once you have successfully migrated to a modern profile model, proceed to Upgrade to Horizon 8 (2203).
Upgrade to Horizon 8 (2203)
The technical process of upgrading to Horizon 8 (2203) is outside the scope of this document. See the VMware Horizon product documentation to plan for your upgrade.
Horizon 8 (2203) removes support for some legacy components. If you are currently using any of these technologies, migrate off of them before proceeding with your Horizon 8 (2203) upgrade.
- Persona Management – If you are using Persona Management, see Persona Management.
- Security Server – If you are using Security Servers, read the Upgrading Horizon from Security Servers to Unified Access Gateway blog by Graeme Gordon of VMware
- ThinPrint – If you are using ThinPrint, see Configuring VMware Integrated Printing.
Horizon 8 (2203) no longer includes View Composer, which includes linked-clone and persistent disk technologies. These technologies will not be available once an upgrade to Horizon 8 (2203) is complete, so it is important to migrate from these technologies to more modern alternatives before upgrading to Horizon 8 (2203).
If you are using Persistent Disks to manage persona, you will need to migrate to an alternative before upgrading to Horizon 8 (2203). For more information, see Migrate from Persistent Disks to a Modern Alternative.
Migrate from Persistent Disks to a Modern Alternative
If you are using persistent disks, your next step should be to migrate to a modern alternative. Persistent disks are not supported with instant clones, and were deprecated in Horizon 8 (2006), so it is important to plan this migration before upgrading to Horizon 8 (2203).
If you are not using persistent disks, proceed to Migrate from Using Linked Clones to Using Instant Clones.
The following two migration scenarios for persistent disks are covered in this document. Choose the one that best fits your needs and modify as necessary.
- Migrate to DEM + Folder Redirection + FSLogix Office Container
- DEM provides Windows and application personalization, and a variety of additional management capabilities. With the new DEM licensing model, DEM Standard is available if you have Horizon 7 or later.
- Folder redirection abstracts user data to a network share, making it easier to manage.
- FSLogix Office Container provides configurable caches for various Microsoft Office applications. If you plan to run Office 365 with nonpersistent Horizon desktops, the Office Container provides a dramatic improvement to the user experience.
- Migrate to FSLogix Profile Container
Conceptually similar to persistent disks, the FSLogix Profile Container abstracts the entire user profile from the guest operating system and stores it in a VHD(X) file.
Once you have successfully migrated to a modern profile model, proceed to Migrate from Using Linked Clones to Using Instant Clones.
Migrate from Using Linked Clones to Using Instant Clones
In Horizon 8 (2012 and newer), linked clones have been removed. You will no longer have the ability to manage linked clone pools or persistent disks. Upgrades to Horizon 8 (2203) will be prevented if any linked clone pools are detected in your current Horizon deployment. It is important that you migrate your linked clone pools and persistent disks to an alternative technology before attempting to upgrade to Horizon 8 (2203). You will need to be on a version and edition of Horizon 7 that supports Instant Clones to perform a migration. This may require an upgrade of your current Horizon 7 environment before you can proceed if you are on a version lower than Horizon 7 Version 7 Enterprise or Horizon 7 version 7.13 for Standard and Advanced.
Important: If you detach View Composer persistent disks and then remove or delete the associated vCenter Server, the detached disks might be rendered unusable. To prevent this issue in a migration scenario, complete your migration from View Composer persistent disks before deleting the associated vCenter Server.
Migrate a Linked-Clone Pool to an Instant-Clone Pool
This procedure explains how to disable an existing linked-clone pool and create a replacement instant-clone pool with the same settings and an updated Horizon Agent. This will need to be done in your current Horizon 7 environment before upgrading to Horizon 8 (2203).
- Make sure you have defined an account in Active Directory that you can then select in the Horizon Console, in the Instant Clone Engine Domain Accounts under Settings > Instant Clone Domain Accounts on a Connection Server in the pod.
This account is described in Create a User Account for Instant-Clone Operations. - In the Horizon Console, review the pool and make sure it does not currently have any of the features enabled that were identified in Instant-Clone Feature Limitations in Comparison to Linked Clones for Horizon 8 (2006) and earlier.
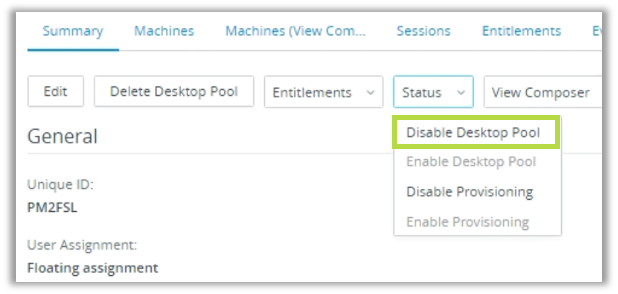
- Make sure there are no users logged in to the pool, and disable the pool by selecting Status > Disable Desktop Pool.
- Verify that the pool is disabled.

- Edit the pool and take screenshots of the settings on each tab (General, Desktop Pool Settings, Provisioning Settings, and so on).
- Take screenshots of all entitlements on the Entitlements tab.
- Download the Horizon 8 (2203) Agent from
vmware.com. - In vSphere Web Client, find the machine you captured for Parent VM in vCenter, power it on, and connect to its console.
- Using the console you opened, log in to the parent VM as an administrator.
- Copy the Horizon 8 (2203) Agent onto the parent VM.
- Write down settings of the current Horizon Agent by opening
regeditand browsing to:HKLM\Software\VMware, Inc.\Installer\Features_HorizonAgent - Uninstall the current Horizon Agent.
- Reboot the VM.
- Install the Horizon 8 (2203) Agent with the same features that were previously installed.
- If you are using DEM and App Volumes, make sure to follow the supported installation order described in the VMware Knowledge Base article Agent installation order for Horizon View, Dynamic Environment Manager, and App Volumes (2118048).
- Reboot the VM.
- Use vSphere Web Client to take a snapshot of the parent VM.
- In the Horizon Console, create a new instant-clone pool.
- Either use a new pool name or, if you need to use the same name, delete the existing linked-clone pool before creating the instant-clone pool.
- Configure the pool with the settings captured in step 5 above, and the parent and snapshot you used in step 17.
- Add the entitlements captured in step 6.
- Test the connection to the pool by using Horizon Client to log in to a desktop.
Congratulations, you have successfully migrated from a linked-clone pool to an instant-clone pool!
Migration Scenario - Persona Management to DEM + Folder Redirection
This scenario is for companies who are currently using Persona Management and wish to migrate to Dynamic Environment Manager with folder redirection. DEM persists user configuration data while user data is redirected to a network share using folder redirection.

Figure 1: DEM and Folder Redirection
Dynamic Environment Manager takes a selective approach to managing the user profile. Given this design approach, you must specify which applications and settings will be managed. Although it does mean a little more work up front, this solution prevents excessive profile growth and profile corruption, enables user settings to roam across Windows versions, and provides IT with granular control to manage as much or as little of the user experience as needed.
Persona Management, Dynamic Environment Manager, and folder redirection are all supported on both virtual and physical Windows PCs.
Considerations
DEM plus folder redirection is an excellent choice if you are managing persistent VM desktop pools, physical PCs, or both. In this model:
- DEM provides personalization, ensuring a consistent user experience as users roam from PC to PC, from PC to VM, or even from PC to RDSH-published applications.
- DEM also provides user environment management capabilities, which add significant value to IT administrators.
- Folder redirection helps to prevent data loss in the case of a corrupt OS or hardware failure.
Although you can use this combination for nonpersistent VM pools as well, there are limitations when it comes to persisting cache data such as OneDrive, Outlook OST, and Windows Search Index. For nonpersistent desktop use cases where caching is required, consider adding FSLogix Office Container to this solution, as described in Migration Scenario - Persona Management to DEM + Folder Redirection + FSLogix Office Container.
Your Persona Management implementation may permit users to save content to nonstandard Windows profile folders. For example, if a user created C:\users\username\MyStuff and filled the directory with content, Persona Management would synchronize the MyStuff directory to the network repository.
Folder redirection abstracts user data stored in standard Windows profile directories such as Documents, Pictures, and Videos and stores this data on a network share. Nonstandard profile directories, in contrast, are not easily supported with folder redirection. This scenario makes use of an optional script to copy any folders and files stored in the Persona Management repository, outside the standard Windows profile folders, and place the copy in Documents\ExtrasFromPersona. If you choose not to use this script, be sure your migration plan accounts for any nonstandard Windows profile directories that may exist in your environment.
In-Place Migration
As the IT admin, you will download existing DEM configuration templates, or create custom templates, to provide personalization for Windows and the applications in your environment. Folder redirection is configured to redirect user data to a network share. DEM and folder redirection are then run side by side with Persona Management, enabling the migration of user data and user configuration data to occur during normal operation, without interruption to end users.
This process requires some administrative overhead at the outset of the project to create configuration templates for the applications requiring personalization. The result of this work is a migration solution with almost zero downtime for end users, excellent end-user experience when roaming between Windows devices, and powerful, flexible administrative tools that extend well beyond personalization.
See the VMware Knowledge Base article How to migrate VMware Persona Management to VMware User Environment Manager (2118056) for detailed information to complete this migration scenario.
See Copy Nonstandard Profile Directories to the User Profile if you plan to migrate nonstandard profile data from the Persona Management repository.
Migration Scenario - Persona Management to DEM + Folder Redirection + FSLogix Office Container
This scenario is for companies currently using Persona Management who wish to migrate to Dynamic Environment Manager with folder redirection. DEM persists user configuration data, while user data is redirected to a network share using folder redirection. This scenario adds FSLogix Office Containers for companies that need to persist large caches of data between nonpersistent desktop sessions.

Figure 2: DEM and Folder Redirection with Office Container
Dynamic Environment Manager takes a selective approach to managing the user profile. Given this design approach, you must specify which applications and settings will be managed. Although it does mean a little more work up front, this solution prevents excessive profile growth and profile corruption, enables user settings to roam across Windows versions, and provides IT with granular control to manage as much or as little of the user experience as needed.
See Configure Office Container to redirect Microsoft Office user data to learn more about the types of data that can be cached in these containers.
See Best Practices for Delivering Microsoft Office 365 in VMware Horizon 7 for guidance on successfully implementing Office 365 with Horizon.
The following assumptions are made and referenced throughout this scenario.
- Persona Management is configured to contain the entire Windows profile (user data + configuration data).
- Persona Management is configured to store user profiles on a network share:
\\server\persona\username.v6 - A Horizon linked-clone desktop pool provides nonpersistent desktops to end users. For our example, this pool is named DesktopPool_1.
- Persona Management GPO applies policies to the desktops in DesktopPool_1.
Considerations
DEM plus folder redirection plus FSLogix Office Container is an excellent choice if you are managing nonpersistent VM pools and need to support cache data for Office and Windows. In this model:
- DEM provides granular control over personalization of Windows and application settings.
- Folder redirection redirects critical user data to the network.
- FSLogix Office Container provides a repository for cache files.
Because DEM user configuration data and folder redirection user data are stored on traditional SMB shares, time-tested technologies to store, back up, and restore this data can be used.
FSLogix Office Containers persist cache data and are typically considered disposable. Treating these containers as disposable may simplify your FSLogix design and reduce administrative overhead because you do not have to design workflows to take backups of VHD(X) files that will often be locked by end users.
Your Persona Management implementation may permit users to save content to nonstandard Windows profile folders. For example, if a user created C:\users\username\MyStuff and filled the directory with content, Persona Management would synchronize the MyStuff directory to the network repository.
Folder redirection abstracts user data stored in standard Windows profile directories such as Documents, Pictures, and Videos and stores the data on a network share. Nonstandard profile directories, in contrast, are not easily supported with folder redirection. This scenario makes use of an optional script to copy any folders and files stored in the Persona Management repository, outside the standard Windows profile folders, and place the copy in Documents\ExtrasFromPersona. If you choose not to use this script, be sure your migration plan accounts for any nonstandard Windows profile directories that may exist in your environment.
In-Place Migration
As the IT admin, you will download existing DEM configuration templates, or create custom templates, to provide personalization for Windows and the applications in your environment. Folder redirection is configured to redirect user data to a network share. DEM and folder redirection are then run side by side with Persona Management, enabling the migration of user data and user configuration data to occur during normal operation, without interruption to the end users. FSLogix Office Containers are automatically created and used for caching Office data. DEM will invoke a logon task to copy any nonstandard profile data from the Persona Management repository to the redirected user profile.
This process requires some administrative overhead at the outset of the project to create configuration templates for the applications requiring personalization. The result of this work is a migration solution with almost zero downtime for end users, excellent end-user experience when roaming between Windows devices, and powerful, flexible administrative tools that extend well beyond personalization.
Note: The following process is very similar to that described in the VMware Knowledge Base article How to migrate VMware Persona Management to VMware User Environment Manager (2118056) but includes the addition of FSLogix Office Containers.
Although both technologies may be configured using alternatives, both the DEM agent and the FSLogix agent were configured using GPOs in our testing.
The process involves the following major tasks:
- Stage New Infrastructure Components
- Prepare DesktopPool_1 for Migration
- Begin Migration
- Complete Migration
Stage New Infrastructure Components
- Configure a network share for folder redirection.
- Example:
\\server\FolderRedirection - See Deploy Folder Redirection with Offline Files for recommendations on share creation and permission configuration.
- When creating the folder redirection GPO, be sure to select Move the contents of Documents to the new location to ensure that the content is migrated from the Persona Management share to the folder redirection share.
- Example:
- Install the Dynamic Environment Manager management console on an administrative PC.

- The Quick Start Tutorial for Dynamic Environment Manager will help you quickly deploy a non-production implementation. For a video demonstration of the procedure, see the VMware Knowledge Base article Deploy and Configure Dynamic Environment Manager (82492).
- For production implementations, see Installing and Configuring Dynamic Environment Manager and the Dynamic Environment Manager Architecture chapter of the VMware Workspace ONE and VMware Horizon Reference Architecture.
- Configure DEM to manage Windows and application settings for your environment.
- DEM includes a number of templates for creating Windows and application configuration files. Additional templates may be downloaded from the VMware Marketplace. See the Deploying Templates from the Marketplace feature walk-through video for more information.
- The Dynamic Environment Manager Application Profiler Guide can help you profile your remaining applications.
- If you get stuck, the Profiling Applications operational tutorial will help with some advanced profiling techniques.
- Configure a network share for FSLogix Office Containers.
Example:\\server\fslogix\OfficeContainers
See Microsoft documentation for guidance.
Prepare DesktopPool_1 for Migration
- Create Group Policy objects for each of the following and apply them to the OU where the DesktopPool_1 VMs reside:
- Enable and configure the DEM agent.
Create and Configure the FlexEngine Group Policy Object in the Quick-Start Tutorial for User Environment Manager describes the minimum required and recommended policy settings. For a video demonstration of the procedure, see the VMware Knowledge Base article Deploy and Configure Dynamic Environment Manager (82492).
In addition, configure the advanced DEM setting Disable DirectFlex, as described in the VMware Knowledge Base article VMware DEM/UEM FlexEngine Advanced Settings (ADMX template) (2145286).
- Enable and configure folder redirection.
See Deploy Folder Redirection with Offline Files for guidance on GPO configuration.
Note: DEM has the ability to configure folder redirection settings. However, in this scenario the goal is to migrate existing user data to the folder redirection share. See the VMware Knowledge Base article Migrating existing Local Profile folders content with Folder Redirection and Dynamic Environment Manager (51879) for more information about why Microsoft GPO-configured folder redirection is necessary.
- Enable and configure FSLogix agent for Office Containers.
See Microsoft Tutorial: Configure Office Container to redirect Microsoft Office user data for guidance.
- Enable and configure the DEM agent.
- Install the DEM agent and FSLogix agent on the DesktopPool_1 golden image.
- In the Horizon Console, recompose DesktopPool_1 to ensure all VMs get the new agents and GPO settings.
Begin Migration
As end users log on and log off the desktops in DesktopPool_1, the migration occurs automatically.
DEM captures the specified Windows and application settings and exports them at logoff to the profile archive share you created.
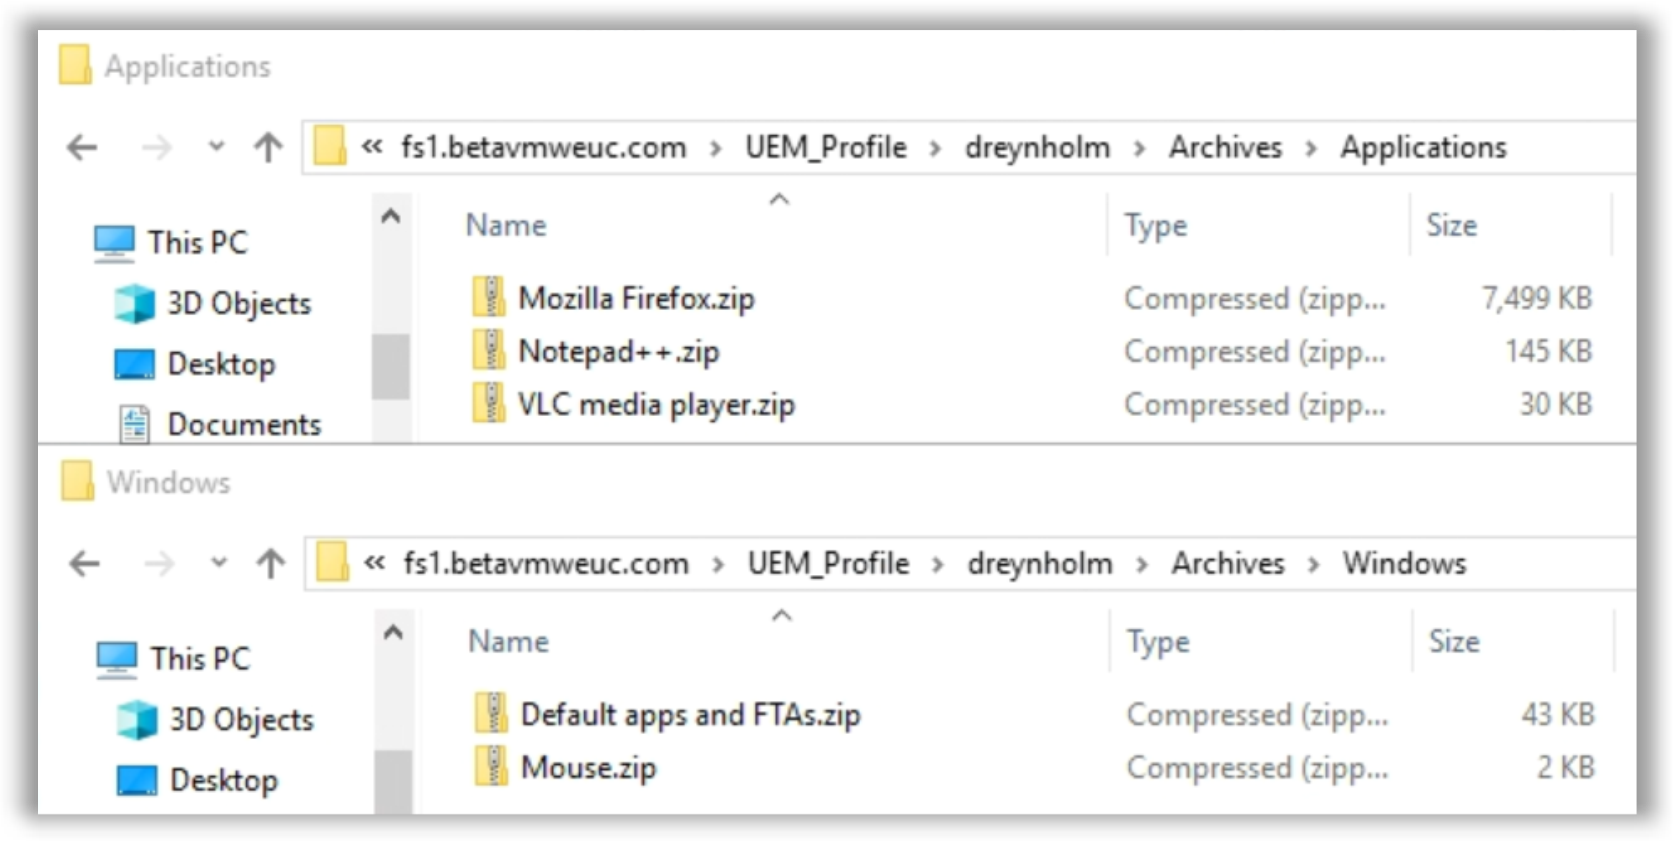
Figure 3: Sample Windows and Application Profile Archives
Windows folder redirection automatically creates the directory structure for the folders you specified in the folder redirection GPO. If you selected Move the contents of Documents to the new location, the content of these folders is automatically copied from the Persona Management share to the new folders.
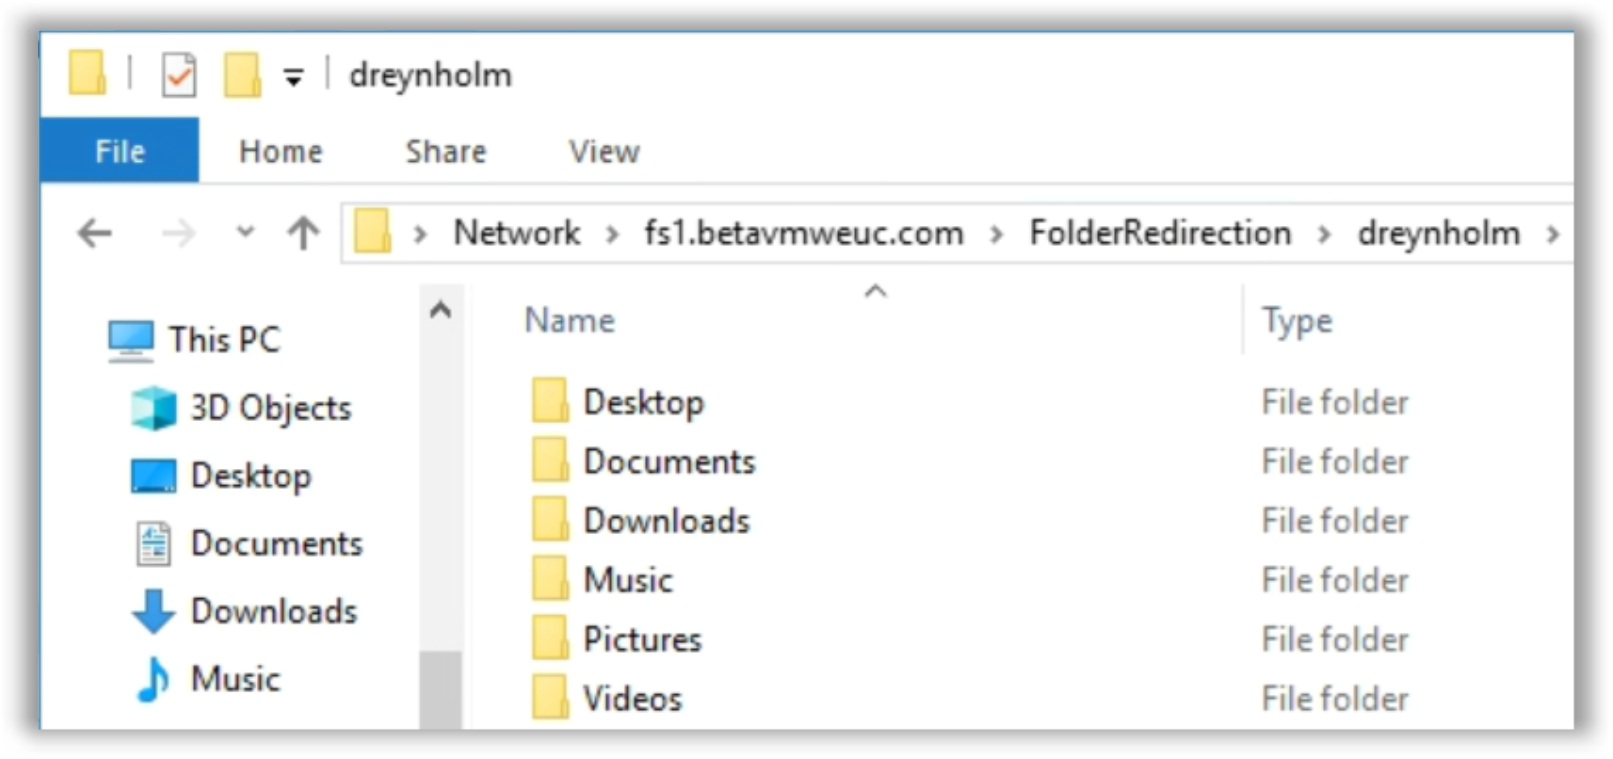
Figure 4: Sample Folder Redirection Share
FSLogix automatically creates the Office Container VHD(X) to store Office cache data.
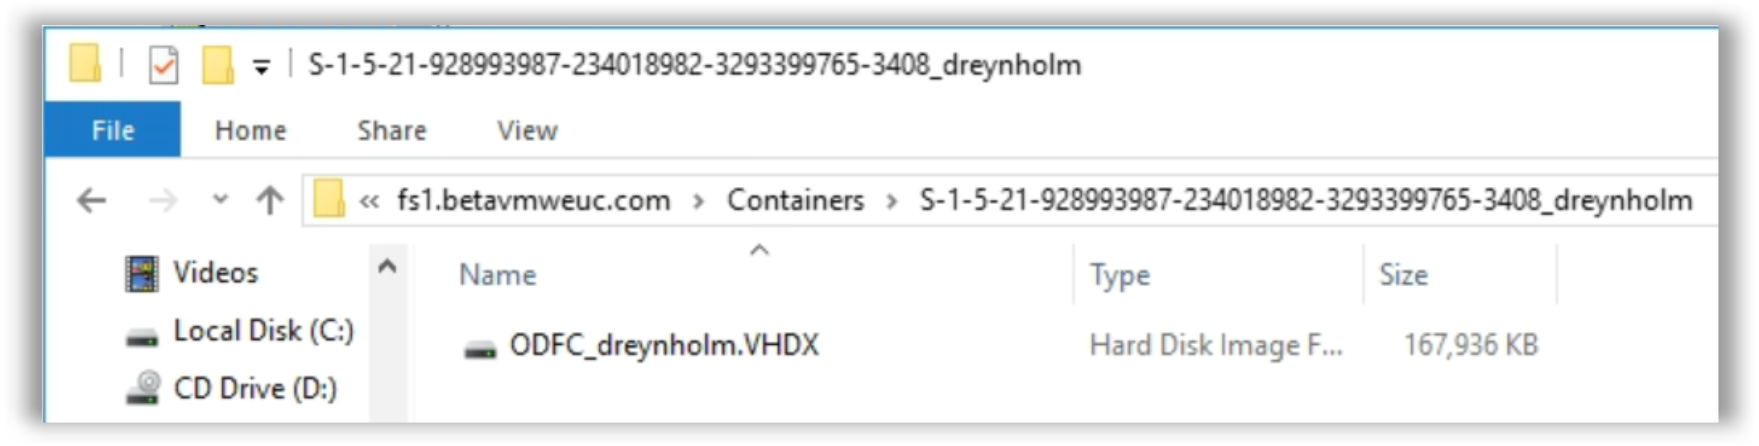
Figure 5: Sample FSLogix Office Container
Important: Be sure to have all users complete at least one logon/logoff cycle before proceeding to ensure data has been migrated and DEM has captured Windows and application settings.
Complete Migration
- See Copy Nonstandard Profile Directories to the User Profile if you plan to migrate extra profile data from the Persona Management repository.
- Disable the Persona Management GPO on DesktopPool_1.
- Edit the DEM GPO and enable DirectFlex to improve logon times.
Configure the advanced DEM setting Disable DirectFlex as described in VMware DEM/UEM FlexEngine Advanced Settings.
At this point, all user data previously managed by Persona Management and stored in standard Windows profile folders should be migrated to the folder redirection share. If you used the Copy-Persona-Extras.ps1 script, user data stored in the profile but outside the standard Windows profile folders should reside on Documents\ExtrasFromPersona. User configuration data for applications and Windows settings you specified are stored on the DEM profile archive share. The FSLogix Office Container persists the Office cache data you specified in the FSLogix configuration GPO.
Because this migration method leaves the Persona Management repository intact, the end user or an IT admin with the necessary permissions can browse the Persona Management repository to restore anything that might have been missed.
Migration Scenario - Persona Management to FSLogix Profile Container
This scenario is for companies currently using Persona Management who wish to migrate to FSLogix Profile Containers. Three options for completing the migration are presented.
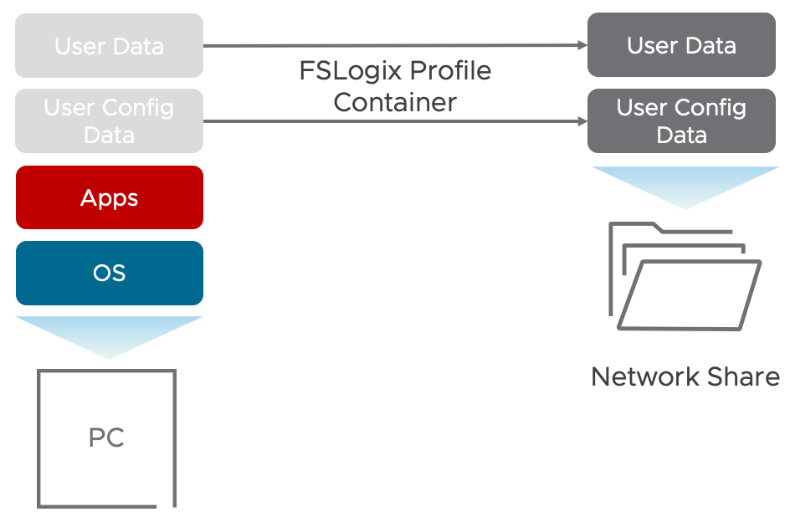
Figure 6: FSLogix Profile Container
See Integrating FSLogix Profile Containers with the VMware Horizon Just-in-Time Management Platform (JMP) to learn more about integration options.
The following assumptions are made and referenced throughout this scenario.
- Persona Management is configured to contain the entire Windows profile (user data + configuration data).
- Persona Management is configured to store user profiles on a network share:
\\server\persona\username.v6 - A Horizon linked-clone desktop pool provides nonpersistent desktops to end users. For our example, this pool is named DesktopPool_1.
- Persona Management GPO applies policies to the desktops in DesktopPool_1.
Considerations
Perhaps the biggest draw to technologies like Persona Management and FSLogix Profile Containers is the efficiency to get them implemented. Simple configurations will enable you to persist the entire user profile (user data and user configuration data), negating the need for additional technologies.
Your Persona Management implementation may permit users to save content to nonstandard Windows profile folders. For example, if a user created C:\users\username\MyStuff and filled the directory with content, Persona Management would synchronize the MyStuff directory to the network repository. Because the entire profile is being redirected to the FSLogix Profile Container, nonstandard Windows profile folders are easily accommodated in the manual and automated migration instructions in this guide. The in-place migration section relies on a Persona Management GPO option called Files and folders to preload to sync user data from the profile archive repository to the FSLogix Profile Container.
User data stored in nonstandard profile directories may get missed during the migration. The in-place migration makes use of an optional script to copy any folders and files stored in the Persona Management repository, outside the standard Windows profile folders, and place the copy in Documents\ExtrasFromPersona. If you choose not to use this script, be sure your migration plan accounts for any nonstandard Windows profile directories that may exist in your environment.
The drawback to storing user data with configuration data is that the two become somewhat dependent on one another. This situation increases administrative overhead after the initial implementation, so that day-two operations are affected. If user data is stored in the Profile Container, you will likely need to devise a strategy and practice to back up and restore the VHD(X) containers.
You may consider a slight variation on this model, where folder redirection is used to redirect standard Windows profile folders to a network share, while the remaining profile components are persisted in the Profile Container.

Figure 7: FSLogix Profile Container and Folder Redirection
Manual Migration
Manual migration includes the following tasks:
- As the IT admin, you create a new desktop pool configured with FSLogix, as described in Provision a New Profile Container Pool. Profile Containers are then created.
- You manually migrate Windows profile data for one user from Persona Management to that user's FSLogix Profile Container, as described in Migrate One User.
- You migrate the rest of the users’ data, and disable the old pool when the migration is complete, as described in Migrate All Users.
Although not required, this manual migration process relies on the creation of a second desktop pool: ProfileContainer_Pool. Be sure you have sufficient resources to create a second desktop pool for the duration of the migration. After the migration is complete, the original DesktopPool_1 pool can be deleted.
Pro Tip: Although this method allows you to reuse an existing linked-clone pool or create a new one, consider creating a new instant-clone pool as part of this migration process. See Migrate from Using Linked Clones to Using Instant Clones for more information.
The steps outlined in the following section will enable you to migrate one user at a time, or all users of ProfileContainer_Pool during an outage window.
Provision a New Profile Container Pool
- Configure a network share for FSLogix Profile Containers.
Example:\\server\fslogix\containers
See Microsoft Tutorial: Configure Profile Container to redirect User Profiles for guidance. - Apply the FSLogix Profile Container GPO to the OU where VMs in ProfileContainer_Pool will reside.
- Install the FSLogix agent on the ProfileContainer_Pool golden image.
- In the Horizon Console, provision the new instant-clone or linked-clone pool.
Migrate One User
In this example you will migrate the user UserOne from DesktopPool_1 to ProfileContainer_Pool and from Persona Management to an FSLogix Profile Container.
Note: You will need to coordinate with UserOne because they will be unable to access desktops in DesktopPool_1, or any other pools that make use of their Persona Management data, until the migration is complete.
- In the Horizon Console, entitle UserOne to ProfileContainer_Pool.
- Ask UserOne to log on one time to ProfileContainer_Pool.
During logon, a new VHD(X) file will be automatically created by the FSLogix agent, and a local profile for UserOne will be established.
Note: Ensure the user does not create data or otherwise modify the profile because changes will be overwritten in a later step when you migrate Persona Management data. - Ask UserOne to log off ProfileContainer_Pool.
- Revoke access for UserOne to ProfileContainer_Pool to prevent any further changes.
- Revoke access for UserOne to DesktopPool_1.
- Ensure that the files are not open or in use on the file share; in this example,
\\server\persona\UserOne.v6 - From an administrative PC, mount the VHD(X) that was created for UserOne and assign a drive letter (
P:\in this example). - Copy the contents of
\\server\persona\userone.v6to the mounted VHD(X):P:\Profile
Overwrite any existing files with the contents ofUserOne.v6.
Note: Whether you use Windows Explorer, Robocopy, or some other tool to copy the profile data, be sure permissions are preserved. - Remove the drive letter and unmount the VHD(X).
- In the Horizon Console, entitle UserOne to ProfileContainer_Pool, ask them to log on, and verify their user profile was successfully migrated.
- Repeat this procedure for each user you wish to migrate.
Pro Tip: Steps 1–4 can be done well in advance of the actual user migration. Doing so will minimize downtime for the end user.
Migrate All Users
In this example, you will migrate all users from DesktopPool_1 to ProfileContainer_Pool and from Persona Management to FSLogix Profile Containers.
Note: You will need to coordinate with the end users because they will be unable to access desktops in DesktopPool_1, or any other pools that make use of their Persona Management data, until the migration is complete.
- In the Horizon Console, entitle users to ProfileContainer_Pool.
- Ask users to log on one time to ProfileContainer_Pool.
During logon, a new VHD(X) file will be automatically created by the FSLogix agent, and a local profile for each user will be established.
Note: Ensure the users do not create data or otherwise modify the profile because changes will be overwritten in a later step when you migrate Persona Management data. - Ask users to log off ProfileContainer_Pool.
- In the Horizon Console, revoke access for all users to ProfileContainer_Pool to prevent any further changes.
- Revoke access for all users to DesktopPool_1.
- Ensure files are not open or in use on the Persona Management file share; in this example,
\\server\persona\username.v6 - From an administrative PC, mount the VHD(X) that was created for one of the users of DesktopPool_1 and assign a drive letter (
P:\in this example). - Copy the contents of
\\server\persona\username.v6to the mounted VHD(X):P:\Profile
Overwrite any existing files with the contents ofusername.v6.
Note: Whether you use Windows Explorer, Robocopy, or some other tool to copy the profile data, be sure permissions are preserved. - Remove the drive letter and unmount the VHD(X).
- Repeat steps 6–9 for each user of DesktopPool_1.
Pro Tip: Steps 1–4 can be done well in advance of the migration. Doing so will minimize downtime for end users. - In the Horizon Console, entitle all users to ProfileContainer_Pool, ask them to log on, and verify that their user profiles were successfully migrated.
- Once all users have been successfully migrated, remove DesktopPool_1.
Automated Migration
Automated migration includes the following tasks:
- As the IT admin, you create a new desktop pool configured with FSLogix, as described in Provision a New Profile Container Pool.
- Batch create Profile Containers and migrate Windows profile data from Persona Management to the VHD(X) files, as described in Batch Migrate Profile Data.
- Entitle users to the new pool, and disable the old pool when the migration is complete, as described in Complete Migration.
This method relies on VMware-provided automation to dramatically reduce the time required to create VHD(X) files and migrate profile data from Persona Management to the Profile Containers.
Note: The migration utility relies on unsupported code and Robocopy to copy user data and permissions. Use this tool at your own risk and be sure to first validate the process in a test environment.
The advantages of using this automated migration tool are a reduction in administrative overhead and reduced downtime for end users compared to the manual migration process.
Although not required, this automated migration process relies on the creation of a second desktop pool: ProfileContainer_Pool. Be sure you have sufficient resources to create a second desktop pool for the duration of the migration. After the migration is complete, delete the original DesktopPool_1 pool.
Pro Tip: Although this method allows you to reuse an existing linked-clone pool or create a new one, consider creating a new instant-clone pool as part of this migration process. See Migrate from Using Linked Clones to Using Instant Clones for more information.
Provision a New Profile Container Pool
- Configure a network share for FSLogix Profile Containers.
Example:\\server\fslogix\containers
See Microsoft Tutorial: Configure Profile Container to redirect User Profiles for guidance. - Apply the FSLogix Profile Container GPO to the OU where VMs in ProfileContainer_Pool will reside.
- Install the FSLogix agent on the ProfileContainer_Pool golden image.
- In the Horizon Console, provision the new instant-clone or linked-clone pool.
Batch Migrate Profile Data
The following steps should be done during an outage window. At a minimum, be sure end users are unable to access their Persona Management data for the duration of the migration.
- In the Horizon Console, disable DesktopPool_1 to prevent users from logging on during the migration period.
- Ensure that files are not open or in use on the file share; in this example,
\\server\persona\username.v6 - Download the PM-To-FSL-migration.ps1 script and run it as an administrator, responding to the prompts as follows:
- Input the FSLogix container path; for this example,
\\server\fslogix\containers - Input the Persona Management path; for this example,
\\server\persona - Input size of the VHD(X) file, in GB; for this example,
30 - Enter disk format:
VHDorVHDX.
Note: FSLogix defaults to using VHD format. If you choose VHDX, ensure that the FSLogix GPO setting Virtual disk type is configured for VHDX. If you skip this step, you will end up with both a VHD and a VHDX file for each user. - Select one or more users from the list and begin migration.
- Input the FSLogix container path; for this example,
VHD(X) files are automatically created using Diskpart commands, and the contents of the user profiles are copied using Robocopy from the Persona Management share to the VHD(X) files.
Complete Migration
- In the Horizon Console, entitle migrated users to ProfileContainer_Pool.
- Once all users have been successfully migrated, remove DesktopPool_1.
In-Place Migration
You will use DEM to capture and migrate HKCU settings from users’ profiles, and then automatically copy these settings to the guest operating system in the VM. Persona Management is configured to sync known, standard Windows user profile data folders to the VM. DEM is then used to copy any nonstandard profile directories and files to the VM. Once the HKCU settings and user data have been written to the VM, and redirected to the FSLogix Profile Container, DEM and Persona Management may be disabled.
Although DEM is being used as a one-time migration tool in this scenario, it is important to note that DEM integrates with and adds considerable value to FSLogix Profile Containers. Consider keeping DEM to complement your FSLogix Profile Containers. See Integrating FSLogix Profile Containers with the VMware Horizon Just-in-Time Management Platform (JMP) for integration examples.
Note: Using DEM to capture the entire HKCU registry hive is not a recommended operational practice. This technique is used only to assist you in your migration efforts. Disable this custom config file after the migration is complete.
This process requires relatively little administrative overhead and almost zero downtime for end users. However, the order of operations described is critical to success. Logon times may be affected by syncing the user data all at once, especially for those profiles containing a large amount of content.
By default, Persona Management is configured to store user data and configuration data on a remote network share, retrieving it on-demand, as shown in the following diagram.
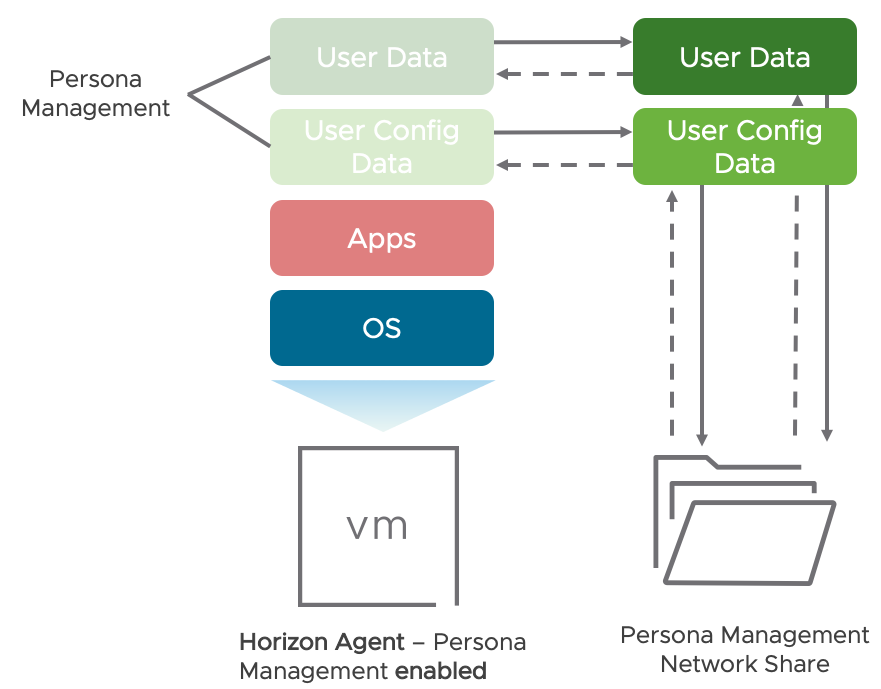
Figure 8: Persona Management Data Flow
The process involves the following major tasks:
- Stage New Infrastructure Components
- Prepare DesktopPool_1 for Migration Phase One
- Begin Migration Phase One
- Prepare DesktopPool_1 for Migration Phase Two
- Begin Migration Phase Two
- Complete Migration
Stage New Infrastructure Components
- Configure a network share for FSLogix Profile Containers.
Example:\\server\fslogix\containers
See Microsoft Tutorial: Configure Profile Container to redirect User Profiles for guidance. - Install the Dynamic Environment Manager management console on an administrative PC.
- The Quick Start Tutorial for Dynamic Environment Manager will help you quickly deploy a non-production implementation. For a video demonstration of the procedure, see the VMware Knowledge Base article Deploy and Configure Dynamic Environment Manager (82492).
- For production implementations see Installing and Configuring Dynamic Environment Manager and the Dynamic Environment Manager Architecture chapter of the VMware Workspace ONE and VMware Horizon Reference Architecture.
- Apply the DEM GPO to the OU where the DesktopPool_1 VMs reside. This GPO configures and enables the agent.
Note: The GPO will have no effect until the DEM agent has been deployed in a later step. - From the DEM management console, create a custom config file that includes the entire
HKCU\registry tree.

Prepare DesktopPool_1 for Migration Phase One
- Install the DEM agent on the DesktopPool_1 golden image.
- Install the FSLogix agent on the DesktopPool_1 golden image.
Note: The FSLogix agent will not be active until a later step when you enable it using a GPO. - In the Horizon Console, recompose DesktopPool_1.
Persona Management is configured to store user data and configuration data on a remote network share. Dynamic Environment Manager is configured to export configuration data (HKCU hive) to a remote network share at logoff and import the configuration data to the guest operating system of the VM at logon. At this point, the FSLogix agent is installed but not yet activated.

Figure 9: Persona Management and DEM Running Side by Side
Begin Migration Phase One
End users should log on and log off of a VM in DesktopPool_1 at least one time.
Upon logoff of the Windows session, the HKCU registry settings will be read from the local profile (effectively from the Persona Management repository) and copied to the DEM profile archive share for the user. You can verify that DEM is capturing data by navigating to \\<ProfileArchiveSharePath>\<username>\Archives and checking for the existence of migration.zip.

Figure 10: Sample migration.zip File
Important: Have all users complete at least one logon/logoff cycle before proceeding so that DEM captures these settings.
Prepare DesktopPool_1 for Migration Phase Two
- Modify the Persona Management GPO as follows:
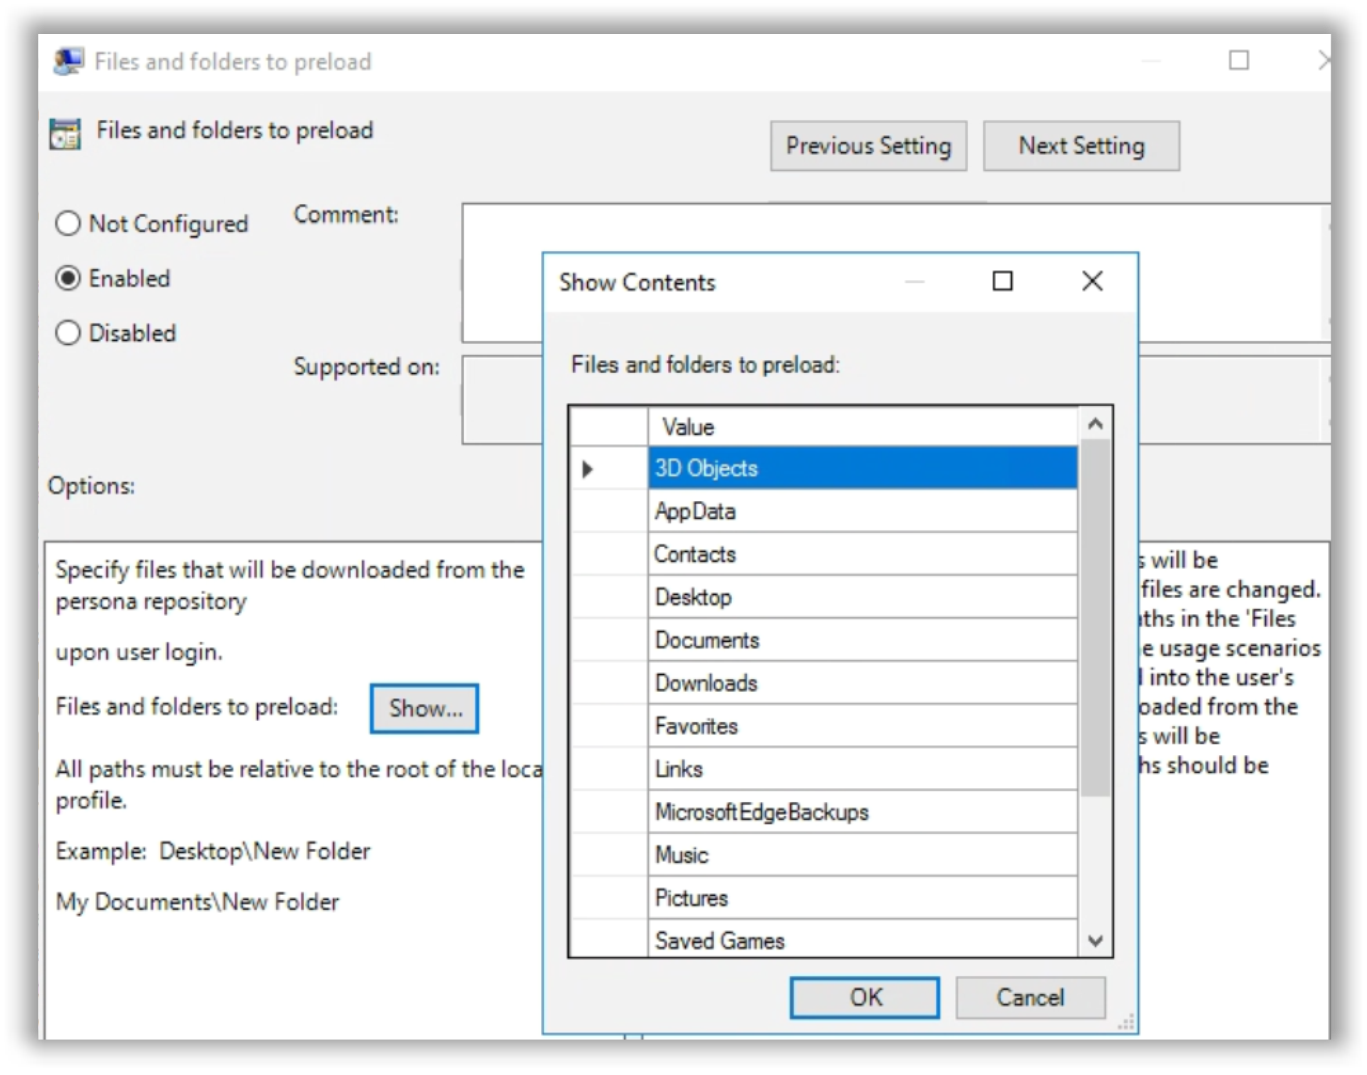
- In the Group Policy Management Editor, navigate to Persona Management > Roaming & Synchronization > Files and Folders to preload.
- Enable the policy and input all profile folders you wish to migrate.
Important: Be sure to specify all folders and files in the users’ profiles that you want to sync. The Files and Folders to preload policy setting does not accept wildcards. You must specify any and all folders you want to have migrated from Persona Management to the Profile Containers.
If an end user created a custom folder or other content at the root of their Windows profile directory, this process will not migrate the data. For example, if a user created
C:\users\username\MyStuffand filled the directory with content, this content will not be migrated becauseMyStuffis not specified in the Files and Folders to preload policy setting. Custom folders and content are addressed in a later step.
- In the Group Policy Management Editor, navigate to Persona Management > Roaming & Synchronization > Files and Folders to preload.
- Enable the FSLogix agent by applying a GPO to the OU where the DesktopPool_1 VMs reside.
- Reboot or refresh VMs to ensure the new GPO policy settings are applied.


Begin Migration Phase Two
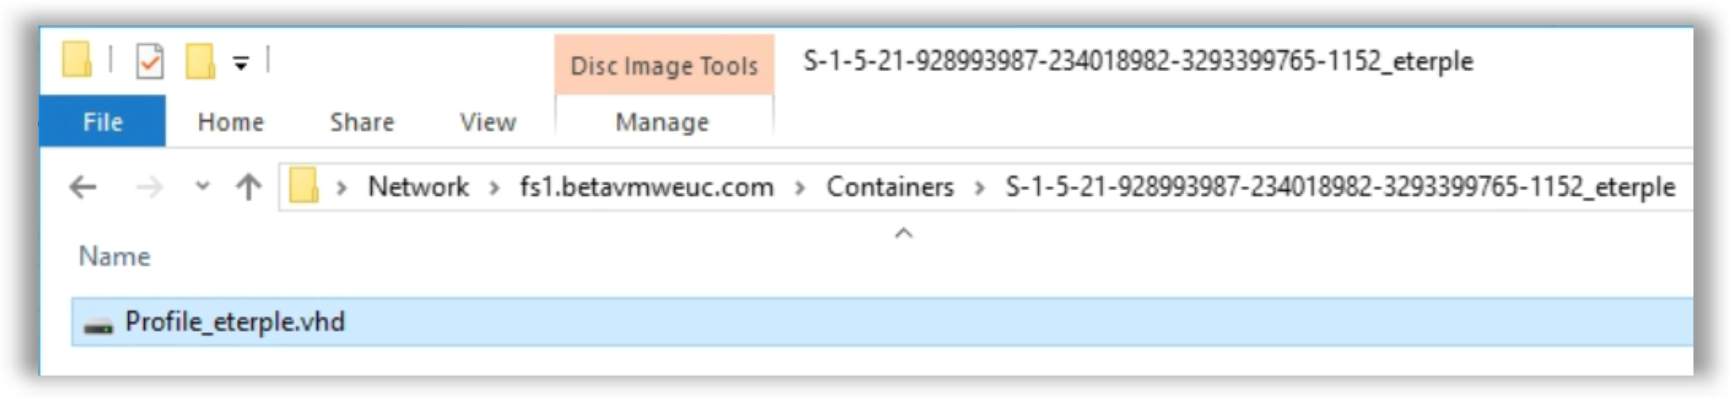
The next time a user logs on to one of the VMs in DesktopPool_1, FSLogix will automatically create a Profile Container VHD(X), mount it to the guest operating system in the VM, and create a new local profile to store user data and user configuration data.

Figure 11: FSLogix Profile Container Is Attached to the VM
As end users log on to DesktopPool_1, the following process takes place:
- FSLogix automatically creates a Profile Container VHD(X) at
\\server\fslogix\containers. - The container is immediately mounted to the VM, and a local profile is established.
- Persona Management takes all the user data you specified in the Files and folders to preload policy setting and force-syncs it from the network repository to the local machine.
- DEM copies the HKCU registry settings (previously captured from the Persona Management repository) from the profile archive share (
migration.zipfile) and writes them to the guest operating system in the VM. - Because the FSLogix Profile Container is already created and attached, the user data from Persona Management and the HKCU settings from DEM will be concurrently written to the Profile Container.
The fact that Persona Management, DEM, and FSLogix are in use concurrently is invisible to end users. Changes to their Windows profiles will be written to the Persona Management network share as well as to the Profile Container during this transition period, as illustrated in the following figure.
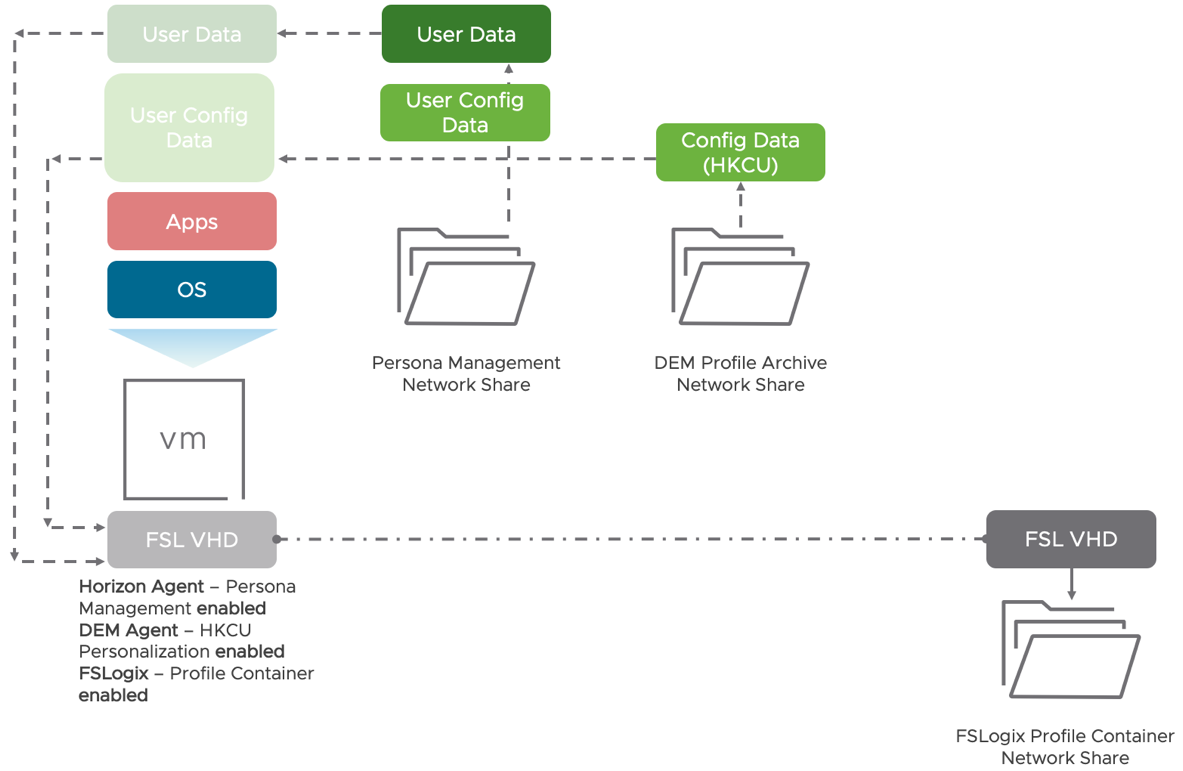
Figure 12: Persona Management and DEM Sync Data to FSLogix Profile Container
Important: Make sure all users have completed at least one logon/logoff cycle on DesktopPool_1 before proceeding.
Complete Migration
- If you plan to migrate nonstandard profile data from the Persona Management repository, follow the procedure described in Copy Nonstandard Profile Directories to the User Profile.
- Disable the Persona Management GPO on DesktopPool_1.
- Once all users have been migrated, perform the following tasks:
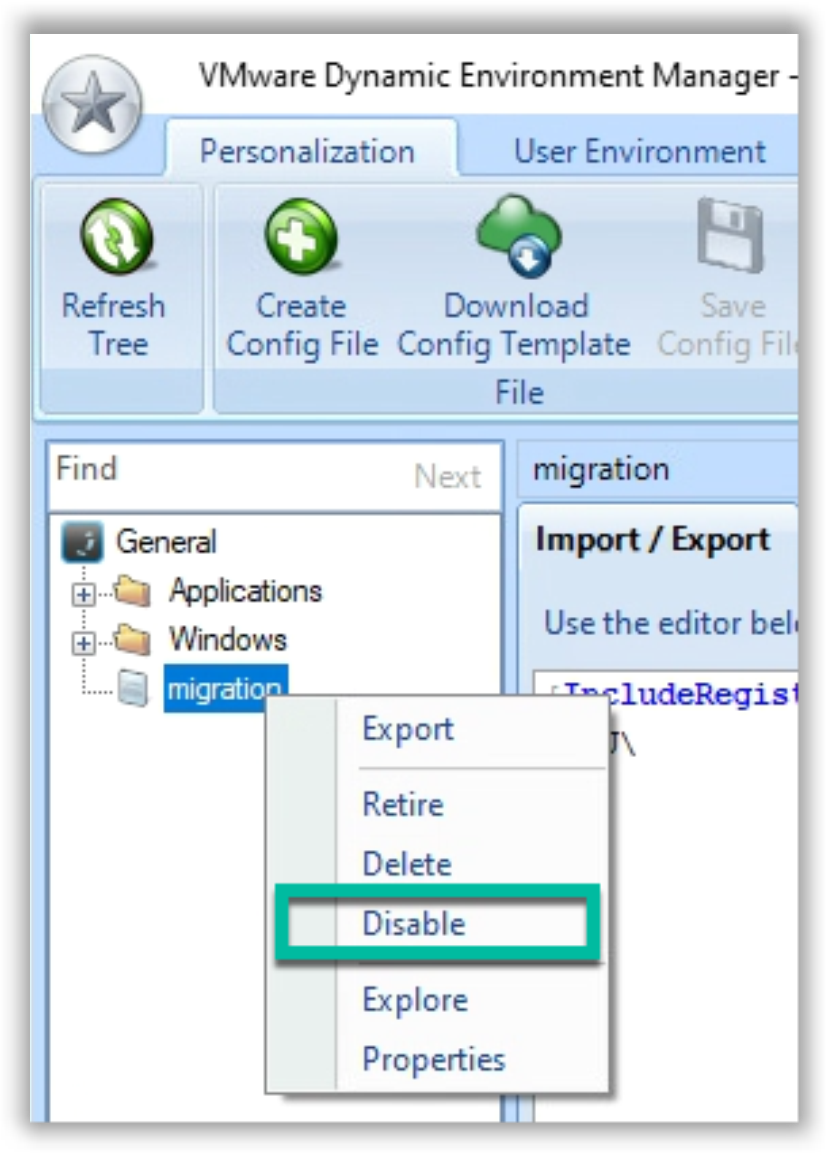
- From the DEM management console, disable the custom config file that the migration process used to persist the HKCU registry settings.
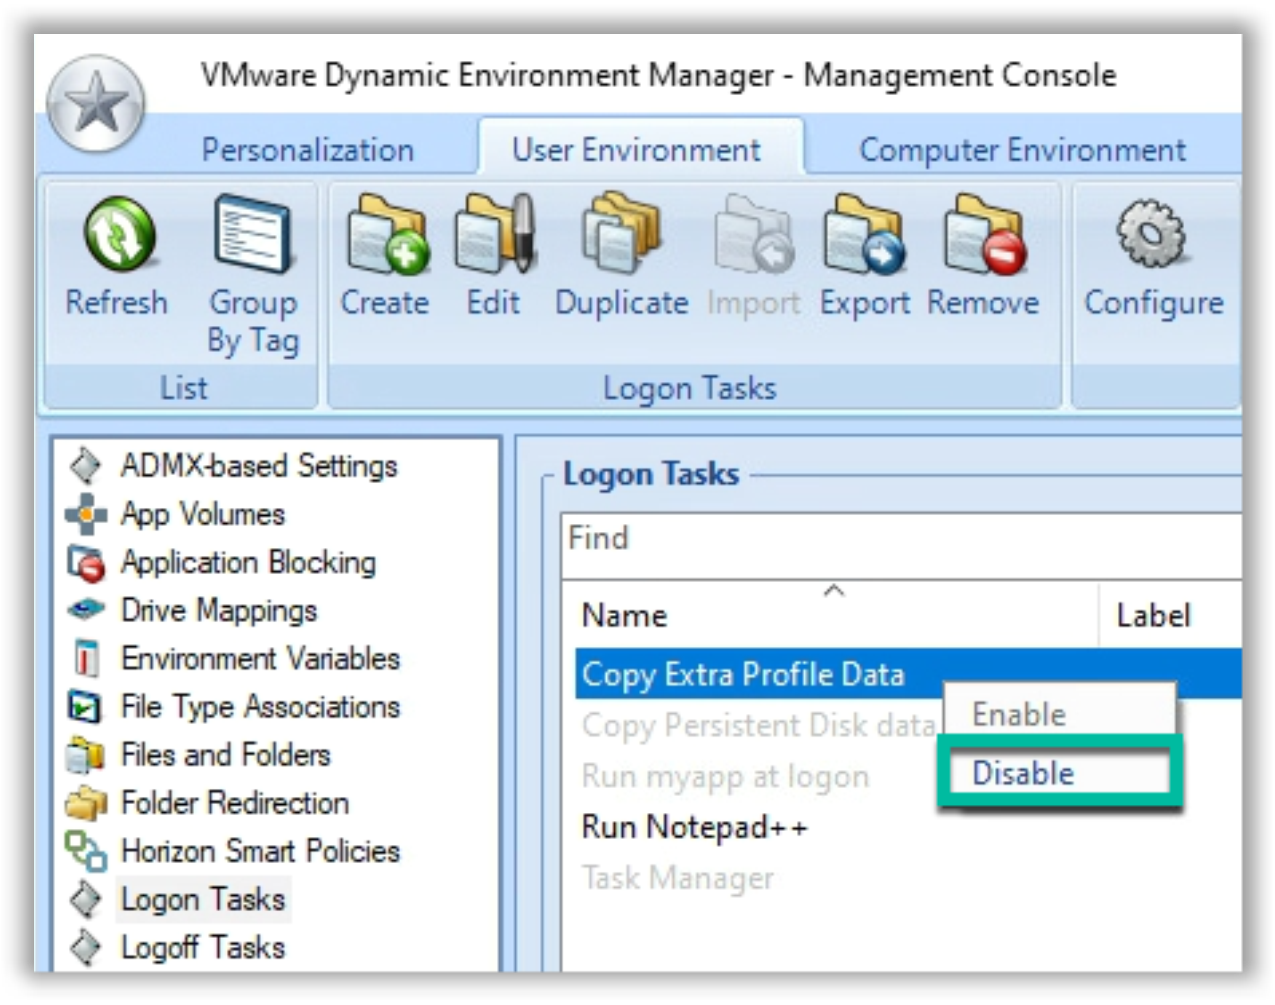
- From the DEM management console, disable the (optional) logon task Copy Extra Profile Data.
- From the DEM management console, disable the custom config file that the migration process used to persist the HKCU registry settings.
At this point, all user data and user configuration data previously managed by Persona Management should be migrated to the FSLogix Profile Container, and FSLogix is managing the Windows Profile exclusively.
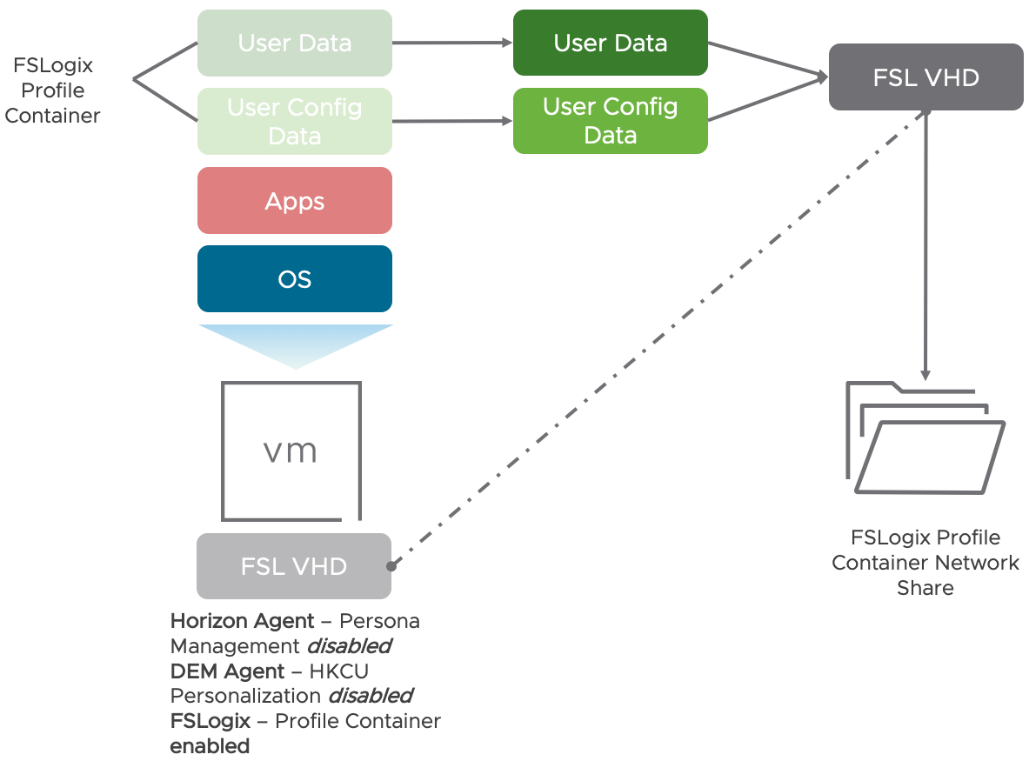
Figure 13: User Profile Managed by FSLogix Profile Container
Because this migration method leaves the Persona Management repository intact, the end user or an IT admin with the necessary permissions can browse the Persona Management repository and manually copy any folders or content that might have been missed by Persona Management or the custom script.
Migration Scenario - Persona Management to App Volumes User-Writable Volume
This scenario is for companies currently using Persona Management who wish to migrate to VMware App Volumes™ user-writable volumes.
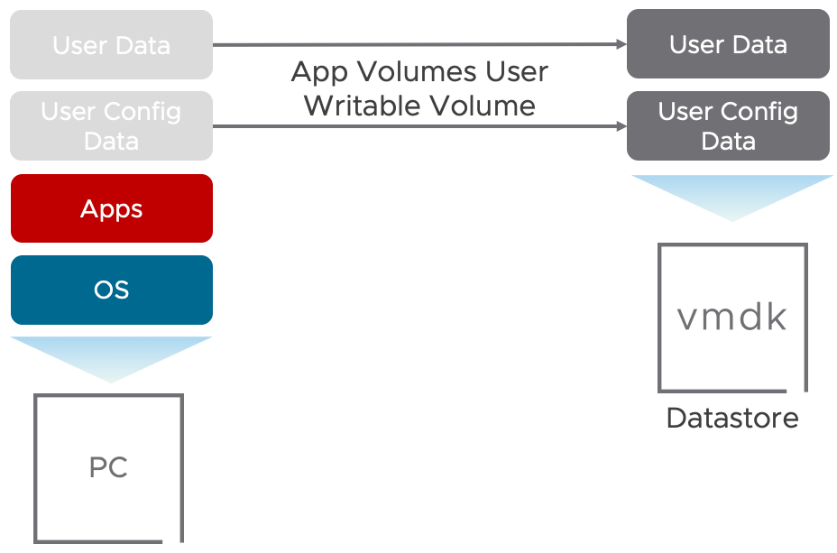
Figure 14: Manage User Profiles with App Volumes User-Writable Volumes
The following assumptions are made and referenced throughout this scenario.
- Persona Management is configured to contain the entire Windows profile (user data + configuration data).
- Persona Management is configured to store user profiles on a network share:
\\server\persona\username.v6 - A Horizon linked-clone desktop pool provides nonpersistent desktops to end users. For our example, this pool is named DesktopPool_1.
- Persona Management GPO applies policies to the desktops in DesktopPool_1.
Considerations
Perhaps the biggest draw to technologies like Persona Management and App Volumes user-writable volumes is the efficiency to get them implemented. Simple configurations will enable you to persist the entire user profile (user data and user configuration data), negating the need for additional technologies.
Your Persona Management implementation may permit users to save content to nonstandard Windows profile folders. For example, if a user created C:\users\username\MyStuff and filled the directory with content, Persona Management would synchronize the MyStuff directory to the network repository. Because the entire profile is being redirected to the App Volumes user-writable volume, nonstandard Windows profile folders are easily accommodated in the manual migration instructions in this guide.
In contrast, the in-place migration instructions rely on a Persona Management GPO option called Files and folders to preload to sync user data from the Profile Archive repository to the App Volumes writable volume. User data stored in nonstandard profile directories may get missed during the in-place migration. This scenario makes use of an optional script to copy any folders and files stored in the Persona Management repository, outside the standard Windows profile folders, and place the copy in Documents\ExtrasFromPersona. If you choose not to use this script, be sure your migration plan accounts for any nonstandard Windows profile directories that may exist in your environment.
The drawback to storing user data with configuration data is that the two become somewhat dependent on one another. This situation increases administrative overhead after the initial implementation, so that day-two operations are affected. If user data is stored in the writable volume, you will likely need to devise a strategy and practice to back up and restore the VMDK files. There are tools available such as the App Volumes Backup Utility Fling to help with this process.
Note: App Volumes is supported only with nonpersistent desktop use cases where VMs are deleted after each use.
You may consider a slight variation on this model, where folder redirection is used to redirect standard Windows profile folders to a network share, while the remaining profile components are persisted in the user-writable volume.

Figure 15: Manage User Profiles with App Volumes User-Writable Volumes and Folder Redirection
Manual Migration
As the IT admin, you create writable volumes, manually migrate Windows profile data from Persona management to each user’s writable volume, and restore access to the pool.
Pro Tip: Although this method allows you to reuse an existing linked-clone pool, consider creating a new instant-clone pool as part of this migration process.
Note: This manual migration option will require a significant amount of administrative effort for large pools. Desktop pools may be unavailable to end users for extended periods of time.
- Install and configure VMware App Volumes.
- The Quick-Start Tutorial for VMware App Volumes will help you quickly deploy a non-production implementation.
- For production implementations, see the VMware App Volumes Installation Guide and the App Volumes Architecture chapter of the VMware Workspace ONE and VMware Horizon Reference Architecture.
- Install the App Volumes Agent on the DesktopPool_1 golden image and, using the Horizon Console, recompose the pool.
- In the App Volumes administrative console, create a writable volume for a user you would like to migrate.
Example for user1:
\\AppVolumesDatastore\writables\user1.vmdk - Have User1 log on to DesktopPool_1.
During the logon process, a local profile will be created on the writable volume. - Have User1 log out of DesktopPool_1 so that the writable volume is detached.
- Prevent User1 from accessing DesktopPool_1 while you migrate the profile.
- Edit the writable volume attributes to allow the volume to be mountable from an admin PC.
- Use Putty to SSH to the vSphere host.
- Run the following command:
cd vmfs/volumes/…/writables - Run the following command:
vi user1.vmdk - Press the I key to change to input mode.
- Change the
ddb.deletable = “false”line toddb.deletable = “true” - Press ESC.
- Type
:wq(write changes and quit). - Press Enter.
- Close the SSH session.
- Ensure that the files are not open or in use on the file share; in this example,
\\server\persona\user1.v6 - From an administrative PC, mount the writable volume, as follows: Use vSphere Web Client to edit the VM settings, under New Hard disk, select Existing Hard Disk, and specify the writable volume.
- Once the disk is attached to the administrative PC, run
diskmgmt.mscand assign a drive letter to the CVWritable disk. - Copy the contents of
\\server\persona\user1.v6to the mounted VMDK. - Use
diskmgmt.mscto remove the drive letter. - Use vSphere Web Client to edit the VM settings and unmount the VMDK.
- Edit the writable volume attributes to allow the volume to be mountable from an admin PC.
- Use Putty to SSH to vSphere host.
- Run the following command:
cd vmfs/volumes/…/writables - Run the following command:
vi user1.vmdk - Press the I key to change to input mode.
- Change the
ddb.deletable = “true”line toddb.deletable = “false” - Press ESC.
- Type
:wq(write changes and quit). - Press Enter.
- Close the SSH session.
- Repeat steps 3–14 for each user you wish to migrate.
- Disable the Persona Management GPO on DesktopPool_1


In-Place Migration
You will use DEM to capture and migrate HKCU settings from users’ profiles, and then automatically copy these settings to the guest operating system in the VM. Persona Management is configured to sync known, standard Windows user profile data folders to the VM. DEM is then used to copy any nonstandard profile directories and files to the VM. Once the HKCU settings and user data have been written to the VM, and redirected to the App Volumes user-writable volume, DEM and Persona Management may be disabled.
Although DEM is being used as a one-time migration tool in this scenario, it is important to note that DEM integrates with and adds considerable value to App Volumes. Consider keeping DEM to complement your App Volumes writable volumes implementation.
Note: Using DEM to capture the entire HKCU registry hive is not a recommended operational practice. This technique is used only to assist you in your migration efforts. Disable this custom config file after the migration is complete.
This process requires relatively little administrative overhead and almost zero downtime for end users. However, the order of operations described is critical to success. Logon times may be affected by syncing the user data all at once, especially for those profiles containing a large amount of content.
The process involves the following major tasks:
- Stage New Infrastructure Components
- Prepare DesktopPool_1 for Migration Phase One
- Begin Migration Phase One
- Prepare DesktopPool_1 for Migration Phase Two
- Begin Migration Phase Two
- Complete Migration
Stage New Infrastructure Components
- Install and configure VMware App Volumes.
- The Quick-Start Tutorial for VMware App Volumes will help you quickly deploy a non-production implementation.
- For production implementations, see the VMware App Volumes Installation Guide and the App Volumes Architecture chapter of the VMware Workspace ONE and VMware Horizon Reference Architecture.
- Install the Dynamic Environment Manager management console on an administrative PC.
- The Quick Start Tutorial for Dynamic Environment Manager will help you quickly deploy a non-production implementation. For a video demonstration of the procedure, see the VMware Knowledge Base article Deploy and Configure Dynamic Environment Manager (82492).
- For production implementations see Installing and Configuring Dynamic Environment Manager and the Dynamic Environment Manager Architecture chapter of the VMware Workspace ONE and VMware Horizon Reference Architecture.
- If using a DEM GPO to enable the DEM agent, apply the GPO to the OU where the DesktopPool_1 VMs reside.
Note: The GPO will have no effect until the DEM agent has been deployed in a later step. - From the DEM management console, create a custom config file that includes the entire
HCKU\registry tree.

Prepare DesktopPool_1 for Migration Phase One
- Install the App Volumes agent on the DesktopPool_1 golden image.
- Install the DEM agent on the DesktopPool_1 golden image.
See the VMware Knowledge Base article Agent installation order for Horizon View, Dynamic Environment Manager, and App Volumes (2118048) for guidance. - In the Horizon Console, recompose DesktopPool_1.
Begin Migration Phase One
End users should log on and log off of a VM in DesktopPool_1 at least one time.
Upon logoff of the Windows session, the HKCU registry settings will be read from the local profile (effectively from the Persona Management repository) and copied to the DEM profile archive share for the user. You can verify that DEM is capturing data by navigating to \\<ProfileArchiveSharePath>\<username>\Archives and checking for the existence of migration.zip.

Figure 16: Sample migration.zip File
Important: Have all users complete at least one logon/logoff cycle before proceeding so that DEM captures these settings.
Prepare DesktopPool_1 for Migration Phase Two
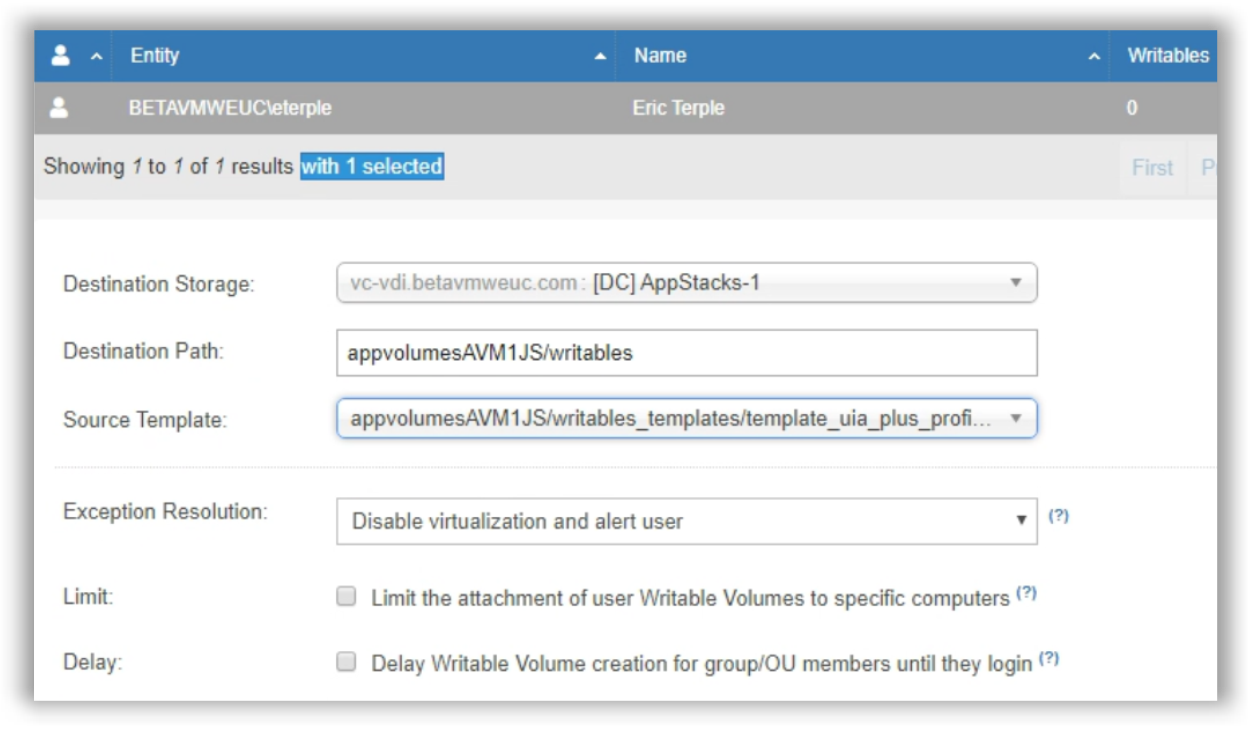
- In the App Volumes administrative console, create writable volumes for a group of users you would like to migrate.
You can batch create writable volumes by selecting an Active Directory group rather than an individual user during the writable volume creation process.
- Modify the Persona Management GPO as follows:
- In the Group Policy Management Editor, navigate to Persona Management > Roaming & Synchronization > Files and Folders to preload.
- Enable the policy and input all profile folders you wish to migrate.
Important: Be sure to specify all folders and files in the users’ profiles that you want to sync. The Files and folders to preload policy setting does not accept wildcards. You must specify any and all folders you want to have migrated from Persona Management to the Profile Containers.
If an end user created a custom folder or other content at the root of their Windows profile directory, this process will not migrate the data. For example, if a user created
C:\users\username\MyStuffand filled the directory with content, this content will not be migrated becauseMyStuffis not specified in the Files and Folders to preload policy setting. Custom folders and content are addressed in a later step.This policy setting will force user data from the profile folders in the Persona Management repository to sync to the guest operating system in the VM when a user logs on to Windows. The data will be simultaneously written to the user-writable volume.
- In the Group Policy Management Editor, navigate to Persona Management > Roaming & Synchronization > Files and Folders to preload.
- In the Horizon Console, reboot or refresh the VMs in DesktopPool_1 so the updated policy settings are applied.

Begin Migration Phase Two
As end users log on to DesktopPool_1, Persona Management will force-sync all user data (profile folders) from the network repository to the local machine. DEM copies the HKCU hive (previously captured from the Persona Management repository) and writes it to the VM. Because the App Volumes writable volume is attached, the user data from Persona Management and the HKCU hive from DEM will concurrently be written to the writable volume.
The fact that Persona Management, DEM, and App Volumes writable volumes are in use concurrently is invisible to the end users. Changes to their Windows profiles will be written to the Persona Management network share as well as to the writable volume during this transition period.
Important: Make sure all users have completed at least one logon/logoff cycle on DesktopPool_1 before proceeding.
Complete Migration
- If you plan to migrate nonstandard profile data from the Persona Management repository, follow the procedure described in Copy Nonstandard Profile Directories to the User Profile.
- Disable the Persona Management GPO on DesktopPool_1.
- Once all users have been migrated, perform the following tasks:
- From the DEM management console, disable the custom config file that the migration process used to persist the HKCU registry settings.
- From the DEM management console, disable the (optional) logon task Copy Extra Profile Data.
- From the DEM management console, disable the custom config file that the migration process used to persist the HKCU registry settings.

At this point all user data and user configuration data previously managed by Persona Management should be migrated to App Volumes writable volumes, and App Volumes is managing the Windows Profile exclusively.
Migration Scenario - Persistent Disks to DEM + Folder Redirection + FSLogix Office Container
This scenario is for companies currently using View Composer persistent disks who wish to migrate to Dynamic Environment Manager with folder redirection. FSLogix Office Containers may be included for those that need to persist large caches of data between nonpersistent desktop sessions.
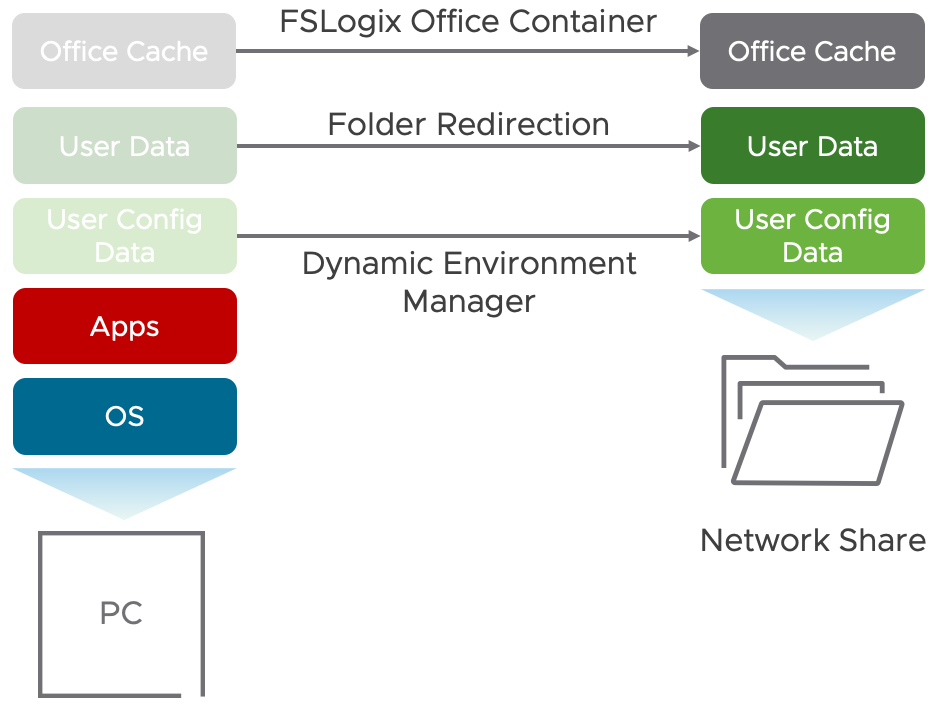
Figure 17: Managing User Profiles with DEM, Folder Redirection, and FSLogix Office Container
See Configure Office Container to redirect Microsoft Office user data to learn more about the types of data that can be cached in these Containers.
See Best Practices for Delivering Microsoft Office 365 in VMware Horizon 7 for guidance on successfully implementing Office 365 with Horizon.
The following assumptions are made and referenced throughout this scenario.
- A Horizon dedicated-assignment linked-clone desktop pool provides nonpersistent desktops to end users. For our example, this pool is named PersistentDisk_Pool.
- By default, the entire Windows profile (user data + configuration data) is redirected to the persistent disk, configured as
D:\.
Considerations
DEM plus folder redirection plus FSLogix Office Container is an excellent choice if you are managing nonpersistent VM pools and need to support cache data for Office and Windows. In this model:
- DEM provides granular control over personalization of Windows and application settings.
- Folder redirection redirects critical user data to the network.
- FSLogix Office Container provides a repository for cache files.
Because DEM user configuration data and folder redirection user data are stored on traditional SMB shares, time-tested technologies to store, back up, and restore this data can be used.
FSLogix Office Containers persist cache data and are typically considered disposable. Treating these containers as disposable may simplify your FSLogix design and reduce administrative overhead because you do not have to design workflows to take backups of VHD(X) files that will often be locked by end users.
Your persistent disks implementation may permit users to save content to nonstandard Windows profile folders. For example, if a user created D:\users\username\MyStuff and filled the directory with content, the MyStuff directory would be persisted in the persistent disk.
Folder redirection abstracts user data stored in standard Windows profile directories such a Documents, Downloads, and Pictures and stores the data on a network share. Nonstandard profile directories, in contrast, are not easily supported. Be sure your migration plan accounts for any nonstandard Windows profile directories that may exist in your environment when choosing this migration scenario.
Automated Migration
You will download existing DEM configuration templates or create custom templates to provide personalization for the applications in your environment. Folder redirection is configured to redirect user data to a network share. DEM and folder redirection are then run side by side with persistent disks, enabling the migration of user data and user configuration data to occur during normal operation, without interruption to end users. FSLogix Office Containers are automatically created and used for caching Office data.
This process requires some administrative overhead at the outset of the project to create configuration templates for the applications requiring personalization. The result of this work is a migration solution with almost zero downtime for end users, excellent end-user experience when roaming between Windows devices, and powerful, flexible administrative tools that extend well beyond personalization.
Although not required, this automated migration process relies on the creation of a second desktop pool: New_Pool. Be sure you have sufficient resources to create a second desktop pool for the duration of the migration. After the migration is complete, the original PersistentDisk_Pool pool can be deleted.
Pro Tip: This scenario relies on the creation of a second desktop pool. Although you can use another linked-clone pool, consider creating a new instant-clone pool as part of this migration process. See Migrate from Using Linked Clones to Using Instant Clones for more information.
Note: This process is very similar to that described in the VMware Knowledge Base article How to migrate VMware Persona Management to VMware User Environment Manager (2118056), but is adapted to persistent disks and includes the addition of FSLogix Office Containers.
Although both technologies may be configured using alternatives, both the DEM agent and FSLogix agent were configured using GPOs in our testing.
Automated migration includes the following tasks:
- Stage New Infrastructure Components
- Stage New Pool New_Pool
- Prepare PersistentDisk_Pool for Migration
- Begin Migration of User Data and Configuration Data
- Complete Migration
Stage New Infrastructure Components
- Configure a share for folder redirection.
- Example:
\\server\share\FolderRedirection - See Deploy Folder Redirection with Offline Files for recommendations on share creation and permission configuration.
- When creating the folder redirection GPO, be sure to select Move the contents of Documents to the new location to ensure the content is migrated from the persistent disks to the folder redirection share.
- Example:
- Install the Dynamic Environment Manager management console on an administrative PC.

- The Quick Start Tutorial for Dynamic Environment Manager will help you quickly deploy a non-production implementation. For a video demonstration of the procedure, see the VMware Knowledge Base article Deploy and Configure Dynamic Environment Manager (82492).
- For production implementations, see Installing and Configuring Dynamic Environment Manager and the Dynamic Environment Manager Architecture chapter of the VMware Workspace ONE and VMware Horizon Reference Architecture.
- Configure Dynamic Environment Manager to manage Windows and application settings for your environment.
- Dynamic Environment Manager includes a number of Windows and application config file templates. Additional templates may be downloaded from the VMware Marketplace. See Deploying Templates from the Marketplace feature walkthrough video for more information.
- The Dynamic Environment Manager Application Profiler Guide can help you profile your remaining applications.
- If you get stuck, the Profiling Applications operational tutorial will help with some advanced profiling techniques.
- Configure a network share for FSLogix Office Containers.
Example:
\\server\share\fslogix\OfficeContainersSee Microsoft documentation for guidance.
Stage the New Pool New_Pool
- Install the FSLogix agent on the New_Pool golden image, and enable the FSLogix agent by applying a GPO to the OU where the New_Pool VMs will reside.
- Install the DEM agent on the New_Pool golden image, and, to configure and enable the DEM agent, apply a DEM GPO to the OU where the New_Pool VMs will reside.
- Enable folder redirection by applying a GPO to the OU where the New_Pool VMs will reside.
- In the Horizon Console, provision the new desktop pool New_Pool, but do not entitle end users to the new desktop pool yet.
Prepare PersistentDisk_Pool for Migration
- Install the DEM agent on the PersistentDisk_Pool golden image.
- To configure and enable the DEM agent, apply a DEM GPO to the OU where the PersistentDisk_Pool VMs will reside.
- Create and Configure the FlexEngine Group Policy Object describes the minimum required and recommended policy settings.
- In addition, configure the advanced DEM setting Disable DirectFlex, as described in the VMware Knowledge Base article VMware DEM/UEM FlexEngine Advanced Settings (ADMX template) (2145286).
- Enable folder redirection by applying a GPO to the OU where the PersistentDisk_Pool VMs reside.
Note: DEM has the ability to configure folder redirection settings. However, in this scenario the goal is to migrate existing user data to the folder redirection share. See VMware Knowledge Base article Migrating existing Local Profile folders content with Folder Redirection and Dynamic Environment Manager (51879) for more information about why Microsoft GPO-configured folder redirection is necessary.
- Install the FSLogix agent on the PersistentDisk_Pool golden image.
- Enable the FSLogix agent by applying a GPO to the OU where the PersistentDisk_Pool VMs reside.
- In the Horizon Console, recompose PersistentDisk_Pool.
Begin Migration of User Data and Configuration Data
As end users log on and log off the desktops in PersistentDisk_Pool, the migration occurs automatically.
Dynamic Environment Manager captures the specified Windows and application settings and exports them at logoff to the profile archive share you created.
Figure 18: Sample Windows and Application Profile Archives
Windows folder redirection automatically creates the directory structure for the folders you specified in the folder redirection GPO. If you selected Move the contents of Documents to the new location, the content of these folders is automatically copied from the persistent disk to the folder redirection share.
Figure 19: Sample Folder Redirection Share
FSLogix automatically creates the Office Container VHD(X) to store Office cache data.
Figure 20: Sample FSLogix Office Container
Important: Have all users complete at least one logon/logoff cycle before proceeding to ensure that data has been migrated and DEM has captured Windows and application settings.
Complete Migration
- In the Horizon Console, disable PersistentDisk_Pool to prevent users from logging in.
Disabling the pool keeps the VMs and persistent disks intact in case there is a need to access them at a later time. - Entitle users to New_Pool.
At this point, all user data previously managed by persistent disks should be migrated to the folder redirection share. The user configuration data for applications and Windows settings that you specified are stored on the DEM profile archive share. The FSLogix Office Container persists the Office cache data you specified in the GPO.
Migration Scenario - Persistent Disks to FSLogix Profile Container
This scenario is for companies who are currently using View Composer persistent disks but wish to migrate to FSLogix Profile Containers.

Figure 21: Managing User Profiles with FSLogix Profile Container
See Integrating FSLogix Profile Containers with the VMware Horizon Just-in-Time Management Platform (JMP) to learn more about integration options.
The following assumptions are made and referenced throughout this scenario.
- An existing Horizon dedicated-assignment linked-clone desktop pool provides nonpersistent desktops to end users. For this example, the name of the desktop pool is PersistentDisk_Pool.
- By default, the entire Windows profile (user data + configuration data) is redirected to the persistent disk, configured as
D:\. - You have the ability to create a second desktop pool: ProfileContainer_Pool.
Pro Tip: This scenario relies on the creation of a second desktop pool. Although you can use another linked-clone pool, consider creating a new instant-clone pool as part of this migration process.
Considerations
Perhaps the biggest draw to technologies like persistent disks and FSLogix Profile Containers is the efficiency to get them implemented. Simple configurations will enable you to persist the entire user profile (user data and user configuration data), negating the need for additional technologies.
The drawback to storing user data with configuration data is that the two become somewhat dependent on one another. This situation increases administrative overhead after the initial implementation, so that day-two operations are affected. If user data is stored in the Profile Container, you will likely need to devise a strategy and practice to back up and restore the VHD(X) Containers.
Your implementation of persistent disks may permit users to save content to nonstandard Windows profile folders. For example, if a user created D:\users\username\MyStuff (where D:\ represents the drive letter that the PersistentDisk_Pool pool uses for the persistent disk) and filled the directory with content, the MyStuff directory would reside on the user’s persistent disk. Likewise, some end users may store content at the root level of the persistent disk (D:\), essentially treating it as a personal storage location. The automated migration process described in the following section will help you migrate data from all these potential locations.
Automated Migration
With automated migration, the process works like this:
- You will use a custom PowerShell script,
Copy-Persistent-Disk.ps1, to copy user data from the persistent disk to a remote network share. This same script will be used in a later step to copy the data from the network share to the end user’s newly created FSLogix Profile Container. - You will use DEM to capture and migrate HKCU settings from users’ profiles and store them on a remote network share. This method allows you to capture the majority of settings that constitute the
NTUSER.DATfile without trying to copyNTUSER.DATwhile it is in use. Copy-Persistent-Disk.ps1will copy standard Windows user profile data folders to the guest operating system in the VMs in ProfileContainer_Pool. The script will also copy data stored in other locations on the persistent disk (examples:D:\PersonalData,D:\users\username\myStuff) to a custom folder in the user’sDocumentsfolder.- Once the HKCU settings and user data have been written to the VMs and redirected to the FSLogix Profile Container, you may disable DEM on ProfileContainer_Pool.
Although DEM is being used as a one-time migration tool in this scenario, it is important to note DEM integrates with and adds considerable value to FSLogix. Consider keeping DEM to complement your FSLogix Profile Container implementation after the migration is complete.
Note: Using DEM to capture the entire HKCU registry hive is not a recommended operational practice. This technique is used only to assist you in your migration efforts. Disable the custom config file after the migration is complete.
The order of operations described in the following sections is critical to success. Logon times may be affected by syncing the user data all at once, especially for those profiles containing a large amount of content.
A new desktop pool is created for this migration because a linked-clone pool that was created to include persistent disks cannot be modified to exclude persistent disks. An instant-clone desktop pool is used in this scenario. Alternatively, you can use a second linked-clone desktop pool.
By default, persistent disks are configured to store user data and configuration data on a locally attached VMDK. The NTUSER.DAT file is modified to redirect the OS to look for the profile on the D:\, or whatever drive letter you specify in the Horizon desktop pool. A second script, DEM_Update_MigZIP.vbs, is used to automatically edit the migration.zip files to reflect the proper drive letter reference.
Important: Perform the following prerequisite tasks before beginning this migration scenario:
- Download Copy-Persistent-Disk.ps1.
- Download DEM_Update_MigZIP.vbs.

Figure 22: Managing a User Profile with a Persistent Disk
Stage a New Pool for FSLogix Profile Containers
- Configure a network share for FSLogix Profile Containers.
Example:
\\server\fslogix\containersSee Microsoft documentation for guidance.
- Install the FSLogix agent on the ProfileContainer_Pool golden image.
- Enable the FSLogix agent by applying a GPO to the OU where the ProfileContainer_Pool VMs will reside.
- Install and configure VMware Dynamic Environment Manager.
- The Quick Start Tutorial for Dynamic Environment Manager will help you quickly deploy a non-production implementation. For a video demonstration of the procedure, see the VMware Knowledge Base article Deploy and Configure Dynamic Environment Manager (82492).
- For production implementations, see Installing and Configuring Dynamic Environment Manager and the Dynamic Environment Manager Architecture chapter of the VMware Workspace ONE and VMware Horizon Reference Architecture.
- To configure and enable the DEM agent, apply the DEM GPO to the OU where the ProfileContainer_Pool VMs will reside.
- In the Horizon Console, provision the new desktop pool ProfileContainer_Pool, but do not entitle end users to the new desktop pool yet.
Prepare PersistentDisk_Pool for Migration
- To configure and enable the DEM agent, apply the DEM GPO to the OU where the PersistentDisk_Pool VMs reside.
Note: The GPO will have no effect until the DEM agent has been deployed in a later step. - From the DEM management console, create a custom config file that includes the entire
HKCU\registry tree. - Create a logon task to run the
Copy-Persistent-Disk.ps1script. - Create a logoff task to run
Copy-Persistent-Disk.ps1. - Install the DEM agent on the PersistentDisk_Pool golden image.
- In the Horizon Console, recompose PersistentDisk_Pool.
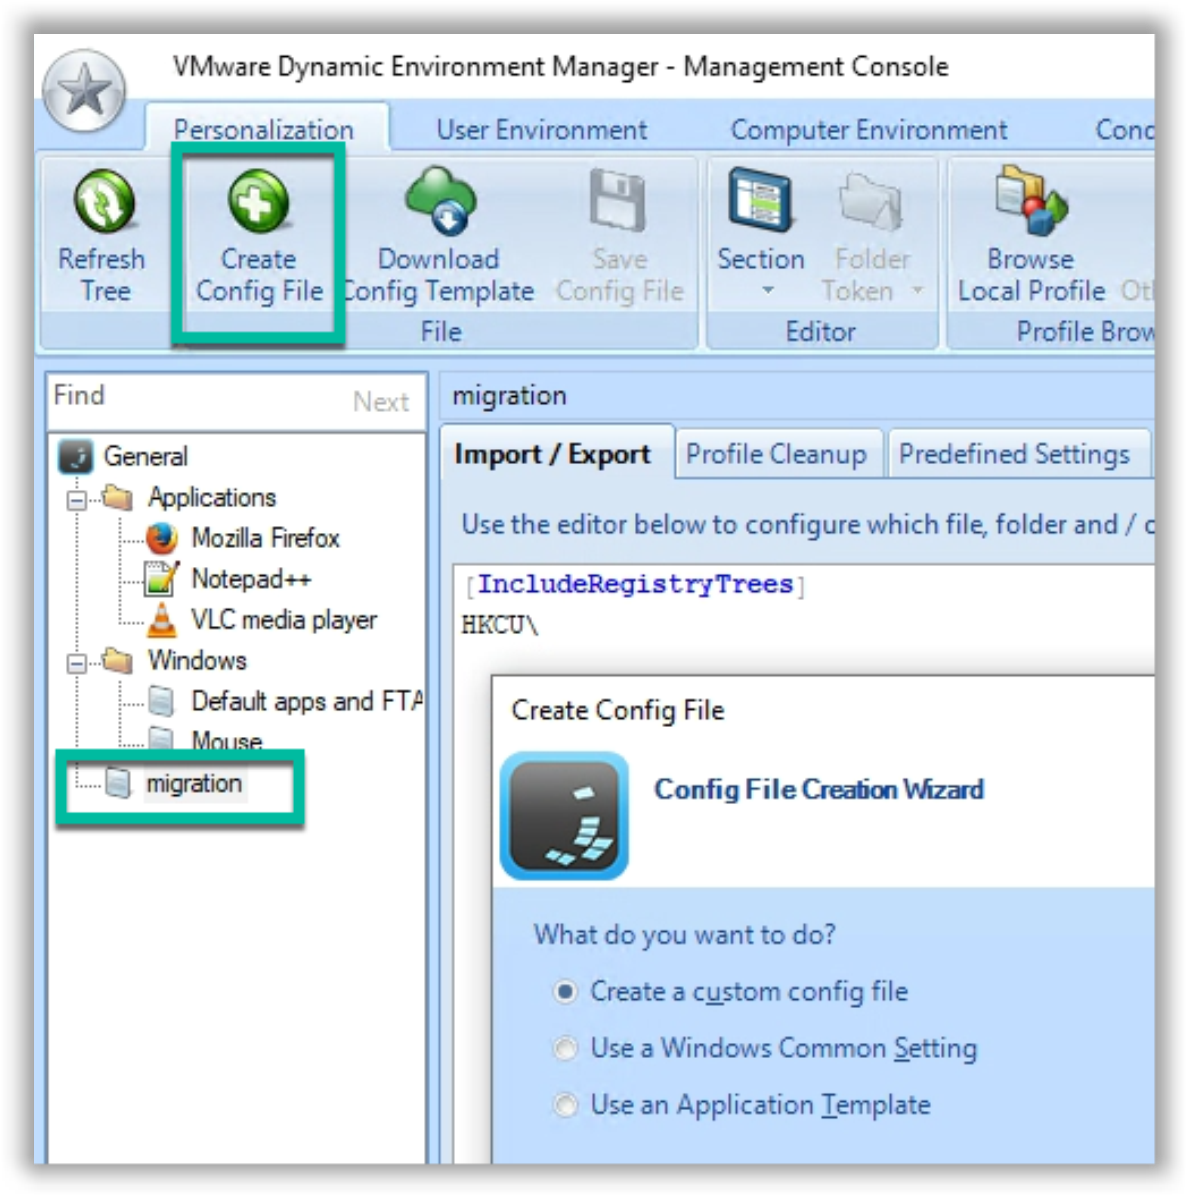
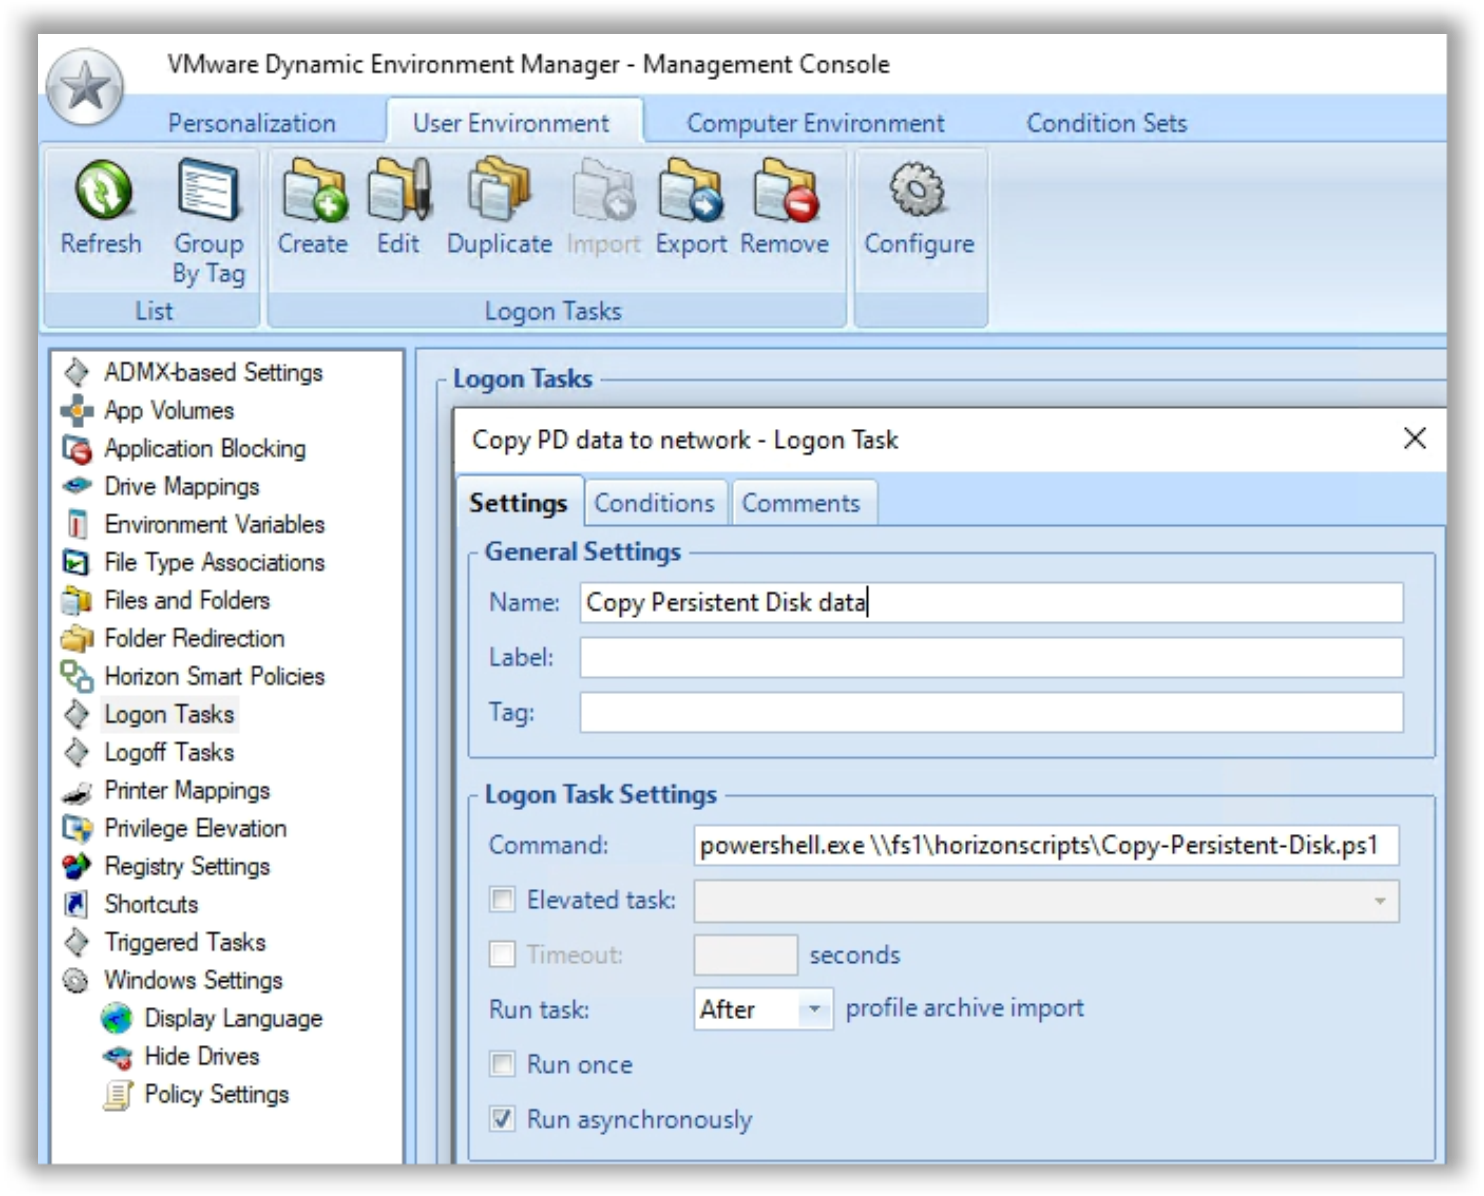
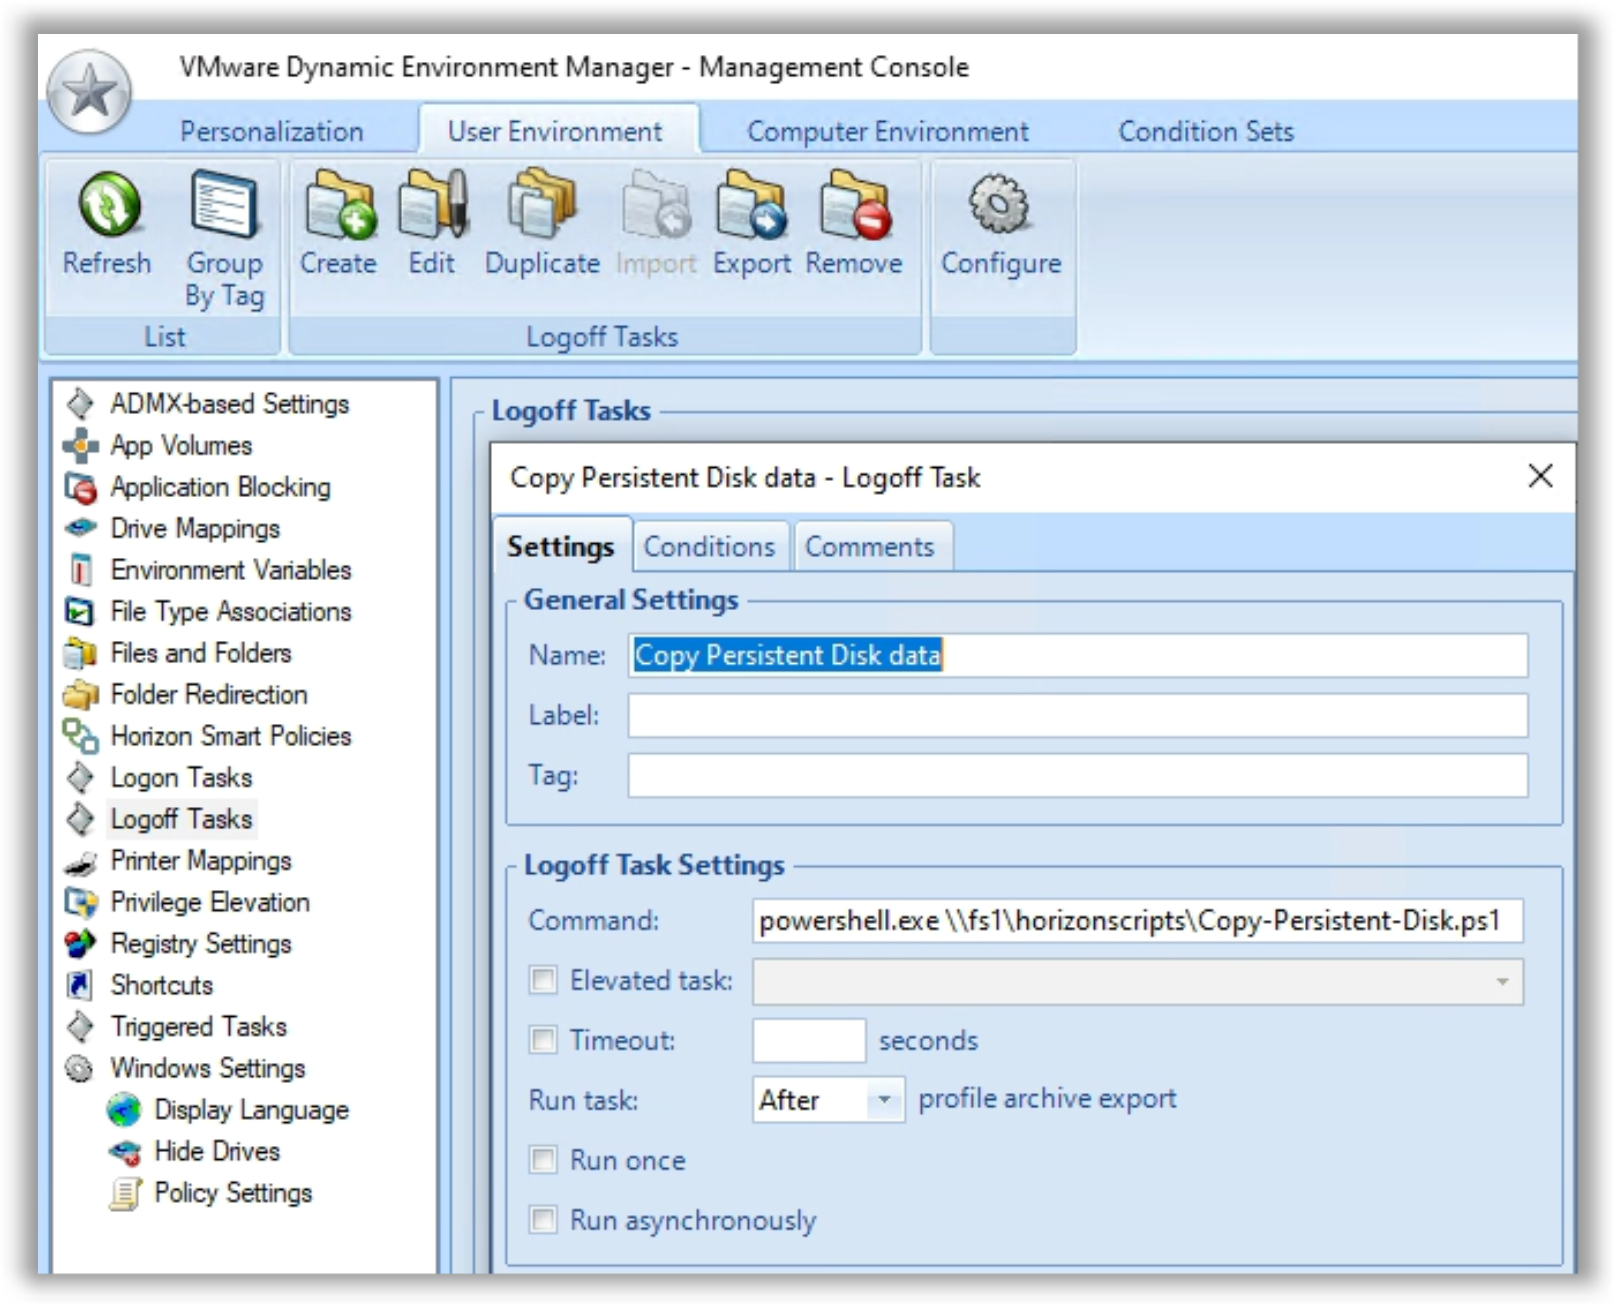
Begin Migration of User Data and Configuration Data
Although logon and logoff times may be affected, there should be no notable effects for end users during this phase.
Dynamic Environment Manager personalization is configured to export configuration data (HKCU hive) to a remote network share at logoff and import the configuration data to the guest operating system in the VM at logon. DEM logon and logoff tasks invoke Copy-Persistent-Disk.ps1 to copy user data and configuration data from the persistent disk to a remote network share.
End users should log on and log off of a VM in PersistentDisk_Pool at least one time. During this logon/logoff cycle, the following actions occur:
- During the initial logon,
Copy-Persistent-Disk.ps1copies all user data from the persistent disk to a remote network share, specified in the script. - On logoff,
Copy-Persistent-Disk.ps1is invoked a second time. Hashes of data on the persistent disk and data that has already been copied to the network are compared, and any changed or new files are copied from the persistent disk to the network share. - On logoff of the Windows session, the HKCU registry settings are read from the local profile (effectively, from the persistent disk) and copied to the DEM profile archive share for the user.
You can verify DEM is capturing data by navigating to
\\<ProfileArchiveSharePath>\<username>\Archivesand checking for the existence ofmigration.zip.
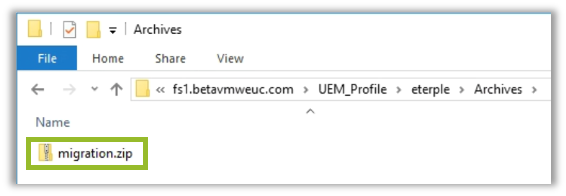
Important: Have all users complete at least one logon/logoff cycle before proceeding so that DEM captures settings and data.
Update migration.zip Profile Archives
At this point in the process, each user of PersistentDisk_Pool should have completed a logon/logoff cycle. DEM should now have a migration.zip file containing the contents of HKCU (essentially, the NTUSER.DAT file) stored on \\<server>\<ProfileArchiveShare>\<username>\Archives.
The migration.zip file contains registry entries that reference D:\users\<username>… where D:\ represents the drive letter configured for persistent disks in PersistentDisk_Pool. FSLogix Profile Containers use a filter driver to direct the user profile to the VHD(X), so all references to the user profiles should use C:\users\<username>…
A script is available to help you automate the process of updating the registry entries in migration.zip. This script will iterate through the DEM profile archive share, looking for the existence of migration.zip. When found, the ZIP file is unzipped to a local working directory that contains a Flex Profiles.reg file. All references to the persistent disk drive letter in the REG file are updated, and the updated REG file is zipped and compressed.
Note: ZIP files used by DEM use proprietary compression. The script relies on a COM object that will properly unzip or zip the migration.zip file. If you choose to complete this process manually, it is important that you use the DEM Helpdesk Support Tool to edit the ZIP files. Never edit the ZIP files using Windows Explorer or third-party tools.
Schedule an outage window to complete the following steps:
- In the Horizon Console, disable the PersistentDisk_Pool pool and ensure that no users are connected to the VMs.
- From an administrative PC, run the
DEM_Update_MigZIP.vbsscript. - In the Horizon Console, entitle end users to the new ProfileContainer_Pool pool.
Complete In-Place Migration
As end users log on to ProfileContainer_Pool, FSLogix will automatically create a Profile Container VHD(X) at \\server\fslogix\containers.
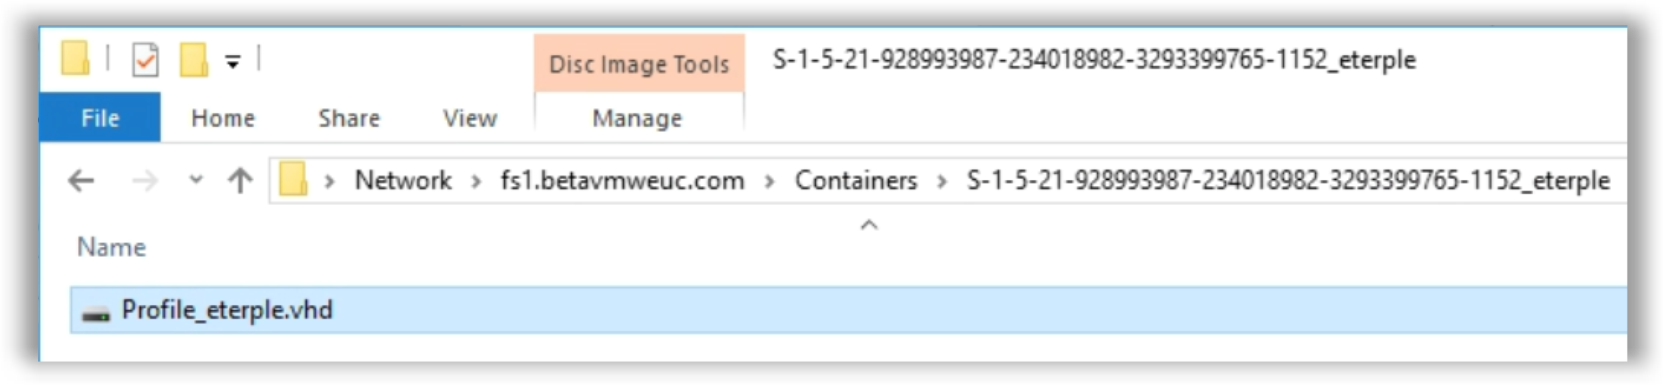
Figure 23: Sample FSLogix Profile Container
- Have all end users log on to ProfileContainer_Pool at least once. When users log on, the following actions occur:
- The container is immediately mounted to the guest OS in the VM, and a local profile is established.
Copy-Persistent-Disk.ps1is invoked by DEM as a logon task and begins copying user data from the network share to the local profile.- DEM copies the HKCU registry settings (previously captured from the persistent disk) from the profile archive share (
migration.zip) and writes them to the VM. - Because the FSLogix Profile Container is already created and attached, the user data from
Copy-Persistent-Disk.ps1and the HKCU settings from DEM are concurrently written to the Profile Container.The fact that DEM and FSLogix are in use concurrently is invisible to the end users.
- After you verify that all users have completed at least one logon/logoff cycle, from the DEM management console, disable the custom config file that includes the entire
HKCU\registry tree (migration.zip).
At this point, all user data and user configuration data previously managed by persist disks should be migrated to the FSLogix Profile Containers, and FSLogix is now managing the Windows Profiles exclusively.
Migration Scenario - Persistent Disks + Persona Management to DEM + Folder Redirection + FSLogix Office Container
Persona Management and View Composer persistent disks provide similar functionality by abstracting the user profile from a nonpersistent VM. In some cases, these two technologies may be combined to get the speed of the local disk with the redundancy of user data on the network.
This scenario is for companies currently using Persona Management, coupled with View Composer persistent disks, who wish to migrate to Dynamic Environment Manager with folder redirection. FSLogix Office Containers may be included for those that need to persist large caches of data between nonpersistent desktop sessions.
Figure 24: Managing User Profiles with DEM, Folder Redirection, and FSLogix Office Container
Dynamic Environment Manager takes a selective approach to managing the user profile. Given this design approach, you must specify which applications and settings will be managed. Although it does mean a little more work up front, this solution prevents excessive profile growth and profile corruption, enables user settings to roam across Windows versions, and provides IT with granular control to manage as much or as little of the user experience as needed.
See Configure Office Container to redirect Microsoft Office user data to learn more about the types of data that can be cached in these containers.
See Best Practices for Delivering Microsoft Office 365 in VMware Horizon for guidance on successfully implementing Office 365 with Horizon.
The following assumptions are made and referenced throughout this scenario:
- A Horizon dedicated-assignment linked-clone desktop pool provides nonpersistent desktops to end users. For our example, this pool is named PersistentDisk_Pool.
- By default, the entire Windows profile (user data + configuration data) is redirected to the persistent disk, configured as
D:\. - Persona Management is configured to contain the entire Windows profile (user data + configuration data).
- Persona Management is configured to store user profiles on a network share:
\\server\persona\username.v6 - Persona Management GPO applies policies to the desktops in PersistentDisk_Pool.
Considerations
DEM plus folder redirection plus FSLogix Office Container is an excellent choice if you are managing nonpersistent VM pools and need to support cache data for Office and Windows. In this model:
- DEM provides granular control over personalization of Windows and application settings.
- Folder redirection redirects critical user data to the network.
- FSLogix Office Container provides a repository for cache files.
Because DEM user configuration data and folder redirection user data are stored on traditional SMB shares, time-tested technologies to store, back up, and restore this data can be used.
FSLogix Office Containers persist cache data and are typically considered disposable. Treating these containers as disposable may simplify your FSLogix design and reduce administrative overhead because you do not have to design workflows to take backups of VHD(X) files that will often be locked by end users.
Your persistent disks plus Persona Management implementation may permit users to save content to nonstandard Windows profile folders. For example, if a user created D:\users\username\MyStuff and filled the directory with content, the MyStuff directory would be persisted in the persistent disk and on the Persona Management network share.
Folder redirection abstracts user data stored in standard Windows profile directories such as Documents, Pictures, and Videos, and stores the data on a network share. Nonstandard profile directories, in contrast, are not easily supported with folder redirection. This scenario makes use of an optional script to copy any folders and files stored in the Persona Management repository, outside the standard Windows profile folders, and places the copy in Documents\ExtrasFromPersona. If you choose not to use this script, make sure your migration plan accounts for any nonstandard Windows profile directories that might exist in your environment.
Important: If Outlook OST files are configured to reside on the persistent disk in the default path, it is necessary to create a new default Outlook profile to update the path and recreate the OST file. For example, if persistent disks are configured to use the D:\ drive, the Outlook OST path would default to D:\Users\<username>\AppData\Local\Microsoft\Outlook\user@domain.com.ost. In this migration scenario, the user profile will be migrated to the C:\ drive, and the D:\... path will no longer exist. See You cannot change the location of the offline Outlook Data File (.ost) in Microsoft Outlook for more information about the inability to change the OST path without recreating the Outlook profile. While there may be alternative methods to address this challenge, Dynamic Environment Manager is used to create registry keys which automate the creation of a new Outlook profile and allow the OST to be rebuilt in the proper location.
Automated Migration
You will download existing DEM configuration templates or create custom templates to provide personalization for the applications in your environment. Folder redirection is configured to redirect user data to a network share. DEM and folder redirection are then run side by side with persistent disks and Persona Management, enabling the migration of user data and user configuration data to occur during normal operation, without interruption to end users. FSLogix Office Containers are automatically created and used for caching Office data.
This process requires some administrative overhead at the outset of the project to create configuration templates for the applications requiring personalization. The result of this work is a migration solution with almost zero downtime for end users, excellent end-user experience when roaming between Windows devices, and powerful, flexible administrative tools that extend well beyond personalization.
Although not required, this automated migration process relies on the creation of a second desktop pool: New_Pool. Be sure you have sufficient resources to create a second desktop pool for the duration of the migration. After the migration is complete, the original PersistentDisk_Pool pool can be disabled or deleted.
Pro Tip: This scenario relies on the creation of a second desktop pool. Although you can use another linked-clone pool, consider creating a new instant-clone pool as part of this migration process. See Migrate from Using Linked Clones to Using Instant Clones for more information.
Although both technologies may be configured using alternatives, both the DEM agent and FSLogix agent were configured using GPOs in our testing.
Automated migration includes the following tasks:
- Stage New Infrastructure Components
- Stage New Pool New_Pool
- Prepare PersistentDisk_Pool for Migration
- Begin Migration of User Data and Configuration Data
- Complete Migration
Stage New Infrastructure Components
- Configure a share for folder redirection.
- Example:
\\server\share\FolderRedirection - See Deploy Folder Redirection with Offline Files for recommendations on share creation and permission configuration.
- When creating the folder redirection GPO, be sure to select Move the contents of Documents to the new location to ensure the content is migrated from the persistent disks to the folder redirection share.
- Install the Dynamic Environment Manager management console on an administrative PC.
- The Quick Start Tutorial for Dynamic Environment Manager will help you quickly deploy a non-production implementation. For a video demonstration of the procedure, see the VMware Knowledge Base article Deploy and Configure Dynamic Environment Manager (82492).
- For production implementations, see Installing and Configuring Dynamic Environment Manager and the Dynamic Environment Manager Architecture chapter of the VMware Workspace ONE and VMware Horizon Reference Architecture.
- Configure Dynamic Environment Manager to manage Windows and application settings for your environment.
- Dynamic Environment Manager includes a number of Windows and application config file templates. Additional templates may be downloaded from the VMware Marketplace. See Deploying Templates from the Marketplace feature walkthrough video for more information.
- The Dynamic Environment Manager Application Profiler Guide can help you profile your remaining applications.
- If you get stuck, the Profiling Applications operational tutorial will help with some advanced profiling techniques.
- If using Outlook OST files on persistent disks, configure Dynamic Environment Manager to create new registry settings.
In the following example, NewOutlook is the name of the new Outlook profile to be created and set as the default.
[HKEY_CURRENT_USER\Software\Microsoft\Office\16.0\Outlook\Profiles\NewOutlook]
@=""
[HKEY_CURRENT_USER\Software\Microsoft\Office\16.0\Outlook]
"DefaultProfile"="NewOutlook"

Note: The Microsoft Outlook profiles registry values vary based on the Outlook version. See How to recreate Outlook profiles after the migration for additional detail on this topic.
Add a new condition so the registry keys are only created on a VM in the desktop poolNew_Pool.
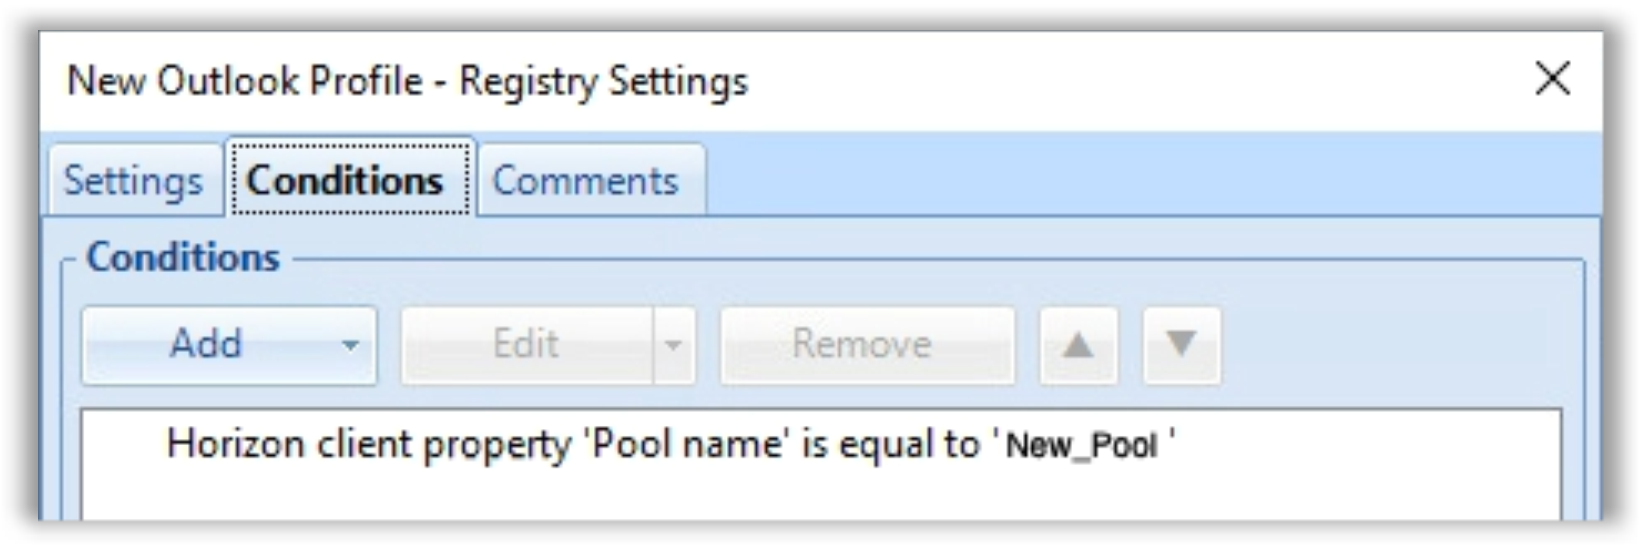
_
- Configure a network share for FSLogix Office Containers.
Example:
\\server\share\fslogix\OfficeContainersSee Microsoft documentation for guidance.
Stage the New Pool New_Pool
- Install the FSLogix agent on the New_Pool golden image, and enable the FSLogix agent by applying a GPO to the OU where the New_Pool VMs will reside.
- Install the DEM agent on the New_Pool golden image, and, to configure and enable the DEM agent, apply a DEM GPO to the OU where the New_Pool VMs will reside.
- Enable folder redirection by applying a GPO to the OU where the New_Pool VMs will reside.
- In the Horizon Console, provision the new desktop pool New_Pool, but do not entitle end users to the new desktop pool yet.
Prepare PersistentDisk_Pool for Migration
- Install the DEM agent on the PersistentDisk_Pool golden image.
- To configure and enable the DEM agent, apply a DEM GPO to the OU where the PersistentDisk_Pool VMs will reside.
- Create and Configure the FlexEngine Group Policy Object describes the minimum required and recommended policy settings.
- In addition, configure the advanced DEM setting Disable DirectFlex, as described in the VMware Knowledge Base article VMware DEM/UEM FlexEngine Advanced Settings (ADMX template) (2145286).
- Enable folder redirection by applying a GPO to the OU where the PersistentDisk_Pool VMs reside.
Note: DEM can configure folder redirection settings. However, in this scenario, the goal is to migrate existing user data to the folder redirection share. See VMware Knowledge Base article Migrating existing Local Profile folders content with Folder Redirection and Dynamic Environment Manager (51879) for more information about why Microsoft GPO-configured folder redirection is necessary.
- Install the FSLogix agent on the PersistentDisk_Pool golden image.
- Enable the FSLogix agent by applying a GPO to the OU where the PersistentDisk_Pool VMs reside.
- In the Horizon Console, recompose PersistentDisk_Pool.
Begin Migration of User Data and Configuration Data
As end users log on and log off of the desktops in PersistentDisk_Pool, the migration occurs automatically. Dynamic Environment Manager captures the specified Windows and application settings, and exports them at logoff to the profile archive share you created.
Figure 25: Sample Windows and Application Profile Archives
Windows folder redirection automatically creates the directory structure for the folders you specified in the folder redirection GPO. If you selected Move the contents of Documents to the new location, the content of these folders is automatically copied from the persistent disk to the folder redirection share.
Figure 26: Sample Folder Redirection Share
FSLogix automatically creates the Office Container VHD(X) to store Office cache data.
Figure 27: Sample FSLogix Office Container
Important: Have all users complete at least one logon/logoff cycle before proceeding to ensure that data has been migrated and DEM has captured Windows and application settings.
Complete Migration
- See Copy Nonstandard Profile Directories to the User Profile if you plan to migrate extra profile data from the Persona Management repository.
- Disable the Persona Management GPO on PersistentPool_1.
- In the Horizon Console, disable PersistentDisk_Pool to prevent users from logging in.
Disabling the pool keeps the VMs and persistent disks intact in case there is a need to access them at a later time. - Edit the DEM GPO and enable DirectFlex to improve logon times.
Configure the advanced DEM setting Disable DirectFlex as described in VMware DEM/UEM FlexEngine Advanced Settings. - Entitle users to New_Pool.
As end users logon to New_Pool and open Microsoft Outlook, they will be prompted to use the new Outlook profile. Once authenticated, the Outlook OST is automatically recreated in the new location. For example, C:\Users\<username>\AppData\Local\Microsoft\Outlook\user@domain.com.ost.
At this point, all user data previously managed by persistent disks and Persona Management should be migrated to the folder redirection share. The user configuration data for applications and Windows settings that you specified are stored on the DEM profile archive share. The FSLogix Office Container persists the Office cache data you specified in the GPO.
Copy Nonstandard Profile Directories to the User Profile
If you are using Persona Management and your environment supports content stored outside the standard Windows profile folders, consider using the following guidance to help migrate that data. Migration scenarios that rely on the Persona Management Files and folders to preload option will likely depend on this or a similar process to migrate nonstandard profile folders. An example PowerShell script is provided, and you can use DEM to run the script in the context of the end user.
- Download Copy-Persona-Extras.ps1 and store it on a network share accessible to end users.
Example:
\\FS1\HorizonScripts\Copy-Persona-Extras.ps1 - Install the Dynamic Environment Manager management console on an administrative PC.
- The Quick Start Tutorial for Dynamic Environment Manager will help you quickly deploy a non-production implementation. For a video demonstration of the procedure, see the VMware Knowledge Base article Deploy and Configure Dynamic Environment Manager (82492).
- For production implementations, see Installing and Configuring Dynamic Environment Manager and the Dynamic Environment Manager Architecture chapter of the VMware Workspace ONE and VMware Horizon Reference Architecture.
- In the DEM console, create a DEM logon task.
- Configure the logon task to run the following command:
powershell.exe\\server\share\Copy-Persona-Extras.ps1 - Choosing Run Asynchronously will allow user logons to continue while files are copied rather than holding up the logon process.
- Configure the logon task to run the following command:
- Consider using DEM conditions to limit the logon task to run only when needed.
In the following example, a condition is used to limit this logon task to VMs in the desktop pool PM2DEMFSL.
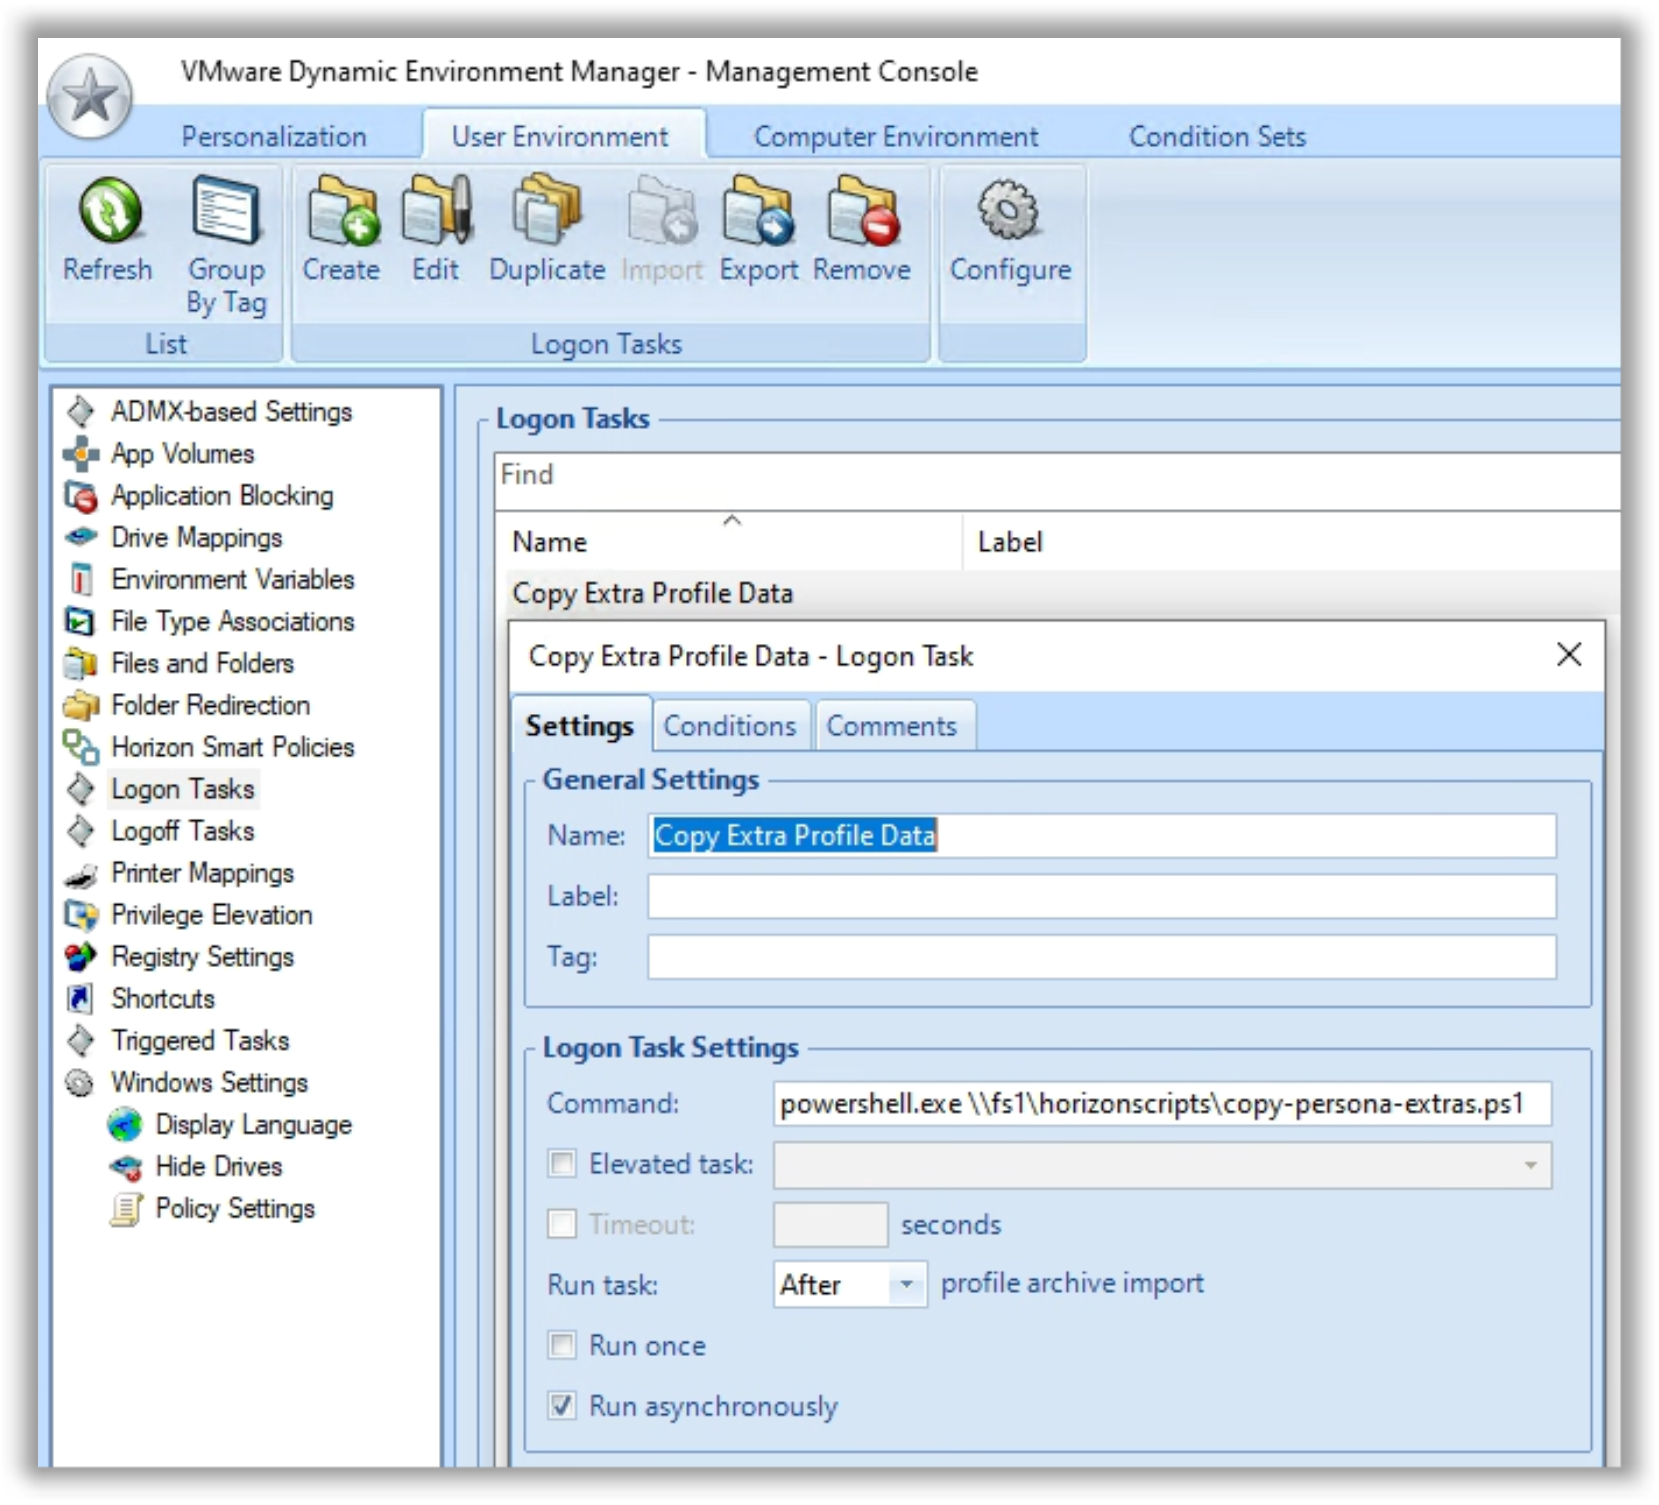

During logon, Copy-Persona-Extras.ps1 will:
- Read
\\server\personamgmt\<username>and enumerate all folders and files outside the standard Windows profile folders. - Copy this content to
Documents\ExtrasFromPersona. - Add the flag file
\\server\personamgmt\<username>\ce-flag.txtto ensure that the data-copy operation occurs only one time.
Note: It is recommended that you disable Persona Management and enable this logon task at the same time. If you run Copy-Persona-Extras.ps1 while Persona Management is still enabled, the end user will end up with two copies of the migrated data.
Summary and Additional Resources
With the release of VMware Horizon 8, companies currently using Horizon 7 are encouraged to migrate to modern components to take advantage of improvements in speed, stability, management capabilities, and overall user experience. With the options and guidance that this document provides, you can choose from among many paths for migrating from View Composer, persistent disks, and Persona Management to modern alternatives.
Additional Resources
- VMware Workspace ONE and VMware Horizon Reference Architecture
- VMware Horizon 7 Documentation
- VMware Horizon 8 Documentation
- VMware Dynamic Environment Manager Documentation
Changelog
The following updates were made to this guide.
|
Date |
Description of Changes |
|
2022‑07‑10 |
|
|
2021‑06‑03 |
|
|
2020‑08‑26 |
Addition of new section: Migration Scenario – Persistent Disks + Persona Management to DEM + Folder Redirection + FSLogix Office Container |
|
2020‑08‑11 |
Initial publication date |
Authors and Contributors
The following authors and contributors have helped make this paper possible:
Authors
Josh Spencer is a Group Product Line Manager, Horizon Product Marketing, VMware.
Chris Halstead is a Senior Staff Technical Product Manager, Windows Management Product Marketing, VMware.
Jim Yanik is a Director, End-User Computing Technical Marketing, VMware
Contributors
- Pim van de Vis (@pimvandevis), Staff Solutions Engineer, End-User Computing, VMware
- Raymond Wiesemann (@Raymond_himself), Manager EUC Solutions Engineering, VMware
- Suresh Kumar Paramasivan, Senior Member of Technical Staff, Horizon R&D, VMware
Reviewers
- Angela Ge, Director, Horizon Product Management, VMware
- Anil Agarwal (@aanil@vmware.com), Product-Line Manager, Horizon Product Management, VMware
- Jerry Looney (@jerrylooney), Staff Technical Support Engineer, End-User Computing, VMware
To comment on this paper, contact VMware End-User-Computing Technical Marketing at euc_tech_content_feedback@vmware.com.