
Windows Modern Management Security Design and Implementation
Introduction
VMware Workspace ONE enables cloud-native modern management to automate IT operations, harden security, and deliver ready-to-work experiences across every Windows Desktop device—whether on or off the enterprise network. This guide will explain how Windows Desktop device enrollment is secured and how communication occurs between a Windows Desktop device and VMware Workspace ONE UEM (Unified Endpoint Management).
Audience
This guide is intended for prospective and current IT administrators of Workspace ONE, information system security professionals, and anyone who uses the Workspace ONE platform. Familiarity with security, networking and storage in a virtual environment, Active Directory, identity management, and directory services is assumed. Knowledge of VMware Workspace ONE® UEM, VMware Workspace ONE® Access, and VMware Horizon is also helpful.
Windows Modern Management Framework Overview
There are several communication channels and clients used to manage Windows Desktop devices. Before proceeding with the other sections, it is essential to understand these components. The following sections build off this knowledge to explain how device enrollment and management is secured when using Workspace ONE UEM.

Figure 1: Windows Modern Management Framework showing management client responsibilities
Device Management Client Summary
Real-time communication between Windows Desktop devices and Workspace ONE occurs over one of two services:
- Windows Notification Service (WNS)
- AirWatch Cloud Messaging (AWCM)
There are two primary management clients installed on the device that communicate with Workspace ONE UEM:
- OMA-DM (Open Mobile Alliance Device Management) – Native to the Windows Operating System
- VMware Workspace ONE® Intelligent Hub – Application/Agent-based
Each client serves a specific purpose and relies on several services to establish real-time communication with Workspace ONE UEM. The following table compares each client.
| Management Clients | ||
| | OMA-DM | VMware Workspace ONE Intelligent Hub |
| Description | Native MDM client built into the device | Workspace ONE Intelligent Hub installed on the device |
| Communication | WNS | AWCM |
| Used for: |
|
|
Table 1: Primary Windows Desktop Management Clients
For a more detailed discussion of the services used to manage Windows Desktop devices, see Troubleshooting Windows Devices: Workspace ONE Operational Tutorial.
'%3E%3Cpath id='Rectangle_1' data-name='Rectangle 1' d='M0,0H800V300H0Z' transform='translate(2297 1132)' fill='%23E2F0D9'/%3E%3Cg id='Group_5' data-name='Group 5' transform='translate(-6 -3)'%3E%3Ctext transform='translate(2534 1280)' font-size='50' font-family='Roboto-Regular, Roboto'%3E%3Ctspan x='0' y='0'%3ECurated Assets%3C/tspan%3E%3C/text%3E%3Ctext transform='translate(2611 1333)' font-size='20' font-family='Roboto-Regular, Roboto'%3E%3Ctspan x='0' y='0'%3ETile View (with image and controls)%3C/tspan%3E%3C/text%3E%3C/g%3E%3C/g%3E%3C/svg%3E)
Network Endpoints
When discussing the network requirements for modern Windows Desktop management, it is important to distinguish between Microsoft services required by the operating system versus Workspace ONE UEM network endpoints.
Reference the Microsoft Docs: Manage connection endpoints for Windows 11 Enterprise for a detailed list of endpoints required by the Windows 11 operating system. On this same page, you will find a detailed list of endpoints for the Windows 10 operating system.
For a detailed list of network endpoints and ports required for Workspace ONE UEM, visit the VMware Ports and Protocols page.
Management Certificates
After successful enrollment, there will be two certificates from Workspace ONE UEM in the device. The Device Enrollment certificate is located in Certificates - (Local Computer) > Personal > Certificates and the Application certificate is located in Certificates - Current User > Personal > Certificates, as shown in the following screenshots. The Device Root Certificate can be generated, if not already done so, in the Workspace ONE UEM console. The Device Root Certificate must be generated before enrolling Windows Desktop devices because the Device Enrollment certificate is issued by the Device Root Certificate.
Device Enrollment Certificate
This certificate is used for securing the MDM (OMA-DM) communication channel. MDM (OMA-DM) device syncs and check-ins will fail without the Device Enrollment Certificate.
Subject Name Format - AW::{Token}::{Device Services URL}::{Token}
Issued by AwDeviceRoot
Valid for 20 years
Enhanced Key Usage: Client Authentication (1.3.6.1.5.5.7.3.2)
Key Usage: Digital Signature (80)
Signature Algorithm is sha512RSA
Signature Hash Algorithm is sha512
Public Key Length: 2048-bit RSA key
Application Certificate
This certificate is used by Workspace ONE Universal Windows Platform (UWP) apps to retrieve device and environment details. You are likely not using any of the Workspace ONE UWP apps as these were all converted to desktop apps. The Application Certificate is delivered as a SCEP payload and is not used during enrollment or device management communications.
Subject Name Format - {Device UUID}:{Enrollment UPN}:{Device Services URL}:{One Time Token}:{Group ID}
Issued by AirWatchCA
Valid for 10 years
Enhanced Key Usage: Certificate Request Agent (1.3.6.1.4.1.311.20.2.1)
Key Usage: Digital Signature, Data Encipherment (90)
Signature Algorithm is sha512RSA
Signature Hash Algorithm is sha512
Public Key Length: 2048-bit RSA key

Figure 2: Location of Workspace ONE certificates on a Windows Desktop device
For a detailed discussion of the certificates used by Windows Desktop during enrollment, refer to the Microsoft documentation: [MS-MDE2]: Mobile Device Enrollment Protocol Version 2.
Windows Device Enrollment Communication Flows
As discussed in the Device Management Client Summary section, two primary management clients installed on the device communicate with Workspace ONE UEM: Workspace ONE Intelligent Hub for Windows and the built-in device management and enrollment client. The underlying device enrollment leverages the Microsoft Mobile Device Enrollment version 2 [MS-MDE2] protocol to enable the device to be enrolled with Workspace ONE UEM or any Device Management Service (DMS).
Two example sequences are shown in Figure 3 and Figure 5, which cover the base enrollment methods, meaning all other enrollment methods leverage these steps at their core. You can easily see this is true if you compare the final steps of Figure 3 and Figure 5 which both leverage the MS-MDE2 protocol to complete enrollment.
The MS-MDE2 device enrollment process can be broken down into five phases: resolve discovery service, discover enrollment services, request and receive security tokens to authenticate against enrollment services, get certificate policies [MS-XCEP], and complete enrollment [NS-WSTEP]. Workspace ONE UEM supports various enrollment methods, but core enrollment will leverage these five phases.
Workspace ONE UEM leverages HTTPS for transport protection to secure the device/server interaction. We will discuss how to enhance the communication security when leveraging the MS-MDM protocol once the device is enrolled and has been provisioned an X.509v3 certificate (Device Enrollment Certificate). Additionally, Workspace ONE UEM leverages Cookies (DMLocationGroupId, ASP.NET_SessionId, _RequestVerficationToken) and HTTP Strict Transport Security (HSTS) to protect against man-in-the-middle (MitM) attacks such as cookie hijacking. This forces the use of only HTTPS connections (TLS/SSL).
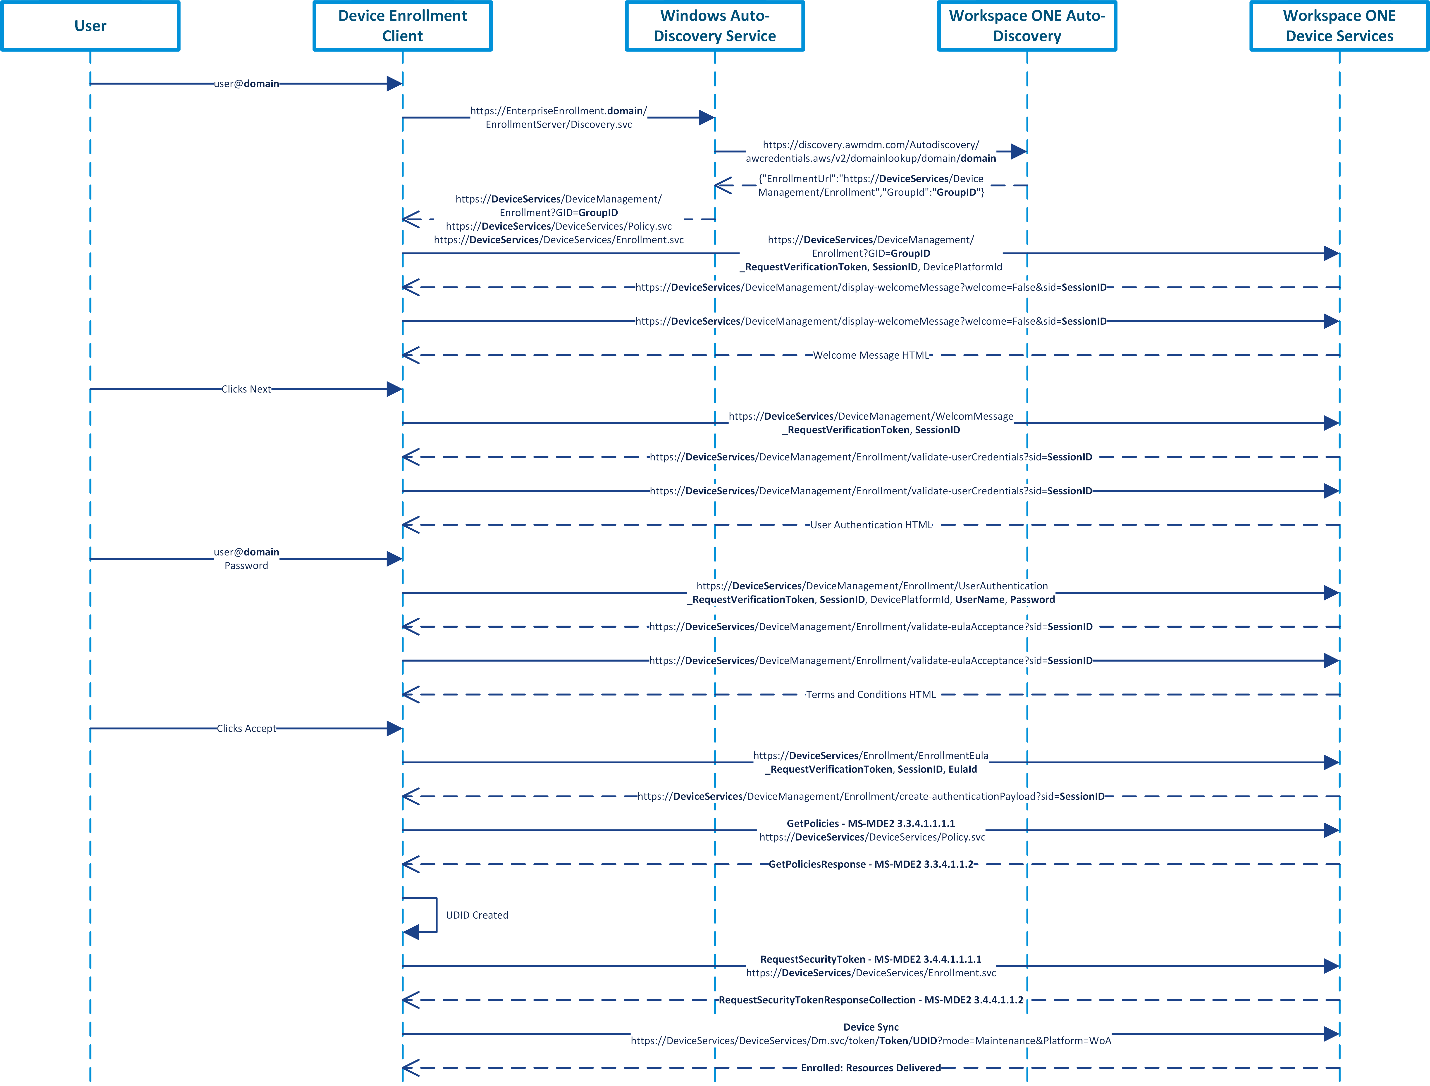
Figure 3: Sample Sequence of Native MDM Enrollment using Windows Auto-Discovery and Workspace ONE Auto-Discovery
Figure 3 depicts a sample sequence for a user enrolling using Native MDM Enrollment (Access Work or School > Enroll only in Device Management). This sample was completed with a Windows 10 Enterprise 20H2 (10.0.19042) device. The Windows and Workspace ONE Auto-Discovery services were used but are entirely optional. Without these auto-discovery services, users would be required to enter their Device Services hostname and Group ID, e.g., DS###.awmdm.com and Acme123. Workspace ONE UEM version 2105 was used as well. However, none of the previous versions impact the enrollment flows.
The steps covered in Figure 3 are as follows:
- The user enters their email address via the native enrollment client.
- The enrollment client extracts the domain suffix (e.g., the domain could be vmware.com) from the email address, prepends the domain name with a well-known label (e.g., EnterpriseEnrollment.domain), and resolves the address to the Windows Auto-Discovery Service (DS). The administrator configures the network name resolution service (that is, the Domain Name System (DNS)) appropriately. VMware offers a cloud-hosted Windows Auto-Discovery service (WADS) which can be configured within the Workspace ONE UEM console. The administrator is required to configure CNAME and provide the appropriate certificate during configuration. The WADS prevents the user from having to enter the Device Services hostname (e.g., DS###.awmdm.com) in addition to their email address during native device management enrollment. For other enrollment methods, the WADS is not used at all. If WADS is not used then the Discovery Service (DS) is sent directly to the Workspace ONE UEM Device Services endpoint (e.g., https://DeviceServices/DeviceServices/Discovery.svc).
- The enrollment client sends an HTTP GET request to the Discovery Service (DS) to validate the existence of the service endpoint.
- The enrollment client sends a Discover (e.g., https://EnterpriseEnrollment.domain/EnrollmentServer/Discovery.svc) message (MS-MDE2 section 3.1.4.1.1.1) to the Discovery Service (DS). The Discovery Service (DS) responds with a DiscoverResponse message (MS-MDE2 section 3.1.4.1.1.2) containing the Uniform Resource Locators (URLs) of service endpoints required for the following steps:
- https://DeviceServices/DeviceManagement/Enrollment?GID=GroupID
- https://DeviceServices/DeviceServices/Policy.svc
- https://DeviceServices/DeviceServices/Enrollment.svc
The Discovery Service (DS) sends the domain information (e.g., https://discovery.awmdm.com/Autodiscovery/awcredentials.aws/v2/domainlookup/domain/domain) to the Workspace ONE Auto-Discovery service, if configured/registered, to attempt to determine the user’s Group ID and enrollment URL for enrollment.
- The enrollment client then hits the enrollment URL (e.g., https://DeviceServices/DeviceManagement/Enrollment?GID=GroupID). Depending on the configurations and customizations completed by the administrator in the Workspace ONE UEM console, users will see various prompts such as a welcome message before authenticating.
- The user provides authentication credentials which are sent to the Device Services endpoint along with the session ID, request verification token, and the device platform ID. Depending on configurations there may be additional redirects at this step, such as when using SAML authentication. An example of this flow is covered in Figure 5.
- Once successfully authenticated, depending on the configurations and customizations completed by the administrator in the Workspace ONE UEM console, users will see various prompts such as having to accept the terms and conditions.
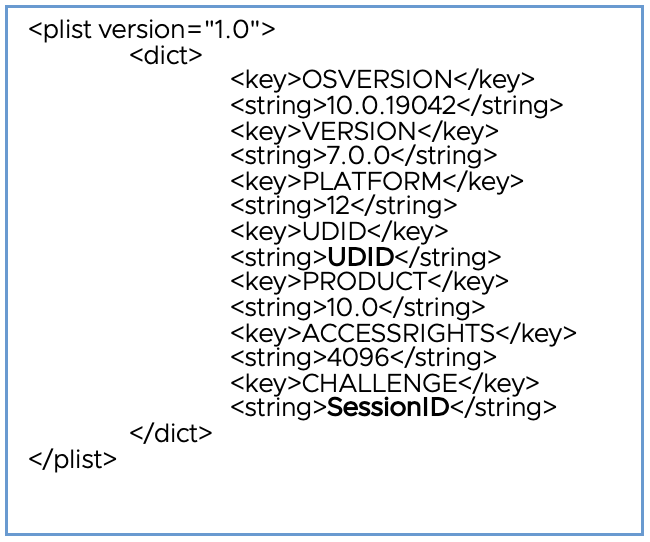
- The enrollment client communicates with the Workspace ONE UEM Device Service’s security token service (STS) (MS-MDE2 section 3.2) (e.g., https://DeviceServices/DeviceManagement/Enrollment/create-authenticationPayload?sid=SessionID) to obtain a security token to authenticate.
<form method="post"
action="ms-app://windows.immersivecontrolpanel">
<p>
<input type="hidden"
name="wresult"
value="Security Token - SessionID"/>
</p>
<input type="submit"/>
</form>
- The enrollment client sends a GetPolicies message (MS-MDE2 section 3.3.4.1.1.1.1) to the Workspace ONE Devices Services endpoint (e.g., https://DeviceServices/DeviceServices/Policy.svc) [MS-XCEP] using the security token (base64 encoded value for wsse:BinarySecurityToken) received in the previous step. The Device Services endpoint [MS-XCEP] responds with a GetPoliciesResponse message (MS-MDE2 section 3.3.4.1.1.2) containing the certificate policies required for the next step. For more information about these messages, see [MS-XCEP] sections 3.3.4.1.1.1.1 and 3.1.4.1.1.2.
- The UDID is created at this time before being sent in the next step. For more information about the UDID, refer to Unique Device Identifier (UDID).
- The enrollment client then sends a RequestSecurityToken message (MS-MDE2 section 3.4.4.1.1.1.1) to the Devices Services endpoint (e.g., https://DeviceServices/DeviceServices/Enrollment.svc) [MS-WSTEP] using the security token received previously, as well as basic information about the device including the UDID (DeviceID field). The Devices Services endpoint [MS-WSTEP] responds with a RequestSecurityTokenResponseCollection message (MS-MDE2 section 3.4.4.1.1.2) containing the Device Enrollment and Root Certificates and provisioning information for the device management client [MS-MDM]. For more information about these messages, see [MS-WSTEP] sections 3.4.4.1.1.1.1 and 3.1.4.1.1.2.
Example of the Base64 decoded value set for wsse:BinarySecurityToken in the RequestSecurityTokenResponseCollection. The Workspace ONE Intelligent Hub for Windows processes this information to install the Device Enrollment and Root certificates as well as setting all of the MDM settings on the device.
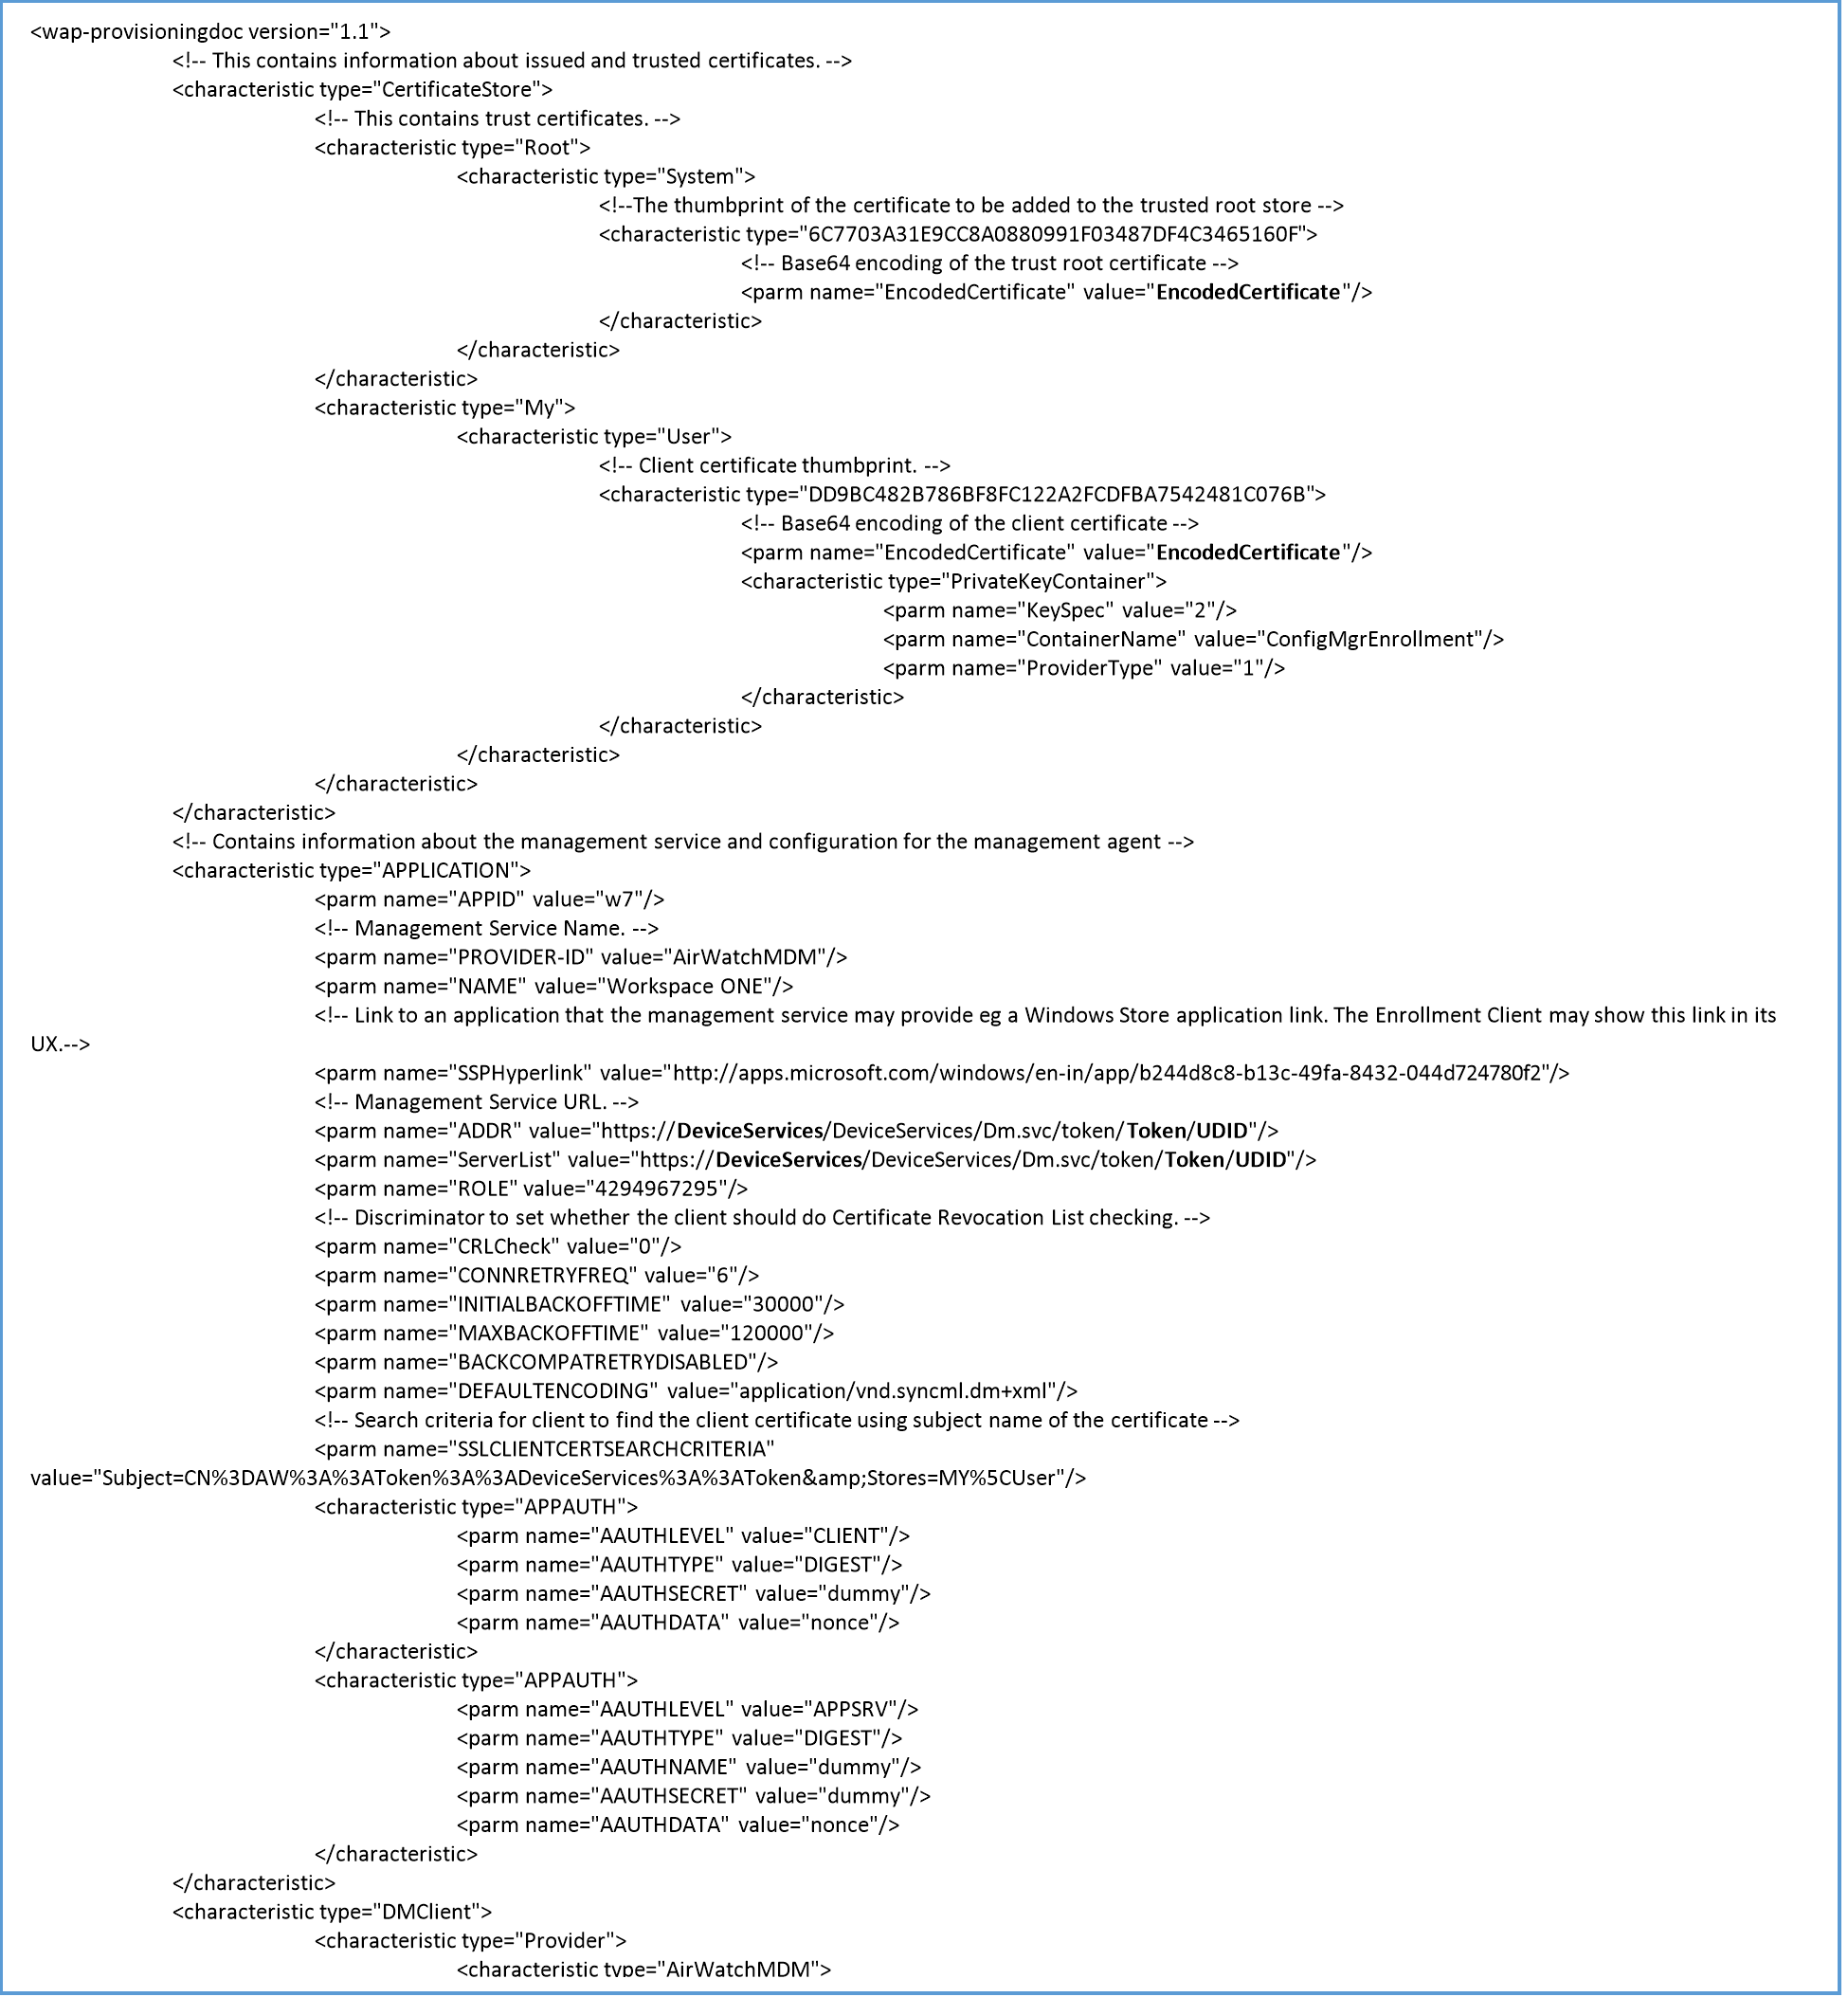
Figure 4: Decoded Device Enrollment Provisioning payload used by Intelligent Hub. Contains Device Root Certificate, Device Enrollment Certificate, as well as MDM provisioning information
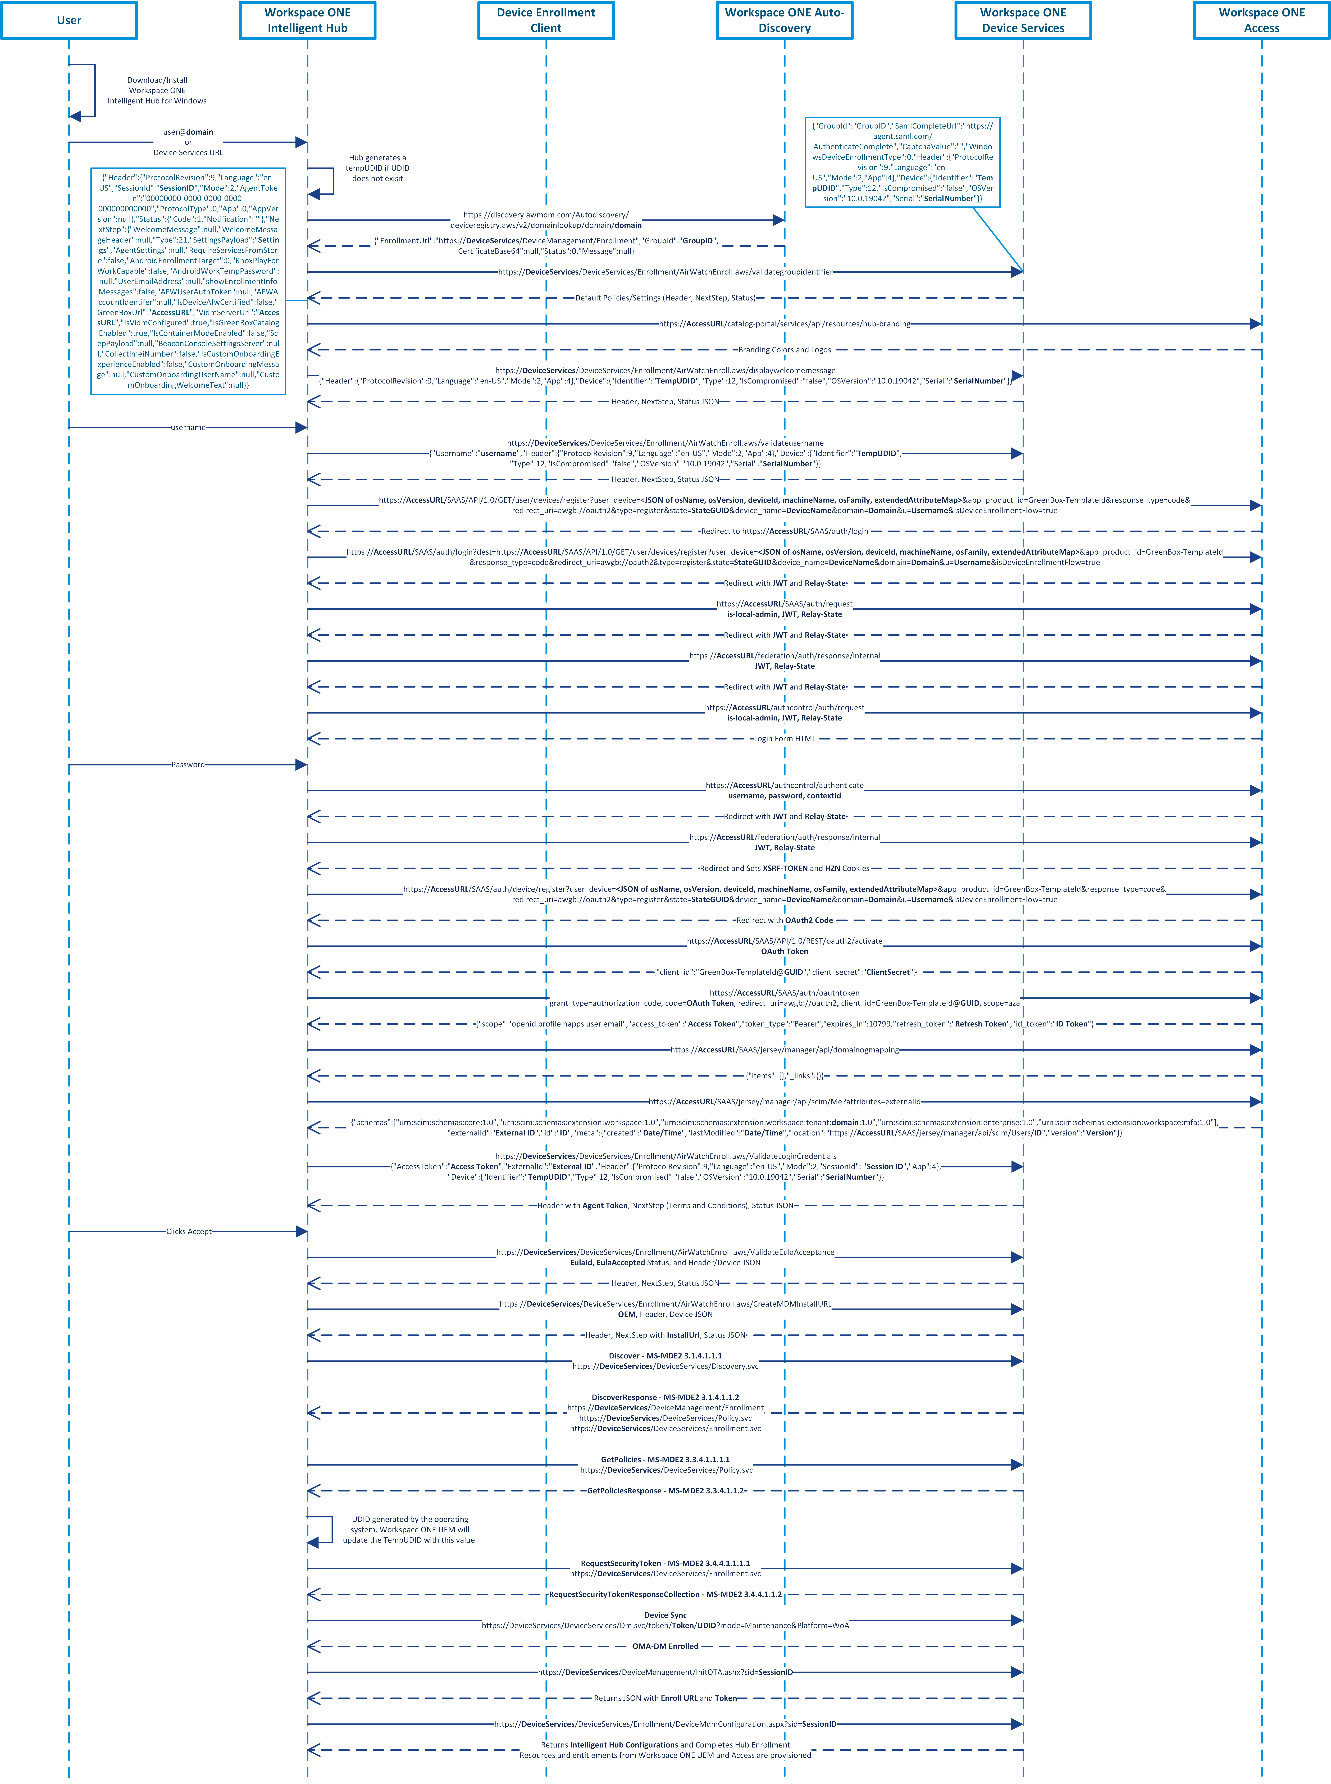
Figure 5: Sample Sequence of Workspace ONE Intelligent Hub Initiated Enrollment using Workspace ONE Access as Source of Authentication and Workspace ONE Auto-Discovery
Figure 5 depicts a sample sequence for a user enrolling using the Workspace ONE Intelligent Hub initiated enrollment. This sample was completed with a Windows 10 Enterprise 20H2 (10.0.19042) device. The Workspace ONE Auto-Discovery service was used but is entirely optional. This example also uses Workspace ONE Access for the source of authentication, instead of Workspace ONE UEM. This was chosen to defer from Figure 3 and to add more complexities such as when using SAML authentication. Without the auto-discovery service, users would be required to enter their Device Services hostname and Group ID, e.g., DS###.awmdm.com and Acme123. Workspace ONE UEM version 2105 was used as well. However, all the previous versions do not change the enrollment flows.
The steps covered in Figure 5 are as follows:
- The user downloads and installs the Workspace ONE Intelligent Hub for Windows from https://getwsone.com/.
- The user enters their email address into the Intelligent Hub. If the corporate domain has not been registered with the Workspace ONE Auto-Discovery service, then the user will be required to enter the Device Services hostname (e.g., DS###.awmdm.com) and Group ID.
- The Intelligent Hub extracts the domain suffix (e.g., the domain could be vmware.com) from the email address. The Intelligent Hub then sends the domain information (e.g., https://discovery.awmdm.com/Autodiscovery/awcredentials.aws/v2/domainlookup/domain/domain) to the Workspace ONE Auto-Discovery service, if configured/registered, to attempt to determine the user’s Group ID (e.g., Acme123) and enrollment URL (e.g., https://DeviceServices/DeviceManagement/Enrollment) for enrollment.
Example Header sent to the Workspace ONE Auto-Discovery endpoint by the Intelligent Hub. Most of the following endpoints will have similar headers, therefore this is the only example that will be provided.
User-Agent: AirwatchWindowsHubAgent/21.5.3.0
aw-auth-signature-version: 1
aw-auth-signature-method: HMAC-SHA256
aw-auth-realm: device
aw-device-uid: UDID (TempUDID if UDID has not been generated)
aw-auth-group-id: com.airwatch.windows.agent
aw-date: 2021-07-26T19:53:01.135Z
aw-agent-client-version: 21.5.3.0
Authorization: UDID:n2OTG9xLQE7JsxTbxCuRkoOEZeWb0yUWoReAxGQZiWY=
Accept-Language: en
Host: discovery.awmdm.com
- The Intelligent Hub takes the Device Services hostname along with the Group ID to validate the Group ID (e.g., https://DeviceServices/DeviceServices/Enrollment/AirWatchEnroll.aws/validategroupidentifier) and pull the next steps to be displayed in the Intelligent Hub. If this fails, users will be asked to re-enter the Group ID. Upon success, a Session ID is returned along with a Settings Payload (base64 decoded example below) and any next steps such as a Welcome Message. Because the Source of Authentication is set to use Workspace ONE Access, that hostname is also sent.
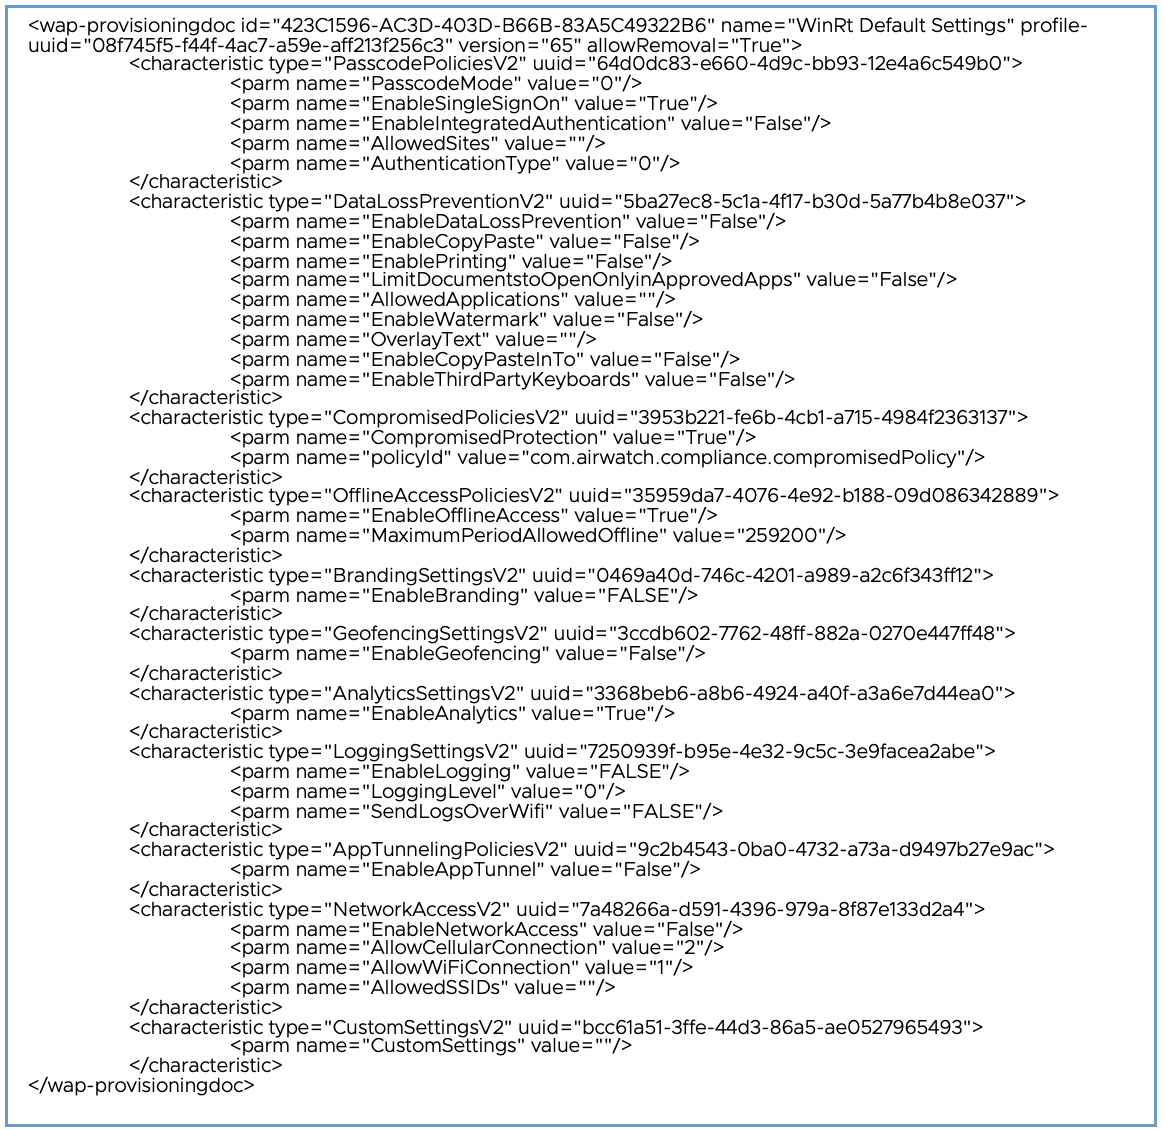 Figure 6: Workspace ONE Intelligent Hub Default Settings received during Enrollment
 - Because Workspace ONE Access is used as the Source of Authentication, the Intelligent Hub will send a request (e.g., https://AccessURL/catalog-portal/services/api/resources/hub-branding) to obtain the Hub custom branding such as colors and logos.
- Depending on the configurations and customizations completed by the administrator in the Workspace ONE UEM console, users will see various prompts such as a welcome message before authenticating.
- The user is prompted to enter their username or email address. The Intelligent Hub will validate (e.g., https://DeviceServices/DeviceServices/Enrollment/AirWatchEnroll.aws/validateusername) the username with the Workspace ONE UEM Device Services endpoint. The Device Services endpoint sends back next steps which contain information such as login hint, Access hostname, and so on.
- The Intelligent Hub then starts the OAuth2 authentication request via multiple redirects within Workspace ONE Access (depending on how everything has been configured these endpoints will differ slightly). Finally, a JSON Web Token (JWT) and Relay-State are sent back to the Hub as well as the Login Form for the user to enter their password.
- The user enters their password. The Intelligent Hub will send the username, password, and contextId to the https://AccessURL/authcontrol/authenticate endpoint. Various redirects occur again to complete the OAuth2 authentication. An XSRF-Token and HZN attributes are set in the cookie before completing OAuth2 authentication.
- The Intelligent Hub uses the OAuth token to retrieve a Client Secret, Access Token, and Refresh Token.
- The Intelligent Hub uses the Access Token and the user’s External ID to validate the login credentials before Workspace ONE UEM returns the Agent Token.
- After successful authentication, depending on the configurations and customizations completed by the administrator in the Workspace ONE UEM console, users will see various prompts such as having to accept the terms and conditions.
- The Intelligent Hub requests an MDM Install URL from the Workspace ONE Device Services endpoint. The Install URL (e.g., InstallUrl=https://DeviceServices/DeviceManagement/InitOTA.ashx?sid=SessionID) is returned within the response JSON and will be used at a later step by the Intelligent Hub after the MS-MDE2 enrollment completes successfully.
- The enrollment client (native OMA-DM client) sends an HTTP GET request to the Discovery Service (DS) to validate the existence of the service endpoint.
- The enrollment client (native OMA-DM client) sends a Discover (e.g., https://EnterpriseEnrollment.domain/EnrollmentServer/Discovery.svc) message (MS-MDE2 section 3.1.4.1.1.1) to the Discovery Service (DS). The Discovery Service (DS) responds with a DiscoverResponse message (MS-MDE2 section 3.1.4.1.1.2) containing the Uniform Resource Locators (URLs) of service endpoints required for the following steps:
- https://DeviceServices/DeviceManagement/Enrollment
- https://DeviceServices/DeviceServices/Policy.svc
- https://DeviceServices/DeviceServices/Enrollment.svc
Note that in the Discover request a default value of staging@aw.com is sent as the Email Address, therefore the Workspace ONE Auto-Discovery service is not used in this flow. The Workspace ONE Auto-Discovery service was used in a previous step already.
- The enrollment client (native OMA-DM client) sends a GetPolicies message (MS-MDE2 section 3.3.4.1.1.1.1) to the Workspace ONE Devices Services endpoint (e.g., https://DeviceServices/DeviceServices/Policy.svc) [MS-XCEP] using the security token (base64 encoded value of the Session ID) received in the previous steps. The Device Services endpoint [MS-XCEP] responds with a GetPoliciesResponse message (MS-MDE2 section 3.3.4.1.1.2) containing the certificate policies required for the next step. For more information about these messages, see [MS-XCEP] sections 3.3.4.1.1.1.1 and 3.1.4.1.1.2.
- The UDID is created at this time before being sent in the next step. For more information about the UDID, refer to Unique Device Identifier (UDID).
- The enrollment client (native OMA-DM client) then sends a RequestSecurityToken message (MS-MDE2 section 3.4.4.1.1.1.1) to the Devices Services endpoint (e.g., https://DeviceServices/DeviceServices/Enrollment.svc) [MS-WSTEP] using the security token received previously, as well as basic information about the device including the UDID (DeviceID field). The Devices Services endpoint [MS-WSTEP] responds with a RequestSecurityTokenResponseCollection message (MS-MDE2 section 3.4.4.1.1.2) containing the Device Enrollment and Root Certificates and provisioning information for the device management client [MS-MDM]. For more information about these messages, see [MS-WSTEP] sections 3.4.4.1.1.1.1 and 3.1.4.1.1.2. For a sample, refer to Figure X: Decoded Device Enrollment Provisioning payload.
- The native enrollment client completes enrollment, however, the Intelligent Hub needs to complete enrollment as well. The Intelligent Hub invokes the Install URL (e.g., InstallUrl=https://DeviceServices/DeviceManagement/InitOTA.ashx?sid=SessionID) from the previous step and retrieves the Enroll URL (e.g., https://DeviceServices/DeviceServices/Enrollment/DeviceMdmConfiguration.aspx?sid=SessionID) as well as a Token (e.g., SessionID).
- The Workspace ONE Intelligent Hub then hits the Enroll URL posting the following XML.
- The Intelligent Hub will receive Intelligent Hub settings via a wap-provisioning payload. Now that the Intelligent Hub is fully set up and enrolled, the Workspace ONE resources such as apps and profiles will be provisioned.
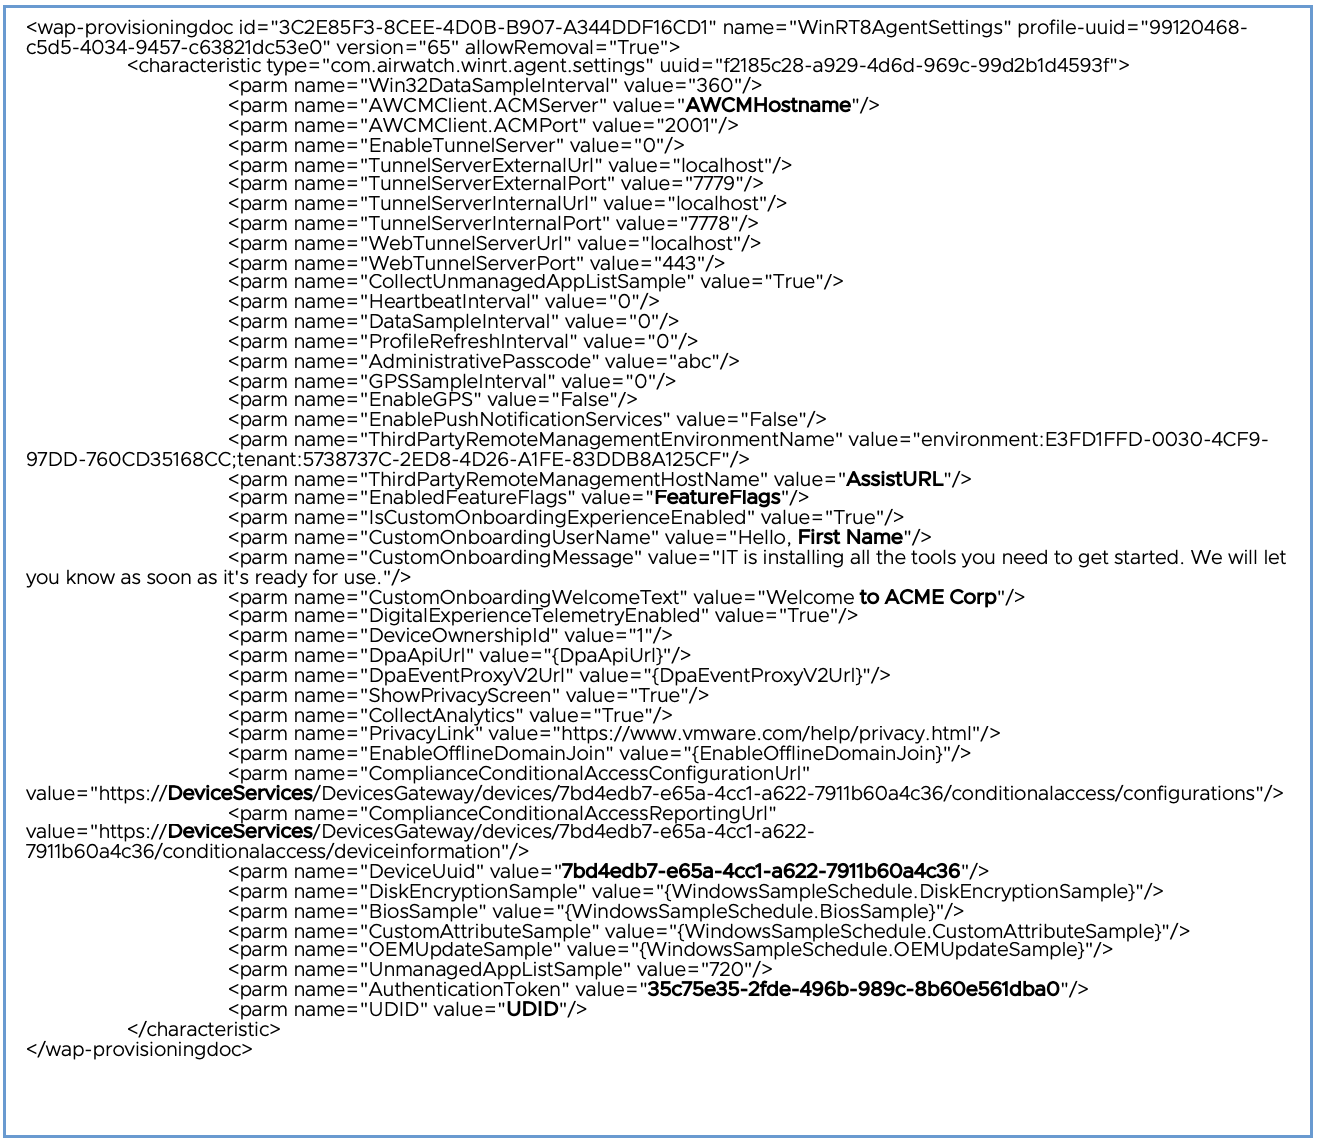 Figure 7: Workspace ONE Intelligent Hub Default Settings received during Enrollment
Windows Device Management Communication Flows
As mentioned in Device Management Client Summary, real-time communication between Windows devices and Workspace ONE occurs over one of two services:
- Windows Notification Service (WNS) which is used by the native OMA-DM client.
- AirWatch Cloud Messaging (AWCM) which is used by the Workspace ONE Intelligent Hub.
Managed devices periodically poll these endpoints and receive push messages from these endpoints to retrieve updates in real time. Workspace ONE admins can also query or sync the device to have them check in with the Workspace ONE Device Services endpoint. Lastly, users can also manually invoke device check-ins either natively via the OMA-DM client or from the Intelligent Hub. All of these methods will vary in the connection steps, but all share the same check-in logic. Figure 8 depicts a sample sequence of a user-initiated sync using the Workspace ONE Intelligent Hub.

Figure 8: Sample Sequence of User-Initiated Sync on the Workspace ONE Intelligent Hub
- Device check-in is initiated.
- The Intelligent Hub checks to see if any configuration changes occurred with Workspace ONE Access and Hub Services.
- The native OMA-DM client (omadmclient.exe) initiates an OMA-DM sync by sending basic details such as login status, UDID, manufacture, model, DM version, and language. A confirmation is sent back confirming the endpoint received the check-in. If any OMA-DM resources or commands were queued, they would be processed at this time.
- The Intelligent Hub invokes its processor (awprocesscommands.exe) to check for any pending commands to process. A status message is returned. If any Intelligent Hub resources or commands were queued, they would be processed at this time.
- Lastly, the Intelligent Hub checks the sampling endpoint. The Hub uses this endpoint to send the Workspace ONE Devices Services endpoint new samples from the device such as installed apps on the device. The request and response body for the sampling endpoint (interrogator) is a byte stream, therefore it is not easily readable as plain-text. However, this data is not encrypted.
There are many other endpoints, but these are the basic commands/endpoints that kick off many of the other resource-unique endpoints. The requests by the Intelligent Hub all contain the following header which uses the unique HMAC as a signature method as well as an authorization that contains the unique UDID of the device.
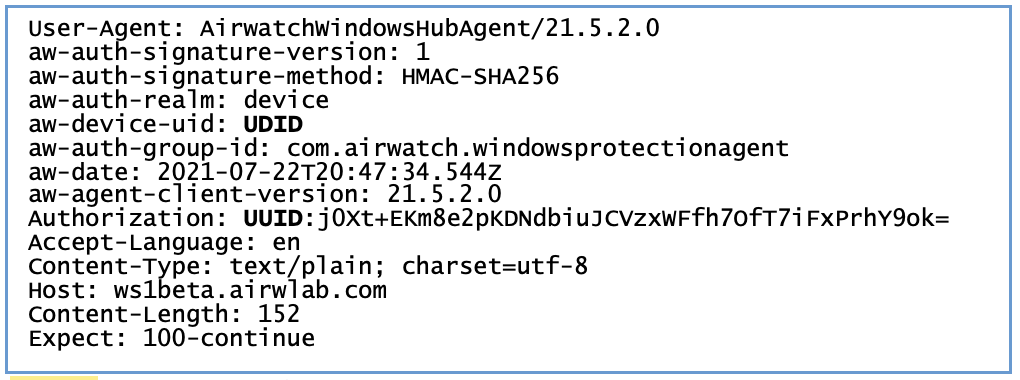
Figure 9: Sample Header for Workspace ONE Intelligent Hub requests
Unique Device Identifier (UDID)
Although many hardware identifiers are collected from the device, the unique device identifier (UDID) is the device’s primary key in Workspace ONE UEM. The UDID is generated locally on the device by the Windows operating system. During Windows Desktop device management enrolment, the device sends this GUID value of the UDID to Workspace ONE UEM. The DmGetClientHardwareUID and DmSetDeviceClientID functions in the dmcmnutils.dll are responsible for generating the UDID and set this value in the registry: Computer\HKEY_LOCAL_MACHINE\SOFTWARE\Microsoft\Provisioning\OMADM\MDMDeviceID\DeviceClientId.After the value is set, the device sends this value to the Workspace ONE UEM management server during enrollment (MS-MDE2 3.4.4.1.1.1.1). Refer to the enrollment web service request for federated authentication sample from Microsoft’s documentation or the snippet in Figure 10. The DeviceID attribute is what Workspace ONE UEM receives during enrollment and maps this value to UDID.
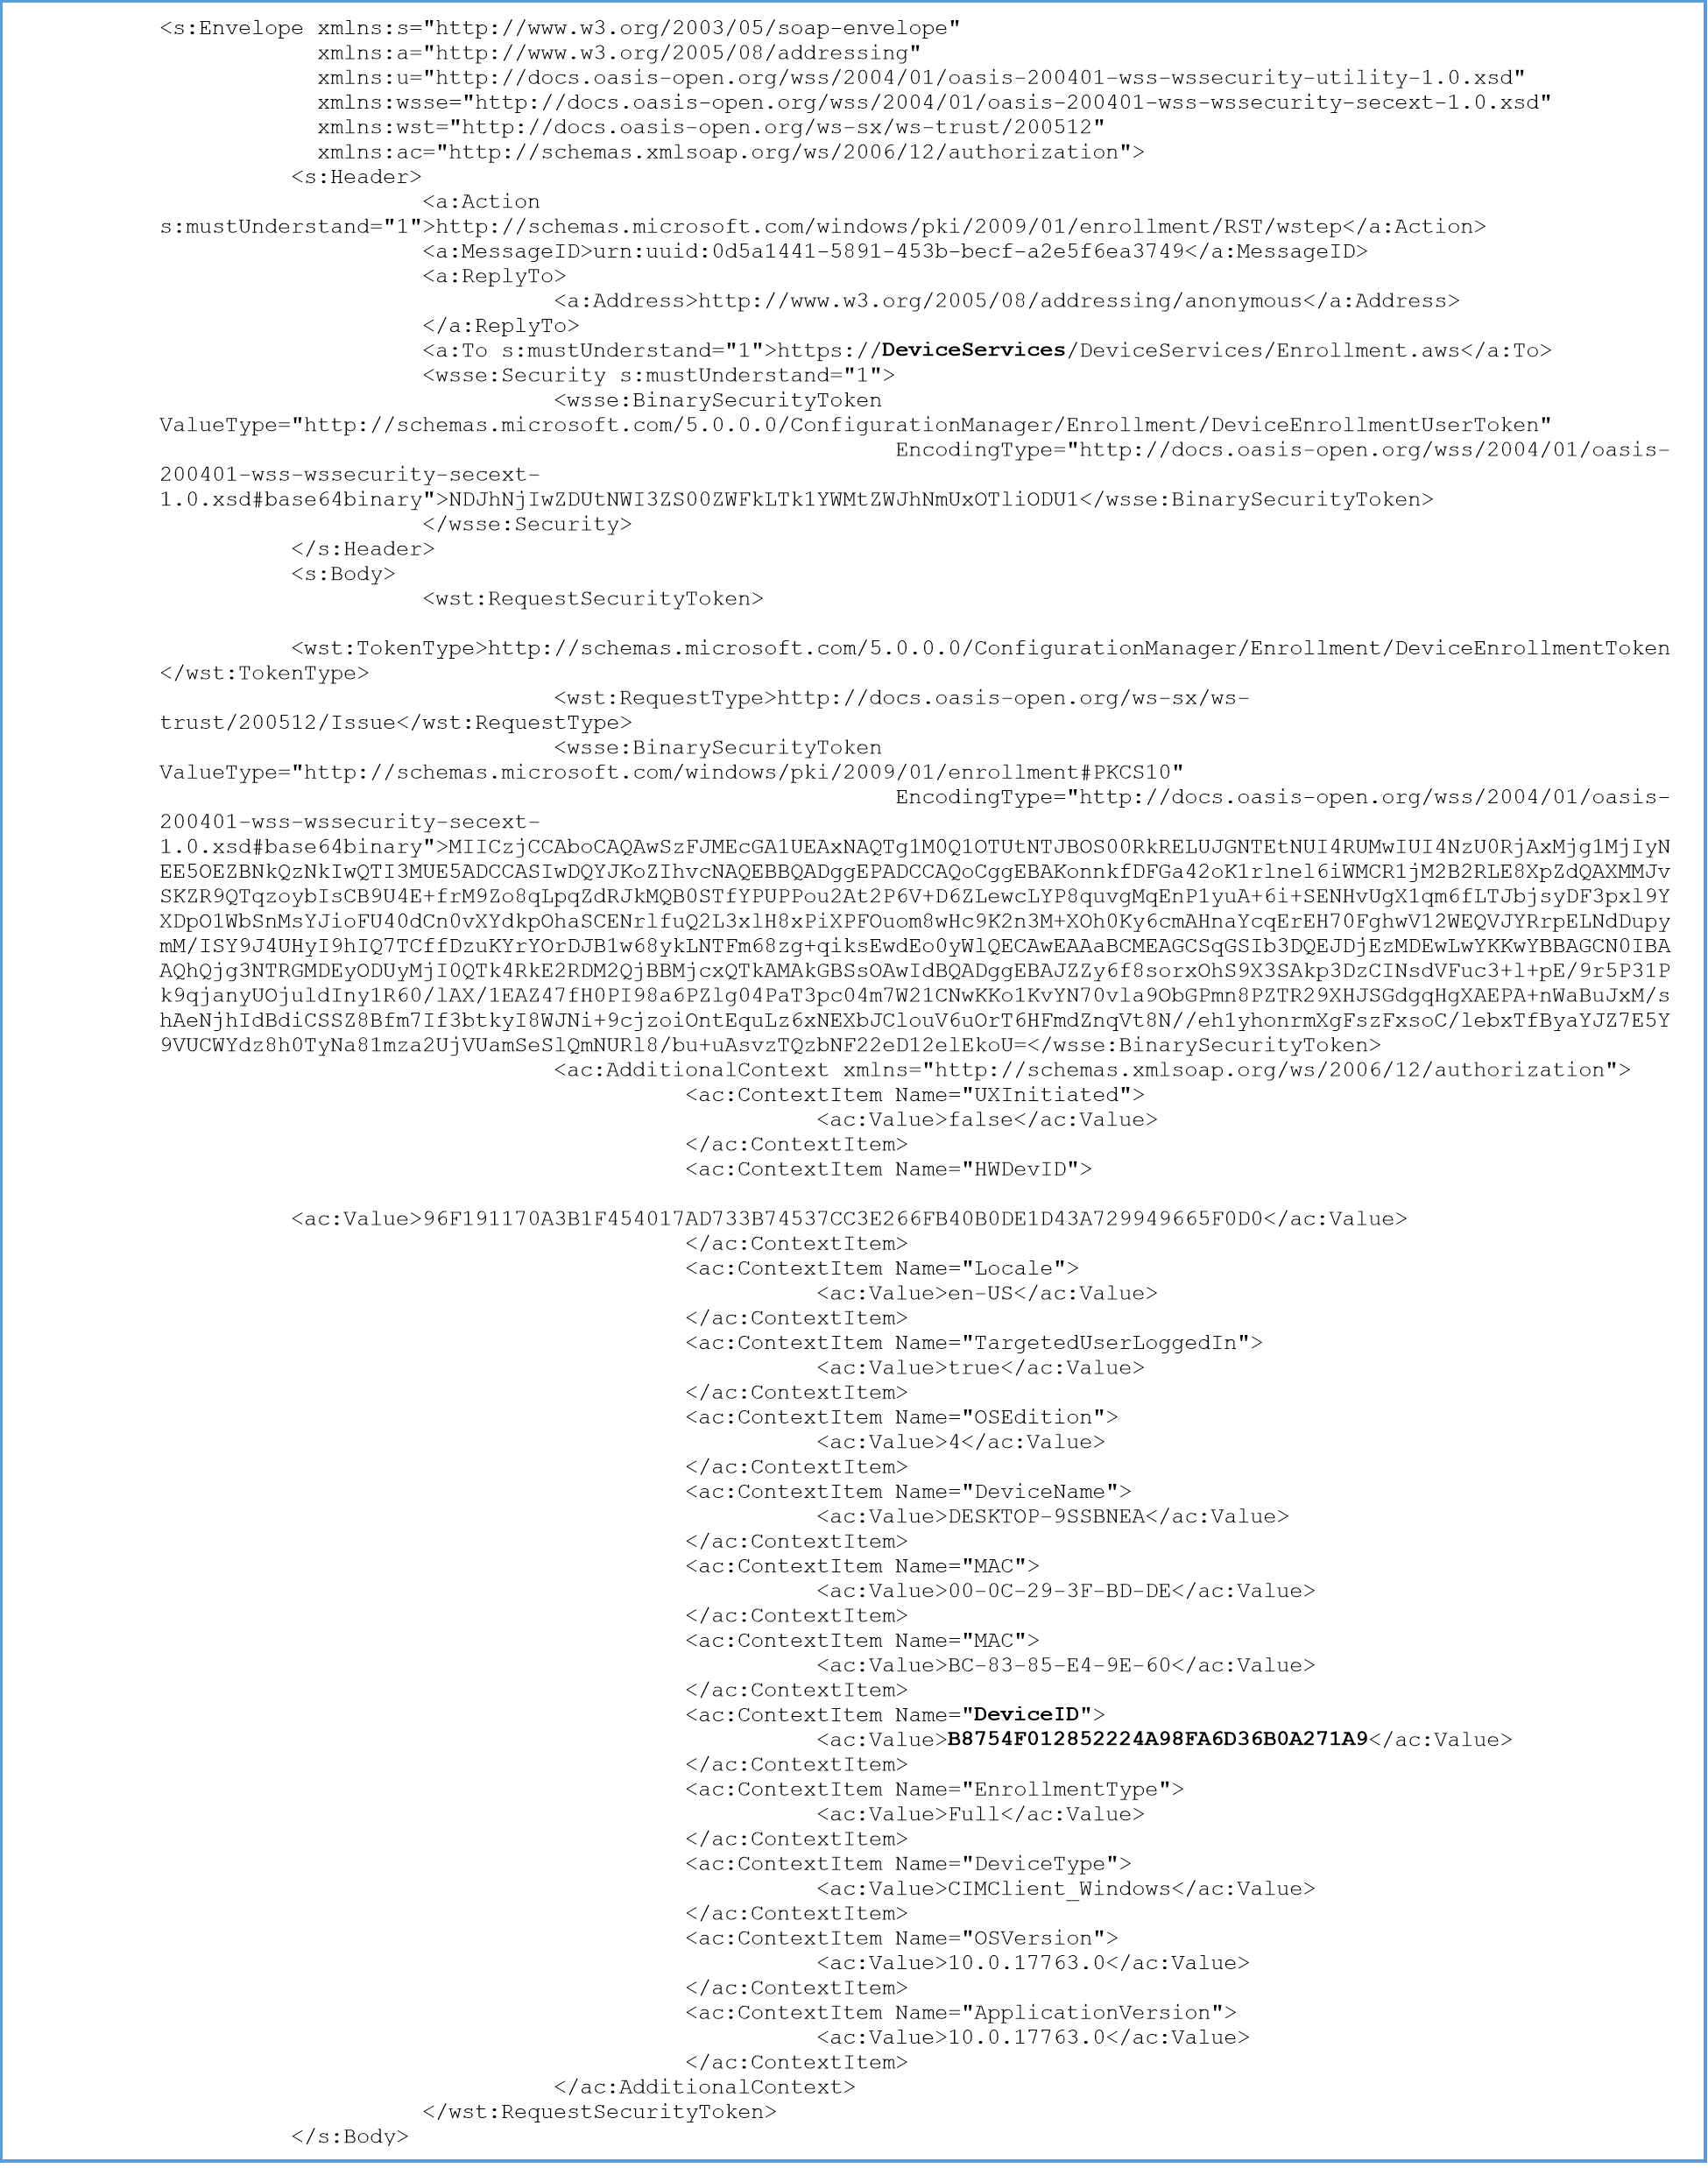 Figure 10: Sample Enrollment Web Service Request for Federated Authentication (MS-MDE2 3.4.4.1.1.1.1)
The UDID can be modified on the device if the user has administrative permissions to modify registry entries. However, modifying the UDID after enrollment causes issues and will not successfully spoof or impersonate a device. The Windows Desktop system generates this UDID during device management enrollment with the management platform. Refer to Figure 3 and Figure 5 to see when the UDID is generated during these two types of enrollments. This process happens with Windows Desktop device management and is irrespective of the management solution. Again, you can refer to the enrollment web service request for federated authentication sample for more information on the MDM enrollment process.
Locally on the device, this value corresponds to the following registry location: Computer\HKEY_LOCAL_MACHINE\SOFTWARE\Microsoft\Provisioning\OMADM\MDMDeviceID. For example, the value for DeviceClientId, like B8754F012852224A98FA6D36B0A271A9, is generated in real time during the device’s first enrollment attempt. After the DeviceClientId is created, this value does not change unless it’s manually deleted or the device is wiped/factory reset.
The UDID lives throughout the registry, task schedules, certificate subject names, and so on. Therefore, modifying this value will not successfully spoof/impersonate the device and breaks communication with the MDM management server.
Optionally, to further protect the MDM (OMA-DM) communication channel against spoofing, the Workspace ONE UEM admin can enable the MDM Channel Security setting in the Workspace ONE UEM console. The MDM Channel Security setting is found under All Settings > Devices & Users > Windows > Windows Desktop > Intelligent Hub Settings > MDM Channel Security. You can select from None, Signed, Encrypted, or Signed and Encrypted. For more information, see DMClient CSP in the Microsoft documentation.
Securing Data at Rest
Leveraging BitLocker Encryption
Consumer Simple Encryption
When it comes to BitLocker encryption for Windows Desktop devices, the security-by-design approach provides the best user experience. Security by design implements device encryption in a way that feels like a non-disruptive, natural part of the device experience.
Enterprise Secure Devices
Create a BitLocker encryption profile to keep Windows Desktop device data enterprise secure. After the profile is configured, Workspace ONE Intelligent Hub automatically enforces encryption settings as part of the device’s general security posture. Use the Workspace ONE UEM compliance engine to ensure devices remain compliant.
For more information, see Microsoft Docs: BitLocker Overview.
Solving Current Device-Encryption Challenges
Two security principles that are top of mind when dealing with device encryption are least privilege and separation of duties.
Workspace ONE UEM leverages role-based access controls (RBAC) for admins, allowing you to grant access to view recovery keys only to the admins who require access.
In addition to RBAC, Workspace ONE UEM logs each action of viewing a recovery key by each admin to the console event logs, which can also be sent to your preferred Syslog provider. This allows for InfoSec to audit admin access to recovery keys to prevent rogue admins from capturing all recovery keys, for example.
Workspace ONE UEM BitLocker encryption also helps in the following ways:
| Current Device Encryption Challenges | Workspace ONE UEM BitLocker Encryption |
| Additional license costs with third-party tools | Eliminate third-party license cost |
| Another third-party agent for encryption | Single agent for all advanced management capabilities |
| Inability to enforce encryption locally on the device | Local enforcement for off-network & off-domain devices |
| No separation of duties for admins | Granular, role-based access controls |
| Complex management via GPOs/scripts | Simple profile with comprehensive controls |
| Recovery key management | Auto escrowing of recovery keys |
| High help desk costs for end-user recovery | Self-service portal key retrieval |
It is recommended to enable BitLocker encryption to further enhance data at rest on the managed device. For more details on deployment and the capabilities via Workspace ONE UEM, refer to Enabling BitLocker Encryption to Remote Windows Devices: Workspace ONE Operational Tutorial.
Workspace ONE Intelligent Hub Database Encryption
The Workspace ONE Intelligent Hub stores data locally on the device in a SQLite database located in the install directory in the Data folder (e.g., C:\Program Files (x86)\Airwatch\AgentUI\Data). There are two databases awWindowsAgentProviderDb_Sqlite.sqlite and HubClientDb.sqlite. These SQLite databases leverage a 256-bit AES encryption in CBC mode.
Additional Security Considerations
This section provides high-level guidance on other features built-in to the Windows operating system as well as provided by Workspace ONE to further enhance the security posture of the managed device. These are solely recommendations on what to further explore and do not provide any configuration steps. Every use case is different, therefore ensure to further research and confirm with your Workspace ONE representative for more details.
Enabling Windows MDM Secure Channel for OMA-DM Communications
Workspace ONE UEM does not use Secure Channel for Windows Desktop, however, something similar can be done using MDM Channel Security options in the Workspace ONE UEM console.
For additional security you can choose to enable the MDM Channel Security settings in the Workspace ONE UEM console under All Settings > Devices & Users > Windows > Windows Desktop > Intelligent Hub Settings > MDM Channel Security. You can select from None, Signed, Encrypted, or Signed and Encrypted. Enabling this setting will force the communication between the Workspace ONE Device Services endpoint and OMA-DM client on the device to either be signed, encrypted, or signed and encrypted. Enabling this feature mitigates an attacker from snooping and intercepting the SyncML (OMA-DM payloads) and successfully performing man-in-the-middle (MitM) attacks. For more information, see DMClient CSP.
This will set the following registry during enrolment (this setting will only work on newly enrolled devices): HKEY_LOCAL_MACHINE\SOFTWARE\Microsoft\Provisioning\OMADM\Accounts\<Enrollment_GUID>\Protected\ConnInfo, EnhancedAppLayerSecurityCert0. This will have the Thumbprint for the device root certificate for its value. SecurityMode will be set to 0, 1, 2, or 3 which corresponds to none, signed, encrypted, or signed and encrypted. You will only see these values in the registry if the Workspace ONE UEM console is set to anything other than none.
Assessing Device Posture
Workspace ONE UEM assesses device posture by evaluating, locally enforcing, and remediating devices using the compliance engine, a Workspace ONE UEM tool that ensures that all devices abide by specified policies. A policy can include basic security settings or more critical security configurations.
The compliance engine detects non-compliant devices and sends end users a warning. If the end user addresses the issue after the warning, no further action is taken. If the end user fails to correct the issue in the specified time frame, it escalates, and disciplinary actions occur.
Use the Workspace ONE UEM Console to specify the escalation steps, disciplinary actions, grace periods, and messages. For example, the following figure demonstrates a tiered approach to compliance. With each security action, an end user’s non-response escalates the risk level.
Device Health Attestation
Device Health Attestation scans devices during startup for failures in device integrity. Use Device Health Attestation to detect compromised Windows devices managed by Workspace ONE UEM.
In both BYOD and Corporate-Owned device deployments, it is important to know that devices are healthy when accessing corporate resources. The Windows Health Attestation Service accesses device boot information from the cloud through secure communications. This information is measured and checked against related data points to ensure that the device booted up as intended and is not victim to security vulnerabilities or threats. Measurements include Secure Boot, Code Integrity, BitLocker, and Boot Manager.
Workspace ONE UEM enables you to configure the Device Health Attestation service to ensure device compliance. If any of the enabled checks fail, the Workspace ONE UEM compliance policy engine applies security measures based on the configured compliance policy. This functionality allows you to keep your enterprise data secure from compromised devices. Because Workspace ONE UEM pulls the necessary information from the device hardware and not the OS, compromised devices are detected even when the OS kernel is compromised.
For detailed information on how Device Health Attestation works, refer to Microsoft Docs: Control the health of Windows Devices.
Ensuring Policy Compliance and Enforcement
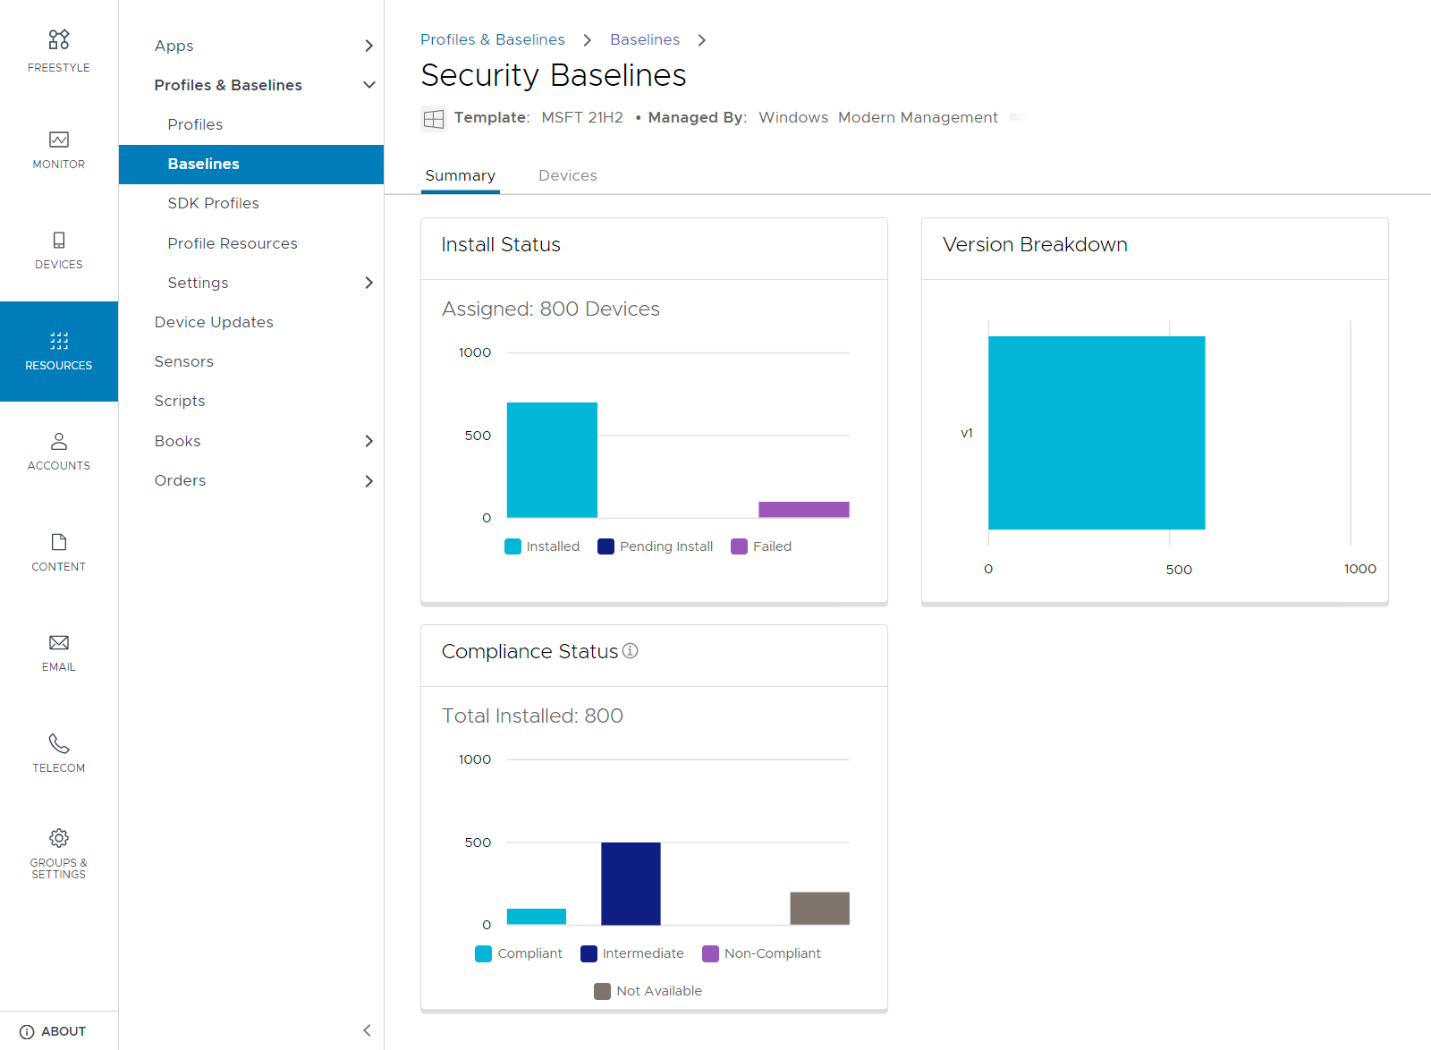
Workspace ONE UEM allows admins to push configurations and group policies to managed devices. Whether you are using MDM profiles or Workspace ONE Baselines, the configured policies are enforced locally. MDM profiles are enforced by the OMA-DM client, while Baselines are enforced by the Workspace ONE Intelligent Hub.
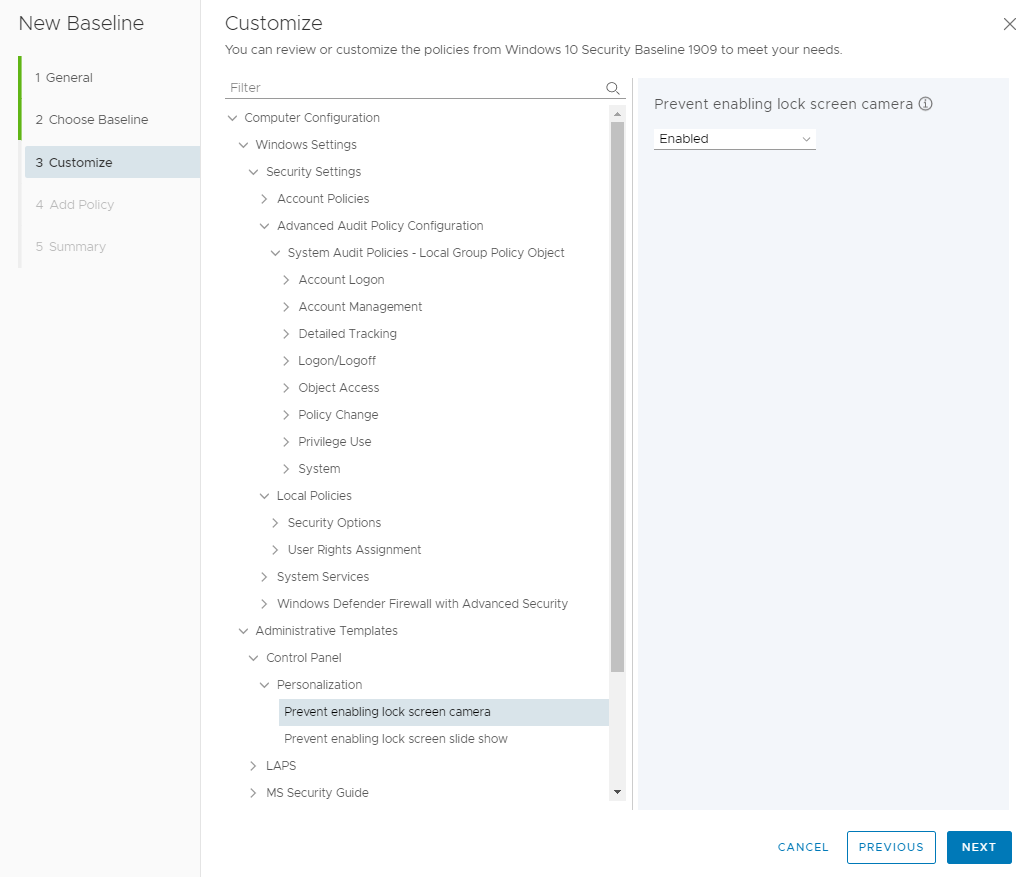
Workspace ONE Baselines allow you to keep all your devices secure with industry-recommended settings and configurations. It uses a cloud-based microservice that handles the policy catalog of settings to apply on devices. Baselines are based on GPOs and function in similar ways. For more information regarding Baselines, refer to Understanding Windows Group Policies: VMware Workspace ONE Operational Tutorial.
Workspace ONE allows for an administrator to create baselines based on industry-certified templates such as the CIS Microsoft Windows Desktop Benchmark and the Microsoft Windows Security Baselines for Windows 10 and Windows 11. You can add additional policies to a baseline that you create from an easy-to-use catalog of thousands of policies based on the Microsoft ADMX files.
Workspace ONE Baselines also helps you overcome the lack of feature parity between MDM profile configurations and traditional Group Policy Objects (GPOs). You can use Workspace ONE Baselines to create and deploy custom policies that match your GPOs or create new ones based on your business needs.
Summary and Additional Resources
Additional Resources
Getting Started with Windows Modern Management
Windows Onboarding
Windows Security and Policy Management
Windows Application Management
Windows OS Patching
Changelog
The following updates were made to this guide.
| Date | Description of Changes |
| 2023-09-26 |
|
| 2021‑08‑10 |
|
About the Author and Contributors
This guide was written by:
- Christina Minihan, Staff Architect, EUC Technical Marketing, VMware
- Darren Weatherly, Senior Architect, End-User Computing Technical Marketing, VMware
- Josue Negron, VMware alumnus
With significant contributions from:
- Saransh Bhatnagar, Senior Manager, Workspace ONE UEM Engineering, VMware
- Saurabh Jhunjhunwala, EUC Customer Success Architect, VMware
To comment on this paper, contact VMware End-User-Computing Technical Marketing at euc_tech_content_feedback@vmware.com.