
Getting Started with Freestyle Orchestrator
Overview
Device management is continuously evolving, and this rapid evolution has directly impacted the IT administrator experience. VMware Workspace ONE® UEM has been following every step of this journey, evolving and innovating with every release, allowing administrators to manage cross-platform devices to enable a true Digital Workspace experience.
To continue that innovation journey, we introduced Freestyle Orchestrator, which enables Workspace ONE UEM administrators to create complex workflows that fit specific requirements with flexibility and speed. Freestyle workflows can be used to set up resources such as applications, profiles, sensors, and scripts. These workflows use conditions to apply resources to devices based on granular criteria.
All the information provided in this article is based on the Freestyle limited availability release and will be updated as we release new versions.
Audience
This Getting Started guide is intended for existing or prospective Workspace ONE UEM administrators and IT professionals managing existing mobile and desktop environments.
What Problem does Freestyle Orchestrator Solve?
The current method to provision resources (profiles, applications, content, scripts, and so on) over-the-air based on MDM APIs started with mobile platforms and later extended to desktops, such as Windows 10, macOS, and Chrome OS. The management experience on each platform has specific needs; overall, administrators want to control the provisioning process, such as control of the sequence in which resources are deployed on the device, and define conditions based on the current resource state and external conditions that require specialized scripts.
There is a lot of complexity behind the scenes to deliver the desired management experience on desktop platforms, and the provisioning process requires knowledge across Workspace ONE and external tools, such as coding. Freestyle Orchestrator simplifies this process and allows administrators to visually define complex workflows in a very effective way.
Freestyle Orchestrator Requirements
Freestyle Orchestrator is supported on Windows and Mac, and requires the following components to be installed and configured:
- Workspace ONE UEM 2111 (or later) console
- For Windows 10 devices
- Workspace ONE Intelligent Hub 2109 (or later)
- For macOS devices
- Workspace ONE Intelligent Hub 2111 (or later)
- Workflow Engine (WFE) 2111 (or later)– available at Resource Portal.
Freestyle Resources
Freestyle workflow is a set of resources organized to be run in a specific order. The following resources are available per platform to be used as part of a workflow:
| Resources | Windows 10 | macOS |
| Applications (only internal apps) | ✓ | ✓ |
| Conditions | ✓ | ✓ |
| Groups | ✓ | ✓ |
| Profiles | ✓ | ✓ |
| Sensors | ✓ | ✓ |
| Scripts | ✓ | ✓ |
| Error Handling | ✓ | Coming soon |
Sensors
Sensors is a feature available for Windows 10 and macOS devices, it allows administrators to automate data collection for desktop endpoints using common scripting languages. For example, administrators can push a sensor to a set of devices to obtain the latest printer connectivity status, report the current device hostname, retrieve a specific version identifier of a component, and so on. You can use Sensors in reports, dashboards, and automations in Workspace ONE Intelligence.
With the introduction of Freestyle Orchestrator, we have added Sensors as a new condition in workflow creation. Using conditions, administrators can create complex criteria rules using sensor values to determine which resource actions to take on devices. You can configure Sensors to run periodically or based on system events and trigger workflow re-evaluations if the condition state changes. With Sensor conditions in Freestyle, administrators can automate configuration drift detection and remediation workflows across desktop endpoints.
Scripts
Scripts is a new resource added as part of Workspace ONE UEM 2111, which allows administrators to automate endpoint configurations on Windows 10 and macOS devices. For example, administrators can push a script to a set of devices to set the hostname of the device, configure driver mapping automatically, set up complex printer configurations, and so on.
Scripts differ from Sensors in that they do not return a specific value, rather they return an execution status. Scripts should be used for configuration or state-change use cases, and Sensors should be used for collecting information without making changes to the device state.
Scripts can be executed in many different ways:
- Individually as a separate resource directly assigned to devices through a Smart Group.
- Silently as part of an associated Freestyle Workflow, with a condition to perform additional steps based on the success or failure of the script.
- On-demand through the Intelligent Hub Catalog.
Scripts can run in the System or Current User context, and are available for Windows and macOS using the following languages:
- PowerShell for Windows.
- Python 3, Bash, and Zsh for macOS.
Scripts also allow the use of variables to securely pass information to the script environment. Variables can be defined with custom names, and include either static information or use console lookup values populated on the server-side. Scripts status is measured based on the exit/error/return code.
Consider the following best practices when writing scripts:
- Add error handling within the script to catch exceptions.
- Write scripts that do final validation and then explicitly end the script with 0 exit code to ensure a successful status change.
- Example: A script that is copying files or directories. Add lines to the script to validate that the copies were successful, then explicitly end the script with the 0 exit code.
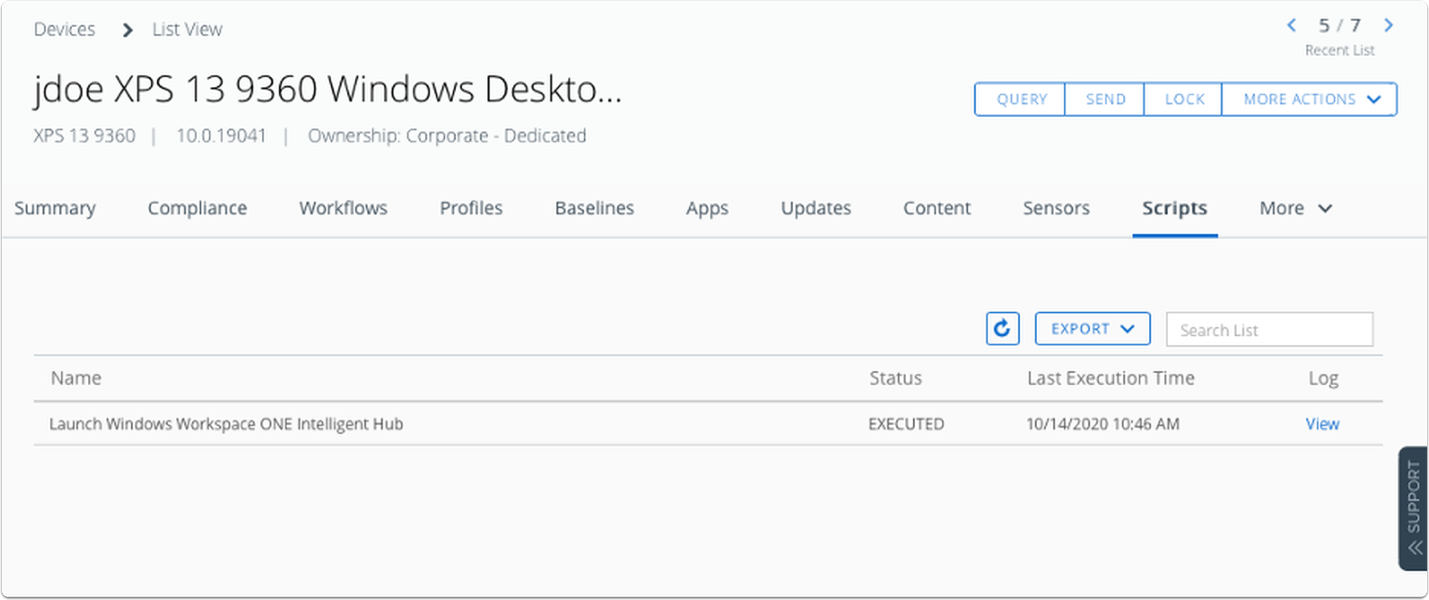
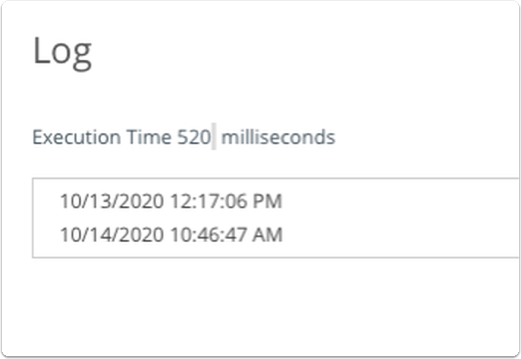
A Scripts tab is available under the Device details page to allow the administrator to identify the script details, including last execution time, status, log, and output.
Getting Started with Workflows
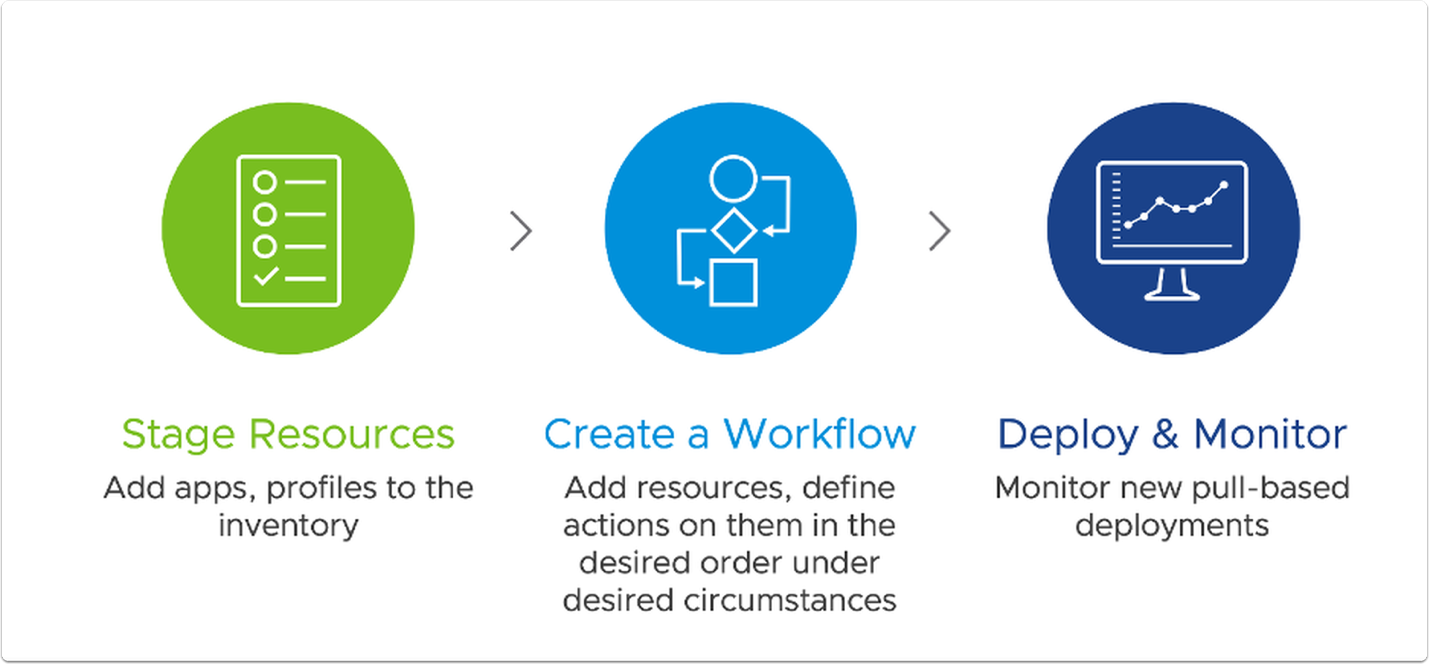
The process to create workflows is organized into three phases:
- Stage resources
- Create a workflow
- Deploy and monitor
Stage Workflow Resources
Before you begin creating workflows, you must add the required resources to your inventory. However, you need not assign the resources to the devices during resource creation.
When you add applications, ensure that the metadata is accurate and add a default application policy. For applications, it is mandatory to create a default policy. The application policies are responsible for in-app behavior and the default policy will be applied to all devices that receive an app from workflows unless the default policy is overridden by a specific policy for users.
When you add a script or sensor resource, identify the trigger and stage your script or sensor.
The resources can be staged at your organizational group (OG) or the parent OG.
Create a Workflow
After the required resources are added to the inventory, you can start creating the workflows. First, provide a name for the workflow, select the platform, and select a smart group for the workflow. All devices in the smart group to which the workflow is assigned, perform the actions specified in the workflow upon publishing. The workflows can be deployed on-demand through the Hub App Catalog or Auto Deploy configuration.
Before the workflow is published to end-user devices, administrators have the option to save an incomplete workflow to resume editing at a later point. However, after the workflow is published, subsequent edits are always published.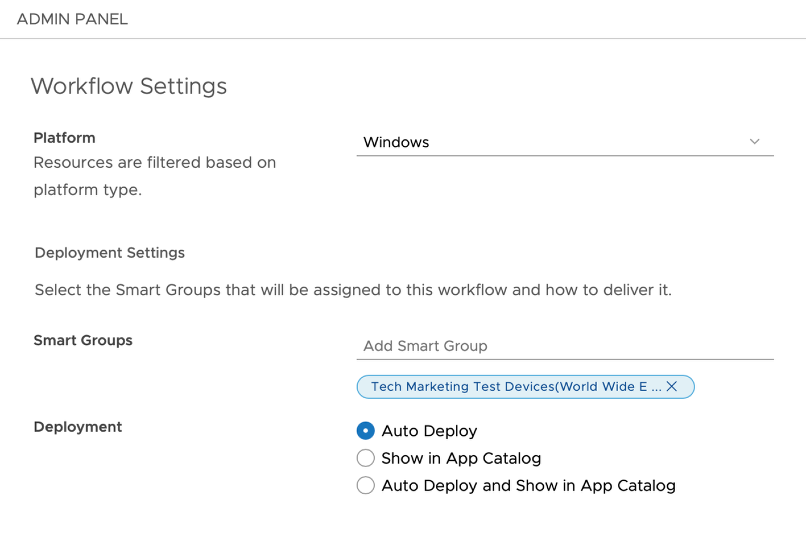
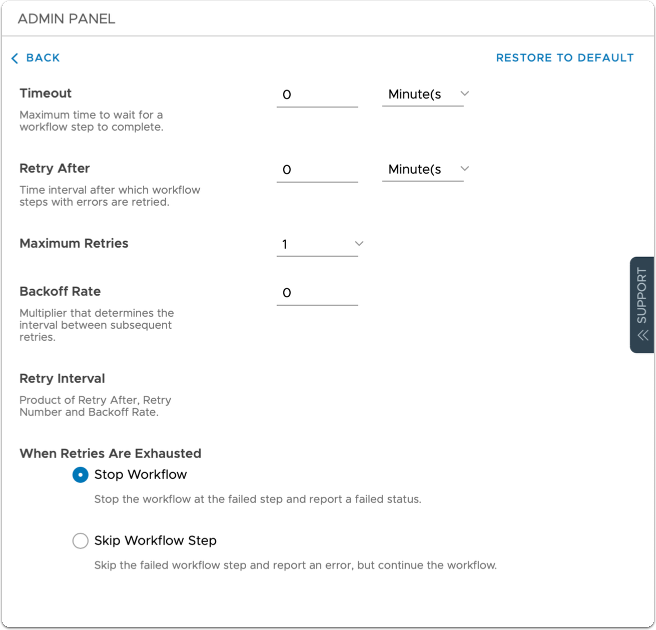
Manage the Workflow Behavior
Administrators manage the workflow behavior based on customizable settings that you can override, such as:
- Maximum time to wait for a workflow step to complete.
- Number of retries for workflow steps with errors.
The workflow settings in Workspace ONE UEM 2011 are available only for the Windows 10 platform.

Additional settings are available when creating workflow steps, such as:
- Error handling to decide if a workflow should skip to the next step or stop in case of errors.
This setting is available only when creating a workflow step.
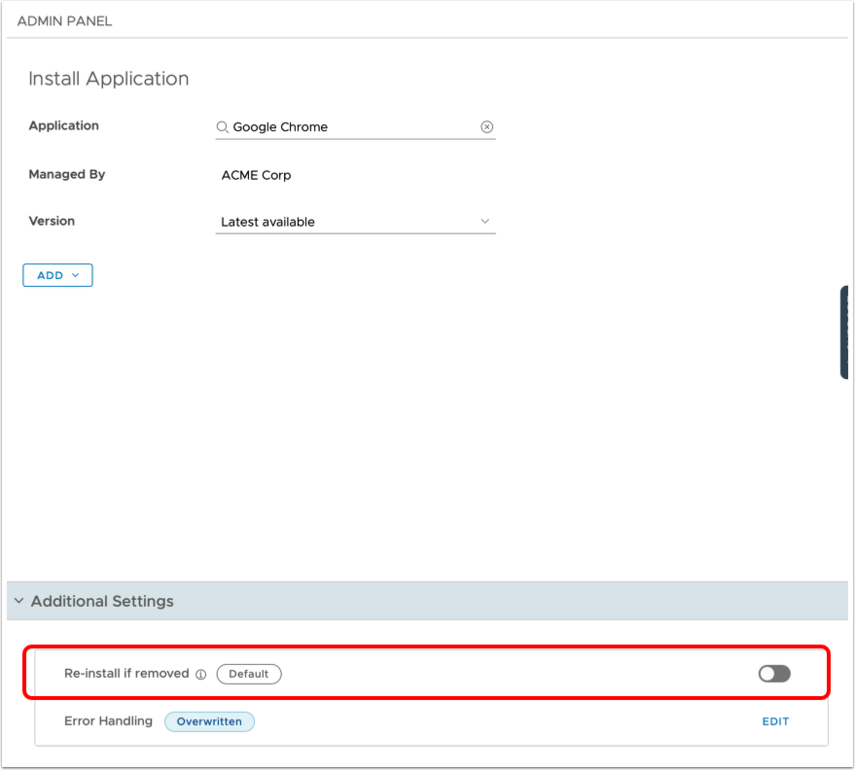
- Re-install if removed, when a resource is removed from the device.
Monitor the Workflow
After you create and assign workflows to the devices, you can monitor the progress of the workflow deployment.
You can view the workflow progress for all assigned devices, or you can view the workflow progress for individual devices. Navigate to the Device details page and check the workflow section for details of individually targeted validations.
You also have the event logs for devices which detail how the device is responding to the workflow.
Understanding the Workflow Lifecycle
The Workflow Lifecycle
Freestyle workflows are sent to the device in the form of a manifest file to be processed locally, minimizing the round trip between Workspace ONE Intelligent Hub and UEM API Servers in operations like identification of an application or profile deployed to a device. The new workflow engine (WFE) introduced as part of Intelligent Hub is responsible for processing each workflow manifest received from UEM when the device syncs.
Each workflow has a workflow UUID. A new workflow version is created and deployed to devices when changes are made to any of its steps. A new version of a workflow is created behind the scenes even when a resource linked to the workflow is updated.
Administrators have the option to save their progress in workflow creation before they publish the workflow to their end users. After the workflow is published, the save option is no longer available and all subsequent changes are published to end-user devices as a new workflow version. Workflows can be paused, allowing administrators to make the necessary changes and resume the deployment of the workflow to the devices.
In the current version of Freestyle Orchestrator, resources are not removed from the device when a workflow is deleted. Unenrolling devices from Workspace ONE UEM uninstalls all resources, apps, and profiles from devices including the ones installed through workflows.
Administrators can create workflows containing resources that are managed at or above the organization group (OG) where the workflow is created. Administrators cannot add resources to a workflow that is managed at a child OG of the group where the workflow is created.
To summarize, when a workflow is published, a manifest is sent to all devices that are part of the assigned smart group when the devices check-in. The workflow engine processes each workflow step locally and does not rely on server-side timing and execution to provision the resources. To support this new approach, a micro-service architecture has been developed.
Time Windows (Business vs Maintenance Hours)
Time Windows allow you to schedule updates and content delivery in Workspace ONE UEM and takes into account your business and maintenance hours. Make your Time Window by scheduling start and end dates, duration, and repeat options.
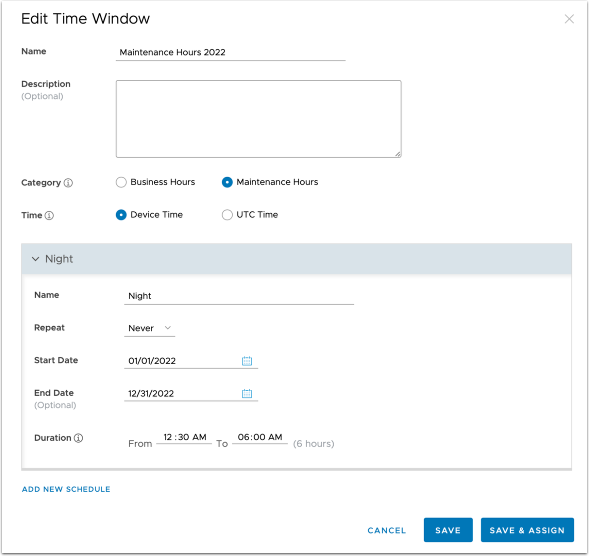
Time Windows is integrated with Freestyle, it can be used as part of a resource condition allowing the administrator to specify that some steps can be only executed during maintenance or business hours.
Common scheduling use cases are:
- As a banker, I do not want to get interrupted with app updates in front of the customer.
- As an admin, I want to schedule application installs only during specific maintenance windows.
- As an admin, I want to work on my own time and not worry about local time on devices, customer work hours, and so on.
- As an end user, I want to set up a time window where I am not bothered by any updates or installations ("Do not Disturb mode").
- As a customer, I want to utilize the application installation time to download files for the next installation.
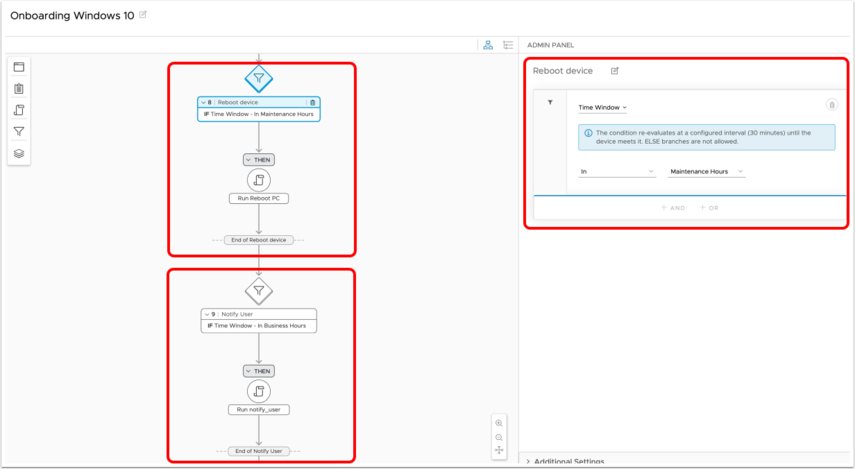
In the above workflow, a reboot is required at the end of the execution. However, this will only happen if the device time is on the range that matches the maintenance hours, otherwise, a script will be executed to notify the user to reboot the device later. The reboot and notify_user steps execute a PowerShell script previously defined in Workspace ONE UEM by the administrator.
Defining the Use Case
A better understanding of the use case and requirements will help to organize the resources in Workspace ONE UEM and define the workflow. The workflow becomes a logical way to achieve a goal, which can evolve as new use cases emerge from business needs.
Consider a Windows 10 device-onboarding use case where you must provision resources in a specific order; where security-related resources must be deployed first, before applications and tools required for the end user to perform their job. The applications and tools that access corporate resources cannot be provisioned unless the secure resources are available.
The business requirements look simple; however, when we translate them into technical requirements, they map to profiles with different types of payloads (restrictions, certificates, custom settings, and so on), applications, specialized scripts, conditions to validate the resource state, and more. The use case in this example translates into the following functional requirements:
- Deploy VMware Carbon Black Sensor to provide advanced protection to the endpoint.
- Ensure that the Carbon Black Sensor checked in with VMware Carbon Black Cloud.
- Configure device policies for additional protection of corporate data on the device.
- Provision the required resources (Per-App VPN profile and Workspace ONE Tunnel App) to enable Per-App VPN on the device, allowing the end user to securely access corporate applications.
- Deploy and configure all corporate tools, such as Chrome, CRM, Zoom Client for Meetings, and Microsoft Office.
- Deploy and configure Outlook plugins like Zoom Meetings only when Microsoft Office is installed.
You must configure the Profiles and Applications resources in advance and as per the following list to be used as part of the workflow:
- Set Applications to on-demand deployment. Resources set as automatic are provisioned outside the workflow.
- Application resources must contain at least one assignment rule for default policy. However, resources provisioned by the workflow use the smart group assigned to the workflow.
- If a profile resource contains direct assignments, it is best practice to set the resource as optional to avoid overlaps in direct and workflow assignments.
If a resource such as an application or a profile is assigned to a device and configured for automatic deployment, in addition to being assigned to the device as part of a workflow, the resource will be installed based on whichever command is processed by the device.
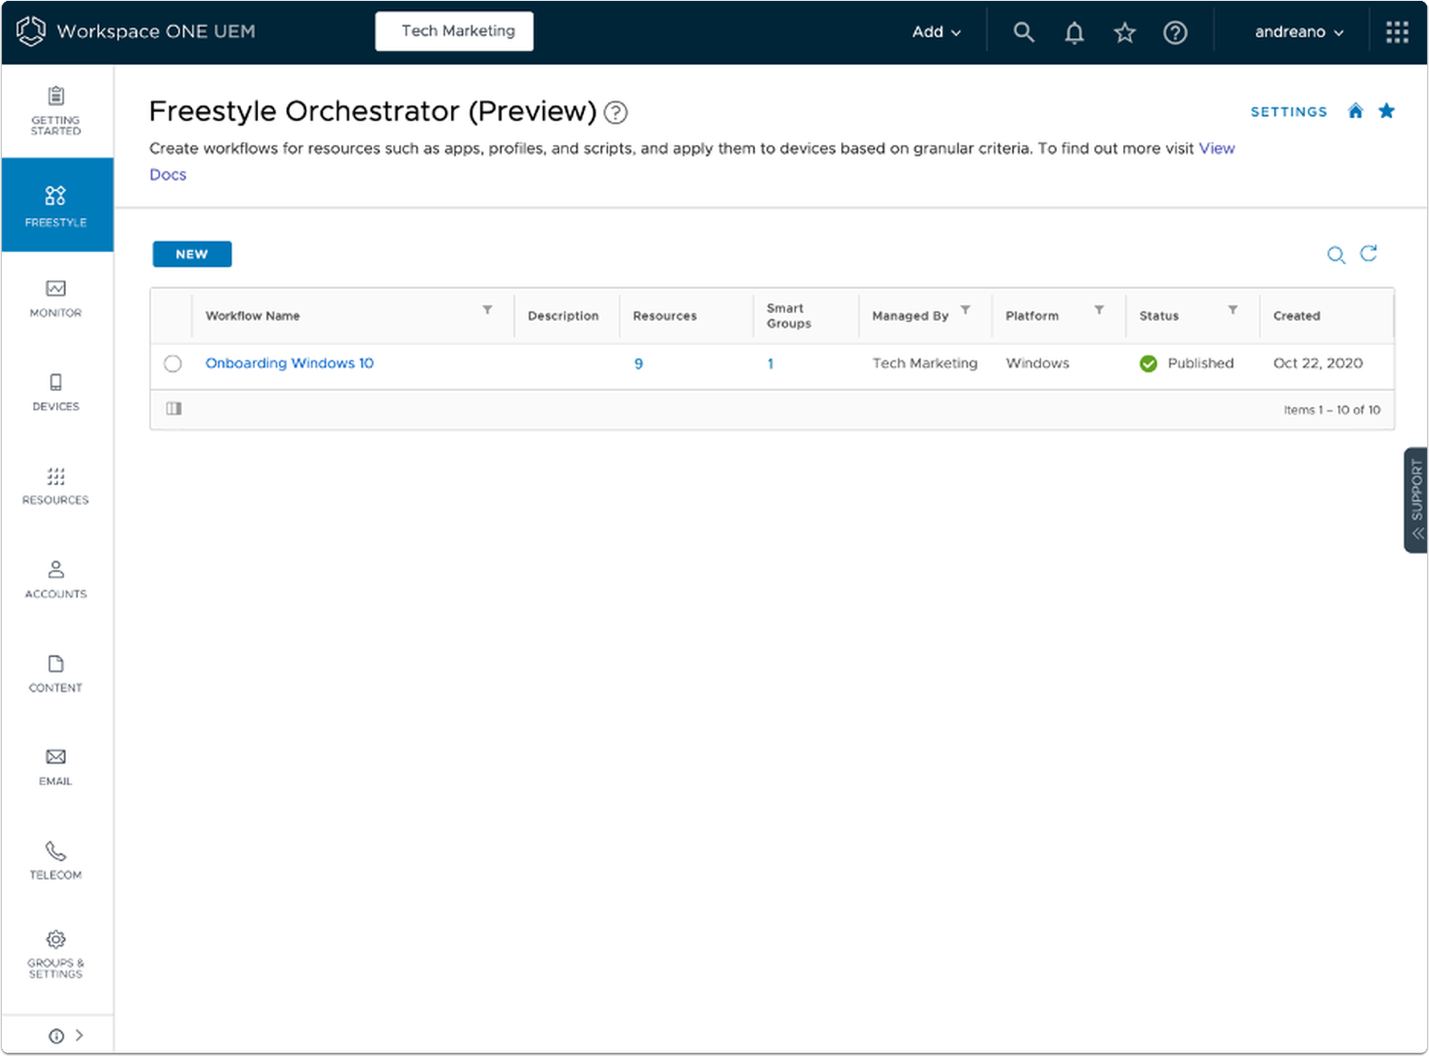
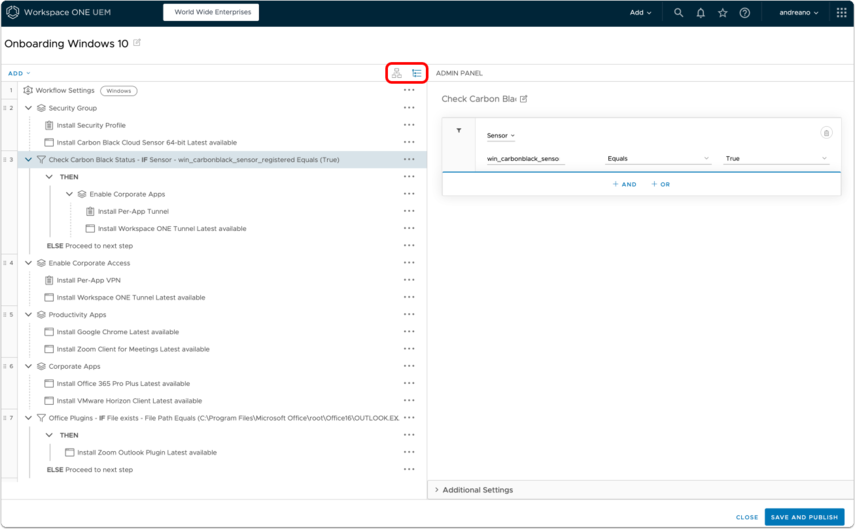
The Windows 10 device-onboarding use case can be translated into a Freestyle Workflow with several steps to satisfy the conditions and successfully complete the workflow. Administrators access the Freestyle Orchestrator Designer through the Workspace ONE UEM Console.
Translating the Use Case into a Freestyle Workflow
When you understand the requirements, it is easier to map the requirements into a workflow. In this section, we review how the use case will translate into a workflow and walk through each step.
Flow Builder vs List Builder Visualization
The Freestyle UI provides the flow builder and list builder methods to create and visualize the workflow. You can switch between them anytime during the use of Freestyle UI.
Flow Builder Visualization

List Builder Visualization
Step 1: Defining Platform and Target Devices (Workflow Settings)
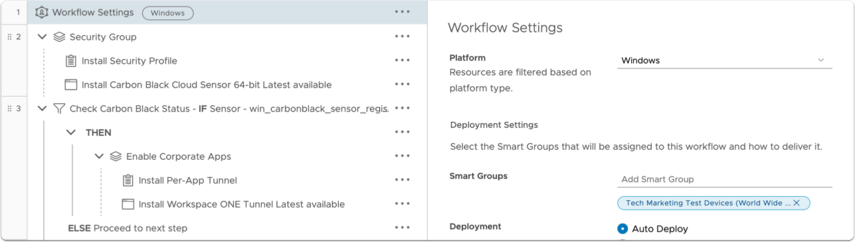
The first step is to create a Workflow for a specific platform (currently Windows 10 or macOS), which will enable the resources available for that platform on the Designer.
Note that the workflow is run against devices in the smart group(s) selected in this example and not against the devices assigned to the resources.
Step 2: Deploying Security Resources (Apps and Profile)
As the goal is to deploy and configure security resources first, in step 2 a Security Group is defined to organize the security resources in the workflow, grouping them and ensuring that the workflow moves to the next steps only after all of the secure resources have completed.
All resources within a Group are installed simultaneously without any inherent dependencies. Groups also help to organize the flow.
If the security resources are added outside the group, each one would be run sequentially.
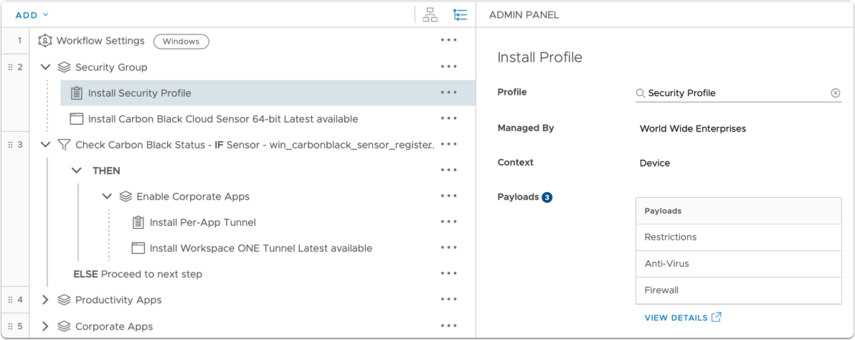
A Profile containing multiple payloads related to the device security is deployed based on the workflow’s assigned smart group, and not the one assigned to the Profile.
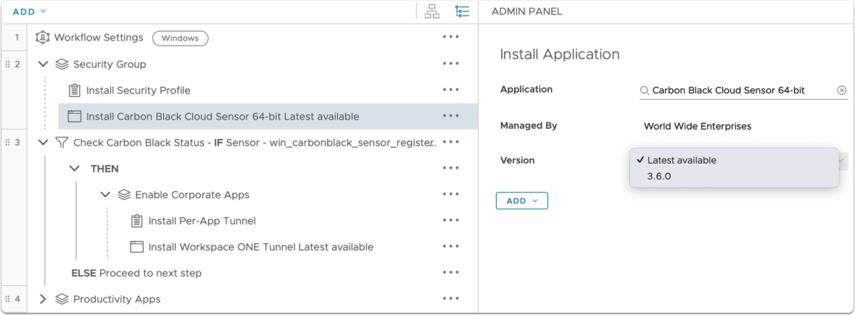
Administrators can deploy applications based on specific versions or the latest available version. In this use case to protect the endpoint, the Carbon Black Sensor is deployed and configured to check-in with the specific customer Carbon Black Cloud Sensor.
The Carbon Black Sensor was previously added as an internal app using an MSI installer and set as on-demand for deployment.
To deploy apps through a Freestyle Workflow, consider the following requirements and limitations:
- Default app policies must be configured for each app version. Because the default policy is tied to full app entitlement, administrators can create an empty smart group and associate it with the default policy.
- App approval, EULA, and required apps from direct app assignments will be ignored by the workflows.
- PSADT, reboot, user context, MST, and app retry checks will be honored.
- App versioning: When the latest version for an app is selected in the workflow, if the administrator adds a new version for this app but cancels the assignments without saving it, the new version will not be recognized. The administrator must add at least one direct assignment which is a default policy and publish the assignment.
- App exclusions only apply to direct assignments. If devices have workflow assignments with the same application, then the app will still be installed. Workflow exclusions are part of the roadmap to be added in the future.
- Dependency apps cannot be added to workflows.
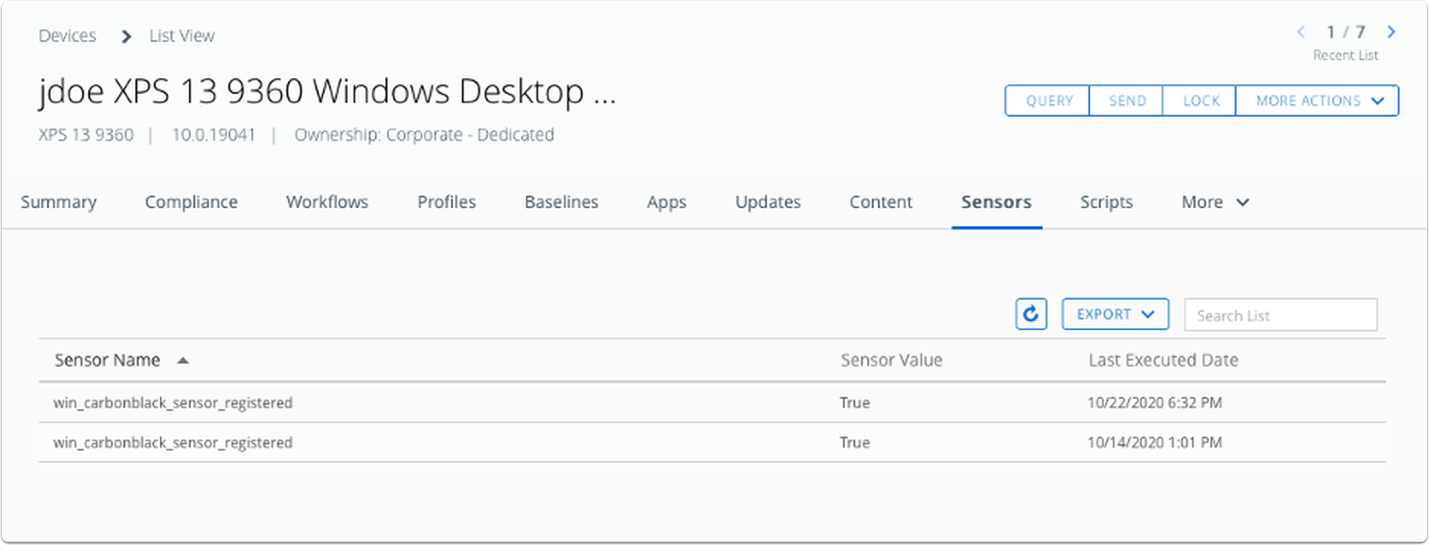
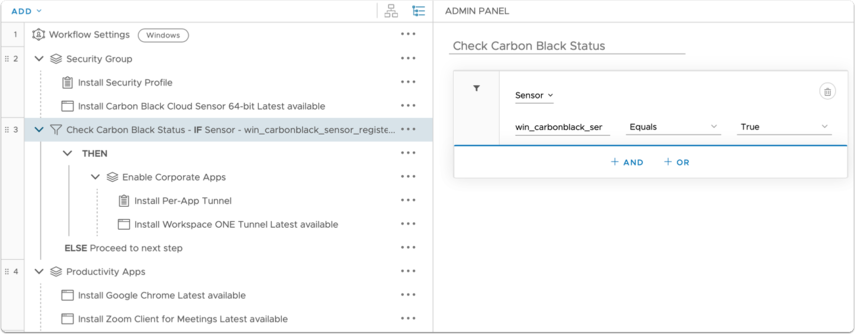
Step 3: Provisioning Workspace ONE Tunnel based on a Sensor Condition
After step 2 is completed, a condition based on Sensors is added to determine if the device checked in with Carbon Black Cloud. The goal with this condition is to ensure that access to internal corporate resources is enabled through Per-App VPN only after the device is properly secure with Carbon Black.
When a Sensor is part of a workflow condition, the sensor is executed by the Intelligent Hub WFE on the device during condition evaluation, instead of reading the latest sensor value synced with Workspace ONE UEM.
Best practices to be considered when writing Sensors:
- Add error handling within the sensor to catch exceptions.
- Write sensors that perform final validation and then explicitly end the script with the correct value and data type (string, integer, Boolean), as this determines how the returned value can be evaluated during the workflow.
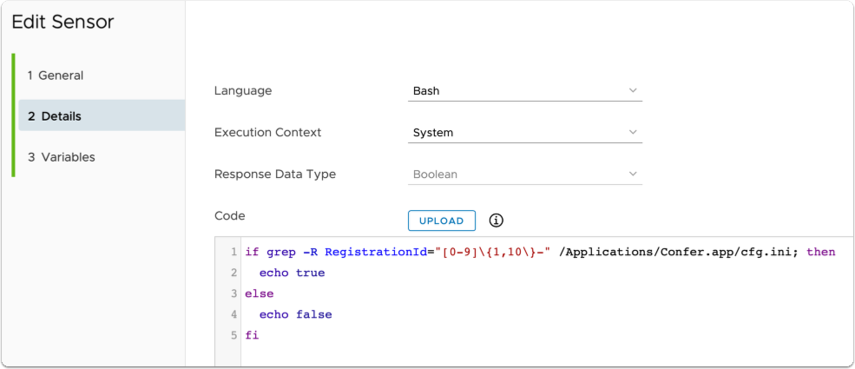
For this use case, when deployed to macOS devices, a sensor written in Bash, Zsh, or Python is required to identify if the Carbon Black Sensor checked in as demonstrated in the following screenshot.
As an administrator, you might have multiple applications that require access to internal corporate resources and want to use VPN to grant access. The administrator can create a group to deploy the resources that will enable secure access to the corporate network. For example, administrators can provision the Workspace ONE Tunnel app, Per-App VPN profiles, DLP solutions to enhance device security preventing data leakage, and more.
In this example, another group (Enable Corporate Access) under the condition was created to ensure that all of the resources that enable Per-App VPN are installed prior to the deployment of corporate tools, allowing the user to access and manipulate the corporate data only the device checked-in into Carbon Black Cloud. Otherwise, the workflow moves to the next step without enabling Per-App VPN on the device.
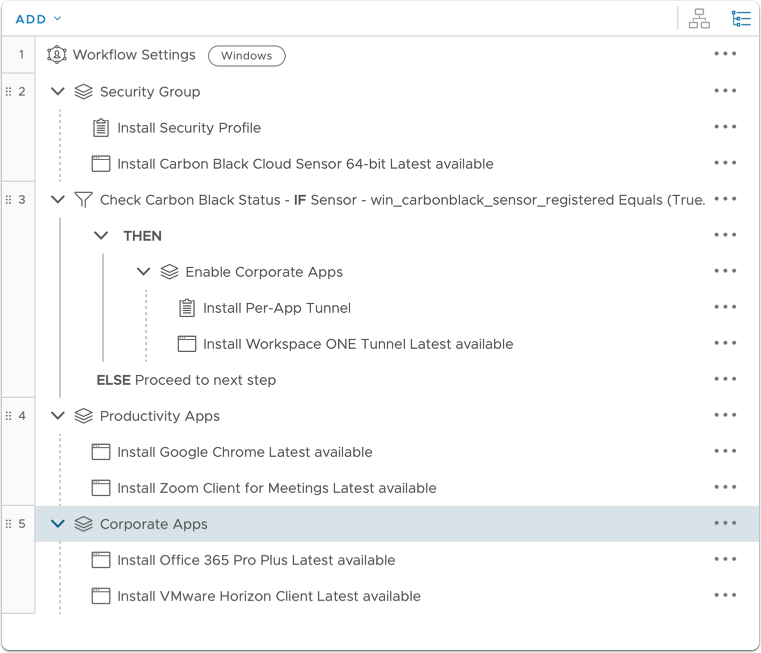
Steps 4 and 5: Provisioning Productivity Apps and Corporate Tools (Group)
The end user requires a collection of apps to perform their job; that ranges from simple utility tools to productivity and corporate apps. For this use case, Google Chrome and Zoom Client for Meetings are the productivity apps, and Office 365 Pro and VMware Horizon Client are Corporate Apps.
All of those apps already added as internal applications for on-demand deployment and assigned to a default smart group are added to the respective group.
As a reminder, the productivity and corporate apps can be added as individual steps to the workflow. Now that we have multiple steps added, you can see the benefit of grouping resources into a group.
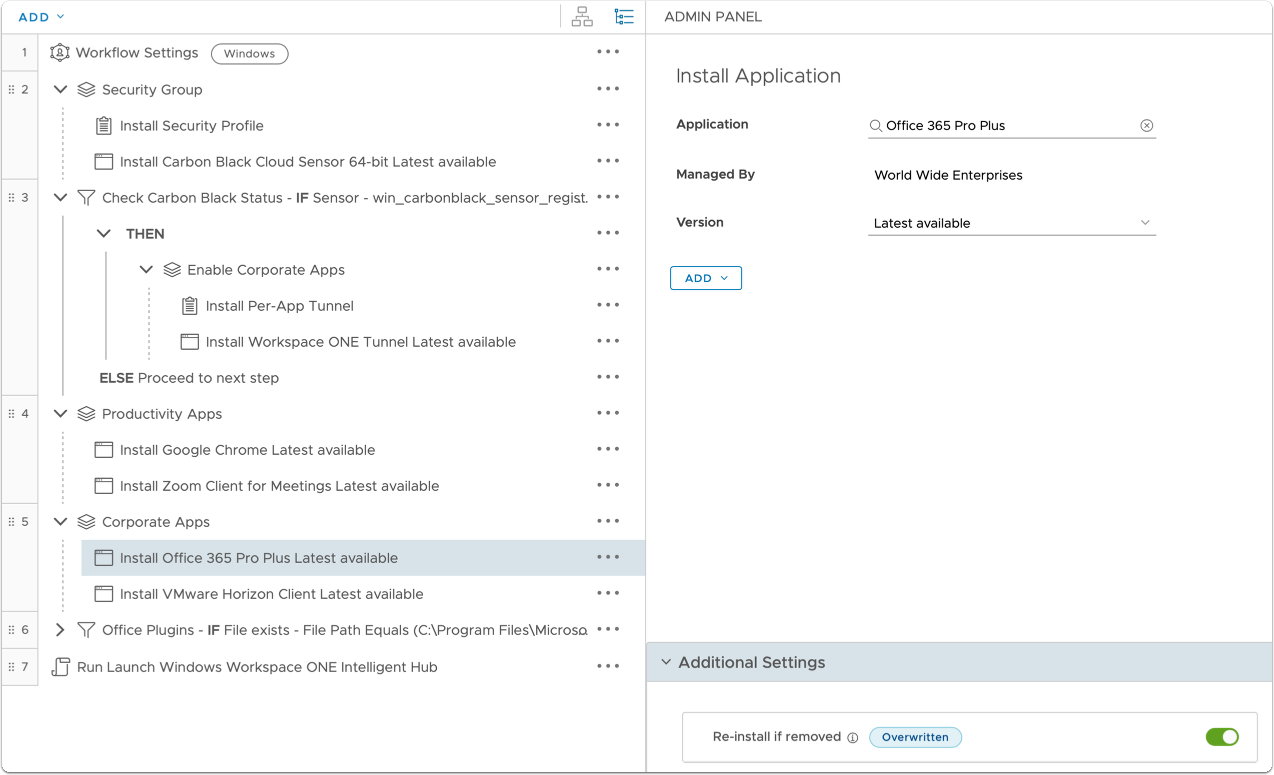
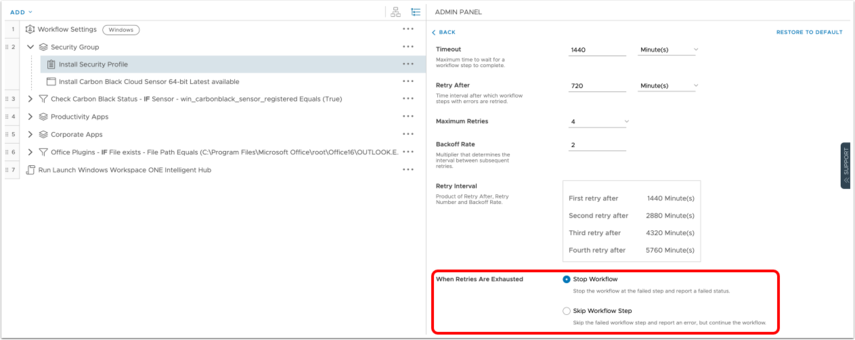
Because many Windows devices already have Office 365 installed, the deployment of a different version configured by the administrator could fail, resulting in a workflow with a failed status. To avoid this issue, administrators have the option to override the Error Handling setting for each workflow step. In this example, for the Office deployment step only, switch the When Retries Are Exhausted configuration to Skip Workflow Step. This option skips the failed workflow step and reports an error but continues with the workflow.
Note: Error handling is currently available only for Windows 10-based workflow.
Step 6: Installing Office Plugins Based on Condition (Groups and Condition)
Finally, the user must integrate the Outlook Zoom plugin with Microsoft Outlook to easily schedule meetings. Other plugins might be required in the feature.
Because there is a dependency, the workflow must perform a condition check (IF THEN) in Freestyle to ensure that Outlook is installed and then deploy the Zoom Outlook plugin otherwise (ELSE) proceed to the next step.
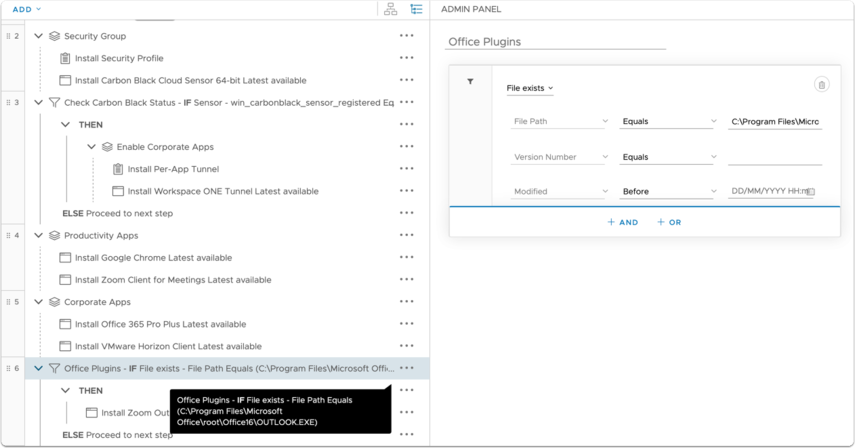
Conditions can be based on the Application, File, Registry, and Sensor values. For conditions based on the Sensor, the workflow engine runs the sensor immediately before the condition comparison to get the latest value.
Complex condition rules separated by And, OR are supported. However, OR is used as a separator. That is, A AND B OR C OR D AND E is evaluated as (A AND B) OR (C) OR (D AND E).
- Else followed by another If condition is treated as
Else-If. - Else block does not support a sequence of steps. If you require a sequence of steps under else, an
Else-Ifshould be used.
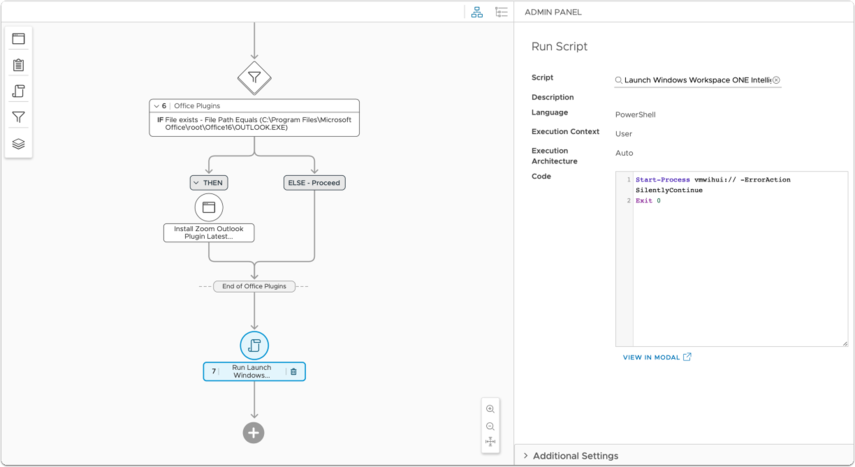
Step 7: Launching Workspace ONE Intelligent Hub (Script)
All the steps up to this point are silent and the user receives notifications when each app is getting installed through the Workspace ONE Notifier. To make sure that the user knows when the provisioning process is completed, the administrator can add a final step that opens the Workspace ONE Intelligent Hub Catalog when the computer is unlocked by creating the following script step.
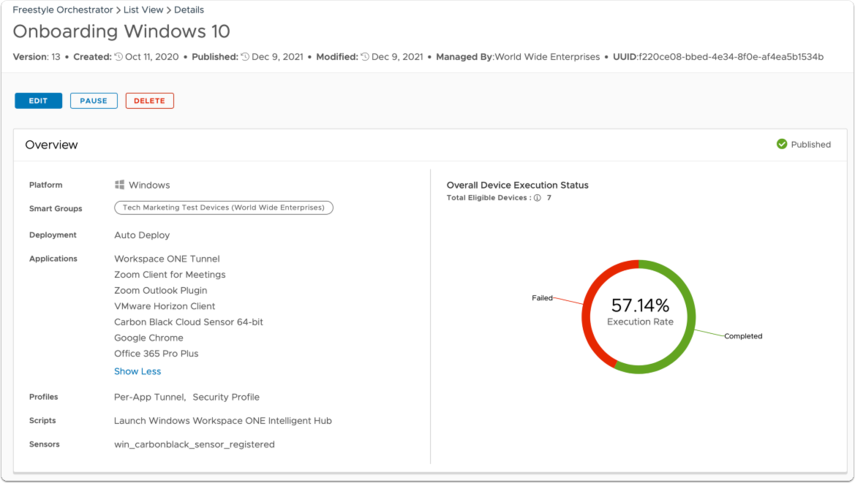
Monitoring the Freestyle Workflow
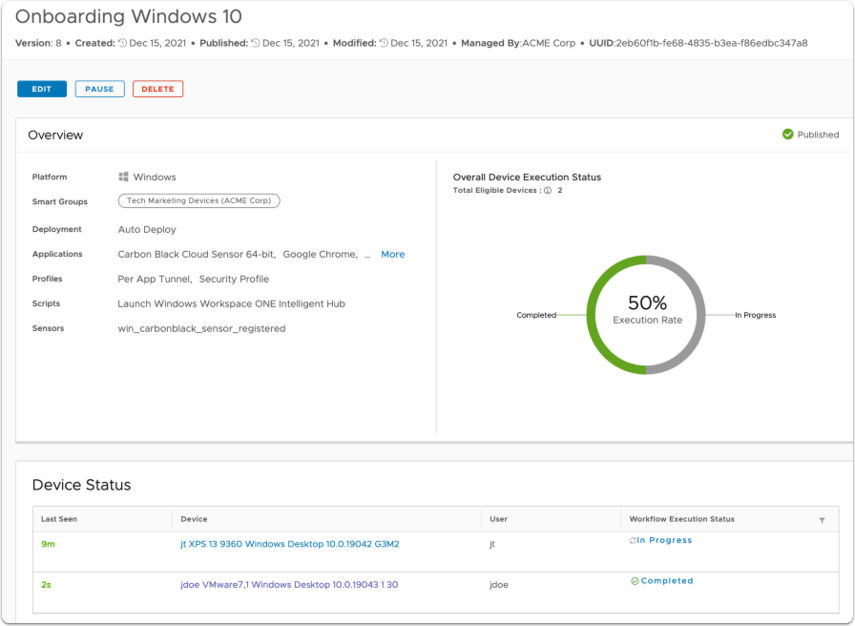
Administrators can monitor the progress of the workflow deployment after it gets published. They can view the progress of the workflow for all the assigned devices under the Device Status list on the Workflow details page. 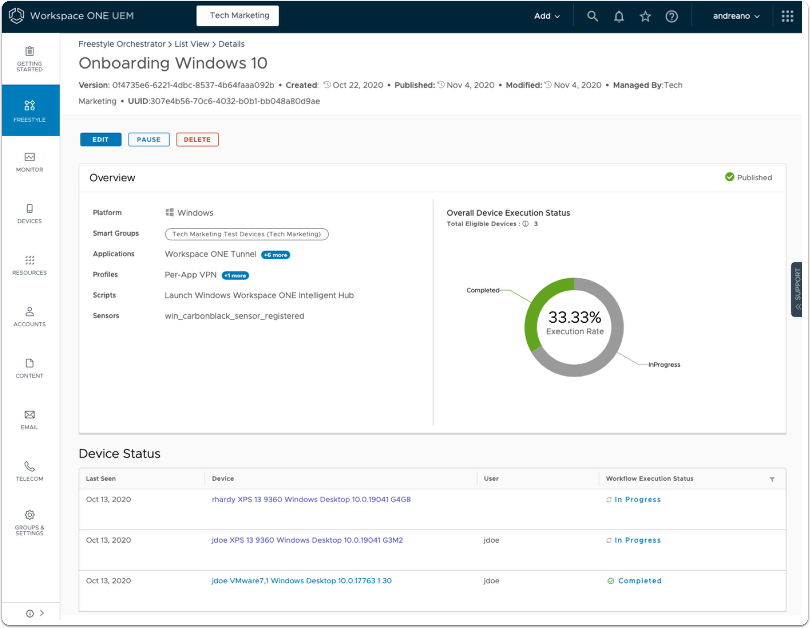
From the devices listed, the administrator can navigate to the individual progress of each step for each device.
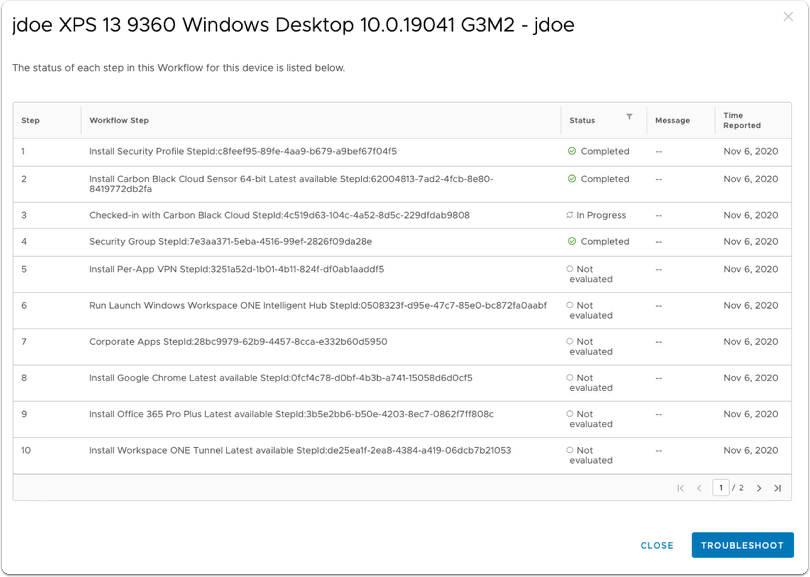
Under the Device details page, administrators can use the Workflow page to obtain the same workflow details presented by the Workflow details page.
The Workflow page provides the current status of the workflow and each step. To refresh the status, the administrator must use the Sync Workflows option under More Actions.
Troubleshooting the Freestyle Workflow
Administrators can troubleshoot the workflow using the Workspace ONE UEM console, server, and device logs. It is recommended to start with Workspace ONE UEM console as this will define the next steps in the troubleshooting process.
In addition to the Monitoring page, administrators can navigate to Devices > List View > Troubleshooting to obtain additional logs related to the workflow execution and resources. They can also filter and search for logs only related to the workflow.

Server-Side Troubleshooting
After the workflow is published, check the following to troubleshoot on the server.
- Device Workflow Sync: These details are generated after the workflow is published and the device syncs within 4 hours to receive Workflows.
- Server-side log entries are generated in the
DevicesGateway.logandAW_MDM_API.log. - Report Status: Immediately reports status as
in-progress. - Server-side log entries are generated in the
InterrogatorQueueService.log.
- Server-side log entries are generated in the
![]()
- Workflow Execution: When the Workflow execution is finalized, it reports as Completed, Failed, Blocked, or Completed with exceptions state.
- Report Status: Final status report based on sample interval.


Device-Side Troubleshooting
The workflow engine execution generates new logs (DSM.log, Workflow.log) on the device which are located under:
- Windows:
C:\ProgramData\Airwatch\UnifiedAgent\Logs - macOS:
/Library/Logs/Workflow
For additional details on the workflow execution and real-time information check the following:
For Windows:
- If the workflow is not getting pulled by the device, administrators can refer to the
workflow.log,DSM.log, andTaskScheduler.logto find out if there is any issue with respect to sync. - If the workflow is getting blocked due to the reason "App Deployment Agent" not present on the device, then verify if the AirWatchMDM registry is available under the path
(HKEY_LOCAL_MACHINE\SOFTWARE\AirWatchMDM). - If a particular App installation step fails to result in workflow failure, refer to the
DSM.logfor issues with queuing of app install and theworkflow.logfor the exact step failure reason. - If a condition step is failing, check the
DSM.logfor issues while querying the device state and the workflow.log for the exact failure reason. - Blocked workflows are re-triggered every 4 hours, from the blocked step. Currently, the workflow status will be blocked only when Software Distribution (SFD) is not present on the device.
- Failed workflows are re-triggered every 24 hours, from the failed step. The workflow sample is reported according to the agent data sample schedule configured on the console. (Data Sample Interval is configured under Settings > Windows > Windows Desktop > Intelligent Hub Settings. The default data sample interval configured is 6 hours).
- If the workflow step to install OMADM-targeted profiles is in progress, check the profile status on the server and check the
profile-uuidentry in the registryComputer\HKEY_LOCAL_MACHINE\SOFTWARE\Microsoft\Provisioning\NodeCache\CSP. Also, verify in theTaskScheduler.logthat the Profile Status Monitor is running. - For a failed Profile installation, check the
workflow.log.
For macOS:
- Every time the workflow engine Host (WFE) starts/restarts, it waits for the Agent to send a setup message. WFE proceeds with pulling workflow mutations from the server only after receiving this message. You can investigate the Agent logs using the console to check if the agent sent the setup message to WFE.
- If the workflow is not getting pulled by the device, administrators can refer to the
workflow.logto find out if there are any sync issues. This log file is created under(/Library/Logs/Workflow/Workflows.log). - If a particular app installation step fails to result in workflow failure, refer to the workflow engine host logs and Agent logs for issues with queuing of app install and workflow log for exact step failure reason.
- Blocked workflows are re-triggered every 4 hours, from the blocked step.
- Failed workflows are re-triggered every 24 hours, from the failed step.
- Blocked/Failed workflows are re-triggered on manual agent sync and on querying workflows from the console.
- Workflow status is reported when the workflow execution begins on the device and workflow reaches a terminal state (Failed/Blocked/Completed).
- For a failed Profile installation, check the workflow logs.
- When communicating with the Device Gateway service, if the HMAC token has expired, WFE requests the Agent to send the new HMAC token. Hub sends the new HMAC token within the Setup message.
- WFE tries to update itself every 24 hours. It checks with the device gateway endpoint to see if a greater version is available and then upgrades itself.
Summary and Additional Resources
This Getting Started guide provided an overview of Freestyle Orchestrator and Scripts, it included steps to create Freestyle workflows based on sequence and conditions across multiple resources on Windows and macOS.
Additional Resources
For additional information on Freestyle Orchestrator, visit the Freestyle Tech Zone page and use videos and tutorials to learn about use cases that Freestyle solves.
Also, see the Workspace ONE UEM Product Documentation at VMware Docs.
Changelog
The following updates were made to this guide:
| Date | Description of Changes |
| 2022/01/11 |
|
| 2021/11/23 |
|
About the Author and Contributors
- Andreano Lanusse, End-User-Computing Staff Architect, Technical Marketing, VMware.
Feedback
Your feedback is valuable.
To comment on this paper, contact VMware End-User-Computing Technical Marketing at euc_tech_content_feedback@vmware.com.