
Troubleshooting macOS Management: Workspace ONE Operational Tutorial
Overview
VMware Workspace ONE® UEM provides a comprehensive management solution for macOS devices, supporting macOS 11 and higher. With the ability to manage Corporate-Dedicated, Corporate Owned, or Employee Owned (BYOD) devices, Workspace ONE UEM offers enterprises the flexibility to meet their employees’ needs at any level.
In this tutorial, you learn how to troubleshoot macOS features in a VMware Workspace ONE® UEM environment. Procedures include parsing the Unified Log, validating console settings, and deploying profiles that aid troubleshooting.
Purpose of This Tutorial
This macOS troubleshooting guide provides general troubleshooting guidance, as well as solutions to specific problems for various macOS features in Workspace ONE UEM. The exercises in this tutorial are targeted to those with previous macOS management experience in the Workspace ONE UEM product.
Audience
This operational tutorial is intended for IT professionals and Workspace ONE administrators of existing production environments. Both current and new administrators can benefit from using this tutorial. Knowledge of the following technologies is helpful:
- macOS 11 Big Sur and later
- Common scripting and configuration languages, such as Zsh, Bash, and XML
- Apple Business Manager or Apple School Manager
- VMware Workspace ONE UEM and VMware Workspace ONE Access
Knowledge of additional technologies such as VMware Workspace ONE® Intelligence and VMware Workspace ONE® UEM is also helpful.
Getting Started with macOS Troubleshooting
Understanding the Workspace ONE Solution Components
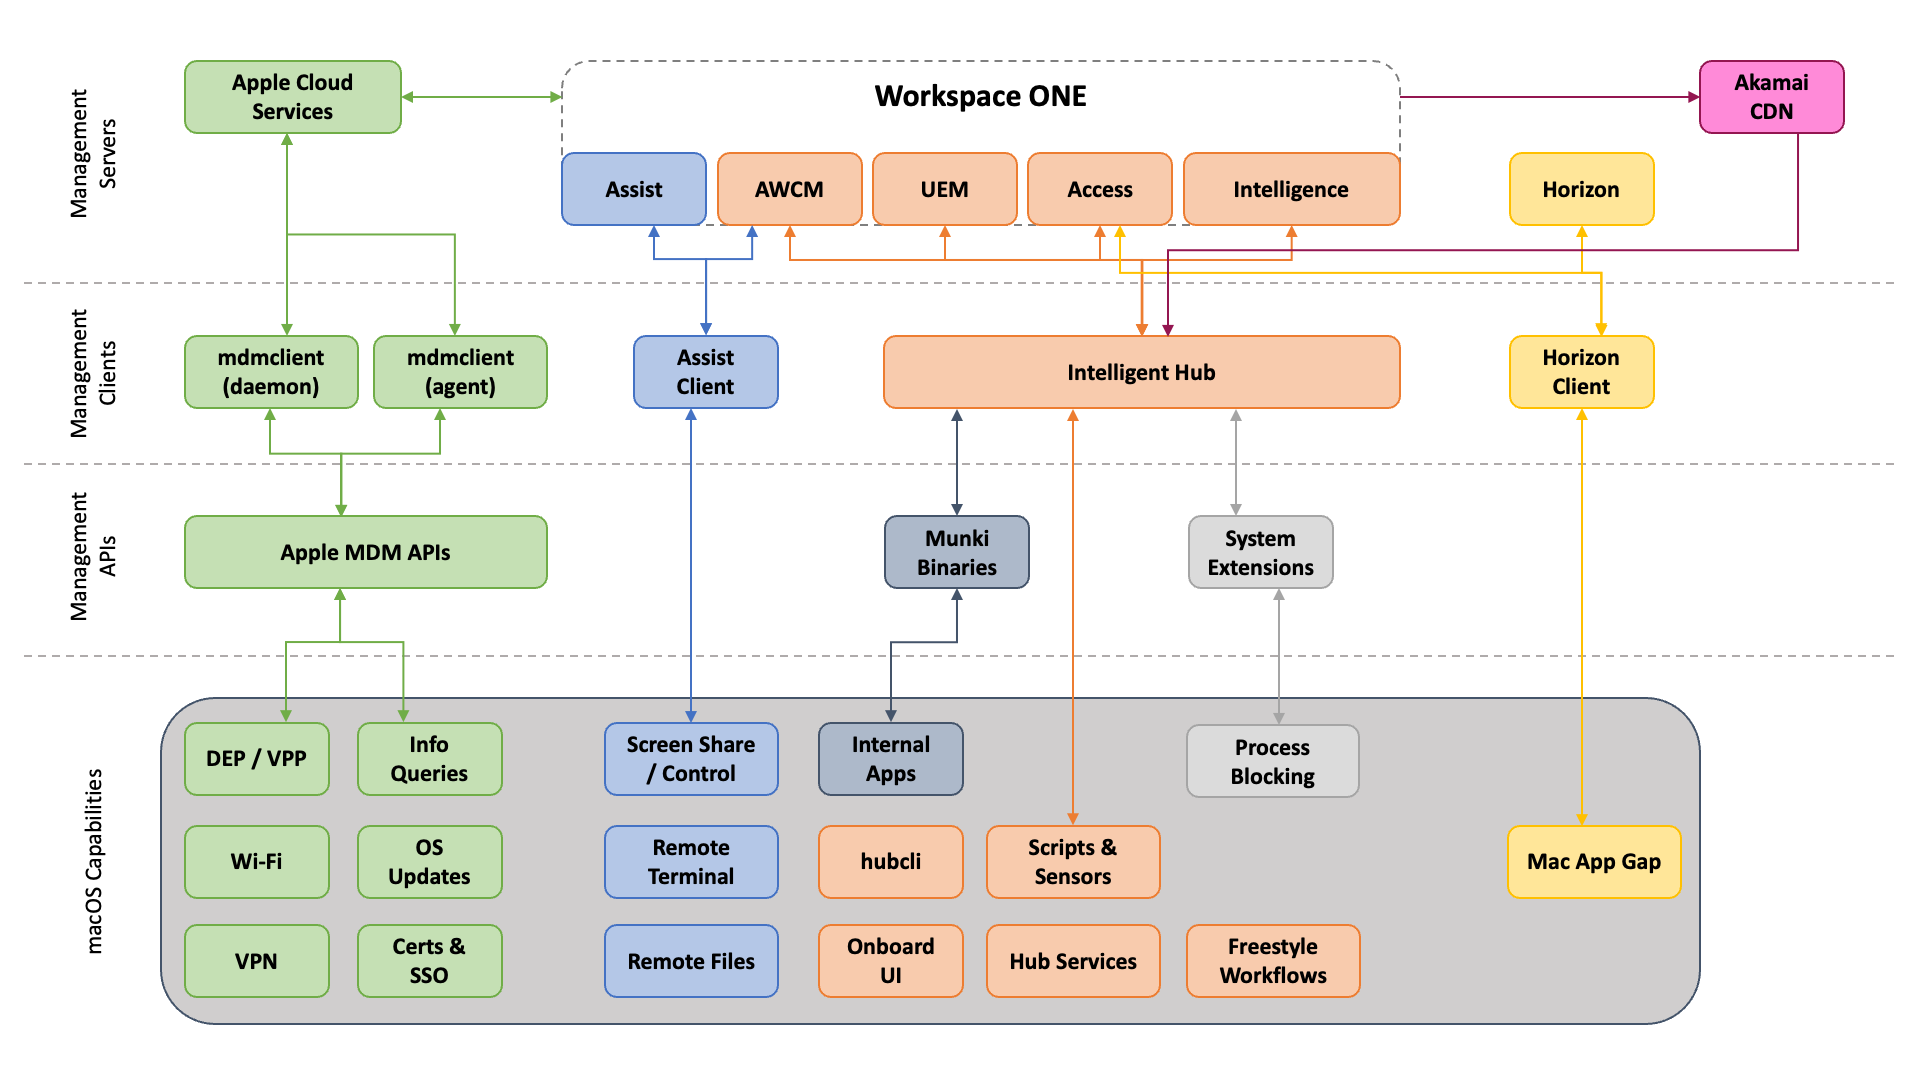
Workspace ONE uses multiple components to create the entire macOS management stack. Some of these components are supplied by Apple, whereas others are value-added functionality included with Workspace ONE. Along with the client-side components and management clients installed on macOS devices, there are also a number of server-side components and management services used in the Workspace ONE solution stack. The following diagram offers a high-level representation of the Workspace ONE solution stack and the communication path between components.
Client-side Components
Workspace ONE relies on several client-side components to manage macOS devices. These components, installed on the devices, provide MDM management, application deployment, remote assistance, and other functionality.
The following table details each client component, its function, and the supplier (Apple or VMware).
| Client Component | Supplier | Use(s) |
| mdmclient (process) | Apple (built-in to the OS) | Native MDM client running in root (daemon) and user (agent). Responsible for enacting any functionality defined in Apple’s MDM specifications, such as profiles, apps, enrollment, and so on. Workspace ONE communicates to these two processes via Apple Push Notification Services (APNS). |
| dasd | Apple (built-in to the OS) | Duet Activity Scheduler daemon. This process monitors system health and can sometimes interrupt/delay normal activity and service startup. In some cases, this can affect things such as out-of-box enrollment. |
| appstored | Apple (built-in to the OS) | (macOS 11 Big Sur and later) App Store download daemon. Responsible for downloading apps from the app store (for example, volume-purchased apps) and bootstrap packages. |
| Workspace ONE Intelligent Hub for macOS | VMware (installed) | Used for value-add functionality with profiles and configuration, employee experience, and internal apps. Workspace ONE communicates with Intelligent Hub using AirWatch Cloud Messaging (AWCM). |
| Workspace ONE Assist Client | VMware (installed) | Allows for remote control, file management, and running remote shell commands from Workspace ONE. Communicates outbound to the Workspace ONE Remote Management server and AWCM. |
| Unified Logging | Apple (built-in to the OS) | Most processes within macOS no longer write to |
Server-side Components
macOS management in Workspace ONE makes use of numerous server/cloud-based components. It is critical to ensure that macOS has network connectivity to each of these components, as specified in the following lists of network requirements:
- Using Apple Products on Enterprise Networks
- If your Apple devices are not getting Apple push notifications
- Workspace ONE ports and DNS names
Management Services
Workspace ONE utilizes multiple services for macOS management. Each of these services plays a crucial role in the overall functionality of your Workspace ONE environment. If one or more of these services are unavailable, macOS management will be impacted and/or limited until the impacted services are restored. These services included:
- APNS (Apple Push Notification service) and AWCM (AirWatch Cloud Messaging) – Both of these services are used for real-time device notifications.
- Workspace ONE UEM (including the console, device services, and API servers) – These are the core services of the Workspace ONE solution. This provides the management console, device communications, integration into Apple and other services, application and profile management, and additional features.
- Workspace ONE Assist – This tool is used for remote device control (for example, helpdesk support), as well as remote file access on devices.
- Workspace ONE Access and Hub Services – These services support employee experience, single sign-on, and conditional access.
- Workspace ONE Intelligence – A reporting and automation (including partner ecosystems) tool for monitoring Workspace ONE.
- Horizon – A virtual desktop solution for enabling the Mac App Gap or Windows-based applications that need to be accessed and used by macOS users.
Management Clients
Clients communicate to Workspace ONE UEM on behalf of the device. The following components are the primary list of clients you must manage on a device as you adopt the entire solution stack:
- mdmclient - The built-in device management client which is part of macOS.
- Workspace ONE Intelligent Hub - The agent which communicates to Workspace ONE UEM and Hub Services to augment device management value-added functionality, the upcoming system extension for process blocking, the unified catalog, and employee experience features.
- Assist Client - The client which facilitates remote troubleshooting sessions (remote control, remote file, and remote terminal).
- Horizon Client - The client which provides access to remote datacenter-hosted applications from macOS.
Validating Workspace ONE UEM Console Settings
When configuring and managing Workspace ONE, some common misconfigurations can happen accidentally. This section provides a quick reference on where to find these common misconfigurations and how to correct them if necessary.
Network Settings
Network connectivity is a common issue and should be verified. Workspace ONE management of macOS devices requires network connectivity to several endpoints at a variety of vendors: Apple, VMware, Akamai, and more (depending on your particular situation). Each vendor maintains a list of required DNS and port names.
The following links point to the latest vendor-required DNS and port names.
System Statuses
The following links can be used to verify the status of various required services, as well as determine if there are any known outages at Apple or VMware.
- Apple System Status
- Apple Developer System Status
- Workspace ONE Status
- Workspace ONE Intelligence Status
Common Configuration Issues
Managing macOS requires regular maintenance, just as would be expected with other platforms. The following list highlights the most common configuration issues that can arise when managing devices.
- If you have trouble deploying newly purchased volume licenses to machines, or devices are not proceeding through Automated Enrollment, check the following:
- Has Apple released new Terms of Use that must be accepted by an administrator in Apple Business Manager (or Apple School Manager)?
See If Apple Business Manager, Apple Business Essentials, or Apple School Manager Asks to Approve New Terms and Conditions. - Has the sToken for the Apple Business Manager location expired?
Navigate to Groups & Settings > Configurations > VPP Managed Distribution and check the Valid Until date and time. If expired, click the Renew button and follow the process.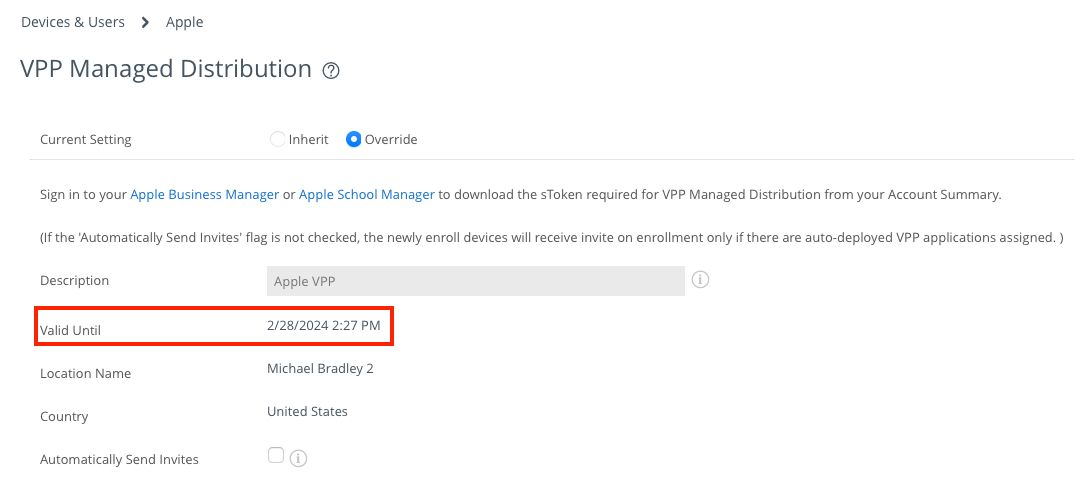
- Has Apple released new Terms of Use that must be accepted by an administrator in Apple Business Manager (or Apple School Manager)?
- If devices are not checking in for commands in a reasonable amount of time:
- Check the APNS Certificate Expiration Date: Navigate to Groups & Settings > Configurations > APNS for MDM and check the Valid To date. If expired, you must log in to the Apple Push Certificates portal and Renew the existing certificate.
Caution: If you replace the certificate instead of renewing it, Workspace ONE will lose connectivity with your devices and you will be required to re-enroll those devices. - Check the device-side APNS status - open Terminal and enter the following command:
/System/Library/PrivateFrameworks/ApplePushService.framework/apsctl status - Check for AWCM connectivity.
- Navigate to Groups & Settings > All Settings > System > Advanced > Site URLs. Scroll down to find the AWCM Server External Hostname. Copy the URL into your browser address bar and append
/awcm/statusto the end.
For example, https://awcm1380.awmdm.com/awcm/status. AWCM should return OK. - In the Device Details view, ensure that the specific device in question shows AWCM Connected.
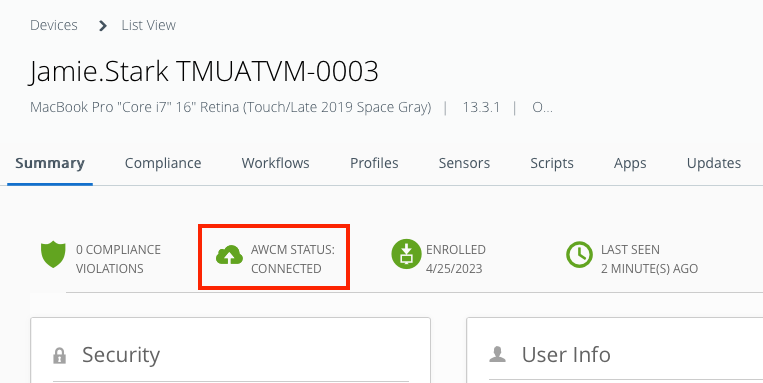
- Navigate to Groups & Settings > All Settings > System > Advanced > Site URLs. Scroll down to find the AWCM Server External Hostname. Copy the URL into your browser address bar and append
- Check the APNS Certificate Expiration Date: Navigate to Groups & Settings > Configurations > APNS for MDM and check the Valid To date. If expired, you must log in to the Apple Push Certificates portal and Renew the existing certificate.
Getting Started with macOS Log Collection
Determining the root cause is a logical first step in troubleshooting. Workspace ONE UEM provides logging to assist IT admins with the troubleshooting process. When troubleshooting issues with managing macOS devices, there are two sets of logs that you should focus on.
- macOS Intelligent Hub Logs
- macOS Unified Logs
macOS Intelligent Hub Logs
For reference, most file-based troubleshooting information is found in the following files within hub logs:
-
install.log- log file generated by the built-in macOS installer process. -
hublogs.log- Console logs related to Intelligent Hub processes and mdmclient. -
ManagedSoftwareUpdate.log- log generated by Intelligent Hub components during Internal Application management.
Collecting macOS Intelligent Hub Logs
There are three ways to collect the Intelligent Hub logs from macOS devices.
- Request hub logs from the Workspace ONE console.
- Request hub logs using the hubcli.
- Collect user-generated logs.
Each of these options will be discussed in this section.
Request Hub Logs from the Workspace ONE Console
Workspace ONE administrators can request the Intelligent Hub to gather historical logging and deliver those logs to the Workspace ONE UEM Console.
- In the Workspace ONE console, select Devices, and then click List View.
- From the list, select the device from which you want to request logs.
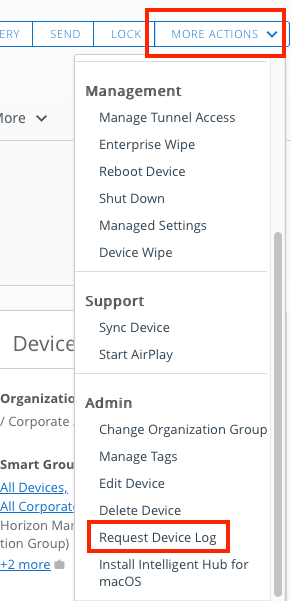
- On the Device Details page, click More Actions.
- From the dropdown menu, click Request Device Log.
Request Intelligent Hub Logs Using hubcli
You can request Intelligent Hub logs from the macOS device using the hubcli. The command instructs Intelligent Hub to send the diagnostic logs to the Workspace ONE UEM console.
- On a macOS device that has Intelligent Hub installed, launch the Terminal app.
- Enter the following command:
sudo hubcli logs --send --duration 1h
NOTE: The--durationflag denotes the duration of logs to be sent. In the above example, the duration is one (1) hour.
Collect User-Generated Logs
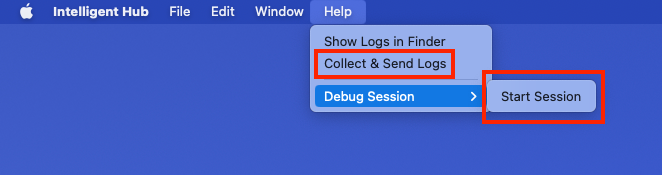
End users can generate and send logs from their devices to Workspace ONE. The following steps will show you how to start a debug session using verbose logging.
- On a macOS device, launch Intelligent Hub.
- Click Help.
- Click Debug Session, and then Start Session. Clicking the same path allows the user to End the debugging session prior to the 30-minute default session timeout.
- From the Help menu, click Collect & Send Logs.
Download Intelligent Hub Logs in Device Details
After you have requested the device logs, you can download and view them from the Workspace ONE console.
- In the Workspace ONE console, click Devices.
- From the List View, select a specific device to enter the Details View.
- Select Attachments in the drop-down menu.
- Select Documents.
- Click the Hub_Complete_Report you want to download and view.
Monitor Internal App Logging in Real-Time
If you are troubleshooting an issue with Internal Apps for macOS, you can easily view the logging for that in real-time on your test device (or via remote command line through Workspace ONE Assist). The following command tails the last 25 lines in the ManagedSoftwareUpdate.log file:
tail -n 25 -F /Library/Application\ Support/AirWatch/Data/Munki/Managed\ Installs/Logs/ManagedSoftwareUpdate.log
Understanding macOS Unified Logging
Apple introduced Unified Logging with the release of macOS 10.12 in 2016. The unified log offers IT admins a comprehensive mechanism to capture logging data across all levels of macOS. The unified log replaced traditional Unix-style text-based logs with a single logging mechanism for user and kernel processes. The unified log takes a more developer-focused approach, capturing greater amounts of data in a compressed format in a fashion that is consistent across each Apple OS (macOS, iOS, tvOS, watchOS).
This new compressed format is no longer human-readable. To read and write to this new log format, admins will need to use either the Console or the log and logger command-line utilities.
When troubleshooting, the log command is the most flexible, in that it allows you to gather multiple processes and subsystems simultaneously. Although much of the information required to run the log command can be found in the manual (man log), the following sections offer some guidance on using these tools.
Useful Tips and Tricks to Search Logs
The following are some tips and tricks that can save you time:
- The
logcommand requires "straight" quotes and not "curly" quotes. This issue can crop up during copy/paste operations. - You can gain additional information by adding the
--infoand--debugparameters to your log command line. - Add
--archive system_logs.logarchiveto search inside a SysDiagnoselogarchivefile.- Generate a SysDiagnose file from the computer in question:
sudo sysdiagnose -f -n ~/Downloads
- Generate a SysDiagnose file from the computer in question:
- For more in-depth detail, you can install some of the developer debugging profiles from https://developer.apple.com/bug-reporting/profiles-and-logs/
- Predicates support "and" (
&&) and "or" (||) operators as long as you include parentheses to wrap each filter. For example,--predicate '(process == "mdmclient") && (eventMessage contains "SetAutoAdminPassword")'
Important: Many details in logging commands are hidden for privacy. Most likely, you will not need to enable this. However, if you intend to enable private data logging, you must send a custom settings profile with the following content (or manually fit this content into a mobileconfig file and install it):
<dict>
      <key>PayloadDisplayName</key>
      <string>Enable ManagedClient Private Logging</string>
      <key>PayloadEnabled</key>
      <true/>
      <key>PayloadIdentifier</key>
      <string>com.apple.system.logging.982757D5-775E-4330-A5EF-089B3B5F4249</string>
      <key>PayloadType</key>
      <string>com.apple.system.logging</string>
      <key>PayloadUUID</key>
      <string>982757D5-775E-4330-A5EF-089B3B5F4249</string>
      <key>PayloadVersion</key>
      <integer>1</integer>
      <key>System</key>
      <dict>
        <key>Enable-Private-Data</key>
        <true/>
      </dict>
</dict>
Predicate-Based Filtering for Log Command
A predicate is a logical expression which evaluates to TRUE or FALSE, normally to direct the execution in code. Predicates are building blocks for filtering the macOS unified log. The following table outlines the predicates available for the log command.
| Predicate | Description |
| | The type of event: |
| | The pattern within the message text, or activity name of a log/trace entry. |
| | For |
| | The name of the process that originated the event. |
| | The full path of the process that originated the event. |
| | The name of the library, framework, kernel extension, or mach-o image, that originated the event. |
| | The full path of the library, framework, kernel extension, or mach-o image, that originated the event. |
| | The subsystem used to log an event. Only works with log messages generated with |
| | The category used to log an event. Only works with log messages generated with |
For example, if an IT admin wishes to search the unified log for entries related to a specific subsystem, they would use the following command:
log show --predicate 'subsystem == "com.example.my_subsystem"'
If you want to search the unified log for subsystem and category, you would use the following command:
log show --predicate '(subsystem == "com.example.my_subsystem") && (category IN { "category1", "category2" })'
Log and Find Troubleshooting Session Time Markers
As you begin to troubleshoot an issue, you can start logging time markers directly into the unified log by using the logger command. You can then later search for these markers by using the log command. The following represents a way to bookmark the start and end time for troubleshooting activities:
- Log a marker in Unified Logging for troubleshooting events:
logger "[WS1-Support] Starting <activity>"andlogger "[WS1-Support] Ending <activity>" - Search for all markers to determine troubleshooting time frames:
log show --predicate 'process=="logger" AND eventMessage CONTAINS "[WS1-Support]"'
With the list of times for troubleshooting activities output by the log command, you can later filter for events constrained to those time frames by using the --start "YYYY-MM-DD HH:MM:SS" --end "YYYY-MM-DD HH:MM:SS" parameters on your log commands. Remember that the hours (HH) are in 24-hour format, and displayed in the machine's configured time zone.
Find and Use System Boot Times
At times, you may be troubleshooting unexpected system restarts and kernel panics. In this instance, you may not know exactly when the system restarted in order to work your way backward through the logs. In this particular case, you can search the unified log for system start messages in order to find timestamps of where to end your logging.
- Find the system boot times using grep:
log show --start "YYYY-MM-DD HH:MM:SS" | grep "=== system boot" - Use the system boot time as the "end" parameter in any
log showorlog collectcommand:--end "YYYY-MM-DD HH:MM:SS"
As mentioned above, you can filter for events constrained to specific time frames by using the --start "YYYY-MM-DD HH:MM:SS" and --end "YYYY-MM-DD HH:MM:SS" parameters on your log commands. Remember that the hours (HH) are in 24-hour format, and displayed in the machine's configured time zone.
Examples Commands to Get You Started
- Find any Logging Markers for the past 12 hours in a SysDiagnose:
log show --archive ~/Downloads/sysdiagnose_2023.10.06_00-55-25-0400_Mac-OS-X_iMacPro1-1_19G73/system_logs.logarchive--predicate 'process=="logger" AND eventMessage CONTAINS "[WS1-Support]"' --last 12h - Filter for Events in Specific Time Slots (Based On Your Markers):
log show --archive ~/Downloads/sysdiagnose_2023.10.06_00-55-25-0400_Mac-OS-X_iMacPro1-1_19G73/system_logs.logarchive--predicate 'process == "mdmclient" OR process == "apsd" OR process == "dasd" OR process == "storedownloadd" OR process == "appstored" OR process == "logger"' --start "2023-10-06 00:47:00" --end "2023-10-06 00:48:49"
Troubleshooting macOS Management
This section will discuss some of the more common issues you may encounter with Workspace ONE macOS management, as well as some initial steps you can take to troubleshoot.
Troubleshooting macOS Enrollment
This section covers potential troubleshooting items related to macOS enrollment.
Enrollment Restrictions
A macOS device might have issues enrolling if there are restrictions in place preventing enrollment. To identify any potential restrictions, follow the following steps:
- In Workspace ONE UEM, navigate to Groups & Settings, and then click All Settings.
- Select Devices & Users.
- Click General, and select Enrollment.
- Click the Restrictions tab. Confirm that no restrictions are preventing the device from enrolling.
Registered Devices Only
If you have the Devices Enrollment Mode set to Registered Devices Only, then the device must be registered in the console before it can be enrolled. To check the Devices Enrollment Mode, follow these instructions:
- In Workspace ONE UEM, navigate to Groups & Settings.
- Click All Settings, and then select Devices & Users
- Select General, and then Enrollment.
- Click Authentication, and check the Devices Enrollment Mode option. If set to Registered Devices Only, then the device must be registered in the console before it can be enrolled.
Note: macOS devices synced from Apple Business Manager (or Apple School Manager) are considered Registered and can be enrolled.
Device Previously Enrolled
Apple Business Manager devices that have already been enrolled cannot re-enroll without first deleting the device record in Workspace ONE UEM.
Devices Enrolled to Wrong Organization Group
When macOS enrolls to Workspace ONE UEM, numerous factors control the specific organization group where the device is placed. Before the Organization Group for the device is finalized, Workspace ONE checks multiple attributes for both the DEP profile and the User account enrolling to best determine where the device should go. The following attributes are considered during Organization Group selection:
- User's Enrollment Organization Group -- Found in the User Account properties under the General tab
- User's Managed By Organization Group -- The level at which this user is integrated into the console
- The Device Organization Group associated with the Automated Device Enrollment (or DEP) Profile
- User Group Mapping setting in the console Groups & Settings > All Settings > Devices & Users > General > Enrollment > Grouping
- Batch Import for device Organization Group Override following Automated Device Enrollment (or DEP). Note: This method is not typically advised.
For devices enrolling with Automated Device Enrollment (or DEP) via Apple Business Manager:
- ONLY if the Automated Device Enrollment (or DEP) Profile specifies Authentication = OFF and staging is configured, the device will enroll to the Staging User's Enrollment Organization Group and NOT the Automated Device Enrollment (or "DEP") Profile's Device Organization Group.
- If User Group Mapping is configured, the device will enroll to the organization group based on the preconfigured AD user group and organization group mapping. In this scenario, the Automated Device Enrollment (or DEP) Profile's Device Organization Group and the User's Enrollment Organization Group are not considered.
- Without User Group Mapping, if the Automated Device Enrollment (or DEP) Profile's Device Organization Group and the User's Enrollment Organization Group are in the same branch (parent/child), the device enrolls to the lower (child) Organization Group.
- Without User Group Mapping, if the Automated Device Enrollment (or "DEP") Profile's Device Organization Group and the User's Enrollment Organization Group are siblings, then the device enrolls to the Automated Device Enrollment (or "DEP") Profile's Device Organization Group.
For more information (and a flowchart), refer to VMware KB 83132 - Organization Group Assignment In Workspace ONE for Automated Device Enrollment (ADE) Devices.
Incorrect Date and/or Time Zone
Using the Terminal on a macOS device, you can enter the following commands to get date and time zone information quickly:
- Date:
date - Time Zone:
sudo systemsetup -gettimezone
If the date/time/zone is incorrectly set, then you will potentially have problems with certificate checking, trust, and more.
Use Shell and Console During the Setup Assistant
One method of troubleshooting during automated enrollment is to obtain console and shell access during the Setup Assistant. Although your options are limited due to the current user context, it is still useful to know these commands:
- Press Command + Option + Control + T during Setup Assistant to open Terminal.
- Press Command + Option + Control + C during Setup Assistant to open Console.
Ensure Correct Automated Enrollment Profile
If you are not seeing the expected behavior during automated enrollment, you can check the settings currently assigned to the device and optionally re-assign a new automated enrollment profile. See the following:
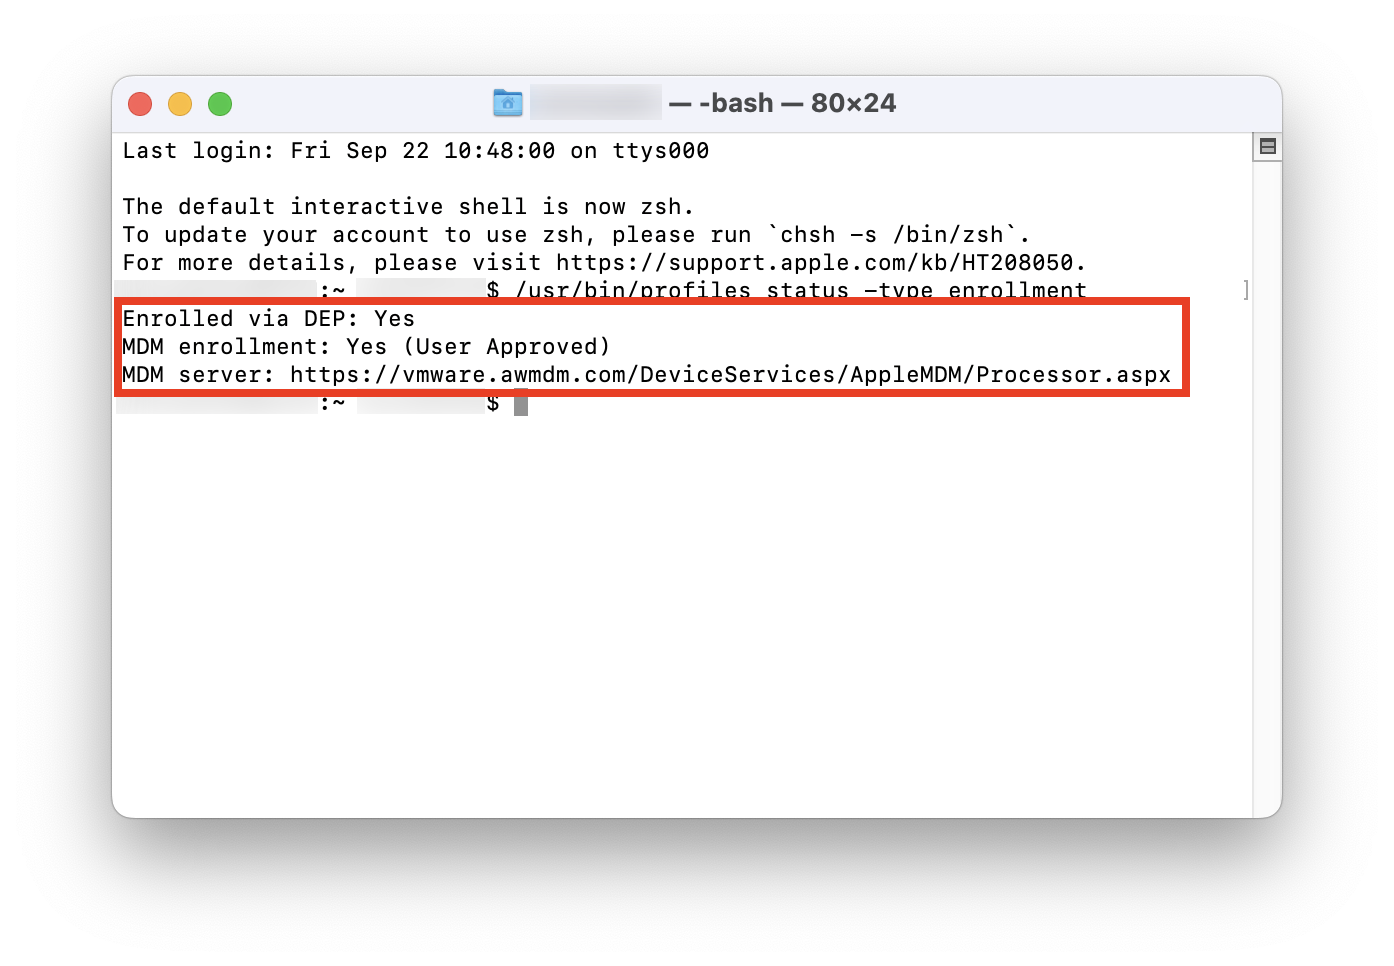
- Check if enrolled via Automated Enrollment:
/usr/bin/profiles status -type enrollment
- Check the current settings applied via Automated Enrollment:
sudo /usr/bin/profiles show --type enrollment - Download a new Automated Enrollment profile:
sudo /usr/bin/profiles renew -type enrollment
Ensure Correct Staging for Multiple Users
macOS is inherently a multi-user operating system. However, the mdmclient processes that provide the foundational management capabilities for MDM are not. When macOS is not staged properly for multiple users, you might notice that one user will get BOTH device and user profiles, whereas subsequent users are not delivered any user profiles from Workspace ONE. This behavior is a function of the mdmclient built-in to macOS and can be altered only by a specific set of configurations.
To enable multi-user functionality for macOS and Workspace ONE, the device should be enrolled using multi-user staging and then bound to Active Directory.
Check Logging
If all else fails, start collecting log information using the command line. The following command extracts relevant details from the Unified Log:
-
log stream --predicate 'process == "mdmclient" OR process == "apsd" OR process == "dasd"'
Additionally, if you gather a SysDiagnose file (as outlined in Understanding macOS Unified Logging), you can filter using the --archive and --last parameters to narrow down the issue.
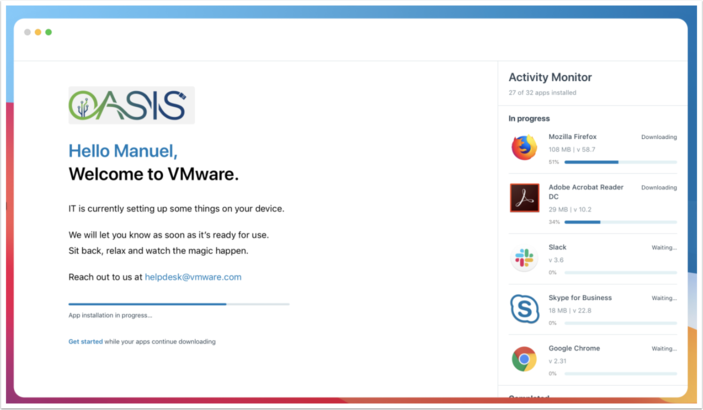
Troubleshooting Post-Enrollment Onboarding Experience
The built-in post-enrollment onboarding screen in VMware Workspace ONE Intelligent Hub for macOS is shown for all enrollment types after hub is installed and displays a list of all auto-deployed apps. Workspace ONE administrators can customize the welcome text to personalize the end-user's experience.
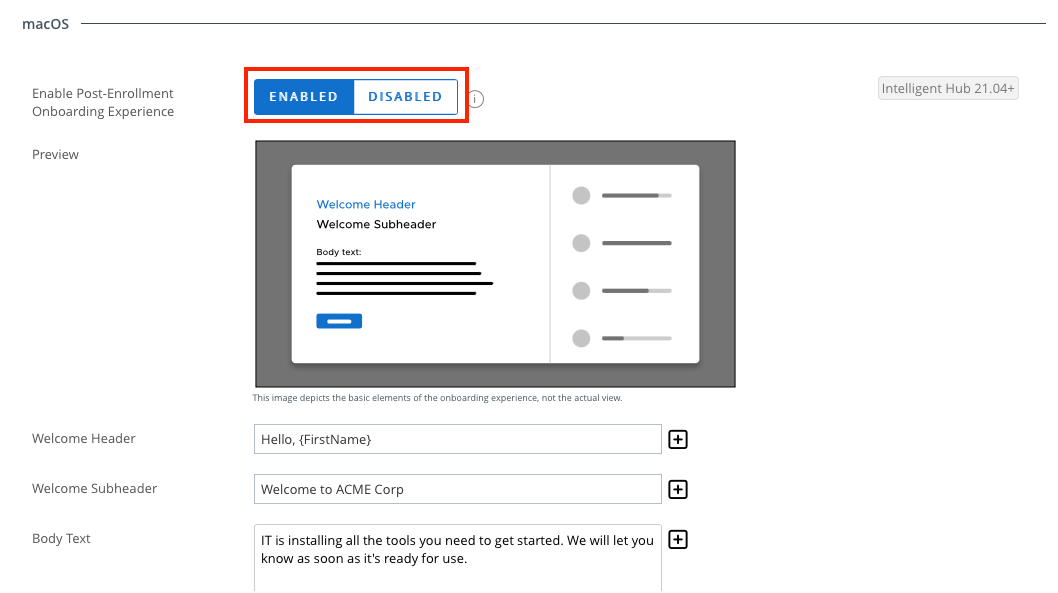
Enable and Configure Post-Enrollment Onboarding
Post-Enrollment Onboarding can only be enabled in production environments running Workspace ONE UEM 2105 or later. Validate that the Post-Enrollment onboarding screen is enabled and configured by doing the following:
- Click Groups & Settings, and then select All Settings.
- Select Devices & Users.
- Click General, and then Enrollment.
- Select the Optional Prompt tab.
- Scroll down to macOS and confirm that Enable Post-Enrollment Onboarding Experience is enabled.
Troubleshoot with Logging
In the Workspace ONE UEM Console, browse to the Device Details view, and click Troubleshooting > Event Log. Look for Agent Settings and Enrollment Settings events.
From within Intelligent Hub Logs (or via Unified Logging), search for the following
- Subsystem: “
com.vmware.hub.hubservices” and Category: “postEnrolmentOnboardingFlow” and “enrollment” - Subsystem: “
com.vmware.hub.uem” and Category: “AgentSettings”
Alternatively, you can search these events in Terminal with the log command as follows: log show --info --debug --predicate '((subsystem == "com.vmware.hub.hubservices") && (category IN { "postEnrolmentOnboardingFlow", "enrollment" })) || ((subsystem == "com.vmware.hub.uem") && (category == "AgentSettings"))' --last 10m
Note: You can alter the --last parameter to adjust for your troubleshooting timeframe. For more details, see Understanding macOS Unified Logging.
Troubleshooting macOS Profiles
Profiles provide the most basic building blocks for macOS management in Workspace ONE. Apple defines much of the profile content in the Developer Reference for Device Management. Apple also provides an MDM for IT Administrators guide that helps admins understand the base management capabilities in all the Apple operating systems.
This section of the tutorial aims to help you troubleshoot profile-related issues.
No User Profiles (Only Device Profiles)
This is most likely not a profile issue, but rather an enrollment issue. Generally, this behavior indicates that a device was improperly staged. Check the staging configuration & enrollment process: Tech Zone Onboarding Options for macOS Tutorial.
Note: Multi-user macOS management requires multi-user staging and Active Directory binding.
No User or Device Profiles
If there are no profiles (user or device) on your device, verify the following:
- Check that the device gets push notifications by attempting to send one via the console.
- Check that the APNs certificate is still valid as described in Validating Workspace ONE UEM Console Settings.
- Check Network Connectivity to APNS and AWCM
- Check the Event Log by browsing to Devices > List View > Select the Device (switch to Device Details View) > More > Troubleshooting and review the Event Log and Command Queue.
Reminder: The content of these views can be filtered. - Check Logging (using Terminal or a SysDiagnose file) as follows:
- SysDiagnose:
sudo sysdiagnose -f -n ~/Downloads - Log Streaming:
log stream --predicate 'process == "mdmclient" OR process == "apsd" OR process == "dasd"'
- SysDiagnose:
Troubleshoot the Privacy Preferences Profile
To troubleshoot the Privacy Preferences (or TCC or PPPC) behavior on macOS, you must stream all events related to Privacy Preference Policy Control prompts:
-
log stream --debug --predicate 'subsystem == "com.apple.TCC" AND eventMessage BEGINSWITH "AttributionChain"' -
log stream --debug --predicate 'subsystem == "com.apple.TCC" AND eventMessage BEGINSWITH "AttributionChain" OR eventMessage CONTAINS "synchronous to com.apple.tccd.system"'
You can also read the TCC Databases using the Terminal. Before attempting to manually review these files, ensure that Terminal is granted full control by MDM or manually in System Preferences. After granting permissions, run the following commands:
-
echo ".dump" | sudo sqlite3 /Library/Application\ Support/com.apple.TCC/TCC.db -
echo ".dump" | sudo sqlite3 ~/Library/Application\ Support/com.apple.TCC/TCC.db
Troubleshooting macOS Bootstrap Packages
This section covers common troubleshooting steps for macOS Bootstrap Packages.
Bootstrap Package Troubleshooting
A bootstrap package is a lightweight distribution package created by a Workspace ONE administrator. The intent of a bootstrap package is to silently deliver and install a small baseline set of agents to onboard macOS for a user. For example, an administrator can use the bootstrap package to install a distribution package containing the chef, puppet, or saltstack agents.
Note: Bootstrap packages install through the InstallEnterpriseApplication command during the Await Configuration phase of device enrollment. Because of this, there is no confirmation of a successful install, other than to audit the ApplicationList sample that the device returns later on.
The following outlines some potential fixes for Bootstrap packages:
- Is the package fairly small in size?
It is best practice to keep the bootstrap package as small as possible so that it installs quickly. - Is the bootstrap package a signed Distribution type package?
- The package must be signed with an Apple Developer ID Installer Certificate. Only the package needs to be signed, not the app because the Apple Gatekeeper does not check apps installed through MDM.
- The package must be a distribution package (product archive), not a flat component package.
- Is Workspace ONE configured to attempt installing the Intelligent Hub also?
Navigate to Devices > Devices Settings > Apple > Apple macOS > Intelligent Hub Settings. Some older versions of macOS could not install two bootstrap packages simultaneously—In this situation, all bootstrap packages would fail to install on the device. If the Install Hub After Enrollment switch is set to Enabled, try setting it to Disabled.

Volume Purchase App Troubleshooting
As organizations deliver volume-purchased apps from Apple Business Manager, some unexpected issues may arise. This article addresses some common issues affecting volume-purchased app delivery.
Newly Purchased Apps Not Syncing to Workspace ONE UEM
This error is typically the result of one of the following issues:
- Delays in Apple Business Manager from when you purchase the app to when the licenses are allocated to the Location Token.
- Apple has released new Terms & Conditions in Apple Business Manager.
- To resume syncing, log in to Apple Business Manager with an account granted the Administrator role, and accept the updated Terms & Conditions.
- The location token downloaded from Apple Business Manager and uploaded to Workspace ONE UEM has expired.
- Download a new server token from Apple Business Manager (under Settings > Apps & Books) and upload it to Workspace ONE UEM.
Device-Based Licensed Apps Not Installing
If you have assigned an app to a device using device-based assignment, one of the following could be an issue:
- If the user is getting a prompt to log in with an Apple ID, there is most likely an assignment that was made to the user before the device-based assignment was created.
- Unassign the app from the user completely before you attempt to reassign the app to the device.
- Ensure that an adequate number of licenses are available to assign to the device.
- Ensure that the device has access to vpp.itunes.apple.com.
- The location token downloaded from Apple Business Manager and uploaded to Workspace ONE UEM may have expired.
- Download a new location token for that same location from Apple Business Manager and upload it to Workspace ONE UEM.
Volume-Purchased Apps Not Removing from macOS
When a VPP app for macOS is no longer scoped to the device or user, or the device is enterprise wiped, the app is not removed from macOS. This is by design in macOS versions prior to macOS 11 (Big Sur), as these earlier versions of macOS did not support any commands to remove the application.
Troubleshooting Non-Store App Installer Problems
This section lists some of the common problems you might encounter when installing a non-store macOS app.
Incorrect Application Name in the Application Catalog
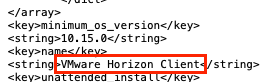
Sometimes an installer package parsed by the VMware Workspace ONE Admin Assistant generates a PLIST file where the application name is incorrect. It is also possible that organizations refer to software by a common or colloquial name that is easily recognized by end users. In either case, administrators can change the name displayed in the Intelligent Hub application catalog before uploading the PLIST to Workspace ONE UEM.
- Start by opening the PLIST generated by Admin Assistant. In Finder, browse to the PLIST file for the app in question (usually in ~/Documents/Workspace ONE Admin Assistant/<app name>-<version> ).
- Right-click the PLIST file and select Open With and then select an editor (such as BBEdit).
- Modify the string value for the name key-value pair.
Installers with No Package Version
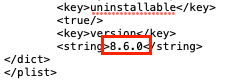
Sometimes an installer package parsed by the VMware Workspace ONE Admin Assistant generates a PLIST file where the version shows Please Edit Me. This problem must be fixed before uploading the PLIST to Workspace ONE UEM.
- Start by opening the PLIST generated by Admin Assistant. In Finder, browse to the PLIST file for the app in question (usually in ~/Documents/Workspace ONE Admin Assistant/<app name>-<version> ).
- Right-click the PLIST file and select Open With and then select an editor (such as BBEdit).
- Modify the string value for the version key-value pair.
Installation is Looping (Always "Installing")
In some instances, an application successfully installs but the Intelligent Hub continually reports the app as "Installing". If you look in the ManagedSoftwareUpdate.log file, you'll see the app is constantly marked for installation each time the Intelligent Hub checks for installed software. This is typically the result of a metadata PLIST that doesn't contain the correct receipt or installs arrays. In this instance, you must make one of the following changes to the metadata PLIST generated by Workspace ONE Admin Assistant:
- Validate or add an
InstallsArray to the PLIST.
NOTE: ThisInstallskey-value pair in the PLIST file specifies identifying information about a binary or file which should be directly compared to determine if the correct version of an app is installed. The installs list can contain any number of items. These can be applications, Preference Panes, Frameworks, or other bundle-style items, Info.plists, or simple directories or files.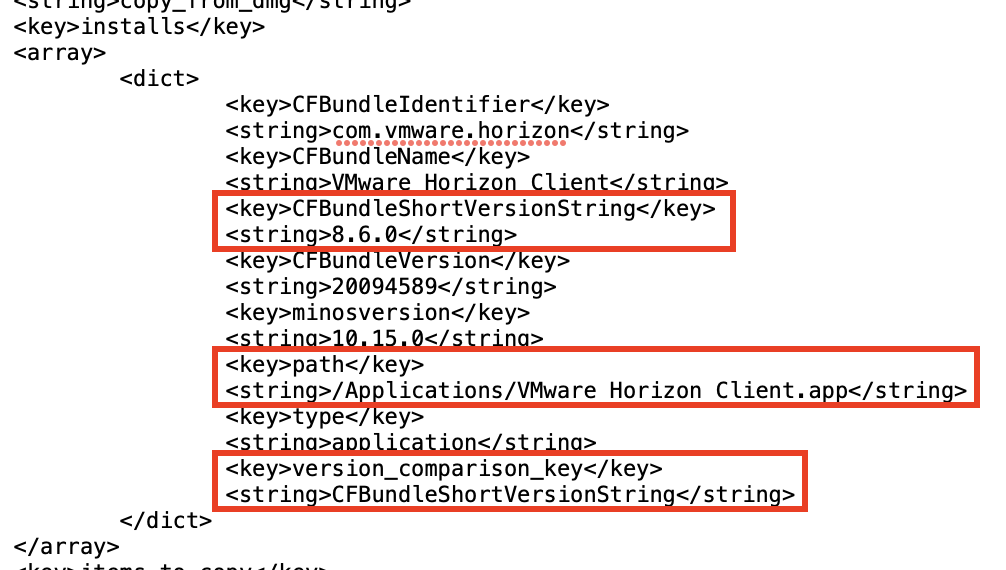
- Add an Install Check Script (and ensure it returns a
zero (0)value return code when an install should proceed).
Troubleshooting SSO Extensions
SSO Extensions are still a relatively new concept with not many vendors publishing SSO Extensions for macOS as of today. If you do start beta testing an extension, here's a quick list of possible troubleshooting steps to help determine issues.
Enable Debug Modes for Logging
- Enable the necessary debug modes by running the following commands in Terminal:
sudo log config --mode "level:debug,persist:debug" --subsystem com.apple.AppSSOsudo log config --mode "level:debug,persist:debug" --subsystem com.apple.Heimdalsudo log config --mode "level:debug,persist:debug" --subsystem org.h5l.gss - Restart the SSO Extension subsystems:
pkill -9 KerberosExtension AppSSOAgent KerberosMenuExtra - Reproduce the issue and generate a SysDiagnose (
sudo sysdiagnose)
NOTE: When finished troubleshooting and gathering debug logs, reset the logging to normal levels by running the following commands:
sudo log config --subsystem com.apple.AppSSO --reset
sudo log config --subsystem com.apple.Heimdal --reset
sudo log config --subsystem org.h5l.gss --reset
You can also enable debug logging via a Custom Settings (XML) profile as follows:
<dict>
 <key>PayloadIdentifier</key>
 <string>com.apple.system.logging.appsso.1</string>
 <key>PayloadType</key>
 <string>com.apple.system.logging</string>
 <key>PayloadUUID</key>
 <string>8C31282A-DD51-46C3-A20C-324CBC263EC6</string>
 <key>PayloadVersion</key>
 <integer>1</integer>
 <key>Subsystems</key>
 <dict>
  <key>com.apple.AppSSO</key>
  <dict>
   <key>DEFAULT-OPTIONS</key>
   <dict>
    <key>Default-Privacy-Setting</key>
    <string>Public</string>
    <key>Enable-Oversize-Messages</key>
    <true/>
    <key>Level</key>
    <dict>
     <key>Enable</key>
     <string>Debug</string>
     <key>Persist</key>
     <string>Debug</string>
    </dict>
   </dict>
  </dict>
  <key>com.apple.Heimdal</key>
  <dict>
   <key>DEFAULT-OPTIONS</key>
   <dict>
    <key>Default-Privacy-Setting</key>
    <string>Public</string>
    <key>Enable-Oversize-Messages</key>
    <true/>
    <key>Level</key>
    <dict>
     <key>Enable</key>
     <string>Debug</string>
     <key>Persist</key>
     <string>Debug</string>
    </dict>
   </dict>
  </dict>
  <key>org.h5l.gss</key>
  <dict>
   <key>DEFAULT-OPTIONS</key>
   <dict>
    <key>Default-Privacy-Setting</key>
    <string>Public</string>
    <key>Enable-Oversize-Messages</key>
    <true/>
    <key>Level</key>
    <dict>
     <key>Enable</key>
     <string>Debug</string>
     <key>Persist</key>
     <string>Debug</string>
    </dict>
   </dict>
  </dict>
 </dict>
</dict>
Logging Commands
As you troubleshoot the SSO extensions, the following command line will stream all events related to the Kerberos SSO Extension and additional Apple-built SSO Extension binaries. If you are using an SSO extension from another identity provider (such as Okta or Azure Active Directory), you must also add the appropriate predicate parameters in the following command:
log stream --debug --predicate '(subsystem == "com.apple.Heimdal") OR (subsystem == "com.apple.AppSSO") OR (subsystem == "org.h5l.gss") OR (subsystem == "com.apple.network")'
Other Command Line Tools
- Show all shared web credentials associated with any apps using AASA or SSO Extensions:
/System/Library/PrivateFrameworks/SharedWebCredentials.framework/Support/swcutil show - Determine if SSO Extension is loaded:
pluginkit -vvv -m -i <SSO.Extension.App.ID>where <SSO.Extension.App.ID> represents the App ID for your specific extension.
Troubleshooting Workspace ONE Assist on macOS
VMware provides Workspace ONE Assist to help you remotely support your macOS fleet. To troubleshoot, check the following.
Check Prerequisites
Check that the following pre-requisites have been met:
- Has the user provided screen recording permissions to the client-side assist app?
- Has the Assist client application been downloaded and installed on the macOS device which needs remote assistance?
- Does the device show as AWCM-connected in the Device Details view?
Analyze the Logging
From within Terminal, run the following command to find out what's going on:
log stream --predicate '(process == "tccd" AND eventMessage CONTAINS "com.aetherpal") OR process == "awcmd" OR process == "assistd" OR process == "AssistCore"'
Troubleshooting Intelligent Hub Processes
The Workspace ONE Intelligent Hub for macOS provides a good deal of functionality to augment the built-in mdmclient functionality. This section illustrates a number of methods you can use to troubleshoot Intelligent Hub for macOS.
General Log Streaming
Stream events related to Hub, awcm, Software distribution, and so on (Internal Apps, NOT VPP):
log stream --predicate 'process == "awcmd" OR process == "apsd" OR subsystem BEGINSWITH "com.vmware.hub"'
Hub Process Blocking
Stream events related to Hub Process Blocking (System Extension):
log stream --debug --predicate 'subsystem == "com.vmware.hub.security" OR process == "com.airwatch.mac.agent.EndpointSecurity" OR process == "hubd" OR process == "IntelligentHubAgent" or process == "endpointsecurityd"'
Sensors
If you are troubleshooting sensors with Intelligent Hub, the following commands are helpful:
- View the list of sensors downloaded to Hub:
sudo hubcli sensors –listsudo hubcli sensors --list json
Note: Sensors require a client-side feature flag:sudo plutil -insert MacOsSensorsCliListValueFeatureFlag -bool YES /Library/Application\ Support/AirWatch/Data/com.vmware.hub.flags.plist - Trigger a sensor run on-demand:
sudo hubcli sensors --trigger <sensor_name>where <sensor_name> represents the name of the sensor you wish to trigger.
Troubleshooting FileVault Encryption
FileVault offers protection for macOS device full volumes, both internal and removable storage devices, by encrypting data at rest with an AES-XTS data encryption algorithm. The encryption key, called a SecureToken is tied to a user, and created during one of three user-related events: user creation, user password creation, or first login by a user. A SecureToken must be created before:
- FileVault can encrypt a disk, and
- Before a device can generate a Bootstrap Token.
A Bootstrap token is created and escrowed in MDM the first time a user who is SecureToken-enabled logs into a macOS device. The Bootstrap token grants a secure token to any subsequent user logging into that device. This token can also be used to authorize the installation of kernel extensions and software updates on devices.
To use a bootstrap token on a macOS device, the following requirements must be met:
- The macOS device must be enrolled and supervised in MDM using Apple Business Manager or Apple School Manager.
- The MDM vendor must support the Bootstrap functionality, which Workspace ONE does.
NOTE: This guide assumes that you have a basic understanding of how FileVault works, and will only focus on troubleshooting issues related to these two features. For a basic tutorial on the fundamentals of FileVault, see the Apple Platform Security guide.
Useful Commands Related to SecureToken
The following commands can provide useful information about the state of users on a macOS device in relation to SecureToken and FileVault.
- Check if a User is SecureToken Enabled:
sysadminctl -secureTokenStatus <username> - List Accounts which can unlock FileVault encrypted disk:
diskutil apfs listcryptousers / - Map UUIDs of CryptoUsers with Usernames:
sudo fdesetup list
Troubleshooting Bootstrap Token
- Start by checking if Workspace ONE already sets the MDM Option for
BootstrapTokenAllowed.
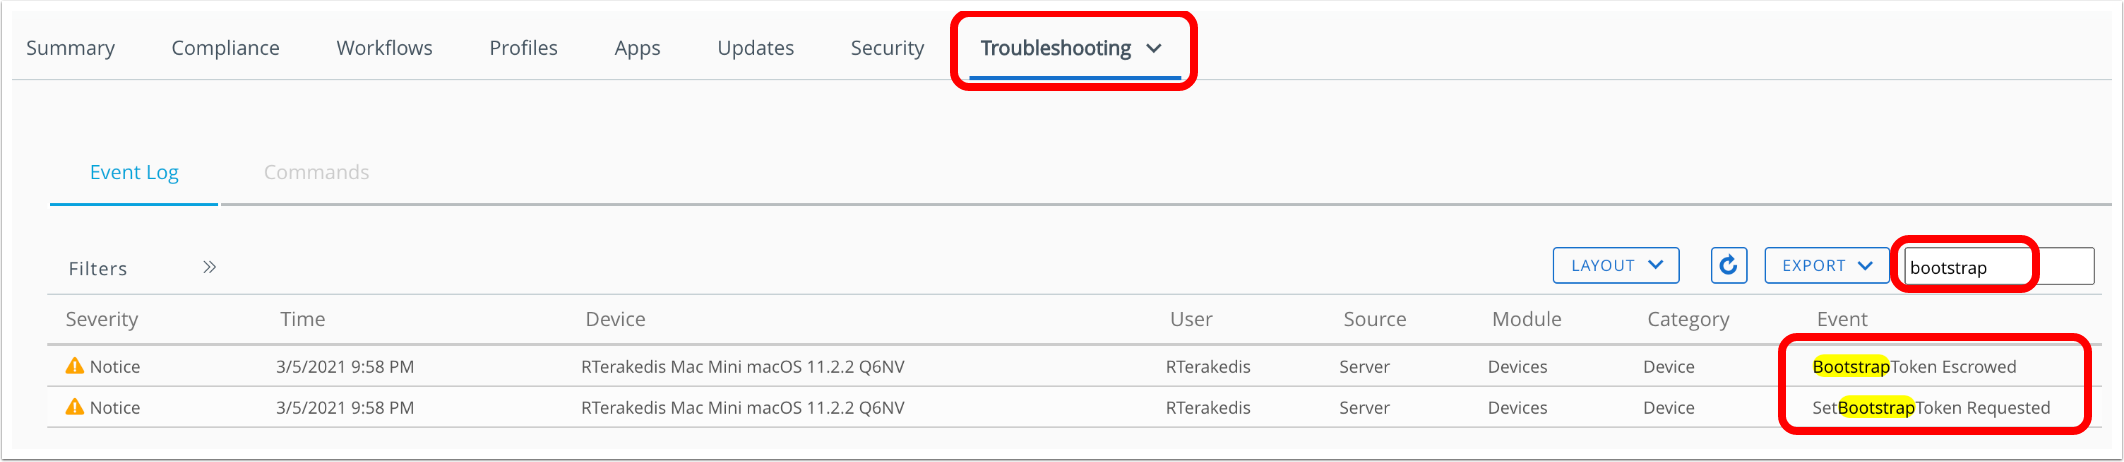
- In the Workspace ONE console, click Devices, and then select List View.
- Click the specific macOS device, and then select the Troubleshooting tab.
- Enter
bootstrapin the search field. You should see an event where we set the MDM Option and another event where Bootstrap Token is escrowed. This MDM Option should trigger macOS to generate a Bootstrap Token when possible.
- Check if Bootstrap Token is supported from the device:
sudo profiles status -type bootstraptoken- The first line indicates that UEM supports Bootstrap Token and the second line indicates if it has already been escrowed or not.
- If
Bootstrap Token supported on serverisNO, but UEM is a version supporting Bootstrap Token, then the device did not receive the MDM Option. - If
Bootstrap Token escrowed to serverisNObutsupported on serverisYES, check that there is at least one account with SecureToken:diskutil apfs listcryptousers /and optionallysudo fdesetup list.NOTE: Bootstrap Token cannot be escrowed to server if none of the user accounts present on the system has SecureToken.
- You can manually Generate and Escrow Bootstrap Token:
sudo profiles install -type bootstraptoken- The command is interactive and requires the Admin username and password.
- Re-validate on the UEM console that the Bootstrap Token is escrowed.
- Validate the BootStrap Token for macOS:
sudo profiles validate -type bootstraptoken
Troubleshooting FileVault Recovery Key Escrow
macOS ONLY escrows the recovery key when instructed to do so, and ONLY for personal recovery keys.
FileVault Recovery Key escrow is initiated by the com.apple.security.FDERecoveryKeyEscrow payload in a profile.
The following steps can assist with troubleshooting an issue with FileVault Recovery Key Escrow.
- Confirm the
FDERecoveryKeyEscrowpayload landed before FileVault was enabled. - Ensure that only one FileVault payload was delivered to the device.
- Was the device upgraded to macOS 10.13 or later and potentially already had a previous-style payload? It may have been removed after upgrade, so look at the UEM Console to determine if a previous-style payload was sent pre-upgrade.
- Look to see if the
/var/db/FileVaultPRK.datfile was created.- If the
FileVaultPRK.datfile exists, but the Personal Recovery Key is not shown in the console, check the device details troubleshooting tab for three events: Security Information Requested, Security Information Confirmed, and Security Information. - The Personal Recovery Key is not escrowed until the device receives a
SecurityInfocommand and responds to MDM with the encrypted Personal Recovery Key. You can trigger a Security query from the More menu in device details. Remember, the device doesn't forcibly send the recovery key; the MDM server must request it via theSecurityInfocommand.
- If the
- Look to see if there is anything in the
fdestatus.plist:sudo nano /var/db/ConfigurationProfiles/fdesetup.plist- Look for a
RecoveryKeykey-value pair. You can check if the PRK is valid for the currently encrypted disk:sudo fdesetup validaterecoveryand enter the PRK (in the formatAAAA-AAAA-AAAA-AAAA-AAAA-AAAA).
- Look for a
- Perform a
sudo log collect --last 1h(substituting1hfor the appropriate time frame where your testing began) to output asystem_logs.logarchivefile which can be opened and reviewed in Console on the macOS device.
If Workspace ONE Intelligent Hub is NOT Installed:
Recovery Key Escrow still occurs without Intelligent Hub installed, as the key escrow process is a product of the built-in mdmclient and fdesetup processes. The FileVaultPRK.dat file remains as long as the version of the FileVault payload that triggered encryption remains on the device. If a change is made to the FileVault profile, macOS removes the FileVaultPRK.dat file even if the disk continues to be encrypted by the same Personal Recovery Key. You can attempt to validate the personal recovery key by performing the following commands:
- Check if a PRK is listed:
sudo nano /var/db/ConfigurationProfiles/fdesetup.plist - Check if the PRK is valid for the currently encrypted disk:
sudo fdesetup validaterecoveryand enter the PRK (in the formatAAAA-AAAA-AAAA-AAAA-AAAA-AAAA).
If Workspace ONE Intelligent Hub is Installed:
The Workspace ONE Intelligent Hub monitors for the presence of the FileVaultPRK.dat file when a FileVault profile is assigned. If the file is determined to be missing, Workspace ONE Intelligent Hub will prompt the user for their password and use that password to rotate the key via fdesetup. On the next SecurityInfo commmand, macOS should report the new Personal Recovery Key back to MDM for escrow. Additionally, macOS removes this file each time a change is made to the FileVault profile. As such, Workspace ONE Intelligent Hub will prompt the user for their password to ensure the Personal Recovery Key is re-escrowed.
NOTE: If an admin needs to immediately start this process to re-escrow the PRK, re-install the Intelligent Hub and the event that monitors for a missing FileVaultPRK.dat file will immediately trigger.
You can validate the PRK has been successfully rotated via Unified Logging using the command: log show -predicate 'process = "hubd"' | grep com.vmware.hub.events
<snip>    hubd: [com.vmware.hub.events:Recovery Key] Started
<snip>    hubd: [com.vmware.hub.events:Recovery Key] Processing : Proceeding with Recovery Key change. Sending notification.
<snip>    hubd: [com.vmware.hub.events:Recovery Key] Successfully Processed : Recovery Key Rotated.
Troubleshooting DEP Admin Password Rotation
Workspace ONE UEM offers support for rotating the password for the administrator account created during automated enrollment. These auto-rotated passwords adhere to the CIS MS-ISAC Best Practices. The bulk majority of this process is driven via Apple APIs for the mdmclient. The aim of this section is to show how the Admin Password Auto-Rotation process works and where to look if it doesn't seem to work as expected.
DEP Admin Password Rotation Process
The password rotation process at a high-level works as follows:
- Workspace ONE UEM Console generates a randomized password and saves it in the Automated Enrollment (DEP) Profile when assigned to each device record at Apple. The password is also saved to the device record.
- When the macOS device proceeds through the SetupAssistant, macOS creates the local administrator account using the profile-provided username and randomized password.
- Workspace ONE receives the auto-created admin user account on macOS in the
DeviceInformationquery, which includes the GUID for the user account. - When the password is accessed in Workspace ONE, a scheduled job is created that automatically issues SetAutoAdminPasswordCommand using a newly generated password and the admin account's GUID after approximately 8 hours.
- If necessary, Workspace ONE administrators can also manually force a password rotation via API:
POST /api/mdm/devices/<DeviceID>/commands?command=RotateDEPAdminPassword
Troubleshoot Password Rotation via UEM Console
From within the Workspace ONE UEM Console, browse to the device details view and click the Troubleshooting tab. In the Event Log, search for events such as the following:
-
ManagedAdminPassword Accessed-- Indicates an Administrator has accessed the admin password. This starts a timer for the password rotation. -
ScheduledAdminPassword Rotation Requested-- Indicates Workspace ONE UEM has attempted to change the admin password.
Workspace ONE UEM attempts to rotate the password approximately 8 hours after the initial password access.
Troubleshoot Password Rotation via Unified Logging
Using Unified Logging, you can filter for events specific to the Auto Admin Password rotation via this command:
log show --predicate '(process == "mdmclient") && (eventMessage contains "SetAutoAdminPassword")'
There may be instances where the command may not be immediately processed, which can lengthen the amount of time between initial password access and password rotation. These will show in the logs as a NotNow response to MDM, and should include a reason for the delayed change.
Once the device has successfully changed the admin account password, you will see an Acknowledged(SetAutoAdminPassword) entry in Unified Logging.
Summary and Additional Resources
This operational tutorial provided general troubleshooting guidance and solutions to specific problems for various macOS features in Workspace ONE UEM, including macOS log collections and management.
Additional Resources
For more information about Workspace ONE, explore the VMware Workspace ONE Activity Path. The activity path provides step-by-step guidance to help you level-up in your Workspace ONE knowledge. You will find everything from beginner to advanced curated assets in the form of articles, videos, and labs.
For more information on macOS, see Understanding macOS Management.
You may also wish to read these additional operational tutorials for macOS on VMware Tech Zone.
- Configuring Basic macOS Management
- Getting Started with Freestyle Orchestrator on macOS Devices
- Managing Updates with the macOS Updater Utility
- Distributing Scripts to macOS Devices
- Deploying a Third-Party macOS App
Changelog
The following updates were made to this guide:
| Date | Description of Changes |
| 10-20-2023 |
|
| 06-2021 |
|
| 03-2021 |
|
| 10-2020 |
|
About the Author and Contributors
The latest version of this document was written by:
- Michael Bradley, Senior Technical Marketing Architect, End-User-Computing Technical Marketing, VMware.
This tutorial was originally written by:
- Robert Terakedis, VMware alumni.
Considerable contributions were made by the following subject matter experts:
- Paul Evans, Product Line Manager, VMware.
- Chris Morelock, Product Manager, VMware.
Feedback
Your feedback is valuable.
To comment on this paper, contact VMware End-User-Computing Technical Marketing at euc_tech_content_feedback@vmware.com.