
Workspace ONE Access Configuration
This chapter is one of a series that make up the VMware Workspace ONE and VMware Horizon Reference Architecture, a framework that provides guidance on the architecture, design considerations, and deployment of Workspace ONE and Horizon solutions. This chapter provides information about common configuration and deployment tasks for VMware Workspace ONE Access.
Multi-site Deployment
Use the procedures, described here, to create SQL Server clustered instances that can fail over between sites and to set up a highly available database for Workspace ONE Access. The following diagram shows the architecture.
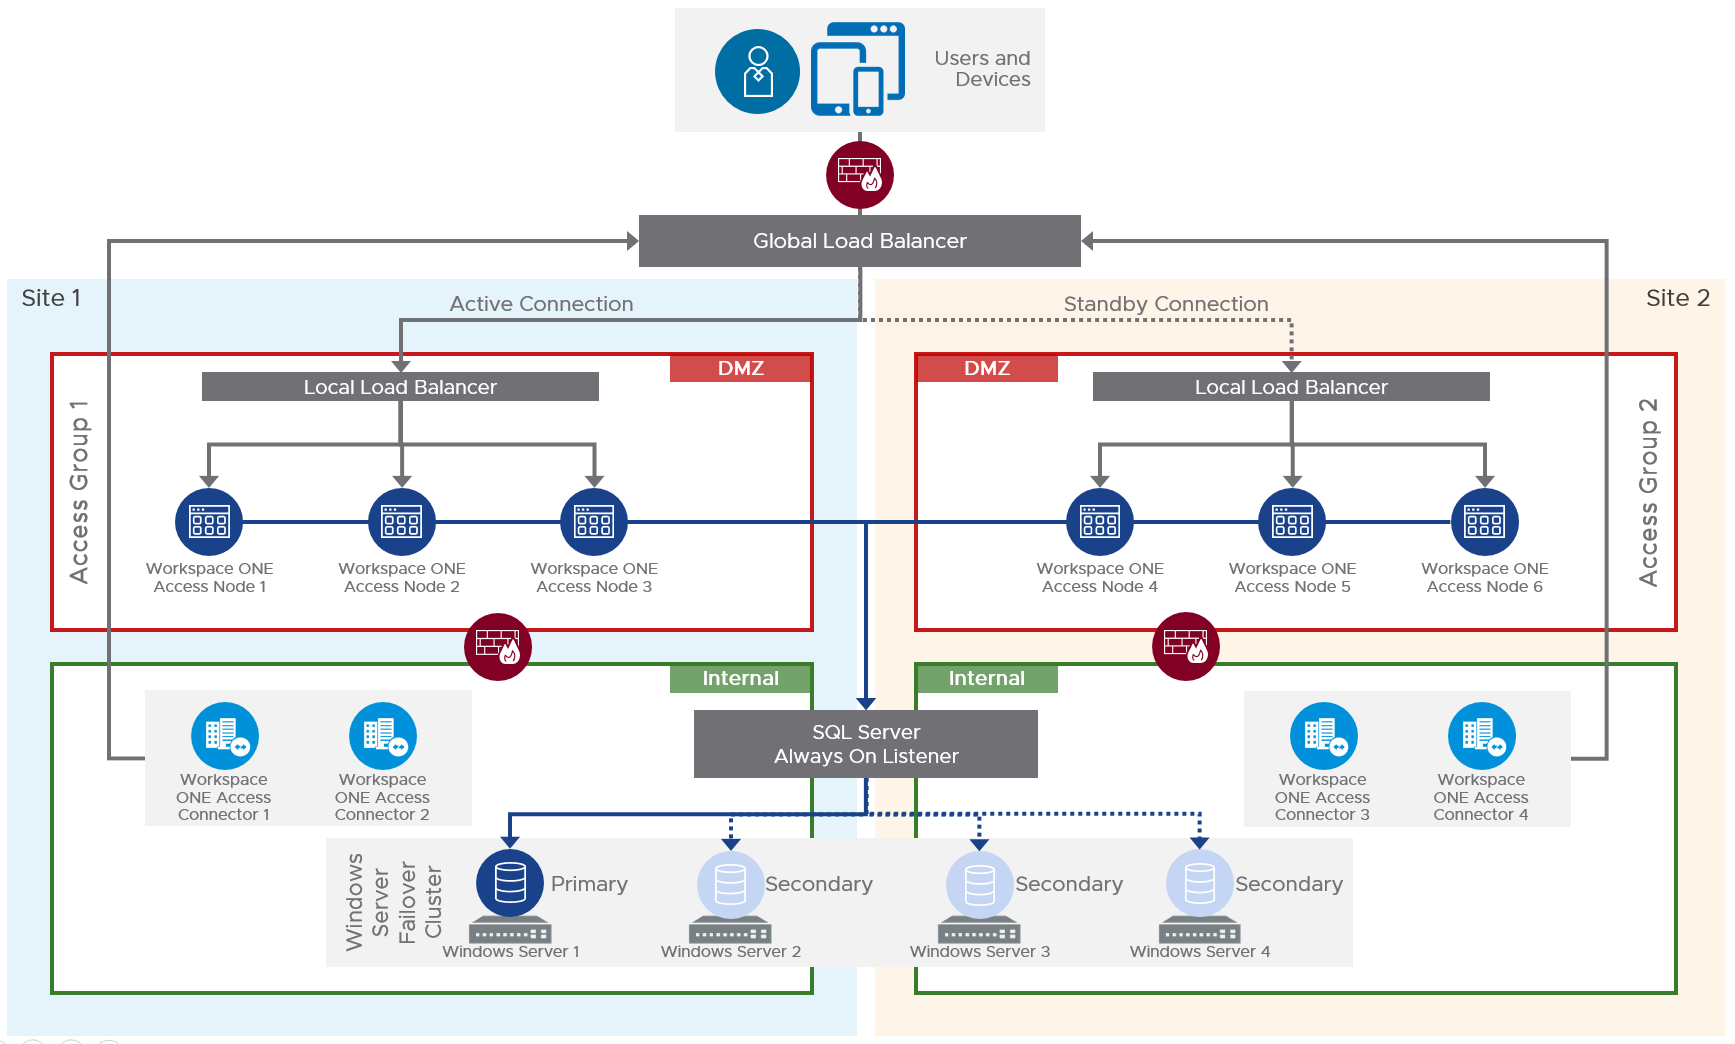
Figure 1: On-Premises Multi-site Workspace ONE Access Architecture
The tasks you need to complete are grouped into the following procedures:
- Create a Windows Server Failover Cluster
- Configure Cluster Quorum Settings
- Install the SQL Server
- Create the Workspace ONE Access Database
- Sync the Database Account Across the Availability Group Replicas
- Create and Configure the Availability Group
- Create a SQL Server Maintenance Job to Back Up the Database
- Deploy and Set Up Workspace ONE Access Appliances
- Configure Failover and Redundancy for Workspace ONE Access
- Deploy and Set Up the Connectors Inside the Corporate Network
- Finalize Failover Preparation
Create a Windows Server Failover Cluster
A Windows Server Failover Cluster (WSFC) is a group of Windows Servers that have the same software installed on them and work together as one instance to provide high availability for a service, such as a Microsoft SQL Server database. If a VM, or cluster node, in the cluster fails, another node in the cluster begins to provide the service.
To create a Windows Server Failover Cluster (WSFC):
- In Site 1, create and configure two Windows 2016 VMs and then do the same in Site 2. Ensure that the VMs have the same virtual hardware version and the same Windows Server patch levels.
- In each site, use VMWare vSphere® Web Client to create VMDKs for each of the SQL Server VMs. Format and mount the drives in Windows.
For our configuration, we used the following dedicated drives:
- Windows
- SQL_Binaries
- SQL_Data
- SQL_Logs
- SQL_Temp
- SQL_Backup
The WSFC configuration we used does not rely on clustered shared volumes, but it is essential that each of the individual VM disks and volumes in Windows are presented in the same order with the same drive letters.
- Because two servers in each site form part of the WSFC, VMware recommends that you configure VMware vSphere® Storage DRS™ anti-affinity rules to separate the VMs on different VMware ESXi™ hosts. See Storage DRS Anti-Affinity Rules.
- Follow the guidelines in the Microsoft article Pre-stage cluster computer objects in Active Directory Domain Services.
- Install the Windows Failover Clustering feature on each of the SQL Server VMs (two in Site 1 and two in Site 2), using Windows Server Add Roles and Features Wizard.
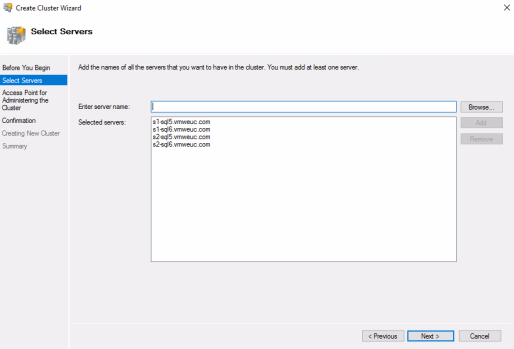
- Use the Windows Create Cluster Wizard to add each of the servers to the new cluster:
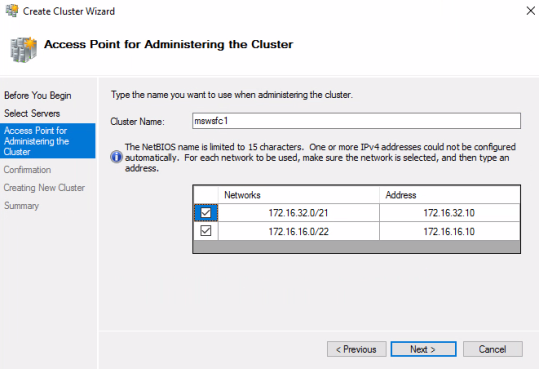
- Add a client access point IP for a subnet in Site1 and a subnet in site 2.
- Because the WSFC spans two sites and subnets, ensure that the cluster heartbeat thresholds are set appropriately.
Four WSFC settings control the behavior of the cluster service regarding missed heartbeat probes:
- SameSubnetDelay controls how often a node sends heartbeat probe packets within the same subnet.
- SameSubnetThreshold controls how many probe misses the node will tolerate before taking action within the same subnet.
- CrossSubnetDelay controls how often a node sends heartbeat probe packets across different subnets.
- CrossSubnetThreshold controls how many probe misses the node will tolerate before taking action across different subnets.
Use the PowerShell commands shown in the following screenshot to verify and configure the cluster settings on one of the cluster member servers.
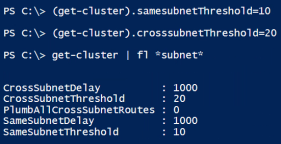
We recommend setting SameSubnetThreshold to 10 and setting CrossSubnetThreshold to 20.
Configure Cluster Quorum Settings
A quorum is required for the WSFC to prevent split-brain scenarios. In this reference architecture, a Windows file share in a third site was used to make a quorum, but it is also possible to use a cloud witness in Azure.
You must configure cluster quorum settings and specify which cluster nodes (VMs) each cluster instance can run on. Each node in a WSFC can cast one “vote” to determine which site is up and thus which node is the primary owner.
To configure the cluster quorum settings:
- Configure quorum votes for Site 1:
- Open Failover Cluster Manager and select More Actions > Configure Cluster Quorum Settings.
- Complete the Configure Cluster Quorum Wizard, using the following guidelines:
- Select Quorum Configuration Option page – Select Advanced Quorum Configuration.
- Select Voting Configuration page – Click Select Nodes and select the check boxes for the SQL Server VMs.
- Select Quorum Witness page – Select Configure a file share witness, click Next, and enter the path to the file share; for example, \\S3-FS1\mswsfc1-fsw
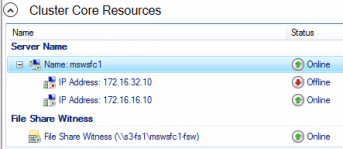
The Microsoft article Configure and manage quorum covers this in more detail.
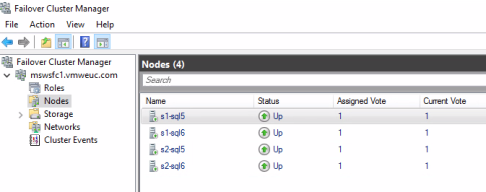
- To verify that the quorum is configured correctly, in Failover Cluster Manager, select Nodes and examine the Assigned Vote column.
Install the SQL Server
In this procedure, you run the Setup.exe program from the SQL Server installation media and select New SQL Server stand-alone installation. Repeat this procedure for each of the SQL Server VMs in each site
In Site 1, on the first SQL Server VM, complete the SQL Server installation wizard, using the following guidelines:
- Installation page – Select New SQL Server stand-alone installation.
- Feature Selection page – Select Database Engine Services feature.
- Instance Configuration page – Select Default Instance.
- Database Engine Configuration page – On the Data Directories tab, for each item, select the disk that you created for that type of file. For example, place the data root directory, system database directory, and user data directory on the VMDK disk you created for SQL data. For the database log directory, select the VMDK disk you created for SQL logs, and so on. On the TempDB tab, configure the Data directories and Log directory field with the path to the SQL_Temp disk.
On the Server Configuration tab, select Mixed Mode (SQL Server authentication and Windows authentication), and enter credentials for a user account that will be part of the SQL Server administrators.
Repeat the procedure for each of the three other SQL Server VMs. Ensure SQL installation paths are identical for each for four SQL Server VMs in the WSFC. An unattended installation is possible using the ConfigurationFile.ini file generated from the SQL Server installation on the first server.
Now we have a WSFC with four SQL Server nodes.
We are now ready to create the database and configure an Always On availability group for the Workspace ONE Access database.
Create the Workspace ONE Access Database
In this procedure, you create the database in Site 1 and make a backup. You also create the horizon login user.
To create the database and login user:
- Log in to Microsoft SQL Server Management Studio as the sysadmin or as a user account with sysadmin privileges.
- Connect to the first SQL Server in Site 1.
- Follow the procedure provided in the product documentation to create a new saas database for Workspace ONE Access, along with a login user named horizon.
See Create the Workspace ONE Access Service Database. This provides a script with SQL commands you must run to create the database and login user.
Note: The default database name used in the script is saas. The default login user name is horizon. You can modify the script to use different names, but if you use a different name, write the name down.
- After the database has been created, right-click the saas database (or, if you modified the database script to use a different name, select that name) and select Tasks > Back Up to create a full backup.
- Use SQL Server Configuration Manager on each SQL Server to set the default port for all IPs to 1433.
- Under SQL Server Network Configuration, right-click Protocols for <Instance-name> in the left pane, and double-click TCP/IP in the right pane.
- In the TCP/IP Properties dialog box, on the IP Addresses tab, scroll down to the IP All section.
- Set TCP Port to 1433.
Sync the Database Account Across the Availability Group Replicas
It is important for us to have consistent SQL Server configurations across Always On availability group nodes because we need database logins to be able to connect to the database after failover.
Consistency across the SQL Server cluster nodes can be ensured through scripts, stored procedures, or manual commands. In this example, the focus is on ensuring account synchronization only.
In this reference architecture, we leveraged Copy-DbaLogin and Sync-DbaLoginPermission commands to ensure consistency across both SQL Server instances. These are a part of the dbatools PowerShell module available on GitHub.
- Ensure that dbatools is installed on all SQL servers.
Note: To install dbatools, you can open PowerShell and enter the following command:
install-module -Name dbatools - Use the copy-dbalogin and sync-dbaloginpermission cmdlets to synchronise SQL Server instances:
Syntax: Copy-DbaLogin -source <SQL_server> -Destination <SQL_server>
Where the source server is the SQL Server instance where the Workspace ONE Access SQL Server account was created, and the destination server is the additional SQL Server Always On replica server we plan to use in the Always On availability group.
- Use the Sync-DbaLoginPermission PowerShell command to sync account permissions across all Always On instances.
Syntax: sync-DbaLoginPermission -source <SQL_server> -Destination <SQL_server>
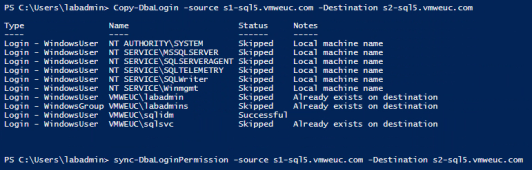
- Run copy-dbalogin and sync-dbaloginpermission from the source server to each of the replica servers.
Create and Configure the Availability Group
In this procedure, you create an Always On availability group, add the SQL Server from Site 1 as the primary replica, and add the other three SQL Server instances as secondary replicas. Replication between both SQL Server instances in the Site 1, where the primary node resides, will be synchronous and have automatic failover. Replication between the secondary-site nodes in Site 2 will be asynchronous, with manual failover.
To create the availability group:
- In preparation for creating the availability group listener, choose a listener name and obtain a corresponding static IP address for Site 1 and a static IP for Site 2.
For example, in this reference architecture, the listener name is access-agl, to designate Workspace ONE Access availability group listener. - In Site 1, in the Management Studio, right-click Always On High Availability in the left pane, and select New Availability Group Wizard.
- Complete the New Availability Group wizard, using the following guidelines:
- Specify Name page – Use the name that you selected in Step 1.
- Select Databases page – Select the check box for the Workspace ONE Access database; for example, saas.
- Specify Replicas > Replicas tab – The cluster instance from Site 1 should already be listed. Click Add Replica to connect to and add the cluster instance from Site 2.
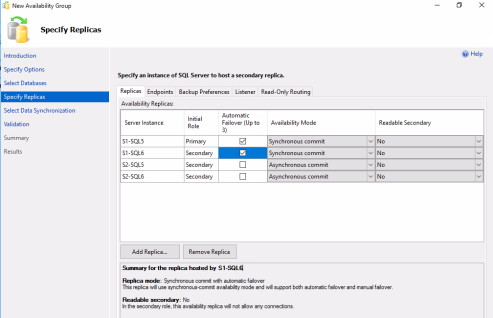
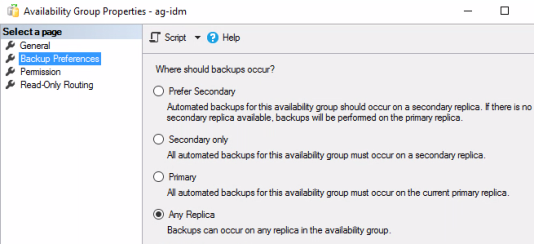
- Specify Replicas > Backup Preferences tab – Select Any Replica. The two server instances are listed and they both have a backup priority of 50 (out of 100).
- Specify Replicas > Listener tab – Select Create an availability group listener, enter the listener name, set the port to 1433, and click Add to add the IP addresses of the two IP addresses you obtained in Step 1.
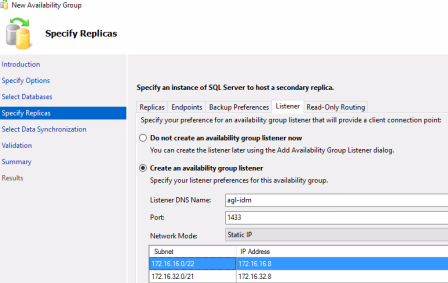
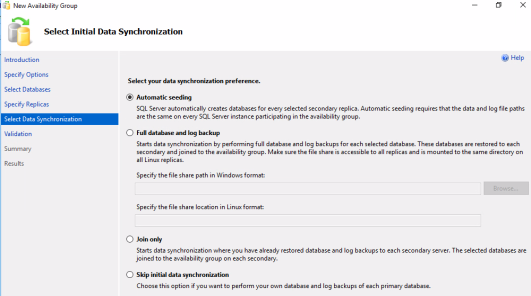
- Select Data Synchronization page – Select Automatic Seeding.
After you complete these pages, the Validation page, the Summary page, and the Results page take you through the process of creating the availability group, the listener, and adding the replicas.
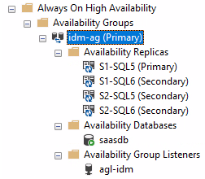
When the process is complete, you can view the new availability groups using the Management Studio.
- In Microsoft SQL Management Studio, connect to one of the SQL Server nodes in the WSFC and expand the availability groups. You can see that the availability group (access-ag) with primary and secondary replicas.
- Because the SQL Always On listener spans two sites and subnets, modify the parameters to change default behavior. Open a PowerShell prompt and use the following PowerShell commands to configure the listener:
- Use the Get-ClusterResource and Get-ClusterParameter cmdlets to determine the name of the resource (access-ag_agl-access) and its settings, as shown in the following example.
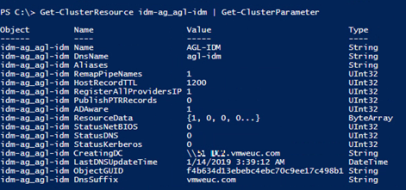
- Change the following settings:
- Use Set-ClusterParameter HostRecordTTL 120 to change HostRecordTTL to a lower value than the default in multi-site deployments. A generally recommended value is 120 seconds, or 2 minutes, rather than the default of 20 minutes.
Changing this setting reduces the amount of time to connect to the correct IP address after a failover for legacy clients that cannot use the MultiSubnetFailover parameter. - Use Set-ClusterParameter RegisterAllProvidersIP 0 to change RegisterAllProvidersIP to false in multi-site deployments.
With this setting, the active IP address is registered in the client access point in the WSFC cluster, reducing latency for legacy clients.
- Use Set-ClusterParameter HostRecordTTL 120 to change HostRecordTTL to a lower value than the default in multi-site deployments. A generally recommended value is 120 seconds, or 2 minutes, rather than the default of 20 minutes.
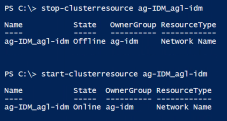
For instructions on how to configure these settings, see RegisterAllProvidersIP Setting and HostRecordTTL Setting. For sample scripts to configure the recommended settings, see Sample PowerShell Script to Disable RegisterAllProvidersIP and Reduce TTL.
![]()
- Use stop-clusterresource and start-clusterresource to restart the access-agl_agl-access resource so that the new settings can take effect.
Now that the database is set up and the SQL Server Always On availability groups are configured, you can deploy and configure Workspace ONE Access to point to the Always On availability group for the database.
Create a SQL Server Maintenance Job to Back Up the Database
VMware recommends creating a SQL maintenance job that makes frequent backups of the Workspace ONE Access transaction log. This job can truncate the transaction log, to guard against filling up the disk with log entries.
Database backup frequency is a matter of operational policy for your organization, but in the following procedure, we provide an example of a SQL maintenance job that backs up transaction logs for a SQL Always On database. These scripts use Ola Hallengren’s MaintenanceSolution.sql script and the stored procedures and objects it generates. The MaintenanceSolution.sql script was run on the WSFC SQL servers prior to performing the following steps.
- Verify the backup preference that is set on the SQL availability group for Workspace ONE Access database.
- Launch Microsoft SQL Management Studio and log in to the primary SQL node (or secondary node, if the backup preference is set to this) using SA or the appropriate admin credentials.
- Expand SQL Server Agent, right-click Jobs in the left pane, and select New Job.
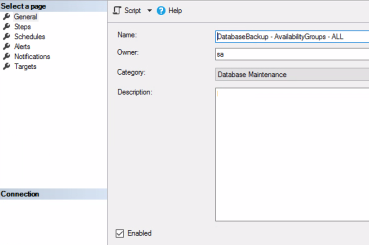
- Provide a Name for the job, set Category to Database Maintenance, and set Owner to SA. Click OK.
- In the left pane, click Steps, and click New to open the Job Step Properties page, which is shown in the next step.
- Provide a Step name and populate the Command pane with script that follows the screenshot.
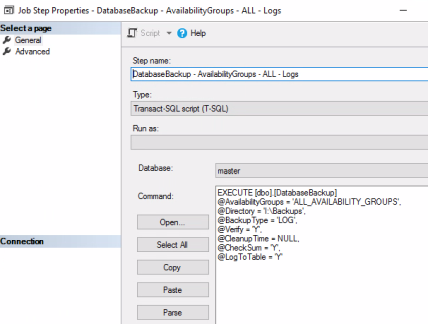
EXECUTE [dbo].[DatabaseBackup]
@AvailabilityGroups = ‘ag-access’,
@Directory = ‘I:\Backups’,
@BackupType = ‘LOG’,@Verify = ‘Y’,@CleanupTime = NULL,@CheckSum = ‘Y’,@LogToTable = ‘Y’
In the script:
- Replace ‘ag-access’ with the name of your SQL Always On availability group. To back up all SQL availability groups on the server, replace ‘ag-access’ with ‘ALL_AVAILABILITY_GROUPS’.
- Replace ‘I:\Backups’ with your backup path.
- To make a FULL backup instead of just backing up the transaction log, change the @BackupType to ‘FULL’.
- In the left pane, click Schedule, click New, and complete the Job Schedule Properties page:
- Provide a Name and edit the schedule to suit your requirements.
- Click OK to close this Window.
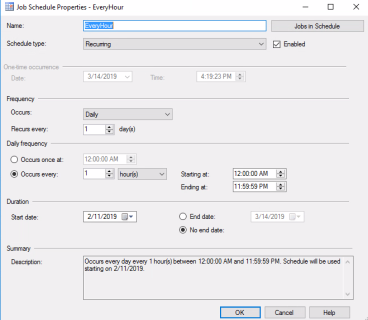
This example schedule creates a new SQL agent job to back up transaction log of the Workspace ONE Access Always On database once every hour.
Deploy and Set Up Workspace ONE Access Appliances
For this reference architecture, we used the Linux-based Workspace ONE Access virtual appliance, which is a standard VMware virtual appliance, with all the usual deployment wizard prompts.
After deploying Workspace ONE Access instances, you point the appliance to the availability group listener you configured in the previous procedure. The Workspace ONE Access appliances reside in the DMZ within each site.
Important: As part of the following procedure, you will need to enter the fully qualified domain name (FQDN) of the global load balancer you are using (the Workspace ONE Access service URL). Most administration tasks will be undertaken from the Workspace ONE Access administration console using the service URL (https://<global-LB-URL>/admin). At a minimum, you should also configure the local load balancer for Site 1.
Before starting the procedure, complete the load balancer prerequisites:
- Verify that you have set up the local and global load balancers according to the vendor’s instructions, that the FQDN for each load balancer is configured in DNS, and that each load balancer server is assigned a static IP address.
- On the global load balancer, obtain and install a TLS/SSL certificate. You can use a wildcard certificate or a Subject Alternate Name (SAN) certificate.
- On the local load balancer, install the TLS/SSL certificate described in the preceding step. The Workspace ONE Access appliances must trust the certificate used. If not, the root from the Certificate Authority must be loaded in Workspace ONE Access. For more information see Installing Trusted Root Certificates.
- Configure the load balancer settings to enable X-Forwarded-For headers, increase the request timeout, and enable sticky sessions. For more information, see the topic Using a Load Balancer or Reverse Proxy to Enable External Access to Workspace ONE Access.
- To the local load balancer, add the FQDNs and IP addresses of the three Workspace ONE Access appliances you plan to create for Site 1.
To set up Workspace ONE Access:
- In vSphere Web Client, use the Deploy OVF Template wizard to deploy the Workspace ONE Access virtual appliance in Site 1.
In the wizard, set a static IP address. See the topic Install the Workspace ONE Access OVA File. For network port requirements, see System and Network Configuration Requirements.
Note: In our example, the name of this first Workspace ONE Access appliance is s1Access01 (s1Access01.vmweuc.com). Make sure you specify the appliance’s FQDN in the Hostname field in the OVF Template wizard.
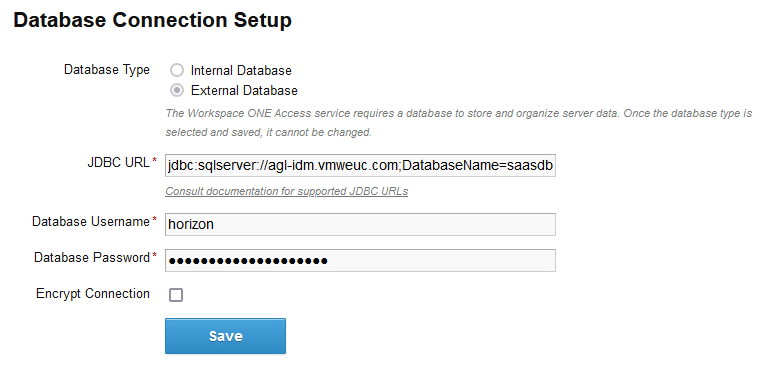
- After deployment is complete, log in to the Workspace ONE Access browser-based console and follow the prompts to complete the Appliance Setup wizard.
This involves entering the JDBC URL string and entering the credentials for the horizon database login user. The syntax of the JDBC URL is:
jdbc:sqlserver://<hostname-of-availability-group-listener>;DatabaseName=saas;multiSubnetFailover=true
Important: When deploying in a multi-subnet setup, be sure to add multiSubnetFailover=true as part of the JDBC connection string. This option enables faster failover. For more information, see MultiSubnetFailover Keyword and Associated Features.
Note: When you test the connection, if you get a connection failed error, verify that you set the database port for all IP addresses to 1433, as described in Step 5 of Create the Workspace ONE Access Database.
For more information about the Appliance Setup wizard, see the topic Use the Setup Wizard to Finish Configuring the Workspace ONE Access Appliance.
- When the Setup Complete page appears, click the link on the page to continue with other Workspace ONE Access configuration tasks.
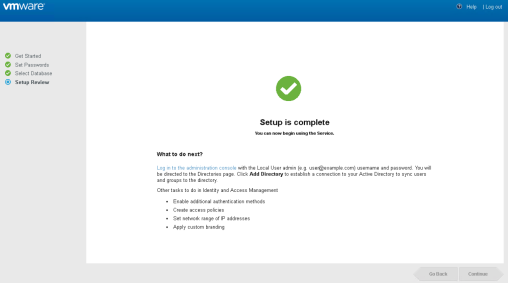
- If you are not using a certificate from a trusted Certificate Authority, download the root certificate for the global load balancer and install it, as described in Installing Trusted Root Certificates for Workspace ONE Access.
- Configure the Workspace ONE Access FQDN by using the FQDN of the top-level, global load balancer.
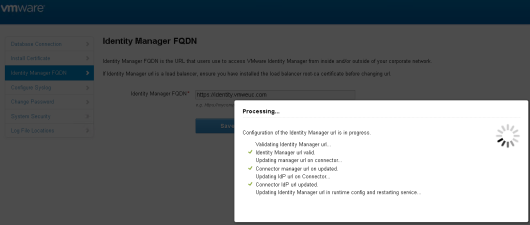
Important: You need a minimum of three Workspace ONE Access appliances in a cluster. We use a local load balancer for our pool of Workspace ONE Access appliances in Site 1 (s1Access.vmweuc.com). We use another local load balancer for our pool of Workspace ONE Access appliances in Site 2 (s2Access.vmweuc.com). We then use a global load balancer named my.vmweuc.com, which is in place above s1Access and s2Access.
For more information about configuring the FQDN, see the topic Modifying the Workspace ONE Access Service URL. As part of this procedure, after you change the FQDN to that of the global load balancer, you will enable the new self-service catalog UI.
- If your load balancer requires to trust the certificate of the Workspace ONE Access nodes, copy the root certificate of the Workspace ONE Access appliance to the local load balancer, as described in Apply Workspace ONE Access Root Certificate to the Load Balancer.
Configure Failover and Redundancy for Workspace ONE Access
You use the Workspace ONE Access appliance you just created to create additional appliances in both Site 1 and Site 2. After giving each appliance its own IP address and DNS name, you configure the built-in Elasticsearch and Ehcache clusters.
- Clone the Workspace ONE Access appliance twice, to create two clones of the Workspace ONE Access appliance in Site 1, as described in Configuring Failover and Redundancy for Workspace ONE Access in a Single Datacenter.
For our example, the original Workspace ONE Access appliance is named s1Access01.vmweuc.com. The two clones for Site 1 are named s1Access02.vmweuc.com and s1Access03.vmweuc.com.
- Give the cloned appliances static IP addresses and verify that an Elasticsearch cluster is created, as described in Assign a New IP Address to Cloned Workspace ONE Access Virtual Appliance.
- When all nodes are up and running, use the System Diagnostic Dashboard to verify that all nodes are using the same cluster ID. Also verify that Elasticsearch and Ehcache are up and running and everything else has a green status. If there are any issues, make sure to resolve these before moving on to deploying the second data center.
- To provide site resilience, set up a separate cluster in the second data center. To implement this strategy, you must perform all the tasks described in: Deploying Workspace ONE Access in a Secondary Data Center for Failover and Redundancy.
- Export the Workspace ONE Access appliance and use it to create a new cluster of three appliances in Site 2, as described in Create Workspace ONE Access Virtual Appliances in Secondary Data Center. Make sure to change the cluster ID on the three nodes in the second data center.
Change the Workspace ONE Access appliances in the secondary data center to read-only access. See Edit runtime-config.properties File for Workspace ONE Access in Secondary Data Center to Set Read-Only Mode.

- After all the nodes are up and running, make sure everything is green in the Systems Diagnostic Dashboard.
Deploy and Set Up the Connectors Inside the Corporate Network
After you set up the Workspace ONE Access instances inside the DMZ, you deploy four Workspace ONE Access Connectors inside the local area network (LAN)—two connectors in Site 1 and two connectors in Site 2. The connectors use the Workspace ONE Access’s built-in identity provider for load balancing.
There is no need for an external load balancer when using the built-in identity provider. The only authentication method that needs external load balancing of the connectors is Microsoft Active Directory Kerberos. The connectors sync users and groups from your enterprise directory to the Workspace ONE Access service.
- In preparation for establishing a connection to Workspace ONE Access Connectors, navigate to the global load balancer URL (https://<global-LB-URL>/admin), log in to the Workspace ONE Access administrative console, and generate JSON configuration files for the two connectors you will create, using the connector names s1AccessC1 and s1AccessC2.
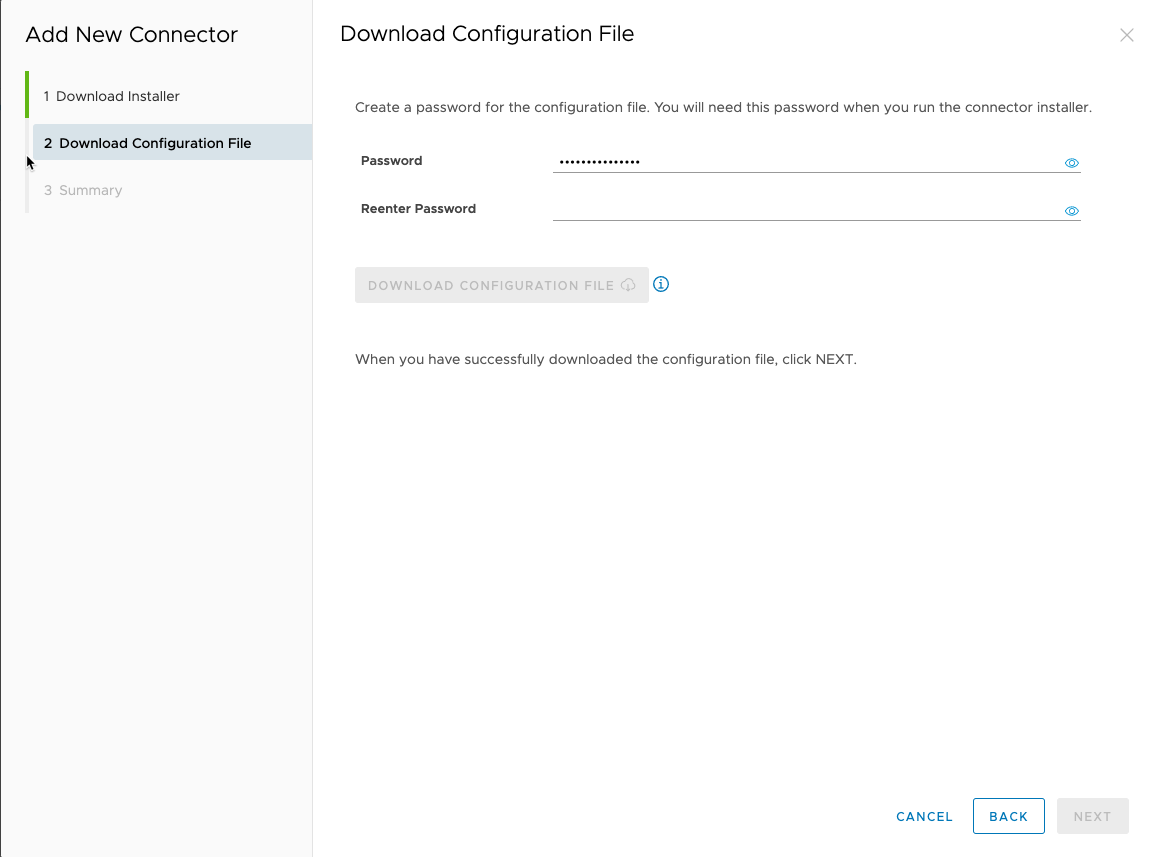
For instructions on generating the configuration files, see step 1 in Installing the Workspace ONE Access Connector.
- Deploy two Workspace ONE Access Connectors in Site 1.
You install the Workspace ONE Access Connector by running a Windows installation wizard on an already up and running Windows machine.
The Workspace ONE Access Connectors run inside your trusted enterprise network. For instructions, see the topic Installing the Workspace ONE Access Connector.
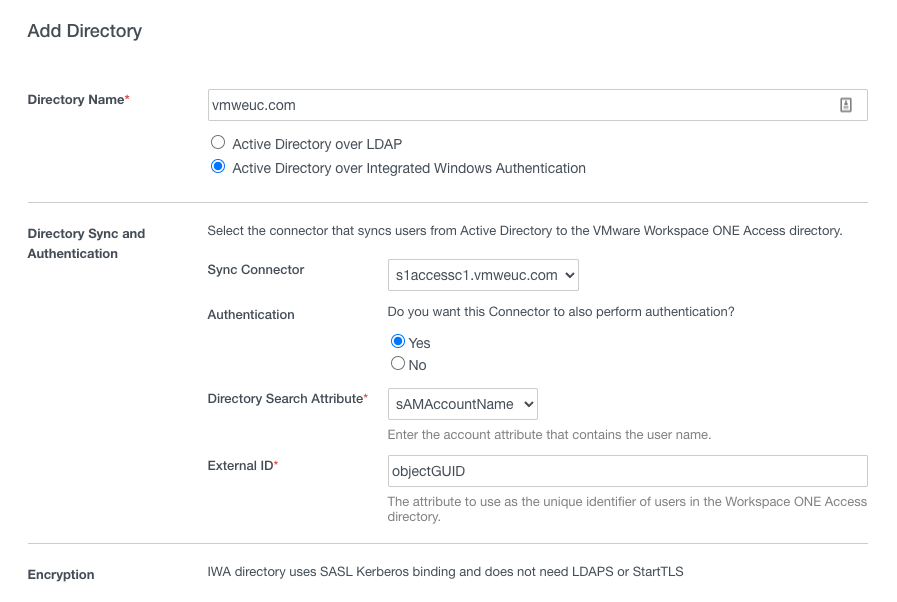
- Use the Workspace ONE Access administration console (at the global load balancer URL) to add a directory.
- Click the link on the Setup is Complete page, which is displayed after you activate the connector.
- On the Identity & Access Management > Directories tab, click Add Directory and select the type of directory you want to add.
- Follow the wizard prompts and add the first connector (s1AccessC1) as your Sync Connector.
Adding a directory allows Workspace ONE Access to sync users and groups from your enterprise directory to the Workspace ONE Access service. For more information, see the topic Directory Integration with VMware Workspace ONE Access.
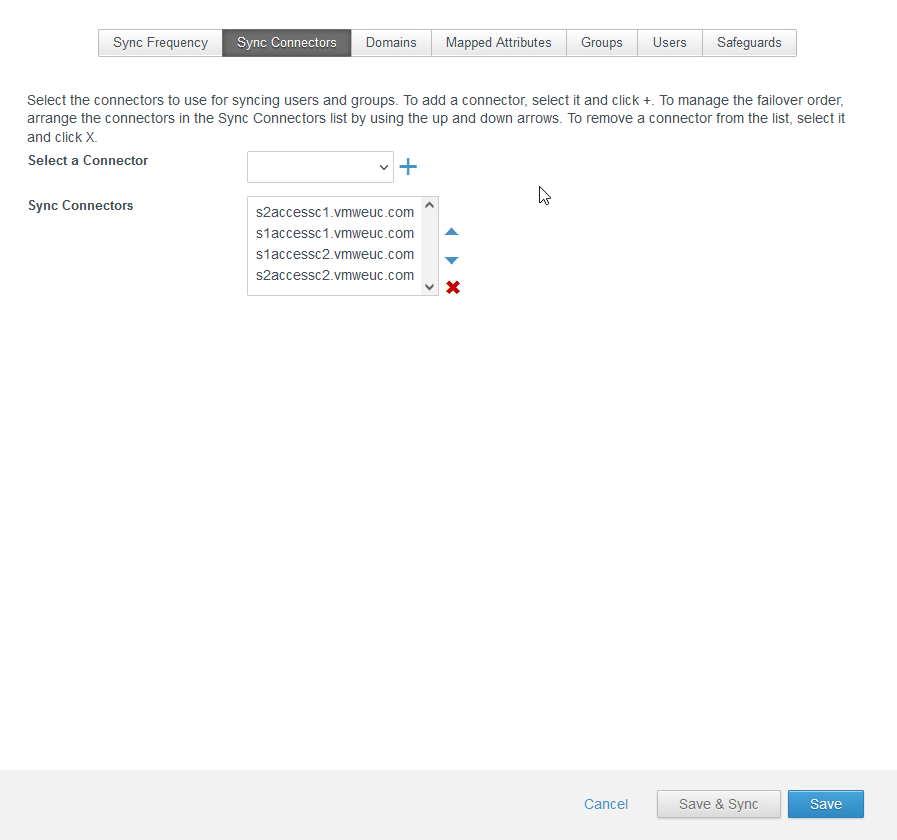
Note: Create configuration files for all four connectors and deploy them. The result is that you will have four connectors—two in Site 1 and two in Site 2—and the initial sync connector will be the s1AccessC1 connector in Site 1.
If the s1AccessC1 connector ever becomes unavailable, you can configure different fallback connectors as the sync connector. If Site 1 has a failure event, you can include connectors from Site 2. For more information, see the topic Configuring High Availability for Directory Sync in Workspace ONE Access.
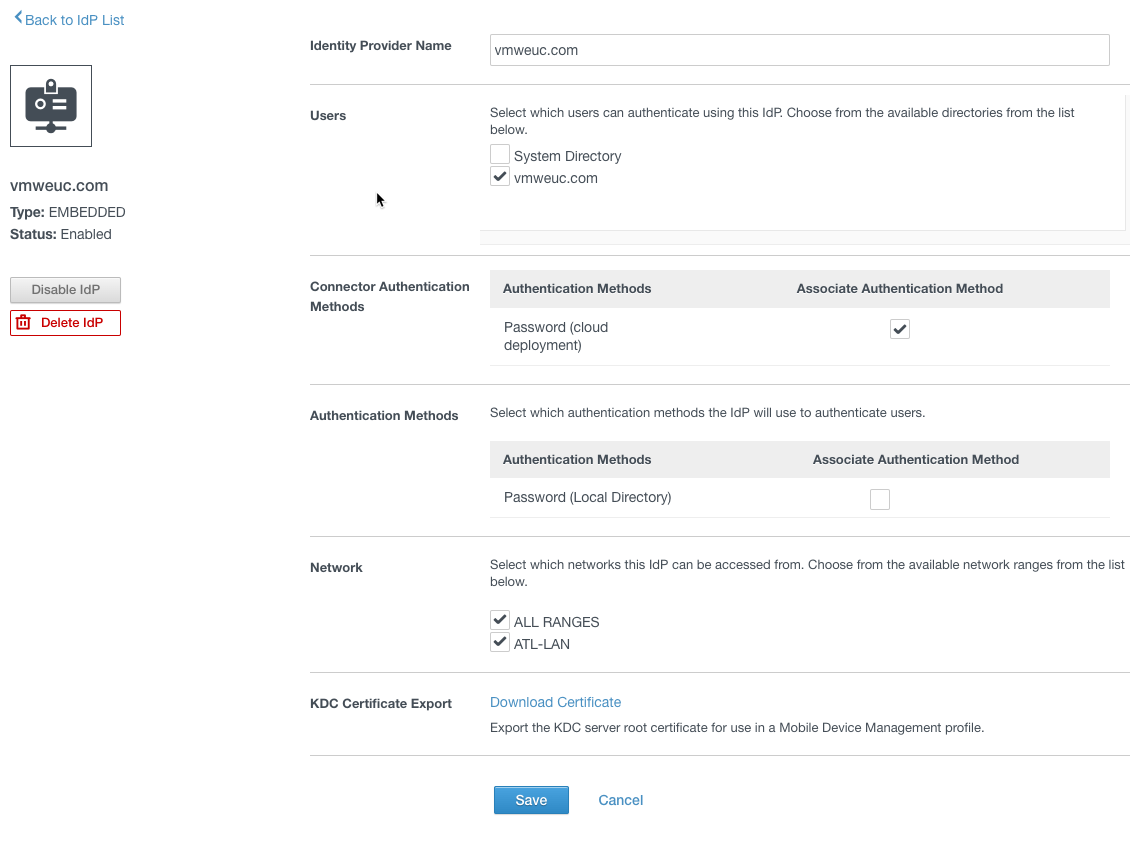
- The connectors’ authentication methods, besides Kerberos authentication which is inbound and uses a Workspace IdP, operate in outbound-only mode. The nodes for high availability are added to the connector authentication methods.
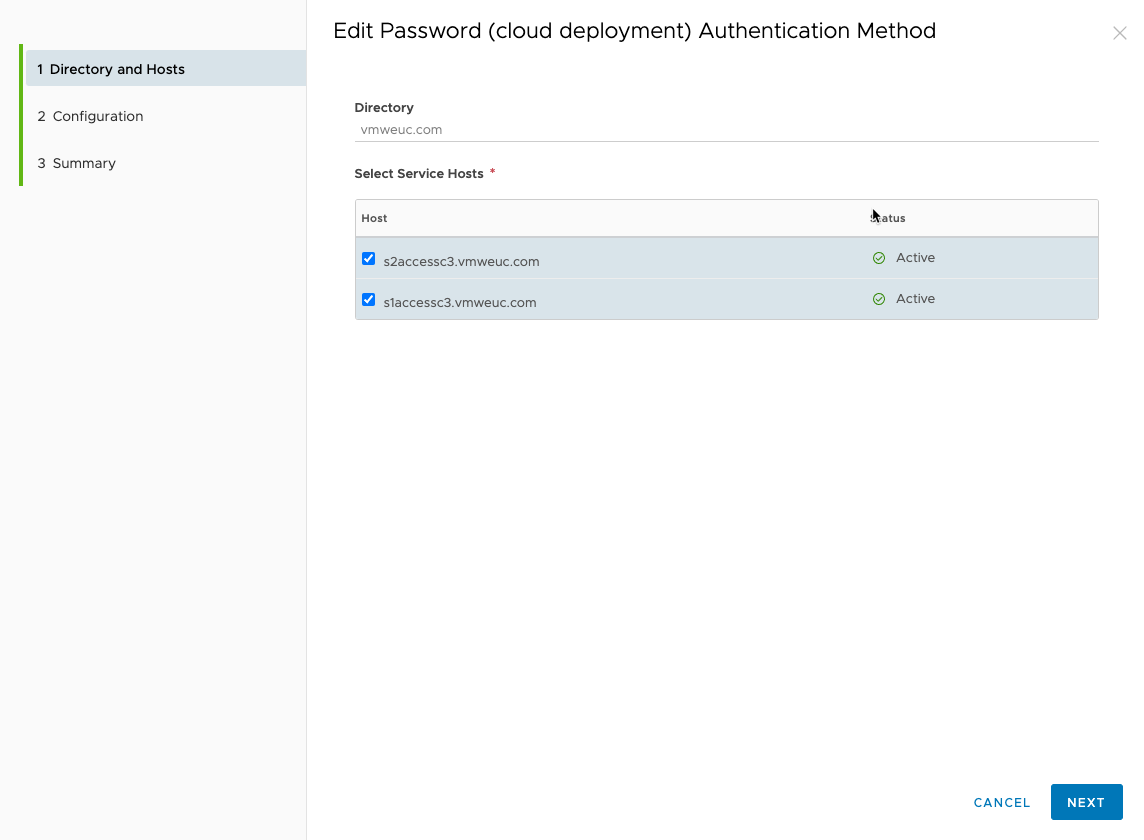
The authentication method itself is added automatically to the Built-in IdP for the directory and can be activated there.
At this point, we have
- 3 Workspace ONE Access appliances for Site 1: s1Access01, s1Access02, s1Access03
- 1 load balancer virtual server for site 1: s1Access
- 2 Workspace ONE Access Connectors for Site 1: s1AccessC1, s1AccessC2
- 3 Workspace ONE Access appliances for Site 2: s2Access01, s2Access02, s2Access03
- 1 load balancer virtual server for site 2: s2Access
- 2 Workspace ONE Access Connectors for Site 2: s2AccessC1, s2AccessC2
- 1 master load balancer virtual server: my.vmweuc.com
Finalize Failover Preparation
To complete the setup, follow the instructions provided in the following topics from Installing and Configuring Workspace ONE Access documentation:
- Configure Failover Order of Horizon and Citrix-published Resources
- Clear Cache in Secondary Data Center
To perform a failover, refer to the following topics:
- Follow the steps in Failover to Secondary Data Center for Workspace ONE Access.
- Configure the Workspace ONE Access appliances in the secondary data center for read-write mode. See Promoting Secondary Data Center to Primary Data Center for Workspace ONE Access.
Troubleshoot Elasticsearch
The most common issue that arises when running a Workspace ONE Access cluster has to do with Elasticsearch health.
You can check the health of the Elasticsearch cluster using the System Diagnostic Dashboard, by monitoring https://hostname/AUDIT/API/1.0/REST/system/health, or, when logged in on console, you can run the following command:
curl 'http://localhost:9200/_cluster/health?pretty'
The command should return a result similar to the following.
{
"cluster_name" : "horizon",
"status" : "green",
"timed_out" : false,
"number_of_nodes" : 3,
"number_of_data_nodes" : 3,
"active_primary_shards" : 20,
"active_shards" : 40,
"relocating_shards" : 0,
"initializing_shards" : 0,
"unassigned_shards" : 0,
"delayed_unassigned_shards" : 0,
"number_of_pending_tasks" : 0,
"number_of_in_flight_fetch" : 0
}
If Elasticsearch does not start correctly or if its status is red, follow these steps to troubleshoot:
- Ensure port 9300 is open between all nodes.
- Restart Elasticsearch on all nodes in the cluster by running the following command:
service elasticsearch restart - Check the logs for more details by running the following commands:
cd /opt/vmware/elasticsearch/logstail -f horizon.log
Summary and Additional Resources
Now that you have come to the end of this configuration chapter on Workspace ONE Access, you can return to the landing page and use the tabs, search, or scroll to select your next chapter in one of the following sections:
- Overview chapters provide understanding of business drivers, use cases, and service definitions.
- Architecture chapters give design guidance on the products you are interested in including in your platform, including Workspace ONE UEM, Workspace ONE Access, Workspace ONE Assist, Workspace ONE Intelligence, Horizon Cloud Service, Horizon, App Volumes, Dynamic Environment Manager, and Unified Access Gateway.
- Integration chapters cover the integration of products, components, and services you need to create the platform capable of delivering the services that you want to deliver to your users.
- Configuration chapters provide reference for specific tasks as you build your platform, such as installation, deployment, and configuration processes for Workspace ONE, Horizon Cloud Service, Horizon, App Volumes, Dynamic Environment Management, and more.
Additional Resources
For more information about VMware Workspace ONE Access, you can explore the following resources:
Changelog
The following updates were made to this guide:
| Date | Description of Changes |
| 2023-07-25 |
|
| 2020-04-29 |
|
| 2020-02-27 |
|
Author and Contributors
This chapter was written by
- Donal Geary, Senior Lab Manager in End-User-Computing Technical Marketing, VMware.
- Graeme Gordon, Senior Staff End-User-Computing (EUC) Architect in End-User-Computing Technical Marketing, VMware.
Feedback
Your feedback is valuable.
To comment on this paper, contact VMware End-User-Computing Technical Marketing at euc_tech_content_feedback@vmware.com.