
App Volumes Configuration
This chapter is one of a series that make up the VMware Workspace ONE and VMware Horizon Reference Architecture, a framework that provides guidance on the architecture, design considerations, and deployment of Workspace ONE and Horizon solutions. This chapter provides information about common configuration and deployment tasks for VMware App Volumes™.
This includes detailed instructions for configuring VMware App Volumes across multiple sites, implementing redundancy both within and across sites. As is described in the Multi-site Design section of App Volumes Architecture, the recommended deployment option for App Volumes across multiple sites is to use separate databases.
The procedures in this guide create a setup in which the App Volumes database can fail over automatically within each site. Site 1 and Site 2 have separate databases, but during a failover, users at Site 1 will be able to use replicated App Volumes packages in Site 2, as long as the user entitlements are also replicated using multi-instance management. See Multi-Instance Management for more information.
Configuration of Separate App Volumes Database Instances per Site
This design uses separate App Volumes database instances for each site. With this option, you can use SQL Always On availability groups within each site to achieve local high availability of the database. To make user-based entitlements for packages available between sites, you can manually replicate entitlements or use the App Volumes Entitlements Sync tool, which is available as a VMware Fling.
To use this setup, perform the procedures in the following order:
- Create a Windows Server Failover Cluster in Each Site
- Install SQL Server 2016 Stand-Alone in All VMs
- Create the App Volumes Databases and Enable Availability Groups for the Clusters
- Create Always On Availability Groups for App Volumes Databases
- Configure Cluster Quorum Settings
- Install App Volumes to Use a Highly Available Database
Create a Windows Server Failover Cluster in Each Site
A failover cluster is a group of VMs that have the same software installed on them and work together as one instance to provide high availability for a service, such as a Microsoft SQL Server database. If a VM, or cluster node fails, another node in the cluster begins to provide the service.
Note: For information about setting up the NSX Advanced load balancer (AVI Networks) for use with App Volumes, see Configure Avi Vantage for VMware Horizon. If you are using another type of load balancer, verify that you have set up this load balancer according to the vendor’s instructions.
To create a Windows Server Failover Clustering (WSFC) cluster:
- On two ESXi hosts in Site 1, create and configure the two VMs that will be used as a clustered instance of Microsoft SQL Server, and then do the same in Site 2.
- For this reference architecture, we used the Windows Server 2019 Standard operating system in the VMs that run SQL Server.
- In this example, we named the VMs as follows: At Site 1, we created VMs named s1-sql4 and s1-sql5 on separate ESXi hosts. At Site 2, we created VMs named s2-sql4 and s2-sql5.
- Set up each VM in the same way, with a total of five 20-GB hard disks: one disk for the Windows OS and five disks for the various types of SQL Server data.
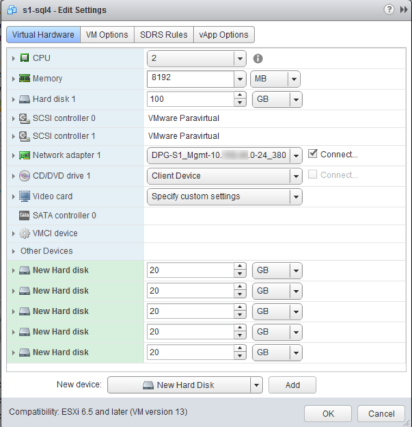
Inside the OS, the disks are mapped to drive letters as follows.

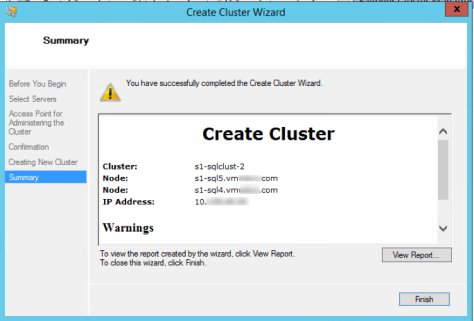
- In preparation for creating the failover cluster, choose a cluster name and obtain a corresponding static IP address for the cluster in Site 1 and in Site 2.
For example, in this reference architecture, we use s1-sqlclust-2 and s2-sqlclust-2 for the cluster names.
- To set up failover clustering on the SQL Server VMs, user Server Manager on each of the four VMs (two in Site 1 and two in Site 2), and use the Windows Server Add Roles and Features Wizard to add the Failover Clustering feature.
In the wizard, select to add the following features:
- .NET Framework 3.5 features
- Failover Clustering, including adding the Failover Clustering tools
For detailed instructions, see the Microsoft blog post Installing the Failover Cluster Feature and Tools in Windows Server 2012. One of the tools installed is the Failover Cluster Manager, which you will use for many of the steps that follow.
- Use the Failover Cluster Manager to create a WSFC cluster that includes two SQL Server VMs in Site 1, and then do the same in Site 2.
For detailed instructions, see Create a Failover Cluster. The failover cluster for Site 1 includes the VMs s1-sql4 and s1-sql5. The cluster for Site 2 includes the VMs s2-sql4 and s2-sql5.
Install SQL Server Stand-Alone in All VMs
You install SQL Server Stand-Alone on each VM, rather than creating a SQL Server failover cluster. For App Volumes, you use stand-alone installations and then create Always On availability groups to achieve failover within a site.
To install SQL Server:
- In Site 1, on the first SQL Server VM, complete the SQL Server installation wizard, using the following guidelines:
- Installation page – Select New SQL Server stand-alone installation.
- Feature Selection page – Select Database Engine Services and Management Tools - Basic.
- Instance Configuration page – Select Default instance. The instance ID is MSSQLSERVER.
- Server Configuration page – The startup type is Automatic for the SQL Server Agent and SQL Server Database Engine.
- Database Engine Configuration page – On the Server Configuration tab, select Mixed Mode (SQL Server authentication and Windows authentication), and enter credentials for a user account that will be part of the SQL Server administrators.
On the Data Directories tab, for each item, select the disk that you created for that type of file during VM creation. Use the following screenshot as a guide:
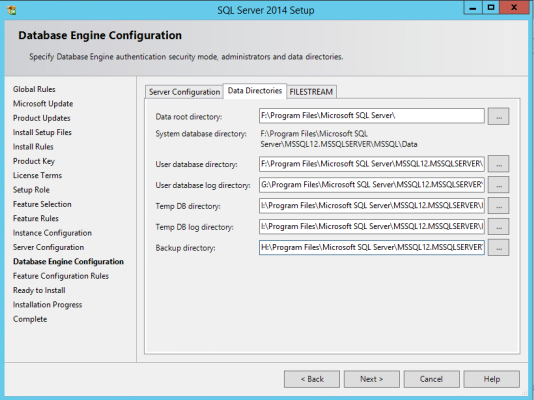
For more information about the setup wizard, see Install SQL Server from the Installation Wizard (Setup).
- Repeat Step 1 to install SQL Server on the other VM in Site 1 and on the VMs in Site 2.
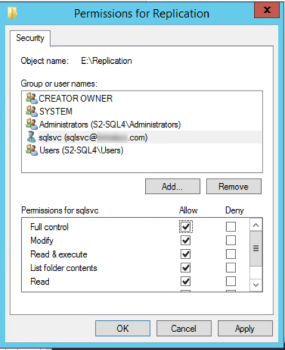
- Create a shared folder on the first SQL Server VM in each site; for this example, the VMs are s1-sql4 and s2-sql4).
- Create a folder named Replication on the SQL_Binaries (E:) drive. You created this drive during Step 1 of Create a Windows Server Failover Cluster in Each Site.
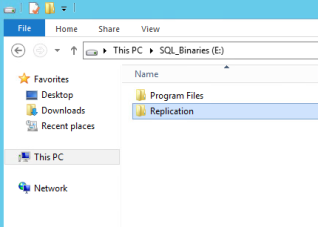
- Give the SQL service account full permissions on the folder.
Create the App Volumes Databases and Enable Availability Groups for the Clusters
This section provides detailed instructions for creating a highly available database, but does not give recommendations regarding the sizing of the database for various sizes of deployments. For information about database sizing, see VMware App Volumes 2.x Database Best Practices.
To create the databases:
- On first SQL Server VM in each site, use Microsoft SQL Server Management Studio to create an App Volumes database.
- For this example, the VMs are s1-sql4 and s2-sql4.
- Log in to the Management Studio as the sysadmin or as a user account with sysadmin privileges.
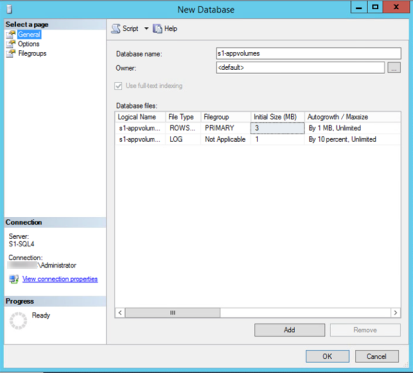
- Connect to the SQL Server instance on the VM, right-click the Databases folder, and select New Database.
- Enter a database name and click OK.
For example, for Site 1, we named the database s1-appvolumes. For Site 2, we named the database s2-appvolumes.
- Open SQL Server Configuration Manager and enable Always On availability groups for the Windows Failover cluster in Site 1 and Site 2.
For instructions, see Enable or disable Always On availability group feature (SQL Server).
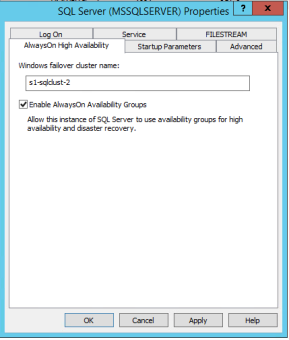
The cluster names are the names you created in Step 2 of Create a Windows Server Failover Cluster in Each Site.
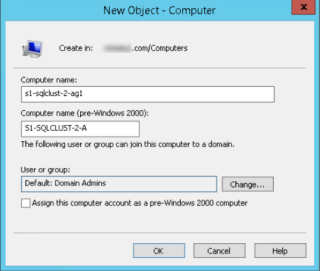
- In each site, on the domain controller, open Active Directory Users and Groups, and create a new Computer object for the availability group.
For this example, for Site 1, the AD computer name for the group is s1-sqlclust2-ag1. For Site 2, the name is s2-sqlclust2-ag1.
Create Always On Availability Groups for App Volumes Databases
In this procedure, you create an Always On availability group, adding the SQL Server stand-alone instances from Site 1 as the primary replica and secondary replicas. You then do the same for Site 2, so that each site has its own Always On availability group to achieve automatic failover within each site (but not across sites).
To create the availability groups:
- On the first SQL Server VM in Site 1, open the Management Studio, right-click Always On High Availability in the left pane, and select New Availability Group Wizard.
- Complete the New Availability Group wizard, using the following guidelines:
- Specify Name page – Use the name of the AD computer object you just created. For this example, the name is s1-sqlclust2-ag1 for Site 1.
- Select Databases page – Select the check box for the local database, which is s1-appvolumes in this example.
- Specify Replicas > Replicas tab – The first SQL Server VM should already be listed. Click Add Replica to connect to and add the second SQL Server VM from this site.

Important: Select the Synchronous Commit and Automatic Failover check boxes. For the Readable Secondary setting, select No for the primary instance and Yes for the secondary instance.
- Select Data Synchronization page – Select Full, and specify the shared Replication folder that you created in Step3, Install SQL Server Stand-Alone in All VMs.
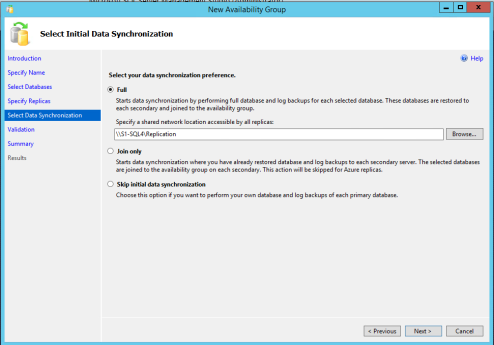
This share is used to synchronize the database on the secondary replica with that on the primary.
After you complete these pages, the Validation page, the Summary page, and the Results page take you through the process of creating the availability groups and listeners, and adding the replicas. On the Results page, you can see that the s1-appvolumes database is synchronized between both SQL servers.
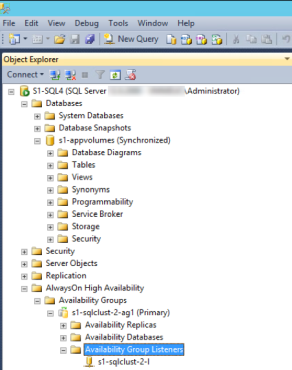
When the process is complete, you can view the new availability groups using the Management Studio. The following screenshot shows the availability group with the primary replica on the s1-sql4 VM.
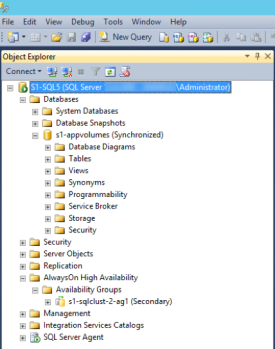
The following screenshot shows the availability group with the secondary replica on the s1-sql5 VM.
- Repeat Steps 1 and 2 for Site 2.
Configure Cluster Quorum Settings
At this point, you will configure cluster quorum settings to use a file share witness. Each element in a cluster can cast one “vote” to determine whether the cluster can run. Because you have two nodes in a cluster and you need an odd number of voting elements, create a file share quorum witness, which will cast the third vote. A file share witness is recommended when you need to consider multi-site disaster recovery with replicated storage.
To configure cluster quorum settings:
- On a file server in each site, use Server Manager to open and complete the New Share wizard and create an SMB share, using the following guidelines:
- Select Profile page – Select SMB Share – Quick.
- Share Location page – For the share location, choose Select by volume, and select the drive.

- Permissions page – Click Customize permissions and give the WSFC cluster object full control over the file share.

When you finish this step, you have two files shares: one for Site 1 and one for Site 2. For more details about accessing and using this wizard, see 12 Steps to NTFS Shared Folders in Windows Server 2012.
- Configure the cluster quorum settings for each site:
- Open Failover Cluster Manager on the first VM in Site 1, right-click the cluster, and select More Actions > Configure Cluster Quorum Settings.
- Complete the Configure Cluster Quorum Wizard, using the following guidelines:
- Select Quorum Configuration Option page – Choose Select the quorum witness.
- Select Quorum Witness page – Select Configure a file share witness.
- Configure File Share Witness page – Enter the path to the file share you created in Step 1.
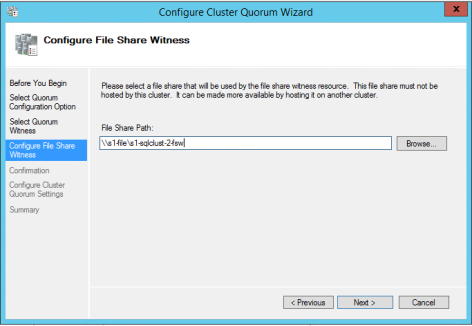
For detailed instructions, see Configure and manage quorum.
- Repeat this procedure to set up a file share quorum witness in Site 2.
You are now ready to install App Volumes and point to the availability group we created.
Install App Volumes to Use a Highly Available Database
This procedure focuses on the specific settings required for connecting App Volumes to a highly available database. For details about other aspects of App Volumes installation, including system requirements, see the VMware App Volumes Administration Guide.
To install App Volumes:
- In preparation for installing App Volumes and connecting to the availability group listener, use SQL Server Configuration Manager on each SQL Server VM to enable named pipes.
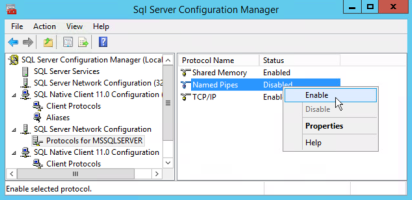
For instructions, see Enable or Disable a Server Network Protocol.
Important: Restart the SQL Server service so the new setting can take effect.
- In Site 1, on the first VM on which you want to install App Volumes, download the App Volumes Manager installer, start the installation wizard, and follow the prompts to the Database Server page.
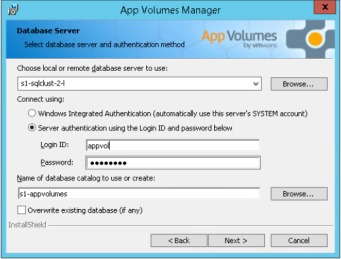
- Complete the Database Server page, using the following guidelines:
- Choose local or remote database server to use – Select the SQL Server Always On availability group listener that you created in Create Always On Availability Groups for App Volumes Databases.
- Name of database catalog to use or create – Select the database that you created in Create the App Volumes Databases and Enable Availability Groups for the Clusters.
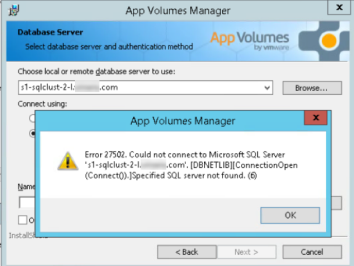
Important: If you see an error message such as the following one, it means you need to enable named pipes, as described in Step 1.
- On the Choose Network Ports page, verify that the HTTP port is set to 80 and the HTTPS port is set to 443.
- Follow the rest of the wizard prompts to complete the installation.
- Repeat Steps 1–5 on the second App Volumes VM in Site 1, but on the Database Server page, be sure to leave the Overwrite existing database (if any) check box deselected.
Both App Volumes Managers in Site 1 must point to the same highly available database. - Repeat this entire procedure in Site 2.
With App Volumes successfully installed, you can begin configuration. For detailed instructions see the VMware App Volumes Administration Guide.
Package Replication
This design uses a shared NFS datastore to replicate packages between sites and app volumes instances. Though NFS is not a requirement, it provides low-cost storage replication that works with both VMware vSphere® VMFS and VMware vSAN™ implementations of VMware vSphere®.
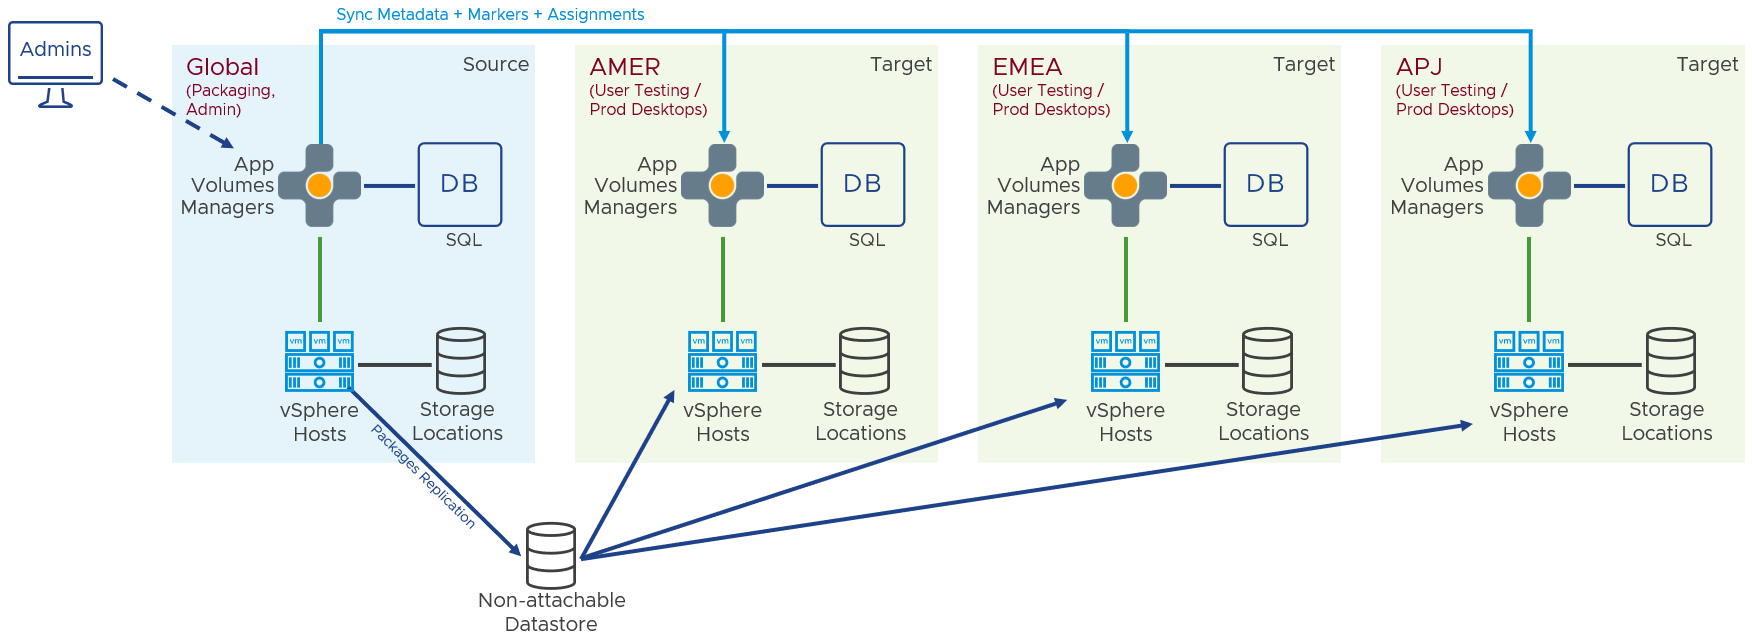
Figure 1: Replicating Packages with a Shared Datastore
NFS datastores can also be used on VMware Cloud on AWS to provide a shared datastore between different SDDCs (software defined data centers).
To use this setup, perform the procedures described in the sections that follow.
Configure a Not Attachable NFS Datastore for Site 1 and Site 2
Note: The screenshots in this section were taken from Site 1. The process was repeated for Site 2.
To configure a non-attachable datastore for replication purposes:
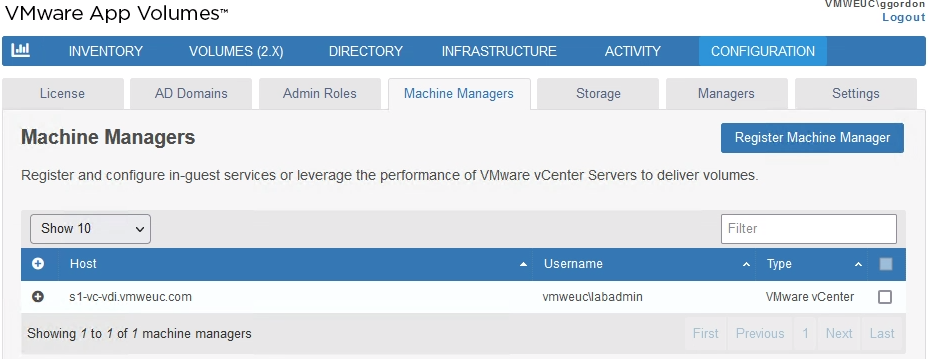
- Use the App Volumes Manager console to configure a machine manager for the VMware vCenter Server®.
App Volumes–managed storage locations are available, based on the vCenter Server selected in the App Volumes machine manager configuration. For example, the following screenshot shows a machine manager configured for the vCenter Server whose host name is s1-vc-vdi.vmweuc.com.
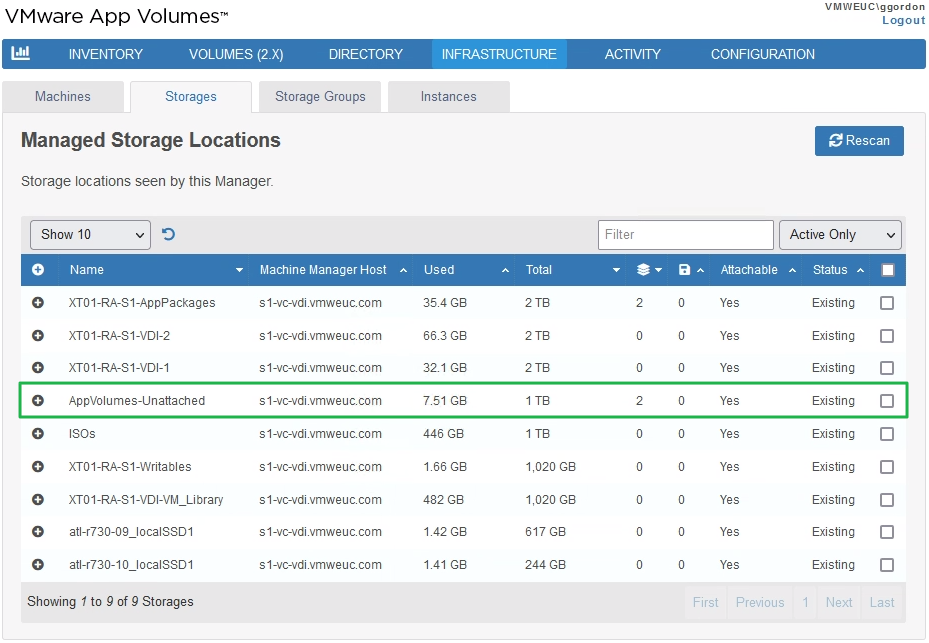
- Mount the NFS datastore to the hosts in the selected vCenter Server, to make them available as App Volumes managed storage locations.
For example, in the following screenshot, the NFS datastore AppVolumes-Unattached is added to vSphere hosts in the s1-vc-vdi.vmweuc.com cluster.

- After the NFS datastore has been added to the vSphere hosts, click Rescan to make it available as a managed storage location.
- Select the datastore, and click Set As Not Attachable. This option allows packages to replicate to and from this datastore, but prevents packages on this datastore from being mounted for use.
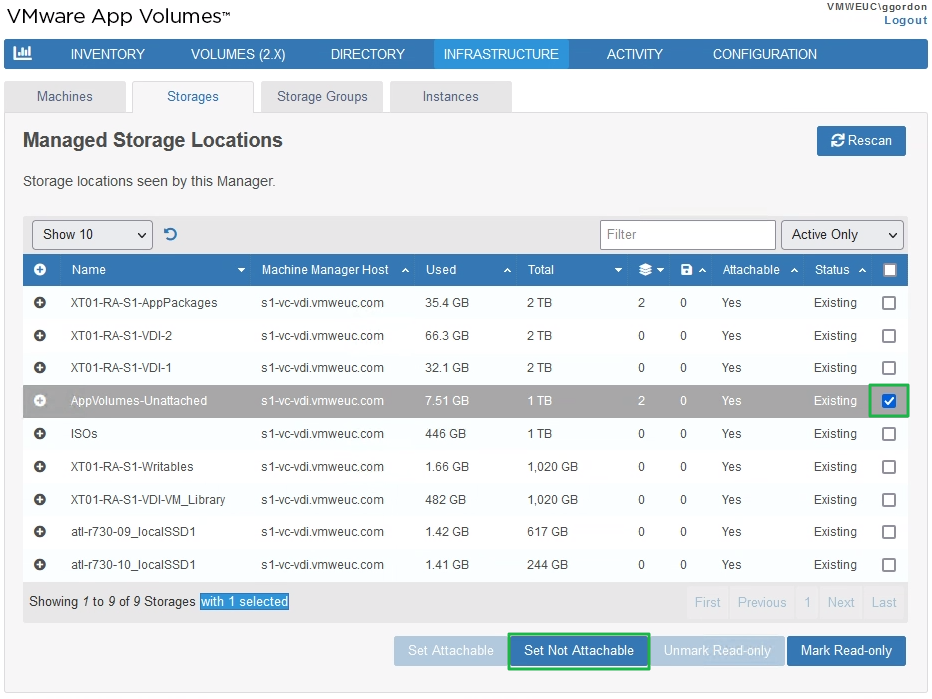
- Repeat these steps for all other App Volumes instances.
Mark Source Instance Storage Locations as Read-only
It is best practice to designate one instance of App Volumes as the source for package replication. This avoids possible conflicts if changes were made in two instances. On the source instance, you should mark the storage locations (datastores) used for packages as read-only.
- Use the App Volumes Manager console on the App Volumes instance you are designating as the source.
- Select the storage locations that will be used for package storage and click Mark Read-only.
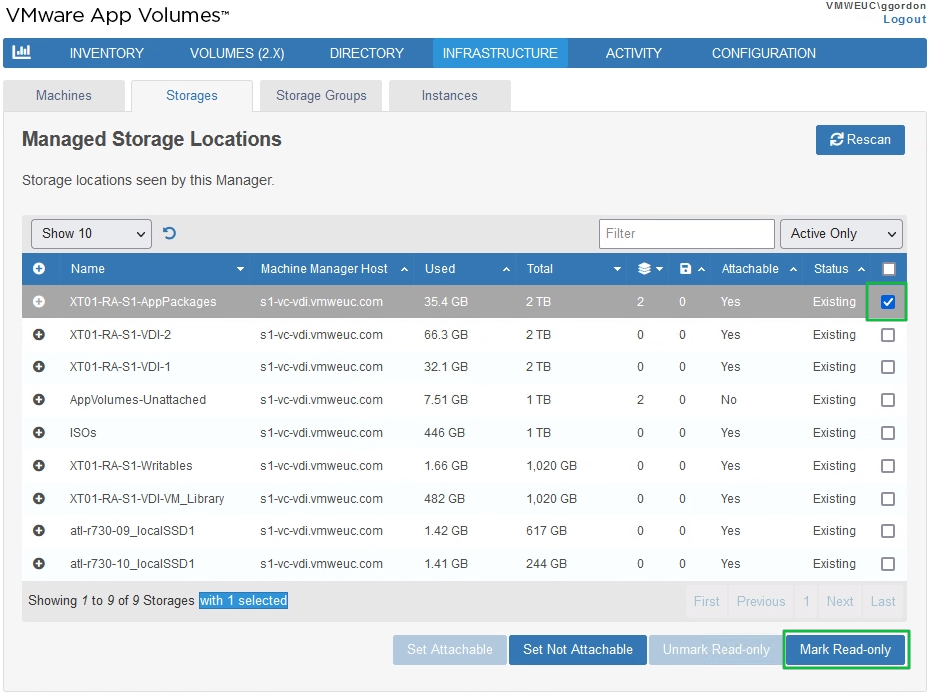
Note: Only do this on the one instance that you are designating as the source. Do not repeat this on other instances.
Create Storage Groups
Next, you create a storage group that includes one or more attachable datastores, and the non-attachable datastore, as shown in the following screenshot.
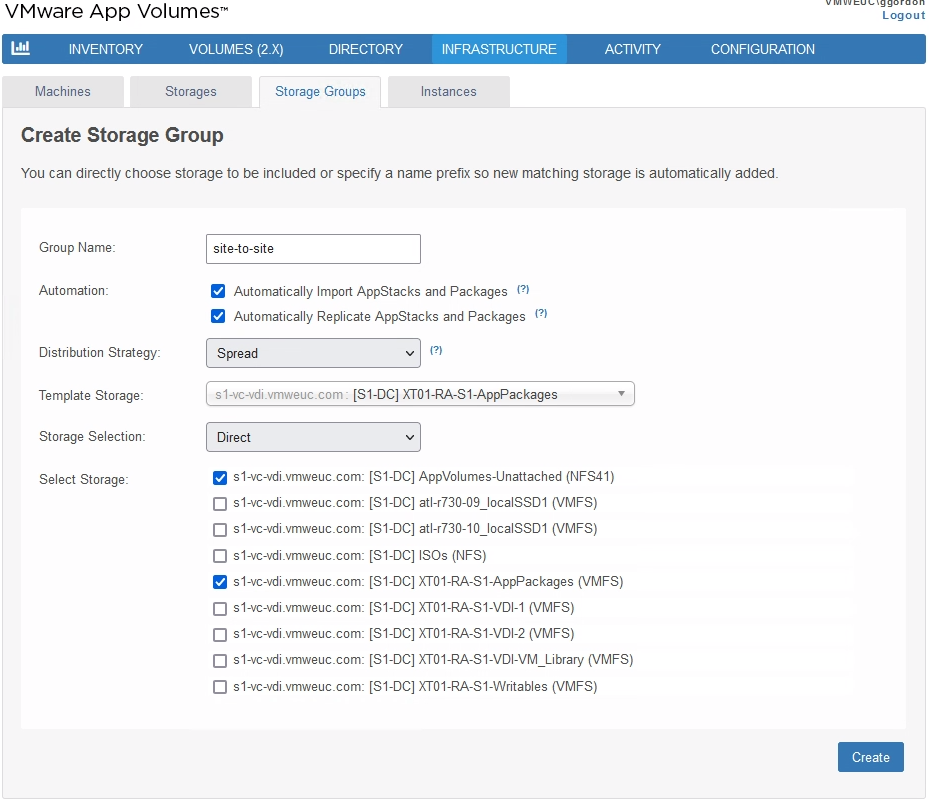
Figure 2: Creating a Storage Group
Repeat this process for the other sites and instances of App Volumes.
Multi-Instance Configuration
When configuring multiple sites and instances of App Volumes, you can set a source and target relationship between App Volumes instances so that packages are distributed across different App Volumes instances and locations. With App Volumes version 2203, the ability to synchronize metadata, markers, and assignments between instances was also added.
The instructions below give the process for a two-site deployment, with one instance of App Volumes per site. It can be amended to add additional sites or instances as targets to the source instance in Site 1.
- Install App Volumes Managers:
- Install the first App Volumes Manager in Site 1. If using Always On availability groups to provide a local highly available database, use the local availability group listener for Site 1 when configuring the ODBC connection.
Important: For step-by-step instructions on this process, see Install App Volumes to Use a Highly Available Database. - Complete the App Volumes Manager wizard and add the vCenter Servers for Site 1 as machine managers, including mapping their corresponding datastores.
- Continue installing the subsequent App Volumes Managers for Site 1. Add them as targets to the local load balancer virtual IP.
- Repeat steps 1–3 for Site 2 so that the App Volumes Managers in Site 2 point to the local availability group listener for Site 2, and register the local vCenter Servers for Site 2 as machine managers.
- Install the first App Volumes Manager in Site 1. If using Always On availability groups to provide a local highly available database, use the local availability group listener for Site 1 when configuring the ODBC connection.
- Add the target instances:
- Using the App Volumes admin console for the Site 1 instance, add the Site 2 instance as a target instance. See Register an App Volumes Instance as a Target.
- Select to enable application package import, synchronize markers, and synchronize assignments.
- Configure storage locations:
- On both Site 1 and Site 2 instances, configure the shared datastore storage location as not attachable.
- On the Site 2 instance (target), mark the shared datastore storage location as Read-only.
- Set up a storage group on each App Volumes instance:
- Create a storage group. For details, see Configure Storage Groups in App Volumes Manager.
- Select all datastores to be used for packages.
- Additionally, select one shared datastore to be used to replicate packages between instances.
- Do not select Automatically Import AppStacks and Packages.
- Select to Automatically Replicate AppStacks and Packages.
- Repeat this step for the Site 2 instance.
With this design, the following is achieved:
- The Site 1 instance is defined as the source and becomes the source for packages and assignments. The instance in Site 2 is a target.
- Packages are made available in both sites.
- Packages are replicated from Site 1 (source) to Site 2 (target) through the storage groups defined, and through the use of a shared datastore that is configured as non-attachable.
- User-based entitlements for packages are replicated between sites.
Additional Configuration Options for Writable Volumes
You can configure writable volumes so that end users can determine how much free disk space is available in their writable volume. You can expand the amount of disk space if necessary.
Allowing End Users to See the Size of Writable Volumes
Administrators can use the App Volumes Manager console to view the disk space remaining in writable volumes. Administrators can also allow end users to see how much disk space is available on their writable volume by looking at their system volume. To do this, administrators must create a new registry key during the App Volumes Agent configuration:
- Navigate to HKLM\System\CurrentControlSet\Services\svdriver.
- From this location, create a new registry key called Parameters if it does not already exist.
- Within the Parameters key, create a new key called ReportSystemFreeSpace with a DWORD value of 0 (zero).
Alternatively, run a command from an elevated CMD prompt to create the correct key and value:
reg add hklm\system\currentcontrolset\services\svdriver\parameters /v ReportSystemFreeSpace /t REG_DWORD /d 0

Figure 3: Screenshot of the Windows Registry with the Proper Path, Key, and Value
Note: This change requires a reboot to take effect. Logging out or logging in does not apply the changes.
End-User Viewing of Writable Volume Space
When end users look at available disk space through Windows Explorer before you make the registry changes, they can see the free space and total space reported for the C: drive.
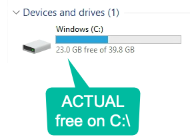
Figure 4: Actual Free Space on C:\
After you make the registry modifications and reboot the system, the C: drive reports the amount of free space on the user’s writable volume, which is 19.7 GB total in the following example:
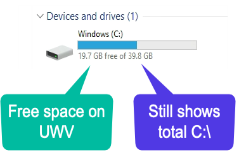
Figure 5: Free Space on User Writable Volume
Notice the total space still reflects the C: drive value.
Configuring the registry so end users can view free space on their writable volumes is recommended any time you use writable volumes.
Expanding Writable Volumes
The default writable volumes template in App Volumes 4 is 10 GB. If a user’s writable volume has reached or is about to reach full capacity, it can be expanded. To expand the writable volume for each user from the App Volumes Manager console:
- Locate the user’s writable volume on the Volumes tab under the Writables sub-tab, and expand the information on the specific writable volume.
- Click the Expand Volume option and enter a larger value in 1-GB increments.
- Have the user log out and log back in. The additional size is added to the writable volume after the user logs out and back in. Also, the free-space usage is not reflected in the App Volumes Manager until the user logs out and back in.
Summary and Additional Resources
Now that you have come to the end of this configuration chapter on App Volumes, you can return to the landing page and use the tabs, search, or scroll to select your next chapter in one of the following sections:
- Overview chapters provide understanding of business drivers, use cases, and service definitions.
- Architecture chapters give design guidance on the products you are interested in including in your platform, including Workspace ONE UEM, Workspace ONE Access, Workspace ONE Assist, Workspace ONE Intelligence, Horizon Cloud Service, Horizon, App Volumes, Dynamic Environment Manager, and Unified Access Gateway.
- Integration chapters cover the integration of products, components, and services you need to create the platform capable of delivering the services that you want to deliver to your users.
- Configuration chapters provide reference for specific tasks as you build your platform, such as installation, deployment, and configuration processes for Workspace ONE, Horizon Cloud Service, Horizon, App Volumes, Dynamic Environment Management, and more.
Additional Resources
For more information about VMware App Volumes, you can explore the following resources:
Changelog
The following updates were made to this guide:
| Date | Description of Changes |
| 2023-07-25 |
|
| 2022-05-25 |
|
| 2020-07-01 |
|
Author and Contributors
This chapter was written by:
- Graeme Gordon, Senior Staff End-User-Computing (EUC) Architect in End-User-Computing Technical Marketing, VMware.
- Donal Geary, Senior Lab Manager in End-User-Computing Technical Marketing, VMware.
- Josh Spencer, Senior Product Line Manager, End-User Computing, VMware.
Feedback
Your feedback is valuable.
To comment on this paper, contact VMware End-User-Computing Technical Marketing at euc_tech_content_feedback@vmware.com.